Whew, we made it through through another wall treatment project! And this one might be my favorite yet.
Rewind back to last weekend, when we began the project assuming it would be complete the next day (yeah right). This is where we were at on Sunday:

So yesterday we (well, more like just me) got back to work. The final two boards went in and it was time to patch all the holes and seams. This is normally the most annoying part because not everything fits together perfectly because the walls are never straight. So I took my time and did my best, using putty on all the hail holes and wood-to-wood seams, and caulk where the boards met the wall:


Then it was just hours of sanding and trying to make everything even and seamless.
After the sanding, while I was letting the caulk dry, it was time to paint.

I was forced to repaint the entire top half because there were some imperfections where the wall met the trim from the first time it was painted, and we ran out of the original paint color. So I picked up a quart of Valspar’s Magic Spell (the original paint was color matched to this) and crossed my fingers that the paint would be an exact match…

But alas, it was not. The real Magic Spell is the slightly lighter/greyer shade on the right. It didn’t take long, however, and pretty soon I was ready to paint the bottom.
After about 10 coats (seriously) of Behr’s paint + primer…

It was done!
Oh, and if you were wondering how we solved this PITA situation…


Let’s just say it took some sculpting skills, but I think I remedied the situation pretty well (for an amateur)


We still need to add the base shoe and grout the tile area so ignore the gnarliness at the bottom as it will be covered.
Anyway, back to the reveal!
Here’s the foyer freshly painted and ready to be re-accessorized:

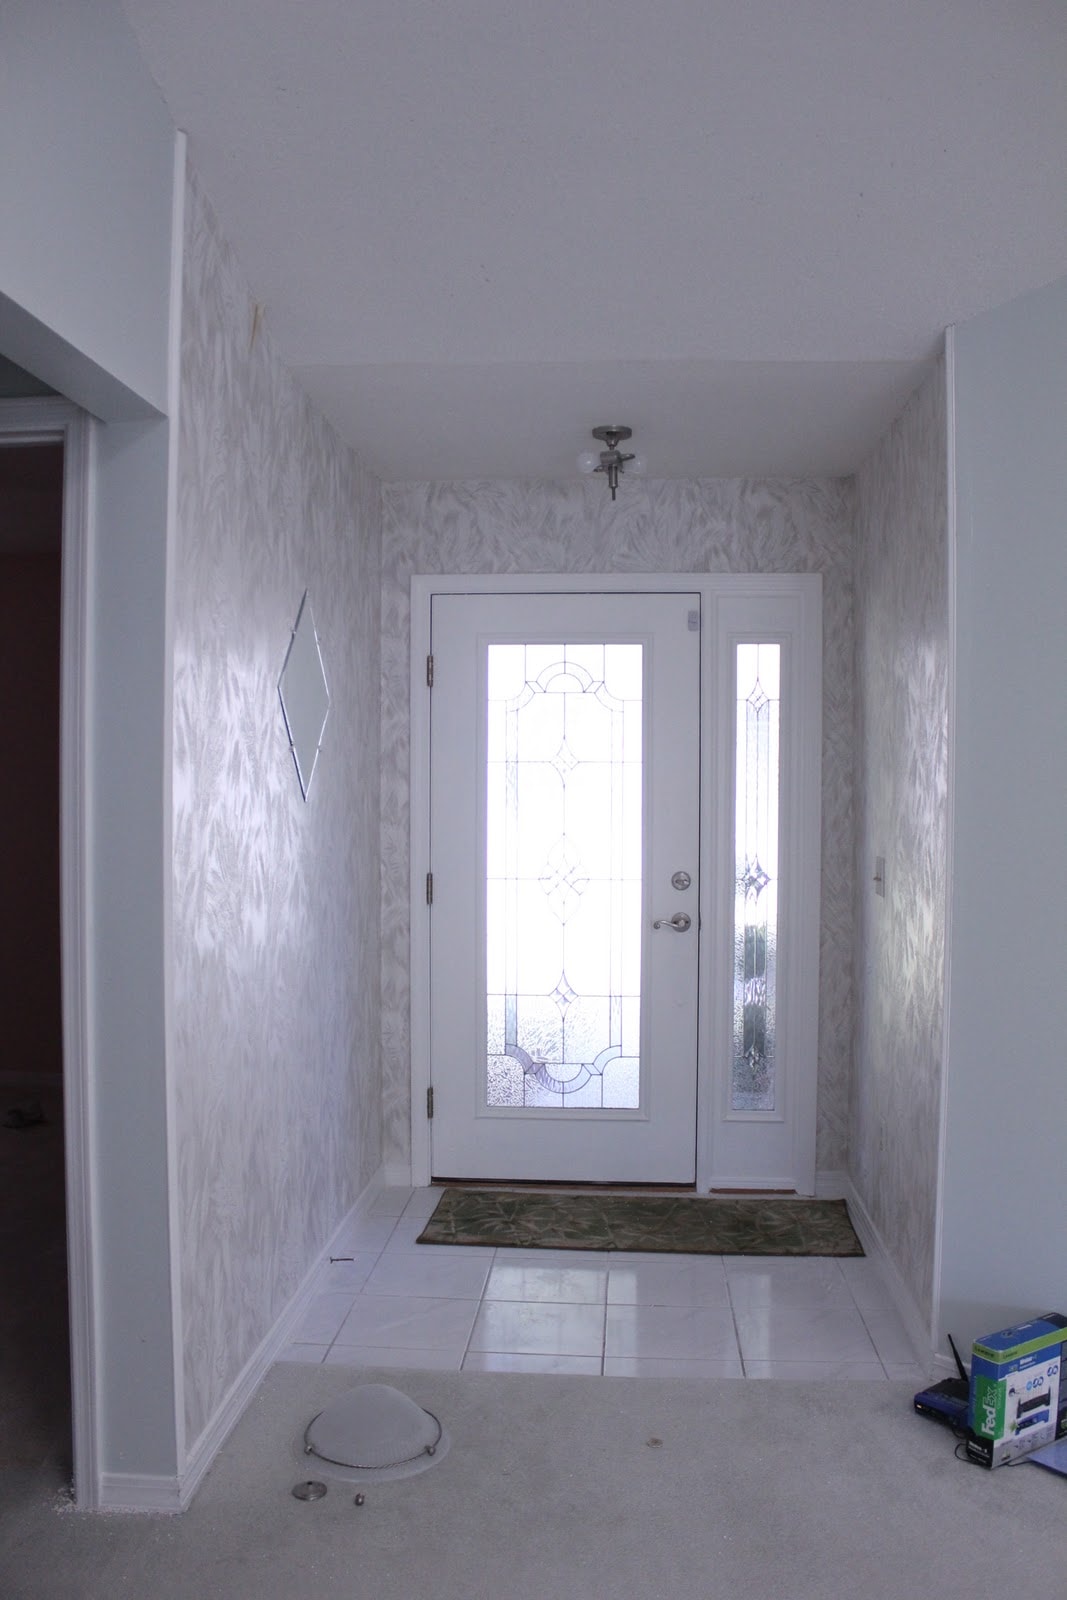
Before I show the final after… let’s take a quick trip down memory lane to the Original Before:
The interim:

And now, the After:
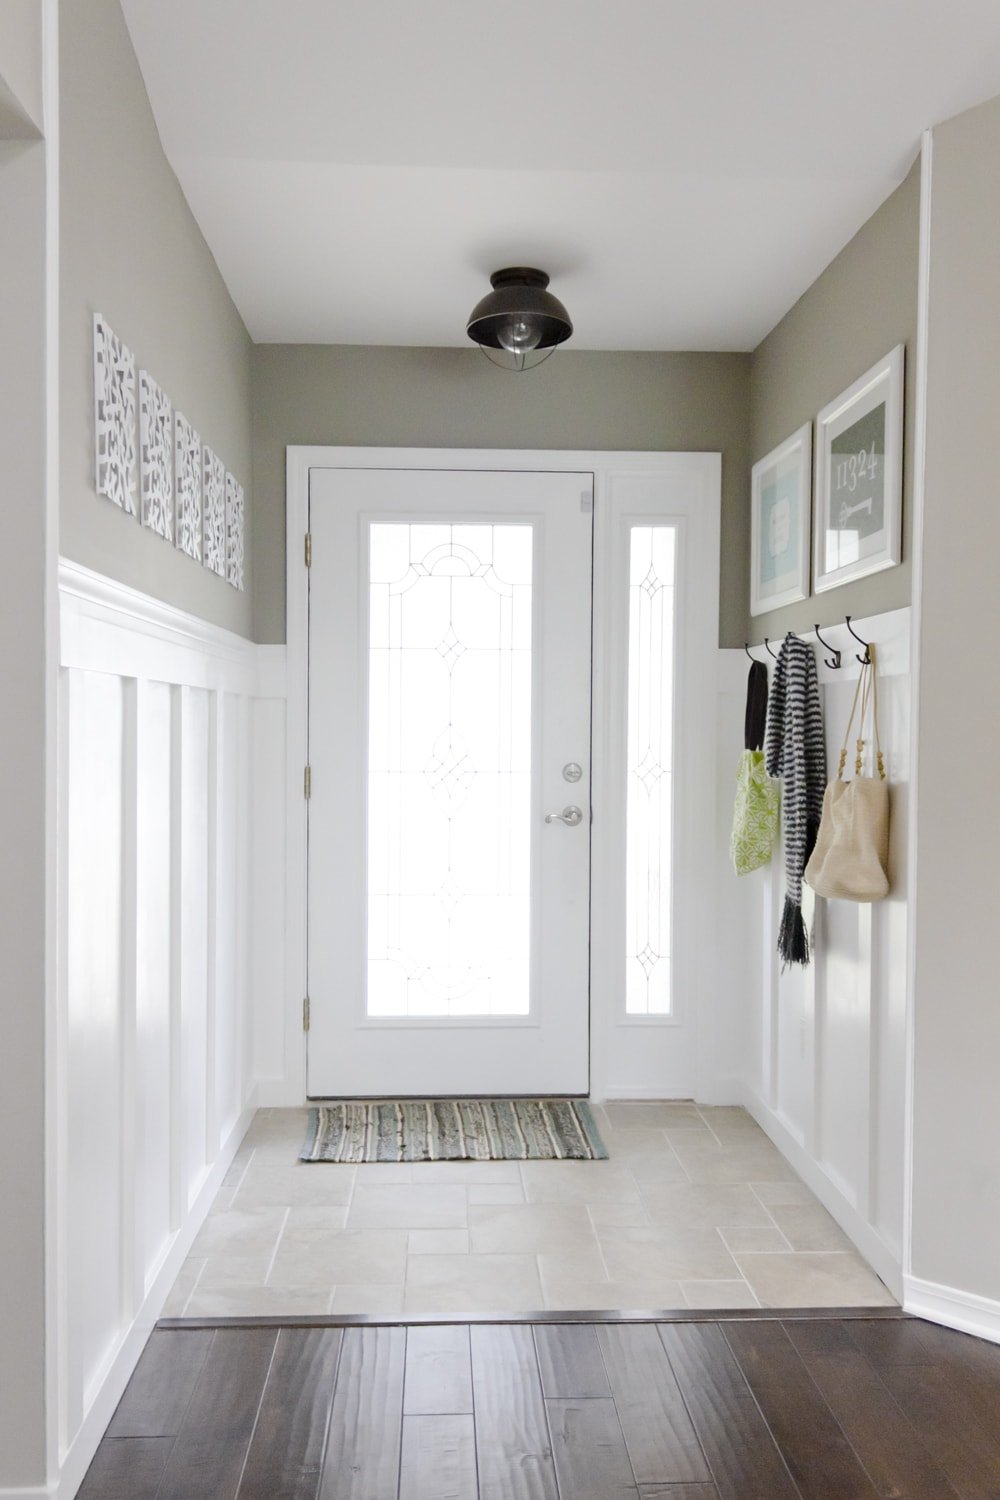
The wall tiles are from Amazon.
I purchased the light from Overstock, but it’s no longer available (see more on that here).


These are 12×16 prints inside Ikea’s $17 Virserum frames, found here. The prints can be customized and purchased in any size, here and here.

The hooks were purchased at either HD or Lowe’s (can’t remember which, sorry!)
A COMPLETE HOUSE SOURCE LIST (including paint colors) can be found here!
There will still be one more After in this foyer’s transformation, when we replace the glass with a solid frosted panel. Not sure when we’ll go ahead and pull the trigger on that, but it’s in the works.
And that does it for this weekend! I’m quite excited about next weekends project… it’s sitting in the garage right now:

Ahhh… it’s the pedastal table I’ve been dreaming about for months and months. We’ll finally be able to fill this empty hole in our dining area….

Get excited.


Erin Melenbacker says
This is beautiful! Would you mind sharing what the color is of the wall after you get through the entry, the lighted beige-ish wall? I love this color.
Anonymous says
Love every thing! Question the boards used on the corners of the walls from ceiling to floor, what are they called and where did you purchase? Can't get enough…
Jenna Sue says
They are 1×4″ mdf boards. Check out the part 1 I linked to at the beginning of the post for details 🙂
Anonymous says
We think your foyer looks great. We're looking to do the same thing in our mud room, and were wondering what thickness the vertical and horizontal pieces you used are? You didn't post the materials and measurements you used.
Great job all around on your projects!
Zealouslyme says
I would love to do this to my entry way. Could you tell me what materials you used and the sizes used for the board and batten?
Chantelle Bieber says
I am currently copying pretty much every single thing from this entryway for our back entrance. I'm so excited for it!
Ashley @ The North Carolina Cowgirl says
Just read about your update on Young House Love! OMG I love the change. It looks amazing! You did such a wonderful job.
Jenna Sue says
Jessica – it was just off the shelf white. Some of the boards made it into studs, but it really isn't necessary. They were sandwiched pretty well between the top and bottom boards, and once the seams were caulked and painted, they weren't going anywhere!
Jessica says
Also, my husband wanted me to ask if you attached the vertical boards into studs and if not how did the boards stay secure with finishing nails?
Jessica says
Hey, would you please share the paint color you actually used on the board and batten? I know you said it was Behr paint & primer, but I did not see the color name listed. Thanks!!!!
Claire says
Saw your foyer on YHL! I love what you did!!!
Steph says
Thank you, Jenna Sue! I'm pretty sure I found the exact ones at Lowe's.
Melanie @ Mailbox Journey says
Came over here from YHL – Your entry way is amazing!
I love all of the prints, so I checked out your Etsy shop – It's fantastic! I love the world map, utensils and wild animal prints! You've got serious talent!
Beth at southernfriedliving.blogspot.com says
Over here from YHL!
Love love your new entry….I may need to copy you on this one!
~Beth
Jenna Sue says
Steph — either HD or Lowe's, can't remember.
Ali – Lowe's (details are in my Florida House page)