Whew, we made it through through another wall treatment project! And this one might be my favorite yet.
Rewind back to last weekend, when we began the project assuming it would be complete the next day (yeah right). This is where we were at on Sunday:

So yesterday we (well, more like just me) got back to work. The final two boards went in and it was time to patch all the holes and seams. This is normally the most annoying part because not everything fits together perfectly because the walls are never straight. So I took my time and did my best, using putty on all the hail holes and wood-to-wood seams, and caulk where the boards met the wall:


Then it was just hours of sanding and trying to make everything even and seamless.
After the sanding, while I was letting the caulk dry, it was time to paint.

I was forced to repaint the entire top half because there were some imperfections where the wall met the trim from the first time it was painted, and we ran out of the original paint color. So I picked up a quart of Valspar’s Magic Spell (the original paint was color matched to this) and crossed my fingers that the paint would be an exact match…

But alas, it was not. The real Magic Spell is the slightly lighter/greyer shade on the right. It didn’t take long, however, and pretty soon I was ready to paint the bottom.
After about 10 coats (seriously) of Behr’s paint + primer…

It was done!
Oh, and if you were wondering how we solved this PITA situation…


Let’s just say it took some sculpting skills, but I think I remedied the situation pretty well (for an amateur)


We still need to add the base shoe and grout the tile area so ignore the gnarliness at the bottom as it will be covered.
Anyway, back to the reveal!
Here’s the foyer freshly painted and ready to be re-accessorized:

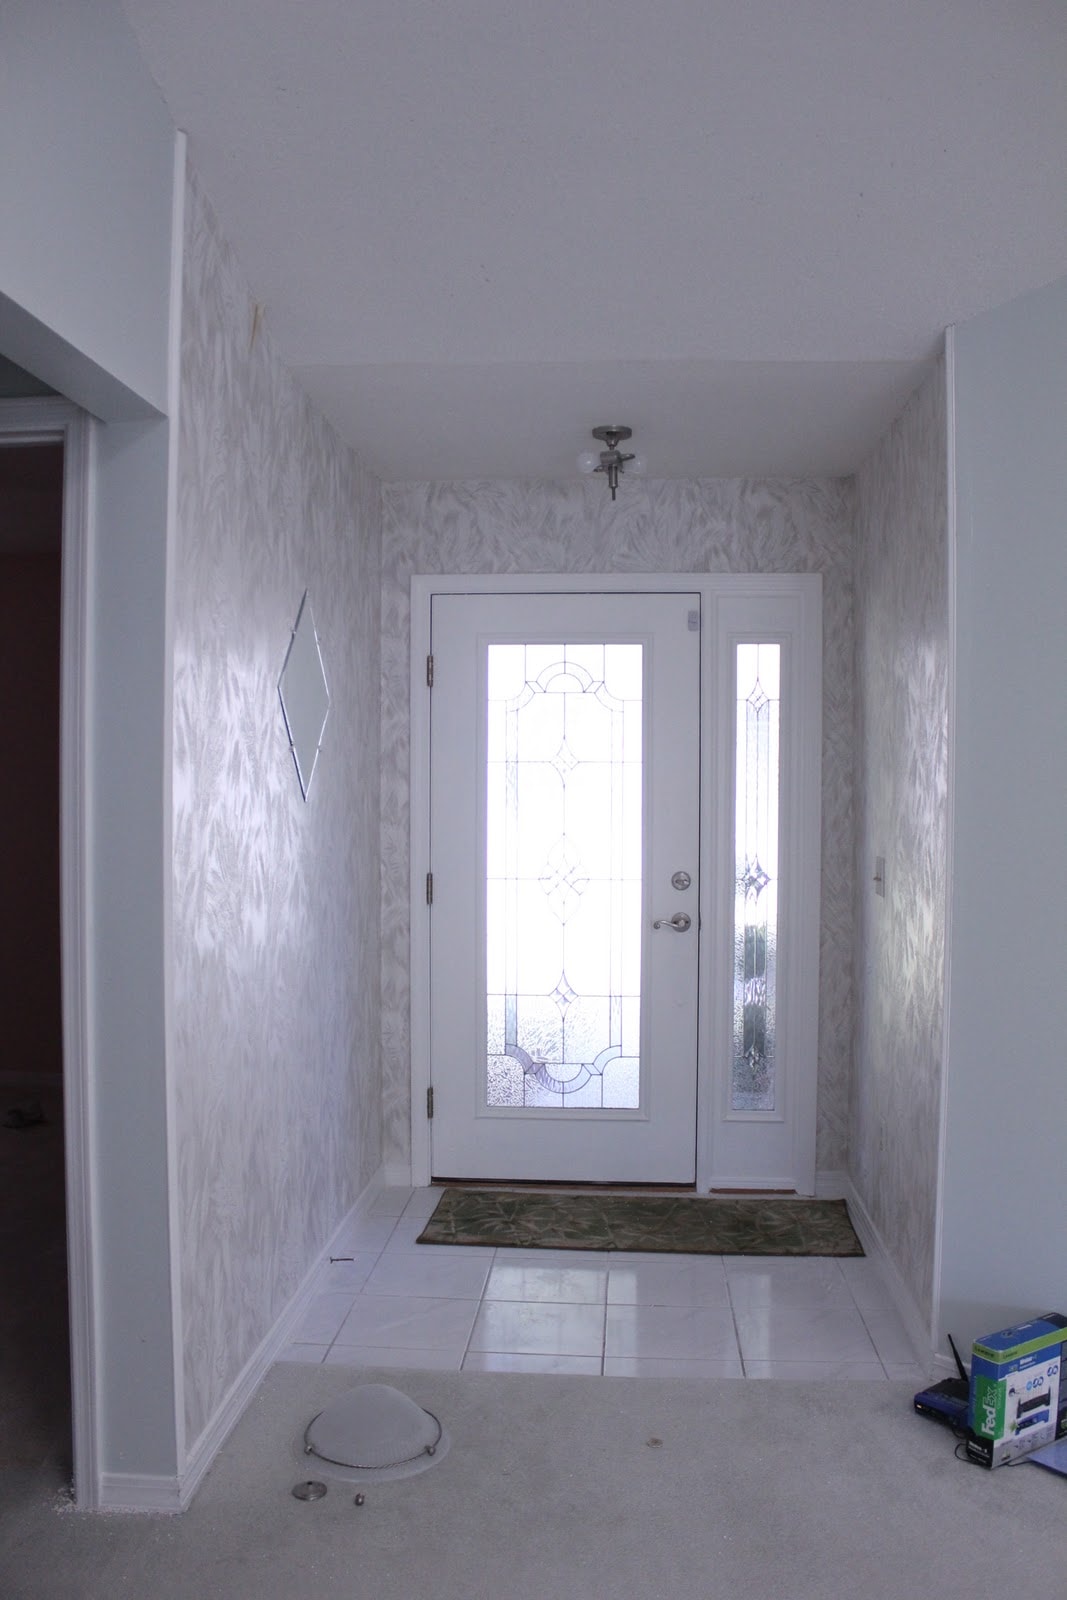
Before I show the final after… let’s take a quick trip down memory lane to the Original Before:
The interim:

And now, the After:
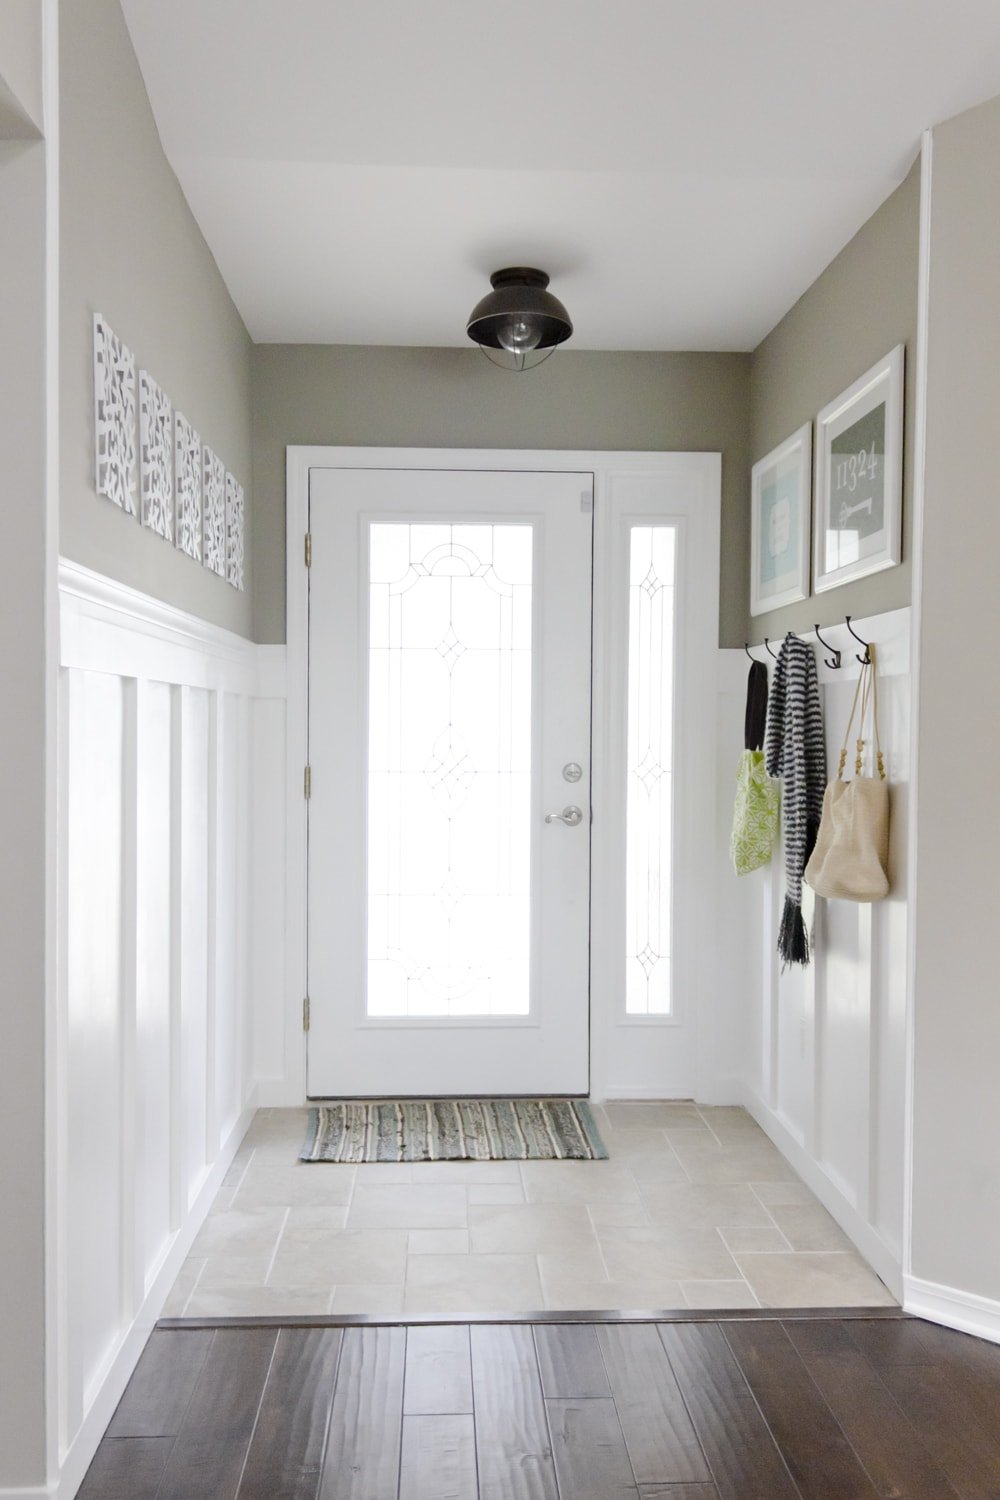
The wall tiles are from Amazon.
I purchased the light from Overstock, but it’s no longer available (see more on that here).


These are 12×16 prints inside Ikea’s $17 Virserum frames, found here. The prints can be customized and purchased in any size, here and here.

The hooks were purchased at either HD or Lowe’s (can’t remember which, sorry!)
A COMPLETE HOUSE SOURCE LIST (including paint colors) can be found here!
There will still be one more After in this foyer’s transformation, when we replace the glass with a solid frosted panel. Not sure when we’ll go ahead and pull the trigger on that, but it’s in the works.
And that does it for this weekend! I’m quite excited about next weekends project… it’s sitting in the garage right now:

Ahhh… it’s the pedastal table I’ve been dreaming about for months and months. We’ll finally be able to fill this empty hole in our dining area….

Get excited.


ERIN says
Hi, I was just wondering what the floor tiles you used were?
NC says
Thanks for the link and your responsiveness.
Jenna Sue says
Hi Nick, yes I used the existing baseboards in the dining room. The battens are made out of thin 1/4″ wood strips so they met up right with the top of the baseboards and there was no overhang. You can check out that post here: https://jennasuedesign.blogspot.com/2011/05/dining-room-wainscoting-done.html
NC says
The baseboards in your dining room look different from your foyer, did you use the existing baseboards in the dining room and just add a lip to the top to create a smooth transition to the batten?
Nick
cory church says
thank you for the quick reply! got it. doing this this weekend!
Jenna Sue says
Sorry about that, link updated!
Part 1 all the technical details: https://jennasuedesign.blogspot.com/2011/09/foyer-board-batten-part-i.html
Hope this helps!
cory church says
A COMPLETE HOUSE SOURCE LIST link is broken or something. Can you repost? Im mostly wondering what your measurements were, for example how high is the chair rail from the floor and how far apart are the vertical slats? are both the top and bottom horizontal boards 1x4s?
Krista @thehappyhousie says
Very pretty! Great job joining the two baseboard styles. DAP and paint can hide a multitude of sins… I was referred to your blog by Ainhoa (A little bit of everything) when she saw our board and batten entry – it reminder her of yours. Glad to find your blog!
Krista
Anonymous says
Yeah that what I figured. I would not mind the extra work at all, but its just not in the budget sad to say. But I will tell you how it turns out and maybe email you some pictures! Your tutorial gave me the inspiration, it turned out so great!
Thanks so much for your help Jenna!
Jenna Sue says
I think it definitely looks better with smooth walls, but I've seen it done with it textured walls and it's still better than nothing! If you don't think the extra work is worth it to you, I would still go ahead with just the trim part.
Anonymous says
Hi Jenna, my name is Brittany 🙂 Love the tutorial, amazing job! I am about to do this for my church in there nursery. So exited!! So they don't have flat walls they are textured, I was wondering if you think it would look bad with the texture? I want to put wood backing up behind the mdf boards but its alot of extra work and money for the church. Just wanted to know your opinion!
Thanks!!
Anonymous says
How high up did you place your horizontal board?
Jenna Sue says
Thanks Cassie! 🙂
{Hi Sugarplum!} says
LOVE. IT! I just updated my post with your final pic and this post link. Thanks so much for the inspiration!
Miyu Toyoshima says
Your foyer looks absolutely amazing! I have a little area that I definitely want to trasnform using some hooks and shelving. Love your blog 🙂 And BTW, that light fixture was on Joss & Main the other day… so I looked on Wayfair and they have it now, if any of your readers want to buy. Except they've doubled the price, it's about $115 now! You got a steal!