First order of business: The “final” guest bath reveal!
Last week Brad installed a dimmer switch for some much needed mood lighting control. At that point we were 95% completed last weekend, so this weekend all that needed to be done was hanging art, finishing the recessed cubby, and swapping out the knobs on the vanity.
I knew I wanted to add a shelf to the cubby for extra storage, so we went to Lowe’s to get a piece of glass cut to size (FYI, our local Home Depot said they don’t cut glass—just a heads up to anyone wondering).
So we came back with our shelf and a few plastic mirror hangers to prop it up. They broke as soon as the screw tightened, so those were out. Brad suggested we just use the bare screws and paint them white.

And so I did. And it worked excellently.
Next up was accessorizing (the funnest part, of course). I went to Hobby Lobby, for the first time in my life, on Friday evening and it was a similar experience to my first time at Garden Ridge…. pretty close to heaven. I don’t know how I managed to go 26 years without stepping foot into one, but now that I know I live 5 miles from one, it’s going to get dangerous.
Luckily, everything I purchased was 50% off so I scored some amazing deals. Like these mason jars for just 75 cents each!

To help them coordinate better with the rest of the finishes in the bathroom, I whipped out the ORB and gave the lids a new look:

Much better!

I fell in love with these brownish-grey tinted glass knobs, $4 for both (after 50% off)

Finally, I framed a couple of my prints in Ikea frames I had leftover and hung them above the loo:
 |
| Prints can be purchased in any size here |
A couple more finishing touches and the bathroom is D-O-N-E! (Until we tackle what’s behind the shower curtain…. just pretend that part doesn’t exist for now)

Let’s get a quick before & after shot to make it more official.
Before:
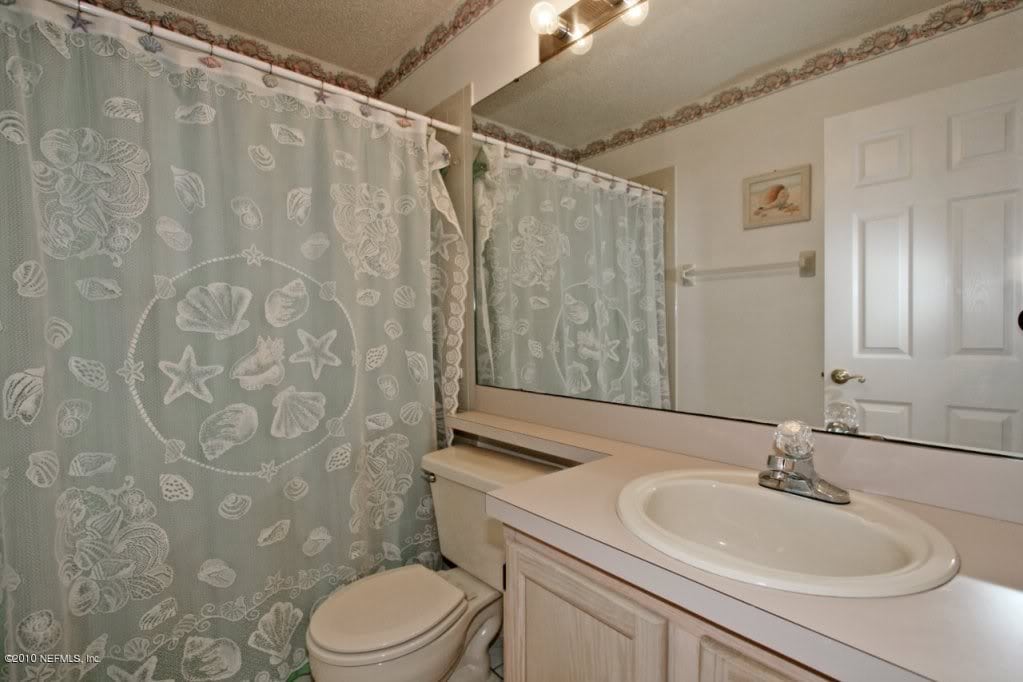


After:


And there you have it! And since I actually remembered to record most of this, here is a rough price breakdown:
Toilet – 125
Vanity/Mirror – 177
Baseboards – 17
Faucet – 55
Vanity light – 110
Dimmer switch – 20
Bead board/trim & supplies – 100
Trash can & paint – 22
Oil rubbed bronze hardware – 37
Recessed cabinet trim,
lighting & glass shelf – 30
Accessories (standing mirror, mason jars, knobs, soap dispenser) – 30
Paint – already had
Art – made/already had
The only thing left off this list was tile and installation… because we don’t have an exact figure since it was quoted with and installed at the same time as the foyer and kitchen. If I have to guesstimate based on square footage and tile/labor cost… I’ll go with $80 for tile (27 sq. ft @ $3/sf tile), and another 150 for labor. That sounds about right. So,
Tile – 230
Grand total: $950, give or take a few. So it’s safe to say it cost under a grand for this:

Not too bad, right? Stay tuned for the shower re-do… coming soon. Or maybe not.
In other news, I was browsing Craigslist and found someone selling an old window pane (no glass) near my work and decided to stop by to check it out. He said it was from some 150 year old house in Pennsylvania and belonged to his mother who passed away. I thought it was perfect, and walked away with it for just $12! Happy Dance.
Here it is at home, waiting to be prepped:

It was painted a light beige, but there were layers of paint underneath it from years of use.
I took out our new electric sander and got to work. We picked up this sander a couple weeks ago at a yard sale for just $10…. best $10 EVER, let me tell you. It took about 15 minutes to turn years of paint to this:

Can you imagine if I tried to do that by hand? It would take weeks. Everyone go buy one of these, now.
After it was sanded with heavy grit, I put a finer sheet of sandpaper on to smooth the surface a bit. Then I brushed on a coat of turquoise, let it dry, and then put a coat of white on. Sorry, no pics of this process… I was working on like 5 things at once and had no time!
After both paint colors dried, I went over it with the fine sandpaper to get some of the turquoise, wood, and original paint colors to show through. Here’s the final product:
 |
| I know, it’s hard to see the detail with this crap lens. Working on getting a better one! |
To hang it, I picked up a french cleat, which is my absolute favorite way to hang heavier pieces. I used it on my dining room mirror and it was the simplest thing ever. This time was no exception.

And the window now lives happily on this previously empty bedroom wall:


I may dress it up later with hooks or something… but for now it can just sit there and look pretty 🙂
And finally… I made a small update to our living room. See if you can spot the difference.
Before:


Yes… Mr Octopus and Miss Seahorse are no longer with us. They have been replaced with this:

These are bus rolls I made of all the special places in our lives…places we’ve lived, visited, special vacations, etc. It was time for a change.
As for these guys….

Well, it’s time for them to move on to become part of someone else’s family. Therefore, I’m going to give them a second chance at life in one of your homes.
Here’s the technical specs: the prints are 11.5×11.
5″ (shown here in Ikea’s Virserum frames, also fits in Ribba).
They are from my Ocean Animal Collection, valued at $20/ea.
All you need to do is leave a comment on the blog if you’re interested in adopting them, and next Sunday (9/4) I’ll randomly choose a winner and ship the prints right away. Sound good?
To make it interesting… tell me what your favorite project has been so far from this blog. It can be something as big as the bathroom reno we just did, or as small as painting all our handles ORB. I’d love to hear what inspires you most.
And with that, I’m off to get some work done in the shop… be sure to check back Sunday to see if there’s an octopus and seahorse with your name on it 🙂


Jenna Sue says
Hi Amy, it's Valspar's Tranquil.
Amy Erickson says
What is the paint color in your guest bath called?
Kelsey Chin says
Love the bathroom! We are doing something VERY similar in ours! I had a question for you! I am having a hard time settling on what to do with the hideous “behind the curtain” walls. Do you have any ideas what color/type of tile you would redo yours in??
Jenna Sue says
We got it custom cut at Lowe's 🙂
Stephanie says
I am doing just this in my master bathroom… you were my inspiration! I have a question though. Where did you get the glass shelf? I'm not sure where to go or how to find something that will fit (or get something cut??). Thanks!!
Ali says
Love the bathroom…where did you get the vanity light?? We are re-doing our bathroom and I think it would be perfect!
Ali says
This comment has been removed by the author.
SJ @ Homemaker On A Dime says
Absolutely lovely! Really appreciate you linking up this great bath post at the Roomspiration blog party. Btw, I am admiring all your creativity in your blog so may I invite you also to join us at Creative Bloggers' Party & Hop? Hope to see you there at the party 🙂
Colleen says
Love how your space came out. Such pretty choices.
sadie607 says
I love your re-do of the ikea bed stands. They look amazing. I have so much ikea furniture and your post inspired me to fix up some of it. I didn't think it was possible.
Anna says
Hi Jenna, Far and away my favourite project of yours is your entryway coat rack. My hubby and I would love to replicate this look in our home. Love your blog!! – Anna
Anonymous says
Love all your projects – but am always really jealous that you live in sunny Florida! Lucky you! Thanks for the chance.
– Danielle
other-option AT hotmail DOT com