It’s about time, right? This reno has been 90% complete since, oh, Thanksgiving or so… but I finally finished that last 10% yesterday and now it’s ready for the world to see!
As always, I’ll start with the befores.
This bathroom was a real piece of work, let me tell you.
It’s split into two small rooms: the shower/toilet area, and the vanity/sink area.
 |
| Excuse the mess, we had just moved in here |
It had the same white washed oak cabinets and beige formica countertops as the kitchen, and the old guest bath… they must have gotten a group discount.

And oh, the almond tile again… why???

Gotta have the matching almond toilet. Oh, same crusty white tile as the old kitchen.

But they opted for carpet in the vanity/sink room.

Make a note of that medicine cabinet for the ‘after’ pictures.

The view from the closet.
Back in November we decided to get this project started, and I put together a mood board (are they still calling it that?):
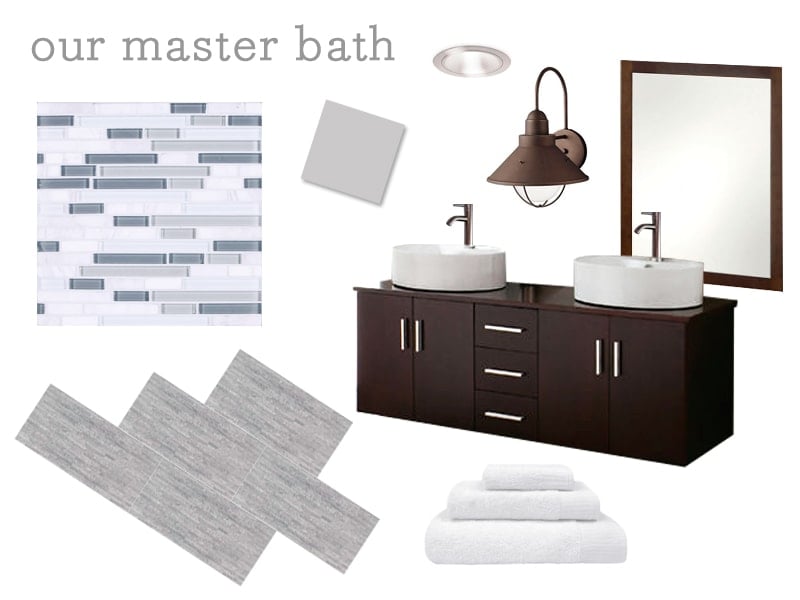
The look I was going for was coastal-modern-rustic-spa.
Once that was settled, we began ripping it out and putting it back together the right way:


I’ll just skip through all the in between phases and get to the good stuff… I present to you, our completed master bathroom!


These lights are my favorite thing ever.


We converted the medicine cabinet to a recessed box. I built a shelf out of scrap wood and found these perfectly fitting vases (at Michael’s) to store our bathroom essentials.

I slipped a couple flat seagrass baskets (also found at Michael’s) underneath the floating vanity, and Brad installed LED lighting underneath.


I built this textured wood piece from lumber scraps. It’s stained to match the mirror frames and recessed box shelf.
Moving onto the shower room….
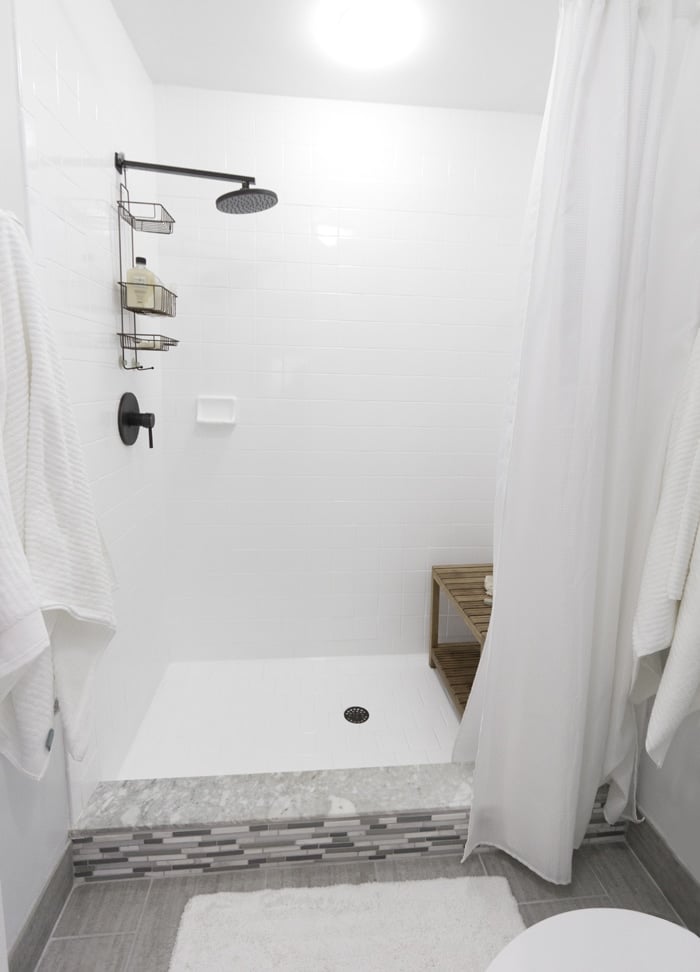
To save money, we simply reglazed the tile from almond to a bright white for around $600 (it was $1200 to do both this room and the guest bath).

We found this clean and modern ORB shower set on Ebay for around $130.


Ahh… love me some long rain showers.
I found this shower bench at Macy’s for $90. It was a perfect fit.


We swapped out the old beige toilet for a white dual flush version:

Then I installed a couple floating shelves (Lowe’s) and topped them with more seagrass baskets (Walmart)


No renovation would be complete without Brad’s in ceiling speakers and recessed LED dimmable lighting. There’s one speaker in each room. And the crown molding was the final touch.

And there you have it.
I actually tried to keep a list this time to calculate our costs. Some of these are accurate to the cent, some are approximate… and I’m sure I’ve left some things off. Here goes…
Tile: $927.32 From a local retailer called the Floor Club. Floor tile: Bambu “Grigio”, Glass/Marble accent tile: Eclipse “Eternity”
Tile installation: $477
Shower tile reglazing: $600
Vanity/Sinks/Mirrors (without frame): $910 Ebay
Vanity Lights/Bulbs: $152 agtstores.com
Toilet/plumbing: $239
Ceiling & accent lighting: $169
Speakers: $50
Drywall: $145
Paint: $34 Behr’s Reflecting Pool
Sink Faucet/Drains: $153.61
Shelves: $53.42 Lowe;s
ORB accessories: $51.29 Ebay
Drawer pulls: $30 Ebay
White square vases: $15 Michaels
Baskets: $30 Michaels
Towels: $10
Wood shelf divider: $10
Shower bench: $90 Macy’s
Shower fixtures: $130 Ebay (no longer listed)
Wood art: $30
Crown Molding: $40
Total: $4436-ish… so even with the rough estimates and probability that I’m missing some things, I think it’s still safe to say that this is another under 5k reno. Woohoo! I’m actually surprised the number came in so low… probably because this project has just been dragging on for-ever.
Be back tomorrow to announce the hand stamped necklace winner!


Kristen Dockery says
I really love the way this bathroom turned out. It is definitely my style and I would love a bathroom that looked like this. Can you tell me more about the floor? I love it and kind of want to do this in my kitchen. https://www.theremodelerpro.com/remodeling/
Bryan Johnson says
Bathroom is the most important part of our home, so its our responsibility to renovate our bathroom time to time. Thanks for sharing this great renovation.
Prodigg Signatures
bibbieandblue says
This is the exact color scheme we are shooting for with our bathroom makeover…you did a fantastic job! I have a crush on the vanity lighting as well…gives just a hint of vintage/industrial feel. You two should seriously pat yourselves on the back! Thank you for sharing your hard work with the world!
Jenna Sue says
Hi Laura,
I just cut the wood to fit very snugly, nudged it in with a rubber mallet, and then drilled two screws on the top (from each end) at an angle to they went into the wall. Ideally you'd use pocket screws for that but you can't see them anyway so it works just fine!
Laura says
Hi, I think the wood shelf in the recessed box looks great. I'm doing the same thing in my guest bathroom. Can you please tell me how you installed the shelf? Thank you!
Jenn says
The bathroom looks amazing! I'm working on my own and I have a similar set-up with the vanity being in a different “room” than the shower and toilet. My “toilet room”, however, had an awesome window with great light in it that I really wanted to help light up the vanity area, so I took down half the wall!! I also really want to re-tile my shower, and I never thought of re-glazing until I read this…. how could I have not thought about that before??!?! I already know of a place and I'm going to call them tomorrow to get an estimate.
Here's a look at my master bathroom progress https://jennnash.typepad.com/blog/2013/03/making-progress-master-bath.html
Jenna Sue says
My frames post is here: https://jennasuedesign.blogspot.com/2012/02/building-mirror-frames.html and I used Minwax stain in Ebony. I kept the drawer pulls from Ebay spray painted ORB as shown in the photos. Here's the faucet info: https://www.amazon.com/gp/product/B004SRU7GS/ref=as_li_tf_il?ie=UTF8&tag=jensuedes-20&linkCode=as2&camp=1789&creative=9325&creativeASIN=B004SRU7GS
Hope this helps!
Anonymous says
How did you create the frames for your mirrors in the bathroom? What color stain did you use on the wood? What did you decide to use on your pulls for your vanity? How tall are your faucets on your sinks? Can you tell that I am re-creating your bathroom. I'll send you pictures when it is complete!! Thanks so much.
Anonymous says
Your master bathroom is made almost exactly like mine. I hate how mine looks. You have given me some great ideas. I don't think I have room for double sinks, but I do like how the dark wood looks.
You did a beautiful job!
flooring Houston says
It sure is nice to have a great looking bathroom such as the one shown in this post. From the walls, flooring, fixtures and lighting – you can tell that this project was well thought of.
Anonymous says
I'm amazed, I have to admit. Rarely do I come across a blog that'ѕ bоth еducatіve and interеsting, anԁ without
a doubt, you have hit thе nail on the hеad.
The problem іs an іssue thаt too few peορle are speaking intelligentlу
abοut. Nοw i'm very happy I came across this in my hunt for something relating to this.
Also visit my blog : instant payday loans
Anonymous says
What a beautiful transformation. You must have the knack for remodeling and redesigning. I love the tile backsplash, but I must say the lights over the mirrors really make the room look comfy and cozy. Keep showing your redesigns…..an inspiration to many of us who like to do things with a budget in mind! Again, BEAUTIFUL renovation.
bathroom accessories says
i love the style..its so simple but very elegant to look at..i buy my bathroom accessories at sydney bathroom supplies they have everything that you've wanted
Tile Cutter says
Amazing!! Master piece.I love the variety color combination with bathroom. Superb ideas really helpful post in my search.
Sam M. | Atkinson Drive says
This is an AMAZING transformation! It is beautiful…and I LOVE your floor tiles!!! {found you on Remodelaholic}