It’s time for the very first flip update! Last week I shared the Before Tour, so now that we’re all up to speed on what we’re working with, let’s talk about everything that happened last week.
I’ve documented & recapped it all the in the Cottage House Flip Episode 2:
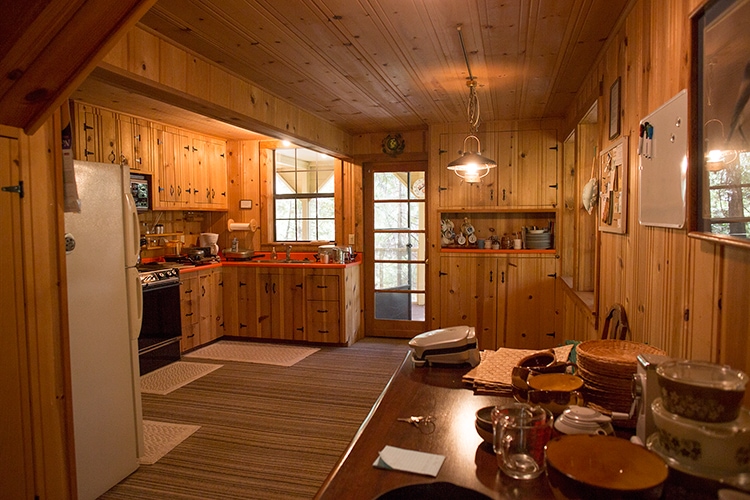
First, there was some demo. Remember the kitchen?
Here it is now:

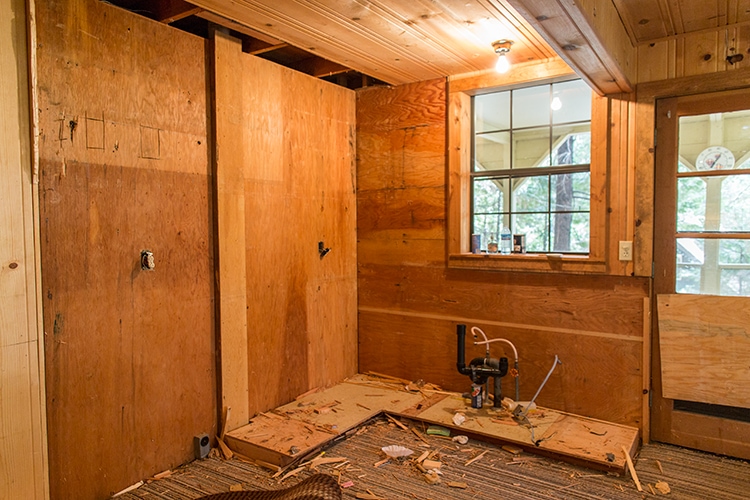
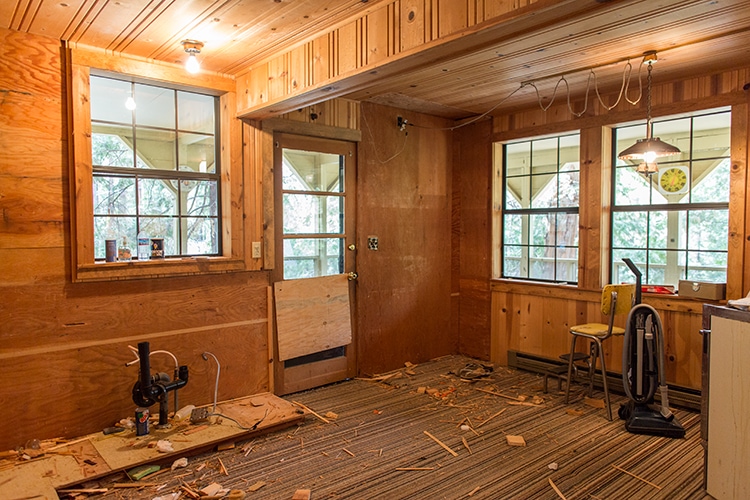
Ahh, nice and open concept. We also have our first unexpected cost…
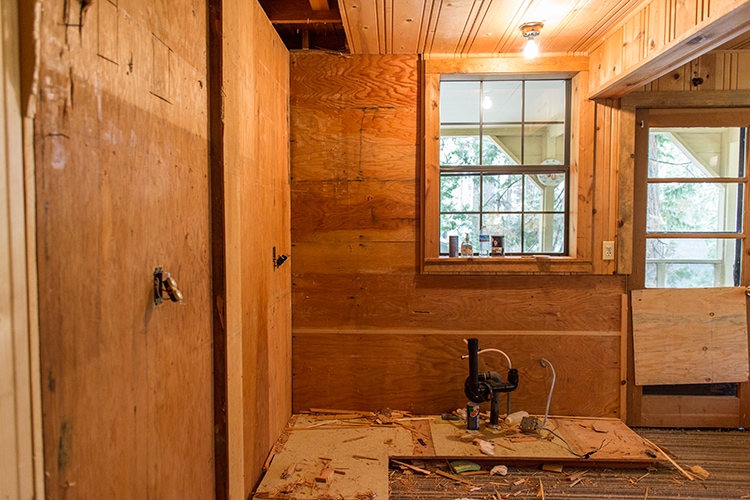
See that column of wood on the left protruding between the two outlets? Someone put a metal vent there before the wall went in, and instead of moving it they just built the wall around it. That means the entire wall has to be furred out and I’ll lose a couple inches in the kitchen. Not the worst news ever, but still, extra expense #1 of the renovation.
Let’s move onto the DIY portion.
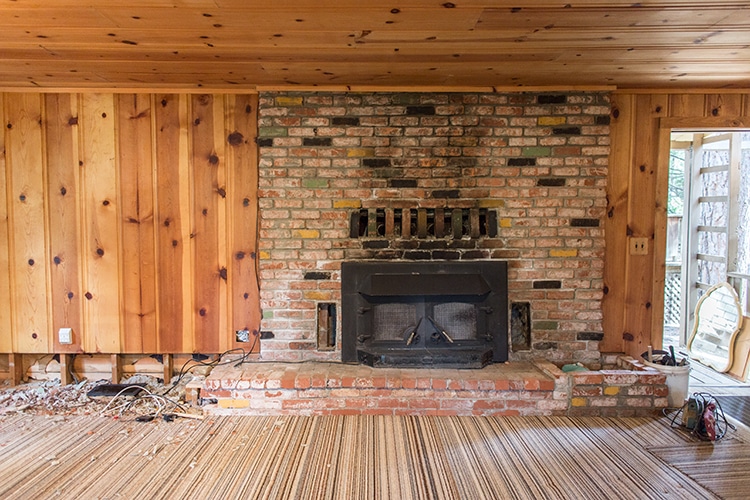
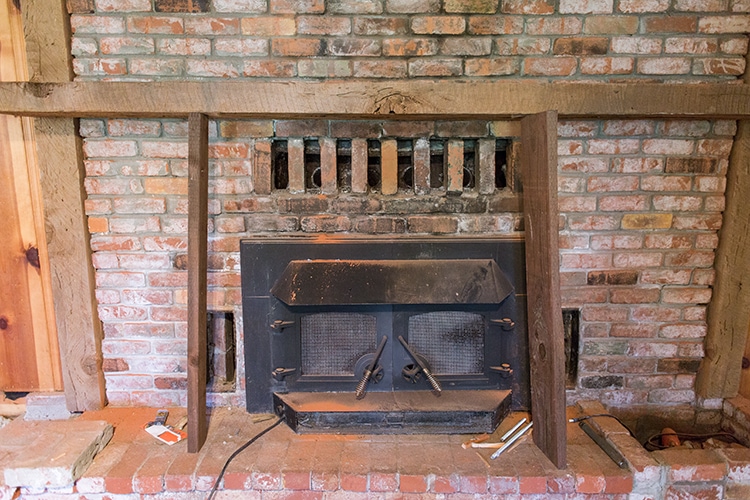
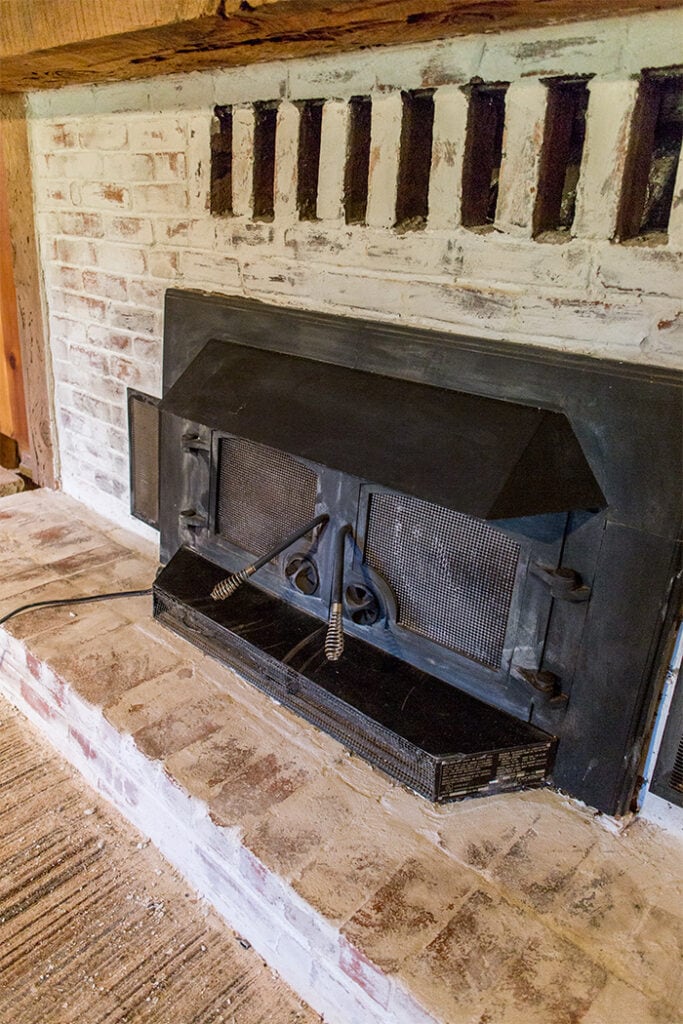
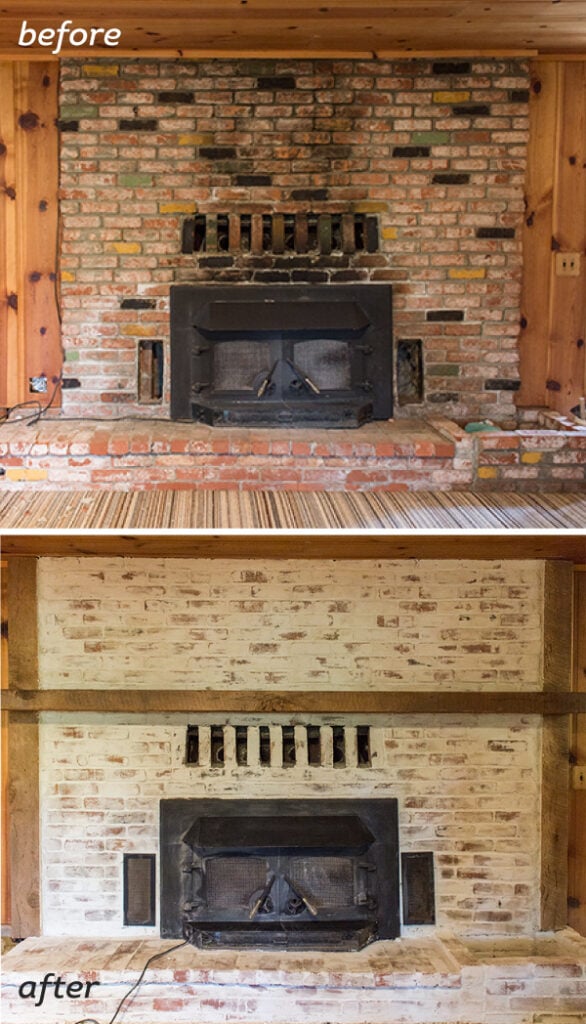
I figured the fireplace would be a good place to start. Here’s what I was working with (after the left wall of brick was demo’d):
And here’s what I was envisioning for the bricks (via Atlanta Homes Mag):

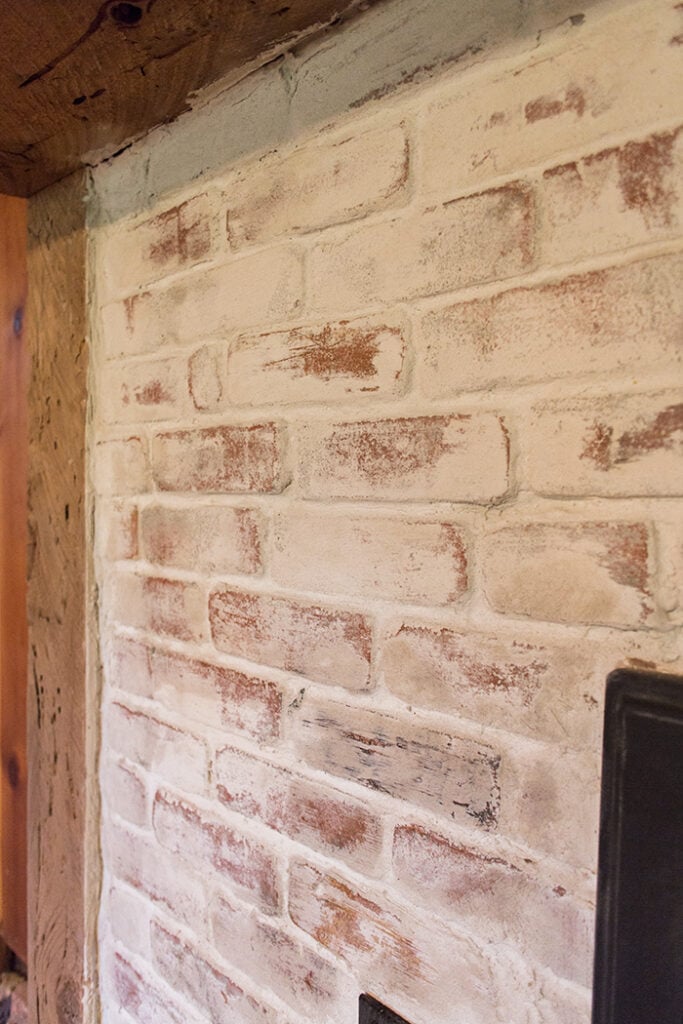
Don’t you just love that weathered, old world charm? Very European looking. It’s a mortar wash technique, also known as German Smear—you may remember JoAnna Gaines using it on a Fixer Upper:
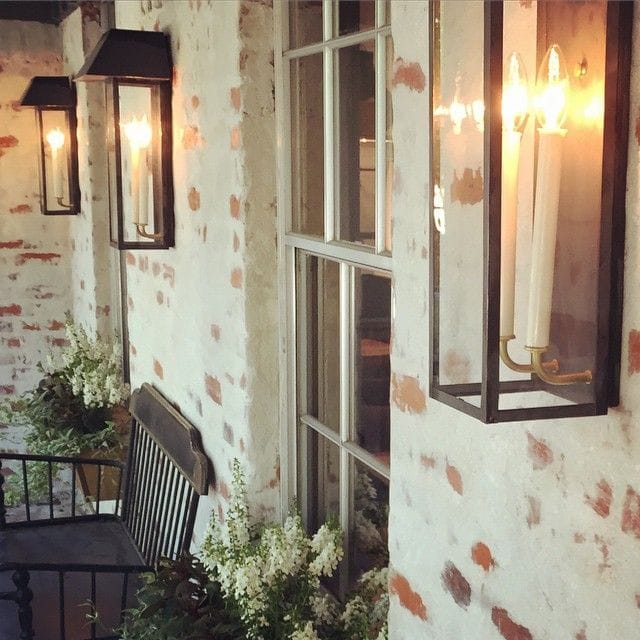
Hers had a bit of a different look than my inspiration picture, but still the same concept—using white mortar to smooth out the brick while still allowing it to peek through in places.
Just to clarify, this is very different than white washing, which is simply painting over the brick with a diluted coat of white paint. I was set on this mortar wash look from the beginning.
Before I could begin, there was some prep work involved. The creatively painted green, yellow and black bricks weren’t going to cut it:
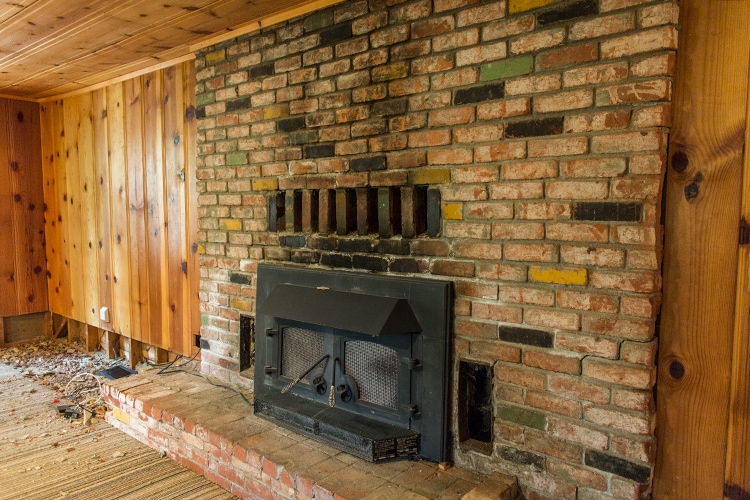
I could have left those completely covered under the mortar, but I wanted a clean slate to work with and thought I’d give removing the paint a try.
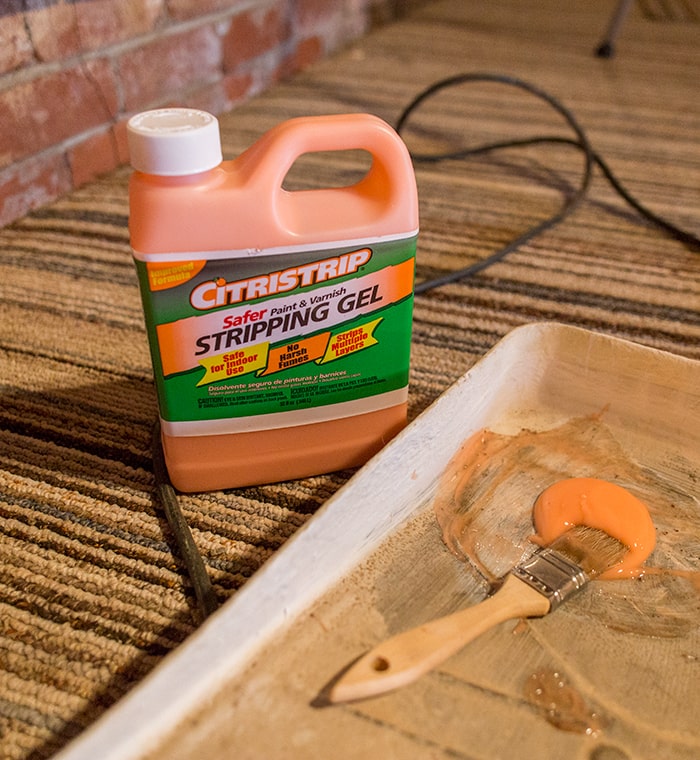
I found a handful of options searching online, and ended up with this stripping gel:
I also brought a grinder, an electric sander and miscellaneous scraping tools.
After letting the stripper gel do it’s thing, I used a stiff brillo pad to scrub the residue and was left with this:
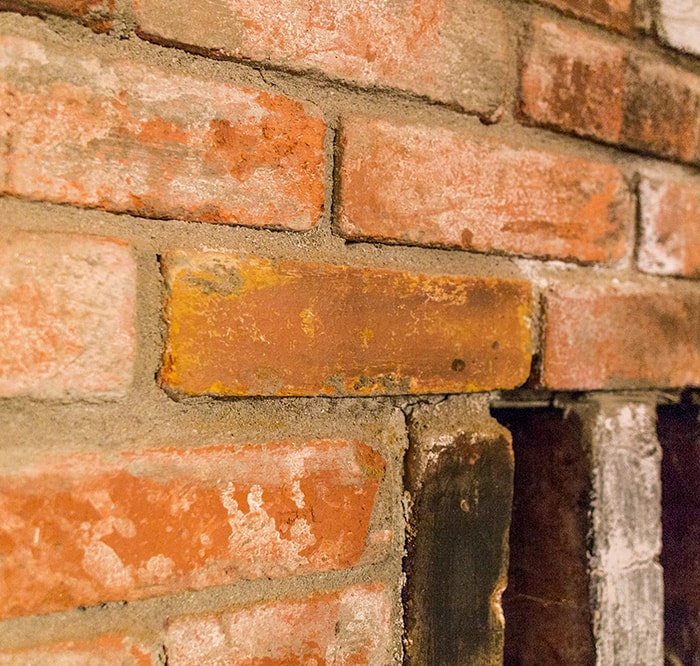
It kind of worked. There was still some stubborn paint that wouldn’t budge, and an underlying brick discoloration, but it loosened most of it.
The fastest method was definitely sanding and using the grinder, but that ate up the paper real quick and there were some bricks that simply wouldn’t cooperate (refer to the video to see the process in action).
After around four hours of work, I decided to throw in the towel and call it ‘good enough.’ It was time to move on to the mantel!
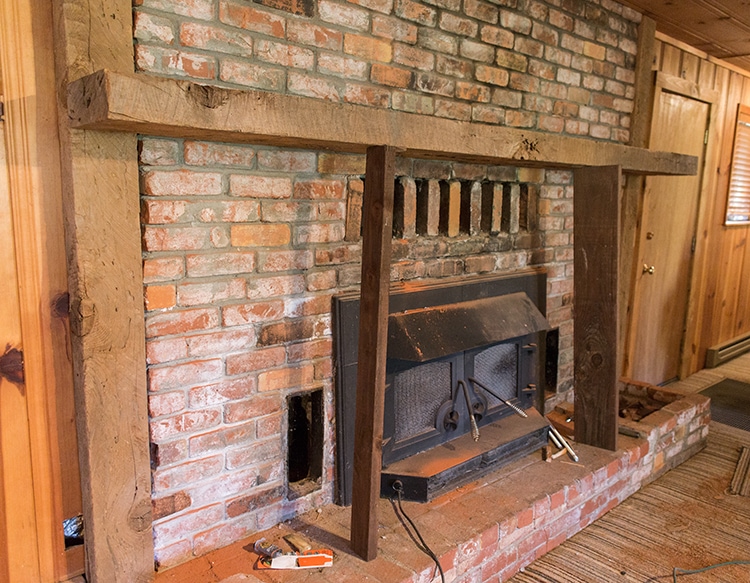
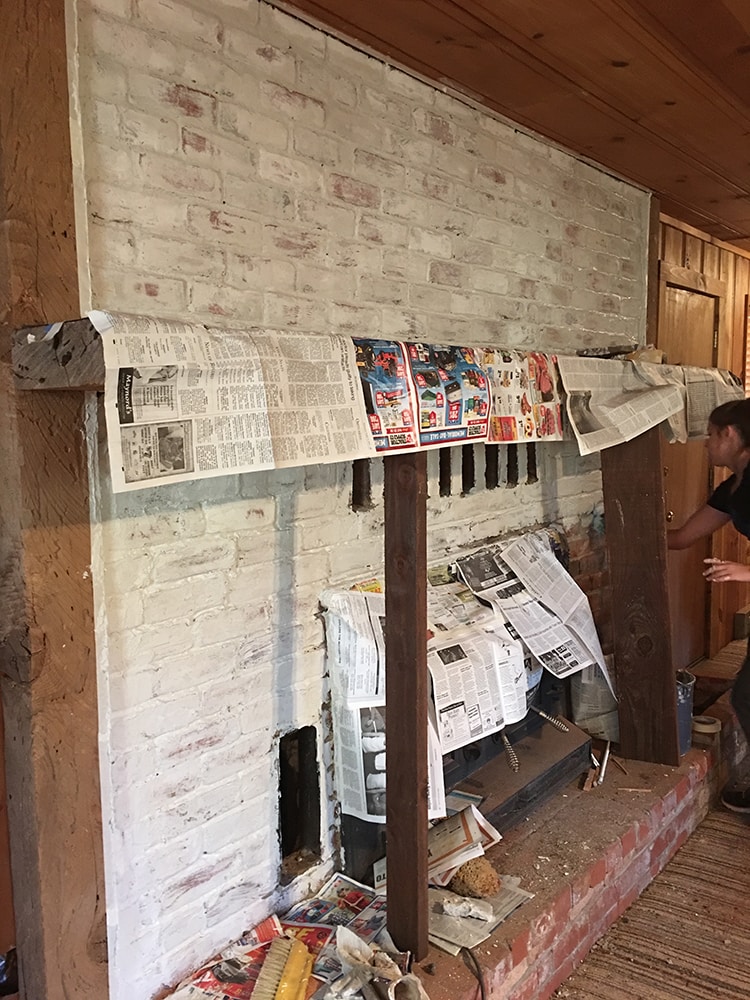
The first thing I knew I wanted was big chunky reclaimed wood framing the fireplace. I’m fortunate enough to have a lumber yard within 10 miles of the cottage, so I stopped in to find the perfect match. Within minutes, I had made my selection and had them cut it to size:
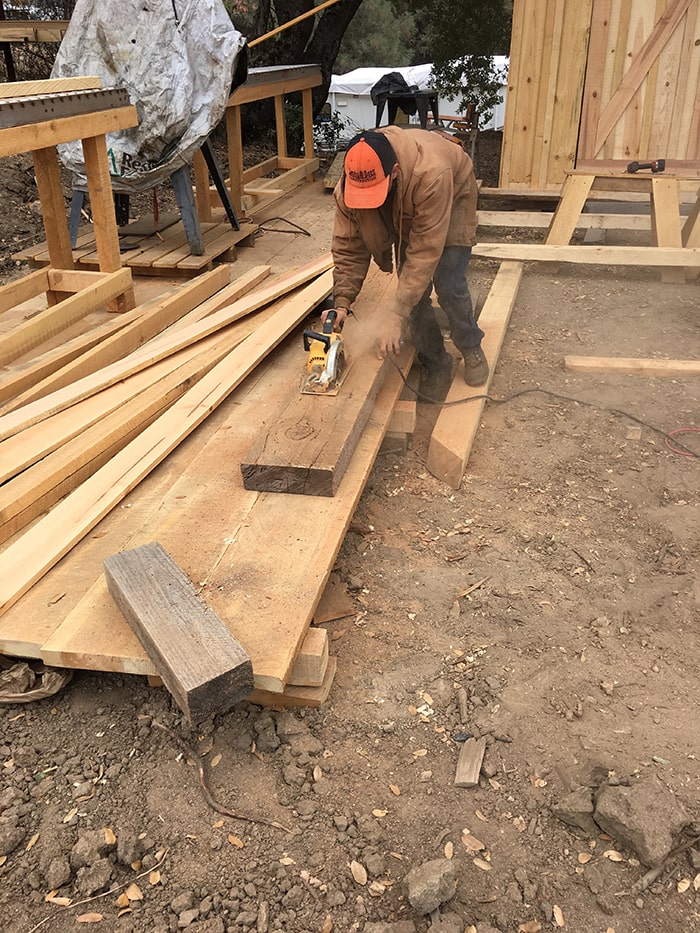
I went with one large horizontal mantel, flanked by two vertical pieces on either side of the brick to make it feel more finished.
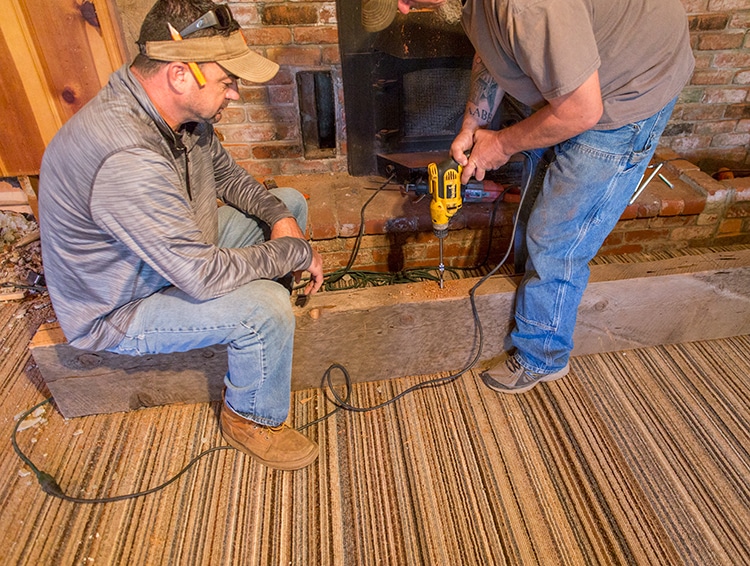
I had loaded up my dads truck with all of the necessary tools to hang this mantel, and was planning on meeting my demo guy at the cottage to help me install it. After reading a tutorial online, I purchased some 5/8″ steel rods, 5 minute epoxy and a 5/8″ masonry drill bit. Turned out my helper couldn’t make it, but I had two contractors on the way to give me an estimate and asked if they had time to help with the mantel. It couldn’t have worked out better—these guys went straight to work and they were awesome.
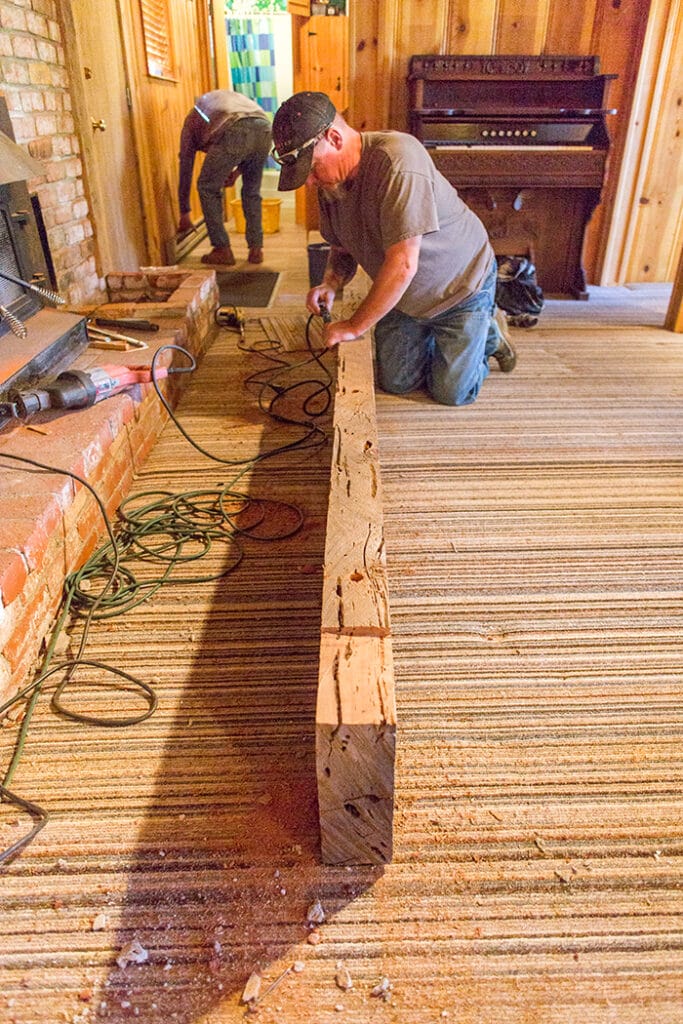
After setting the vertical wood beams in place, they drilled four holes through the brick and inserted the steel rods.

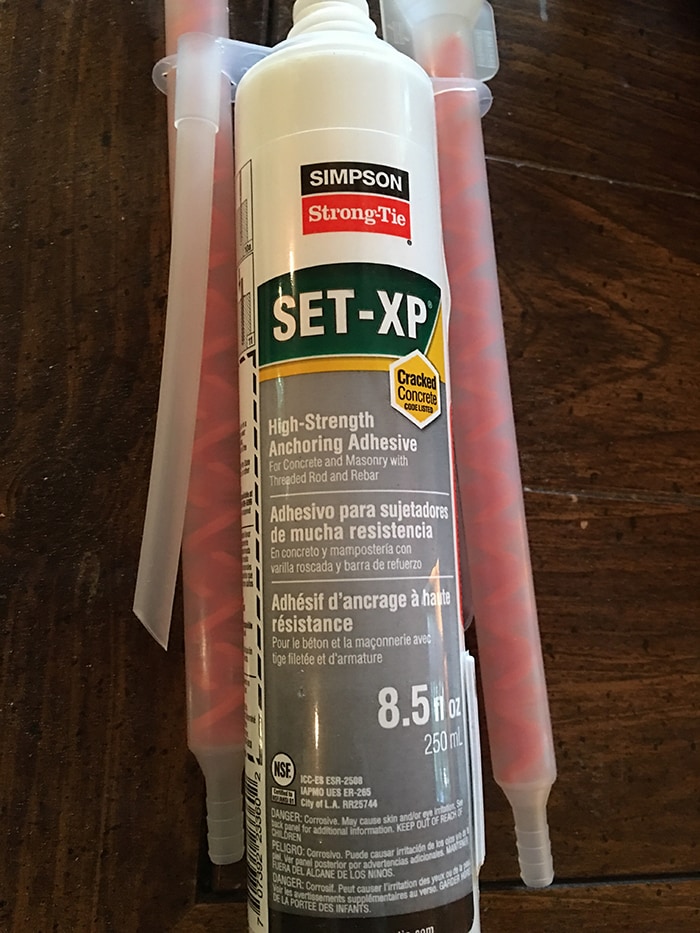
They didn’t trust my Gorilla Glue epoxy and picked up some of this adhesive instead for securing the steel into the bricks:
Then they drilled corresponding holes into the mantel:
Before slipping the mantel piece on, they coated the back in Loctite construction adhesive for extra security:

And up it went!
While the glue was drying, they kept it propped up and level to ensure it wouldn’t shift from the weight:
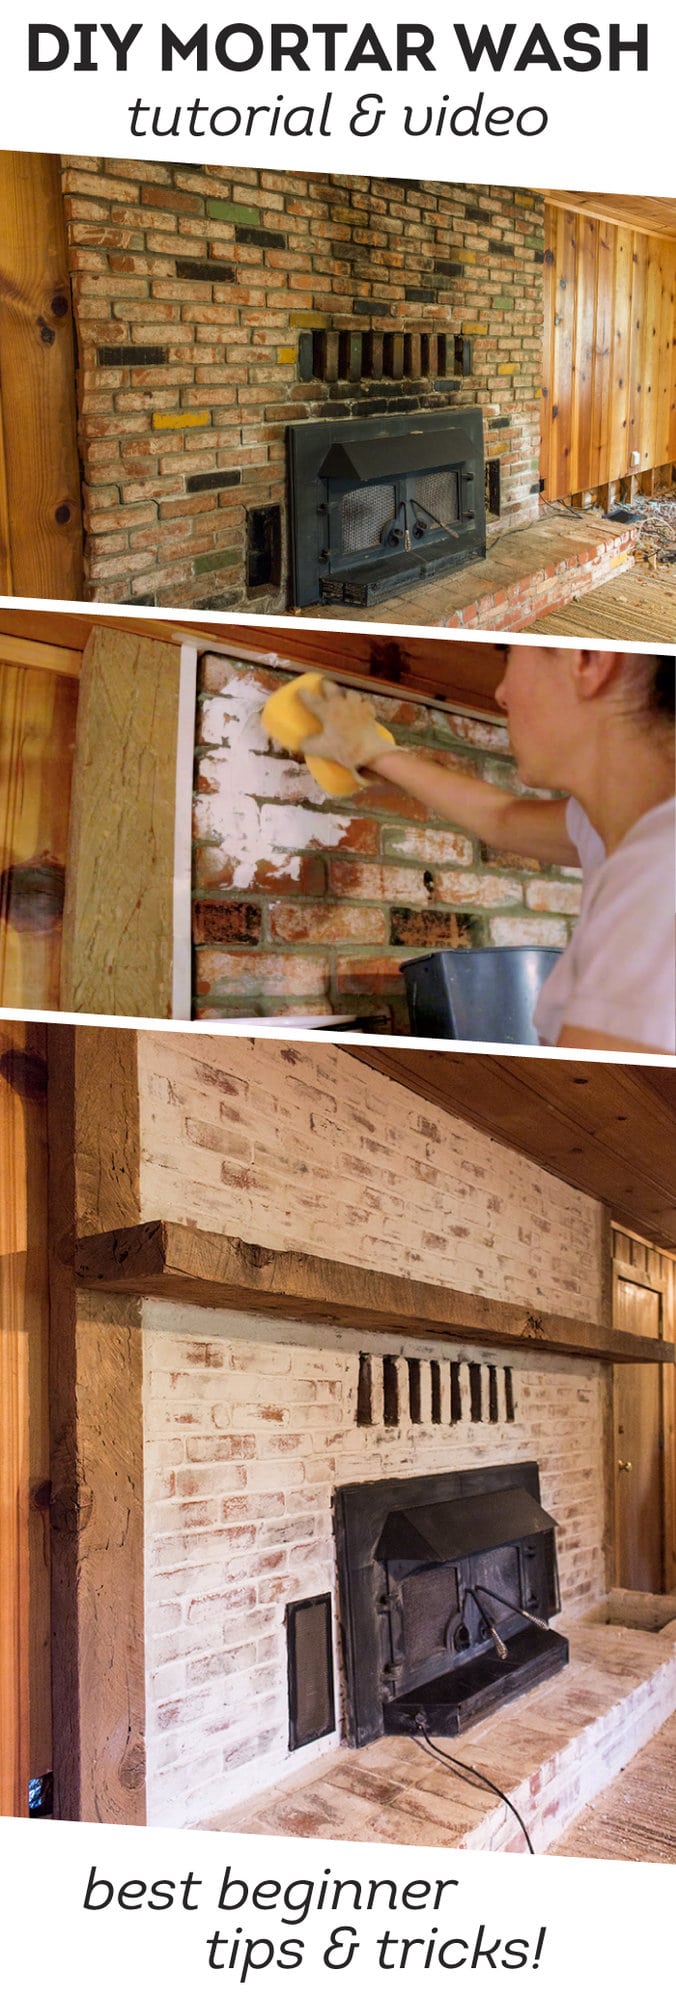
Then it was finally time for mortar washing!
The first step is locating white mortar, which isn’t as easy as one might think. Home Depot is the only retail chain I know of that carries it, and it wasn’t in stock within over 100 miles of me so instead I ended up at True Value, hoping to find an alternative as I tried to explain my mission to the store associates.
The closest thing we could find was white thin-set mortar, which came in at a whopping $19 compared to $10 for the recommended white cement mortar at Home Depot:
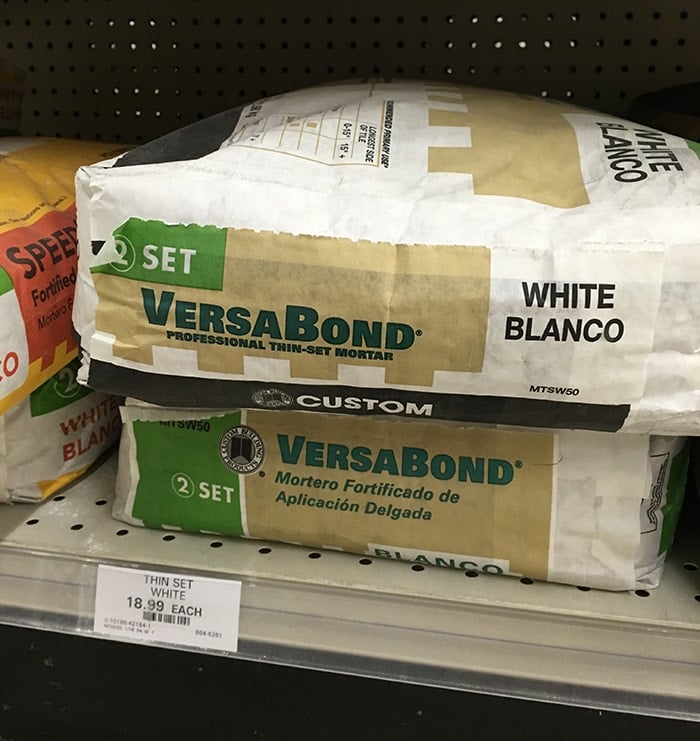
So I sucked it up and paid the price, hoping it would work out (fortunately, it did).
Back at the cottage, I mixed the mortar with water until reaching a consistency somewhere in between yogurt and peanut butter.
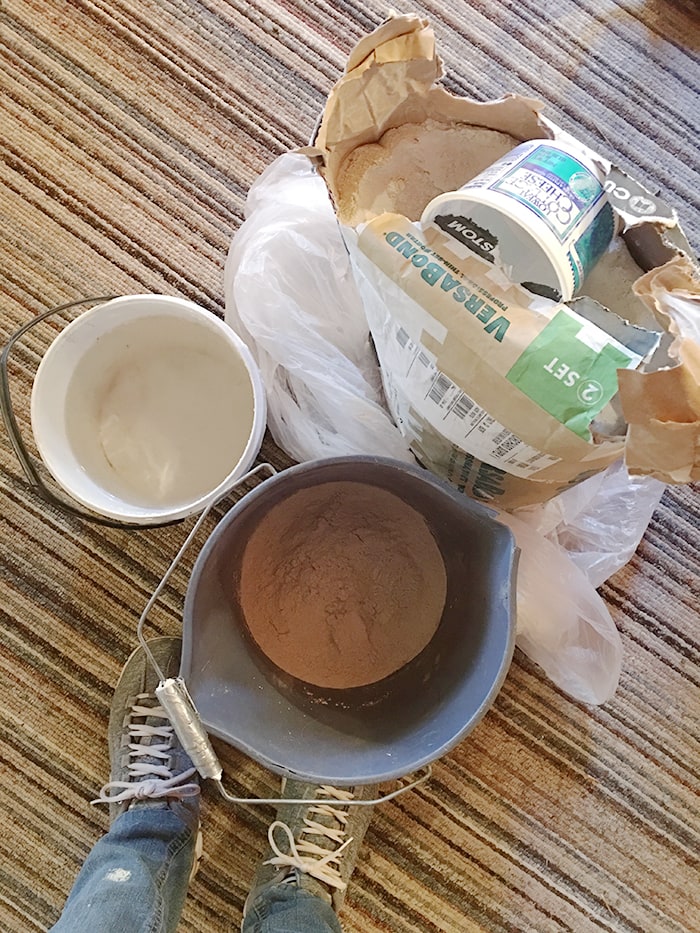
To apply it, you’ll need something that’s flexible enough to get into the grooves but stiff enough to spread and not fall apart. I found that a large stiff sponge worked best, but in hindsight I think a grout float might be ideal.
The existing mortar was really quite deep, and my goal was to level out the surface so it required a lot of mortar. Thick mortar also takes longer to dry, so I found that I needed to leave it on for closer to 45 minutes to an hour before sanding it off.
This took a lot longer than expected. Even with my sister helping, it was about ten hours in all. I later learned that it’s much more time consuming if your bricks are super rough and uneven, as mine were.
Luckily I came away with a few pointers for anyone else attempting this.
Tip 1: Try to focus mostly on the mortar lines, rather than slop mortar over the entire brick. This also depends on the look you are going for, but I wanted a bit more of the brick to show through so I ended up having to do a ton of scraping and sanding afterwards. It would have been nice if half the bricks were left mostly exposed to begin with, but it’s hard to control giant globs of mortar when your hands are stiff and gloves are covered in it (use gloves, by the way!)

Tip 2: Unless you want full coverage, apply less mortar than you actually want. Even residual mortar will stain the bricks white, and it’s hard to remove completely afterwards. It’s much easier to remove it when it’s still wet (within an hour) so if you notice an area where you want more brick showing through, act fast and scrub it off with a wet sponge.
Tip 3: Wet sponges are the best way to wash the mortar off, but you’ll also want to use something abrasive (like a scraper or brillo pad) to remove it all. Once it has completely dried (several hours) you can use an electric sander (60 grit) to expose more of the brick.
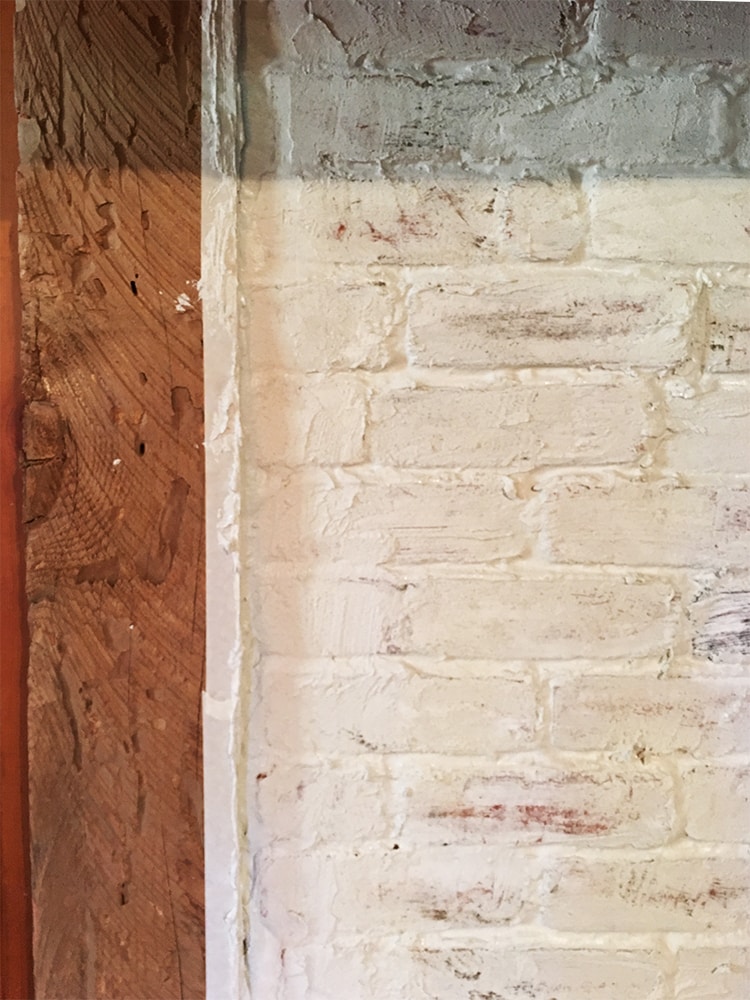
I thought for sure I’d be done Sunday night, but it turns out the mortar needs several hours to dry completely. Each time I’d wipe it down with a wet sponge, it would dry with a white residue. Here you can see the freshly wiped brick on the top vs after it dries on the bottom:
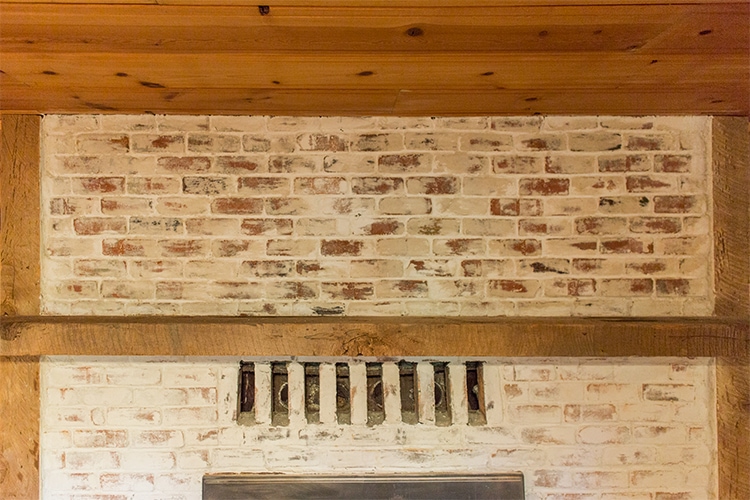
That’s why it’s important to use less mortar from the beginning (and saves time!)
The bricks along the bottom were aligned nice and flat with smooth and level mortar joints, so it ended up taking about 3-4 times less. If you have smooth flat brick joints, consider yourself very lucky because this process should be a breeze!
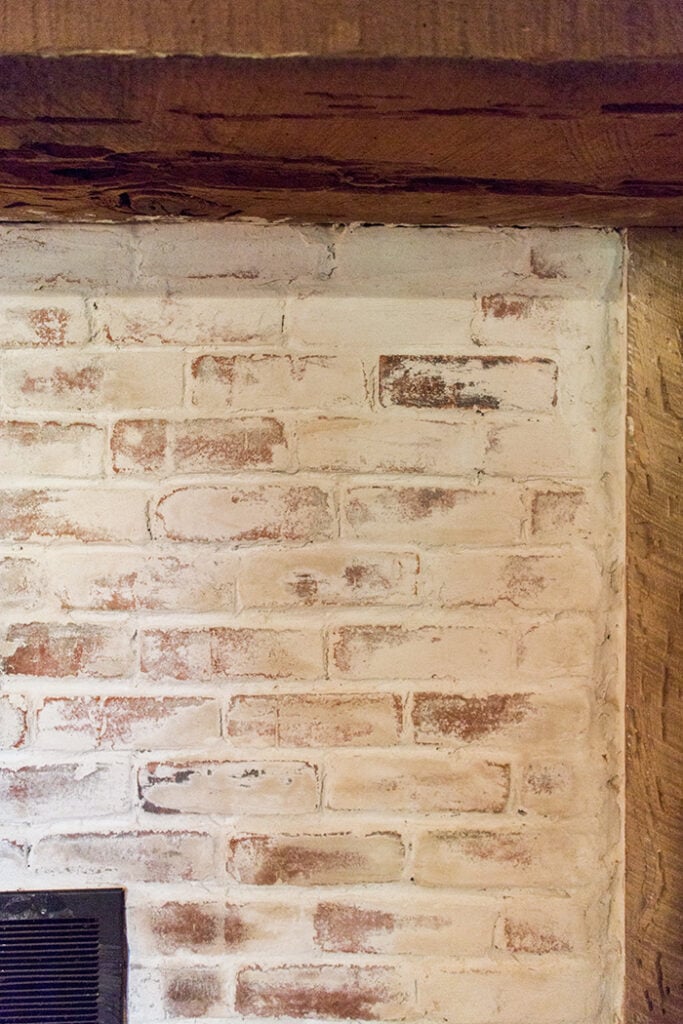
Overall—still very worth it—especially given the cost of just $50 for the wood and $60 for materials. So glad it’s over though. Project #1, in the books!
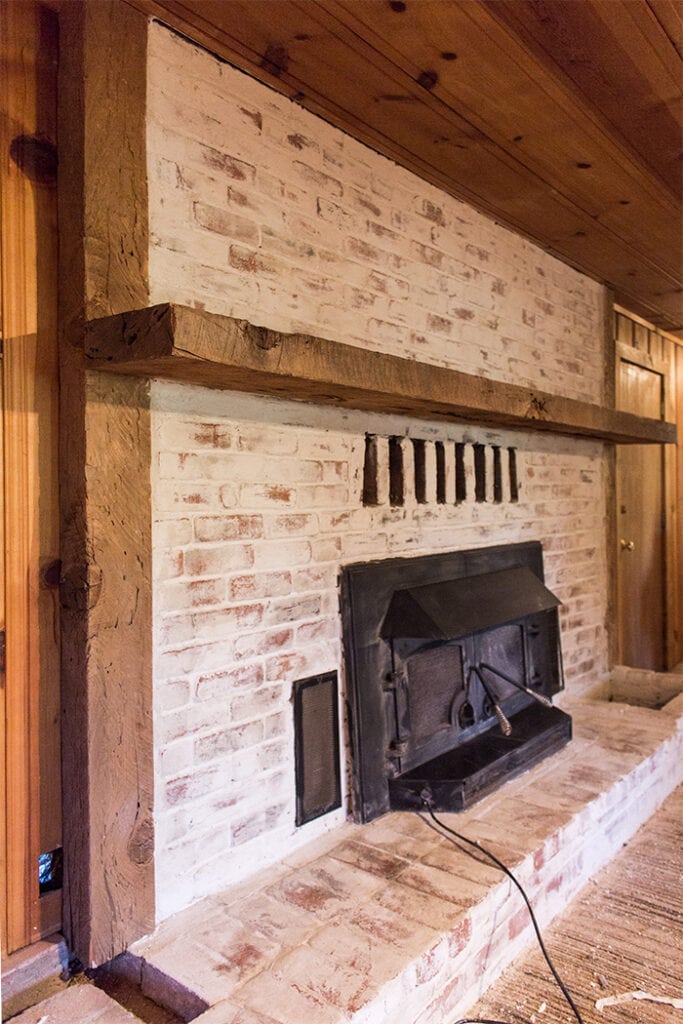
Once the carpet is replaced with wood floors and the orange wood paneling is a fresh white, I think this fireplace will shine.
And it’s hard to see past the construction mess, I know. There won’t be any pretty pictures for a while here, guys. Humble beginnings!
In a couple days I’ll be heading back for Project 2—updating the interior doors! I’ll be using my easy flat panel door upgrade on all 7 doors upstairs, so make sure you’re following on instagram and snapchat (@jennasuedesign) for live updates as it unfolds. See you there!


Leslie Aiken says
Hi Jenna – The original house you mentioned from Atlanta Home Magazine did not use a mortar wash. The finish was created with a limewash paint called BioCalce Classico made by ROMABIO, an authentic slaked-lime paint specially formulated to be washed off and create the antique look. Check out romabio.com/limewash for more details. It actually can easily be applied on an interior brick fireplace – https://www.youtube.com/watch?v=r0BZGkIf8Ow. Your fireplace looks great too, but we will be selling this limewash paint at Home Depot online soon so it’ll be easier to find.
jennasuedesign says
Glad you found my post Leslie, thanks for letting me know the source! Your limewash is awesome and I’ll definitely look into it in the future!
Kerri C says
Great tutorial! We are wanting to do this technique in our home. One question for you though, does the mortar dry hard or does it continue to put off dust?
Thanks!
jennasuedesign says
Once you wipe it down and it’s fully dry there’s no dust 🙂
Vanessa says
Fantastic, I always wondered about how that look was achieved on exterior bricks! It’s a process that has a name! Cool.
kindra says
I just came upon your blog for the first time today and was so excited to see you do this project. I’ve been wanting to do the “German schmear” ever since seeing the Fixer Upper episode you referenced. Anyway, I think your fireplace turned out great and I look forward to continue reading about the updates to your cottage. I think your transparency in sharing all the details of your property purchase is so fantastic!
jennasuedesign says
I appreciate that Kindra, glad to have you on board for the journey!
Kathy S says
Beautiful Jenna Sue ! You are such a hard worker , so excited to watch your new Reno unfold ! So glad your back at it. I found your blog a few years ago and built a house this past year , much of my inspiration was from your house ! So thank you for your great style & sharing all your diy & renos. I sure enjoy watching it all 🙂
jennasuedesign says
Thanks so much Kathy, I’m glad you were able to find some inspiration from it!
LisaV says
Hi Jenna, I was wondering why you chose to apply the mortar after the wood surround and mantel were installed. Would it have been easier to apply and remove the mortar before so that you did not have to work around the wood and worry about getting mortar on it by accident. Thinking about doing this in the future, so thank you in advance for your advice.
So excited to see your vision and follow along with your progress. You are very talented and inspiring!
jennasuedesign says
Thanks Lisa! I had to apply the mortar after to fill in the large gaps between the uneven brick and vertical mantel pieces. If you don’t have that issue then it would make more sense to apply the mortar first 🙂
Patricia says
By the way – I meant to say in my previous comment – I’ve been receiving your blog by email for a while – started back when you were in your previous home, before you went on your world travels. Just want to say I admire you – you are a courageous, adventurous young lady ! Good for you – you are going to go very far in life with your wonderful positive attitude…
jennasuedesign says
That’s so sweet of you to say, I really appreciate that Patricia!
Patricia says
What a difference – it really looks beautiful ! I admire you – quite a project to take on but you will feel such satisfaction and pride when you are finished !
I’ve never attempted a mortar wash but love the look – – but I’m curious…what made you decide to do the mortar wash versus ‘white-washing’ with thinned paint ? Is the look very different ? I’ve never done either but had been looking in the past at Pintrest trying to decide what to do and saw many tutorials there about ‘white washing’ brick fireplaces….what’s your opinion on that ?
jennasuedesign says
Thanks Patricia! It does look very different than white washing — you can especially see the difference in person. I wanted more of an authentic old world look which required adding mortar. White washing is another good option and it’s certainly less work, so if you like that style, then go for it!
Garden, Home and Party says
It’s already looking so much better.
Karen
Barbara H. says
What a huge job! It definitely looks a whole lot better. I haven’t done any stripping for a long time but I never let the stripper dry completely. I wonder if that was part of the problem stripping the paint. Also, I’m sure you have this in mind but make sure when measuring for the cabinets you allow for the furred out wall as well as the drywall depth. Years ago when having an old kitchen redone we decided at the last minute to add insulation and the cabinet guy’s measurements were a little off because of it. He was pretty disappointed but it wasn’t a big deal to us.
jennasuedesign says
Will keep that in mind, thanks Barbara!
Marilyn says
I wait every week for your new posts…my favorite blogger!! You gave me the courage to do things to my home that I would never had done before!! Keep up the good work!!!
jennasuedesign says
Aw I’m so happy to hear that, thanks Marilyn! 🙂
Ginny says
Looking good so far!! Look forward to seeing more renovations!
jennasuedesign says
Thanks Ginny!
lilly says
oh wow, great job done. your vision is coming together and i love how it turns out. lots of elbow grease 🙂
jennasuedesign says
Thanks Lilly — it’s all about the sweat equity!
Rachel Anderson says
Looks amazing!! This is going to be such a great focal piece for the room!
jennasuedesign says
Thanks Rachel! I can’t wait to decorate that mantel 😀
Bonnie Stanfill says
Looks great. Enjoying your posts!
jennasuedesign says
Thank you Bonnie, glad you’re enjoying them!