The last major project for my boy’s budget bedroom makeover is complete! I had no idea how this would turn out since I wasn’t following a specific tutorial, but it’s now my favorite thing in the room (and I have a feeling Cruz will love it too!).
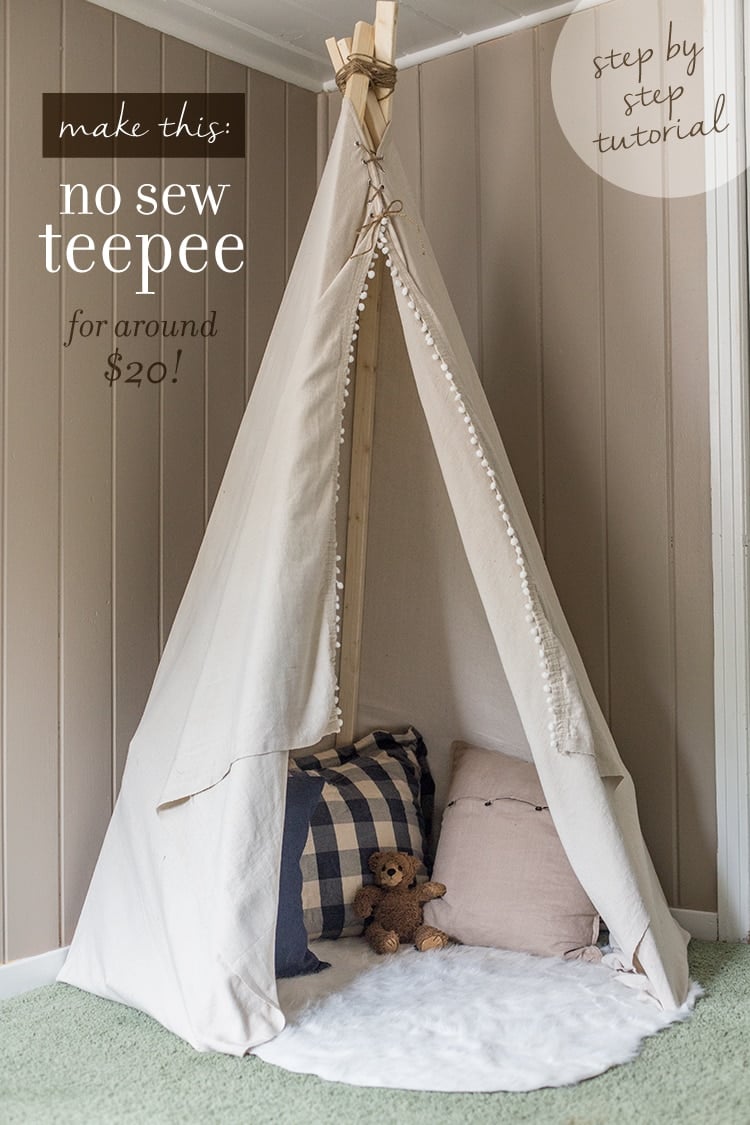
I’ve been making forts as long as I can remember—I keep vivid memories of our living room furniture draped in blankets and shadow puppets in the dark with flashlights. There’s something very nostalgic about makeshift hideaways and if I could relive my childhood, it would be the first thing I’d want in my room. So when it came time to plan Cruz’s woodland/rustic styled space, a teepee just made sense. What five year old boy wouldn’t love that?
Of course, this had to be done on the cheap (with a $250 budget for the entire room) so I headed to Pinterest to explore the possibilities. I found a handful of no-sew tutorials using canvas drop cloths, but the other challenge is the small space I was working with. There’s only a 36″ clearance from the wall to the door so I had to come up with an arrangement to fit inside these constraints and also maximize the space.
I ended up with five 1x2x8 furring strips ($5.80), a 6×9′ canvas drop cloth ($10.50) and grabbed some twine rope I had lying around (free).
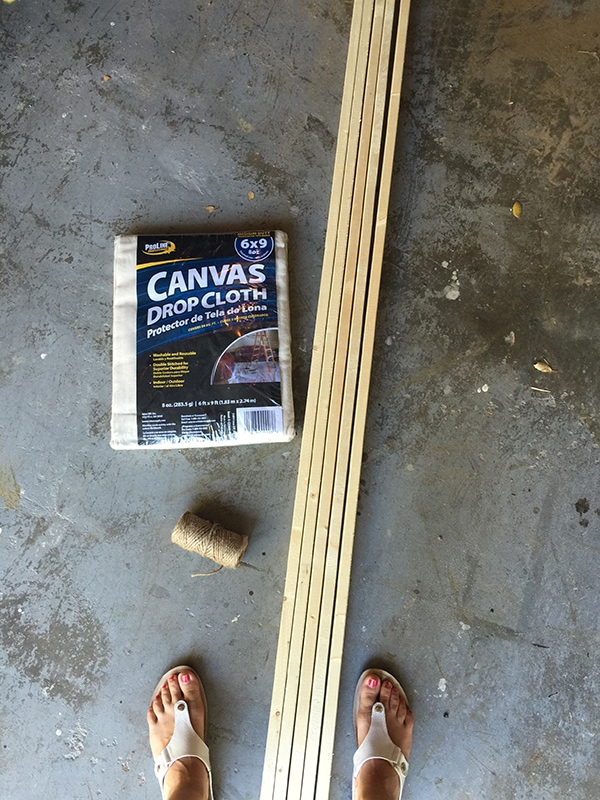
To add some flair and secure the top, I also picked up a packet of eyelets from Joann’s ($4.26, not pictured) bringing the total to just over $20 (I used my Lowe’s credit card for 5% off and had a 30% off coupon at Joann’s).
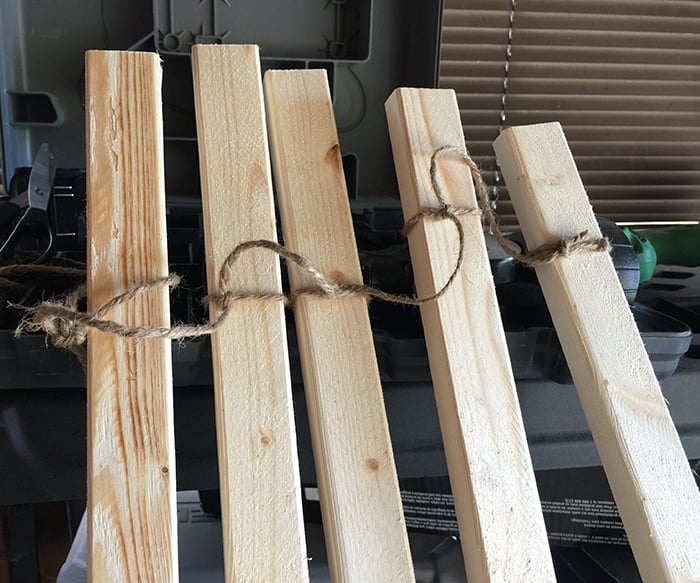
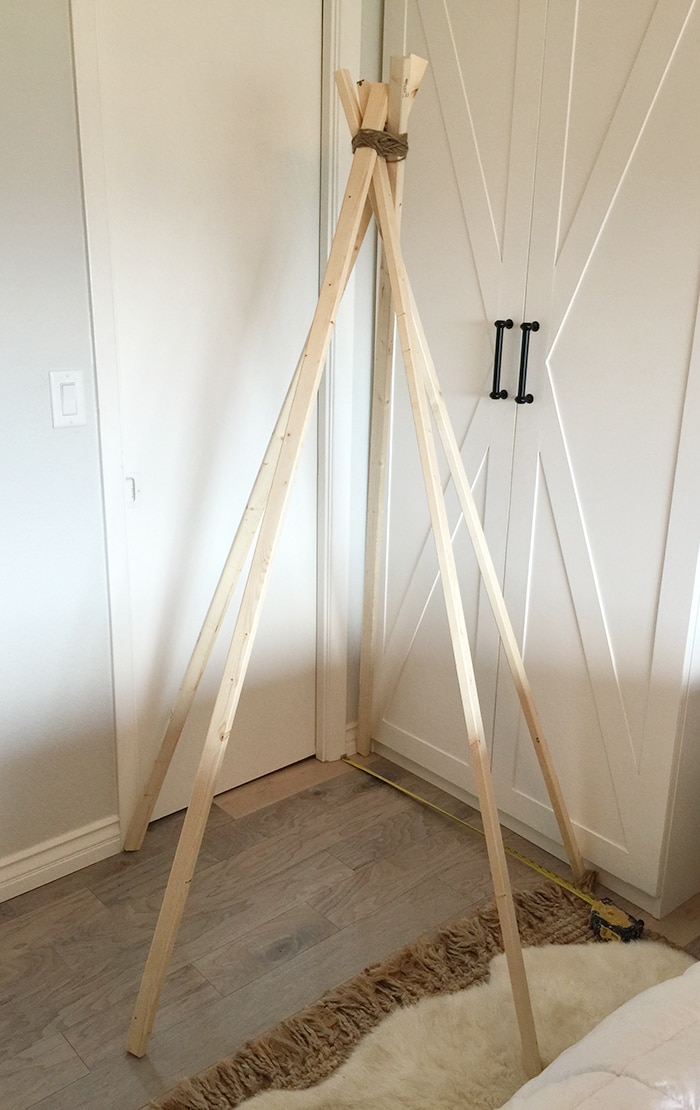
The first step was cutting down the furring strips to 6′. You can leave them 8′ if you’re making a larger teepee, but I’m also working with 7′ ceilings so cutting them down was a must.
I grabbed my boards and tried arranging them into something that made the most sense. It’s a little tough balancing them on your own so I tied my twine around the tops to help hold them together before securing them (this part isn’t necessary though).
Using trial and error, I came up with a suitable layout and began tying them all together—looping in and around each board until they could stand on their own.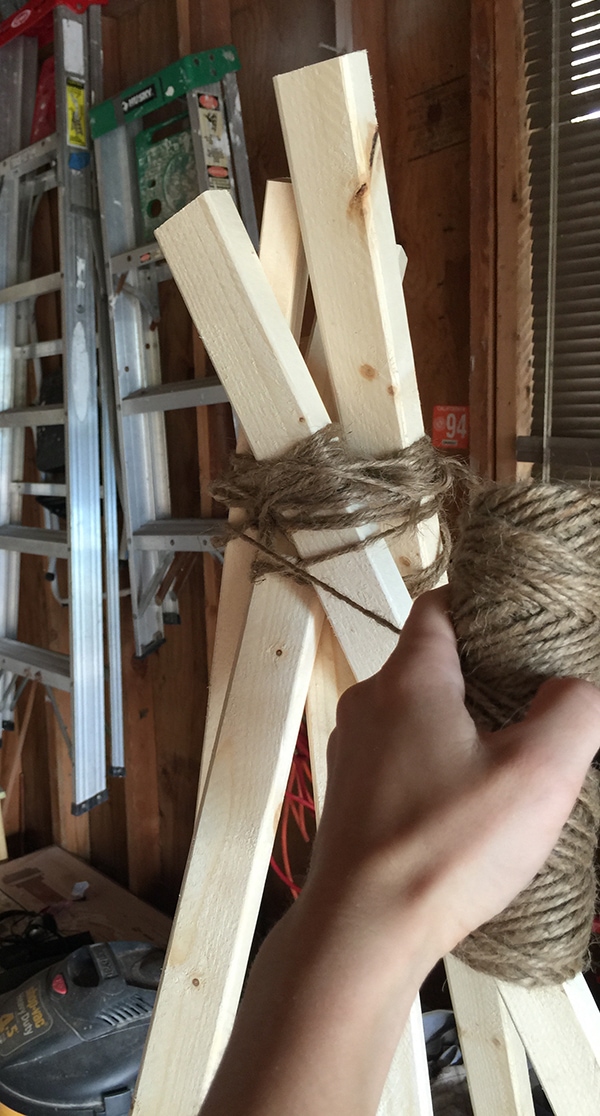
It’s important to note that they aren’t going to be 100% secure. This is actually a good thing so that 1) the teepee can be folded up if it ever needs to be moved 2) I could fit it inside my car, and 3) I could arrange the wood correctly once the teepee was in place.
I brought everything inside to a corner of the room I could recreate the layout and finish assembly.
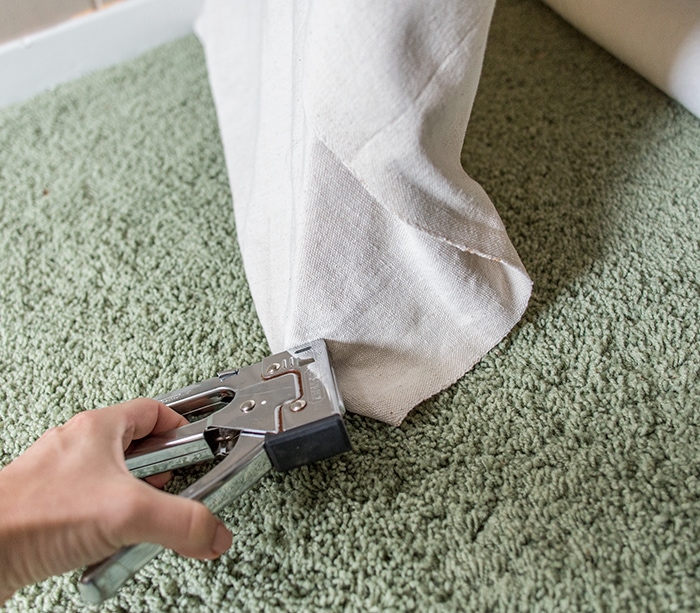
 After washing/drying and ironing the folds out of the drop cloth, I found the horizontal center (there’s a vertical seam going down it) and lined it up with the back leg of the teepee. Then I used a hand stapler to staple it in place at the top.
 On the same leg, I added another staple in the center and one at the bottom for safety (the staples aren’t very visible but this is also the back and won’t be seen).
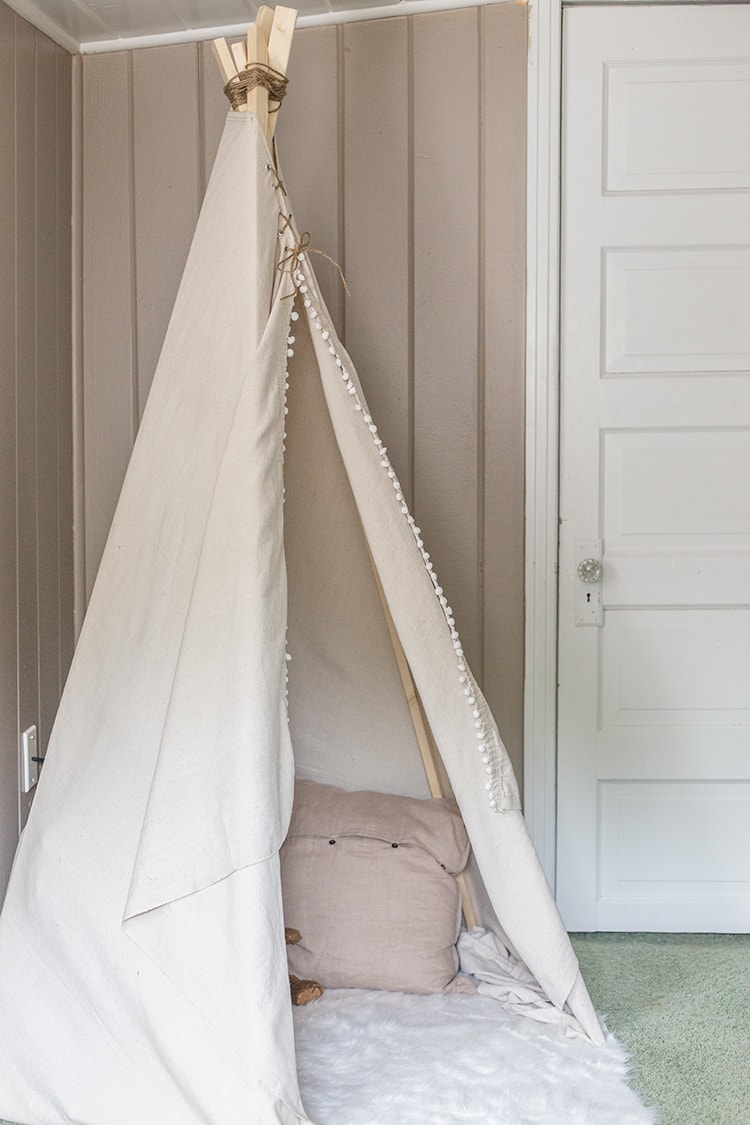
Then I wrapped each side around to the front, securing with a staple at the bottom of the next two legs.
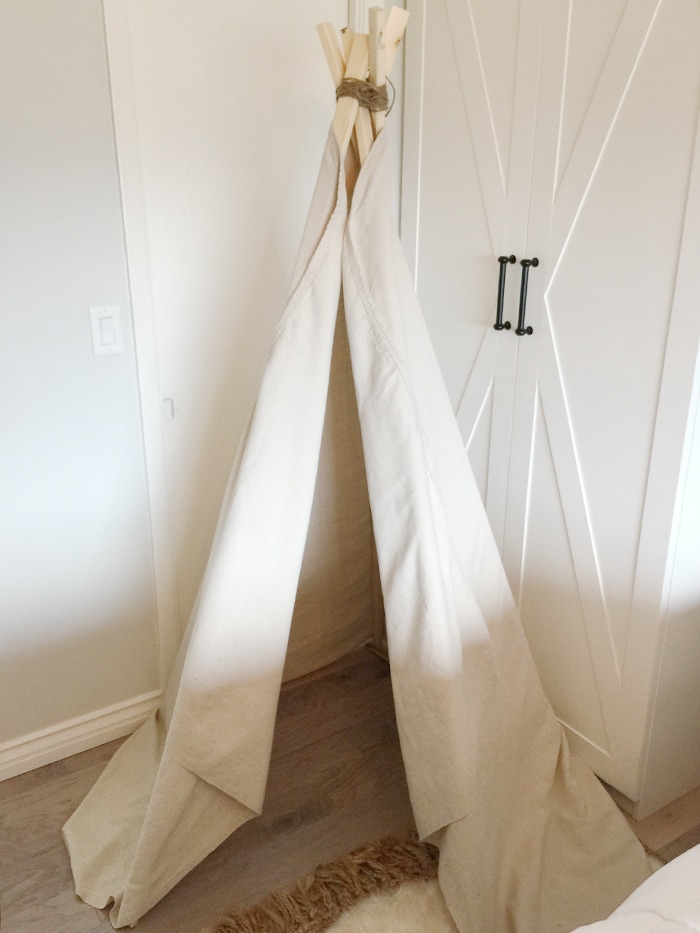
There will be some extra cloth at the bottom which you can either trim with scissors (at the very end, once it’s in place!) or simply tuck underneath. I chose to just fold the excess inside.
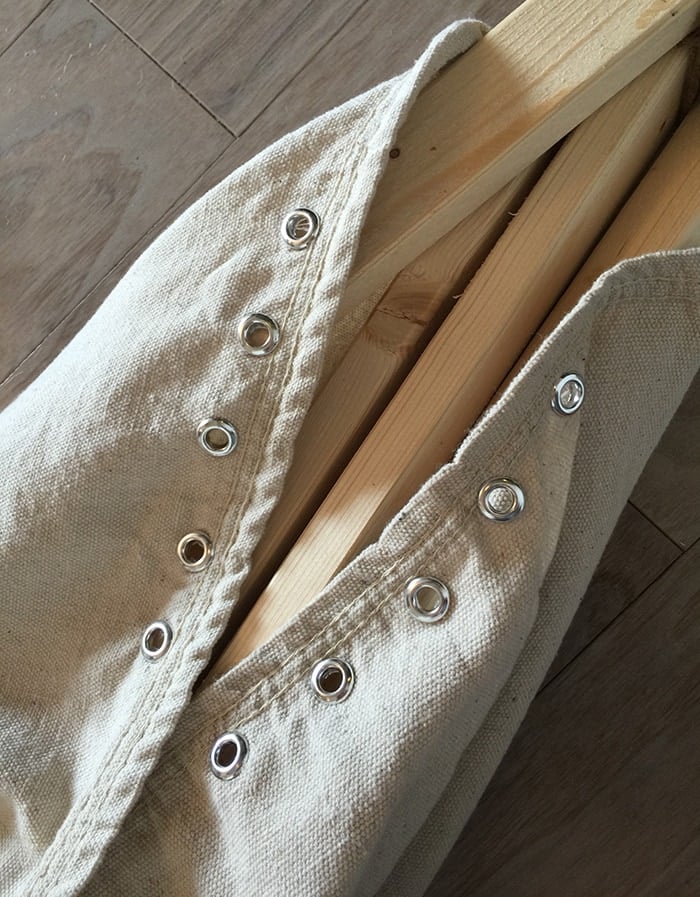
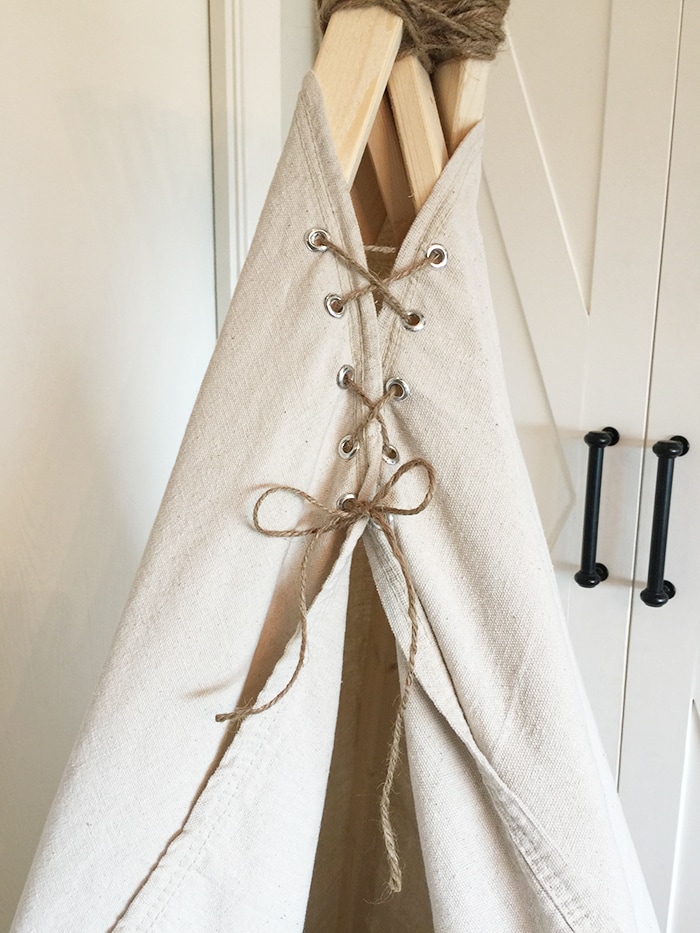
Now that the cloth was in position, I folded the teepee back up and began to attach the grommets at the top where the two pieces came together.
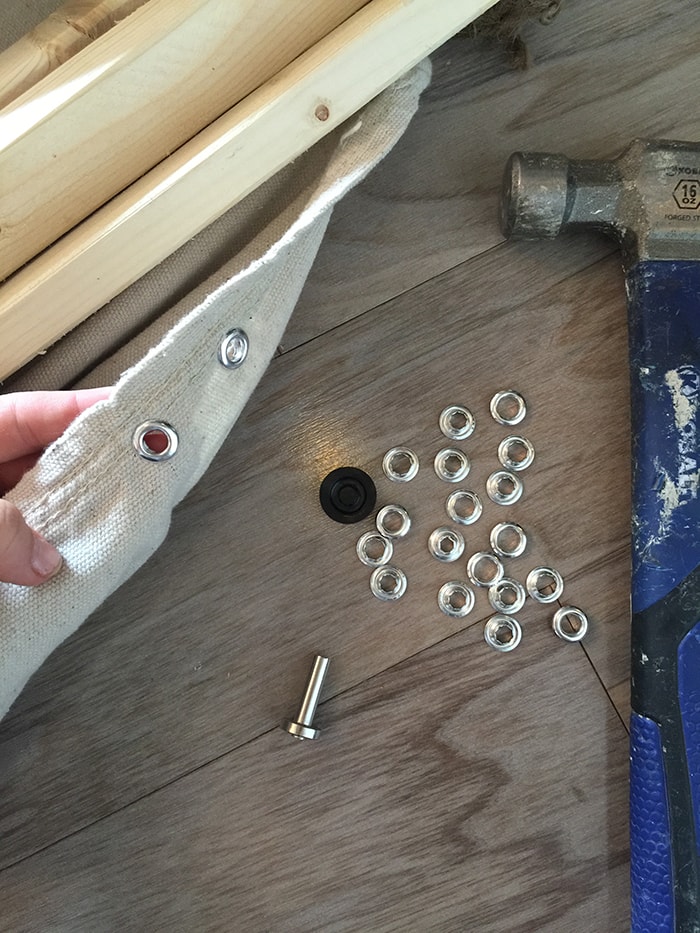 I bought the kit that comes with the little attachment tool so I could simply hammer them into place. Easy breezy…
 Then I lifted it back up into place, repositioned my legs and used twine to tie the top closed.
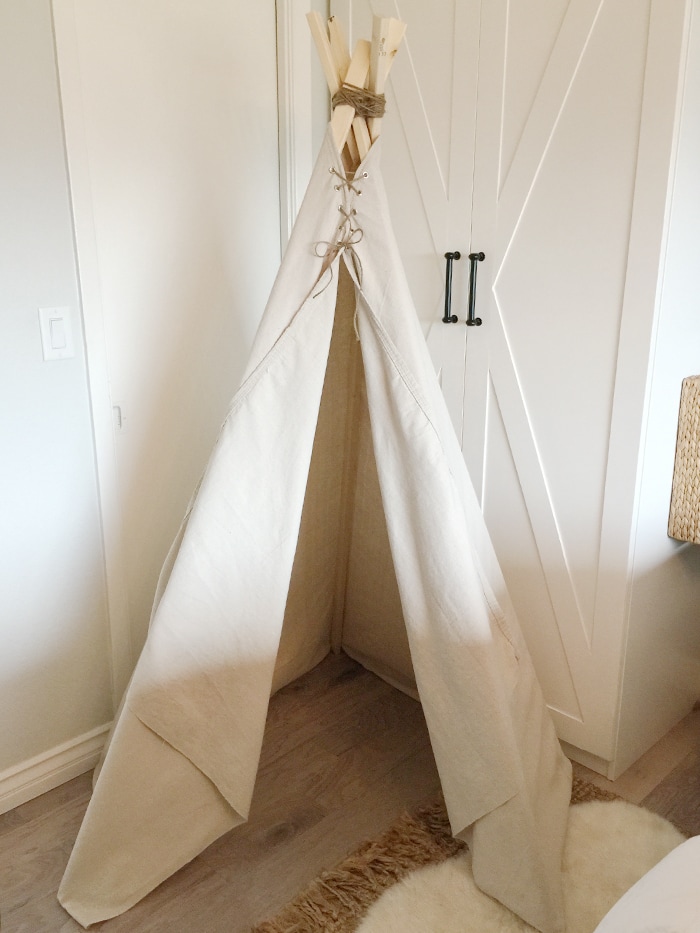
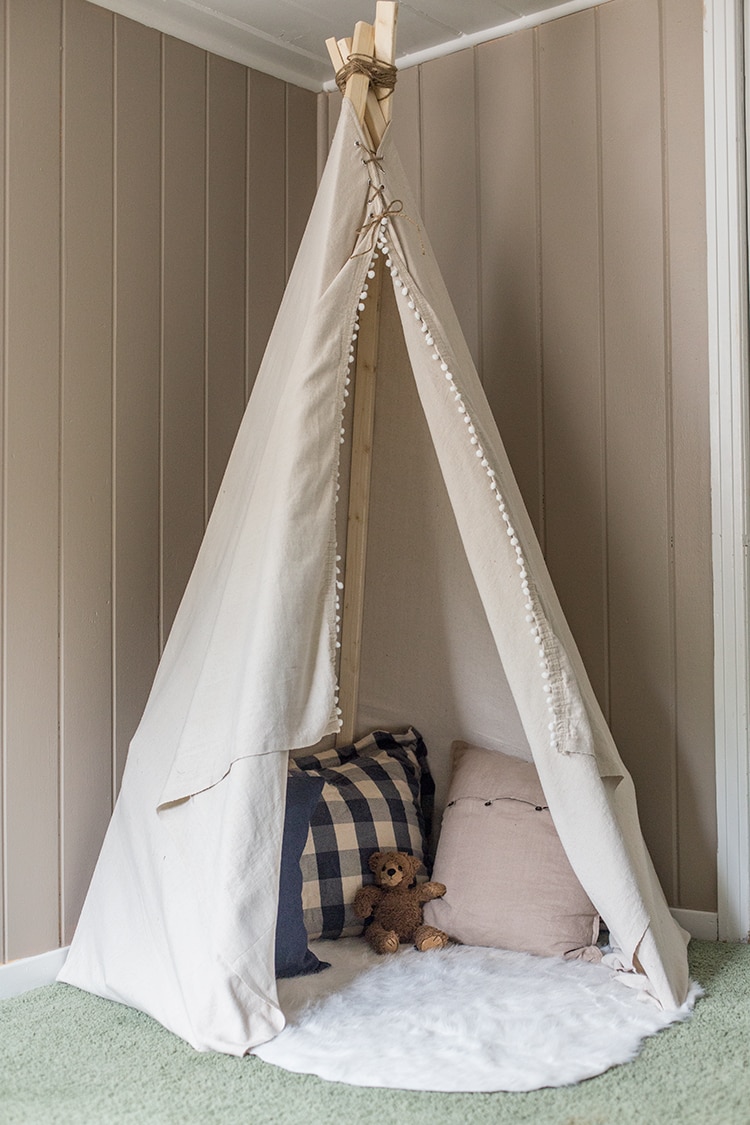
With everything looking good, I brought the teepee over to Cruz’s room for reassembly. Once the legs were in the proper position, I added a couple more staples at the bottom of the remaining two legs.
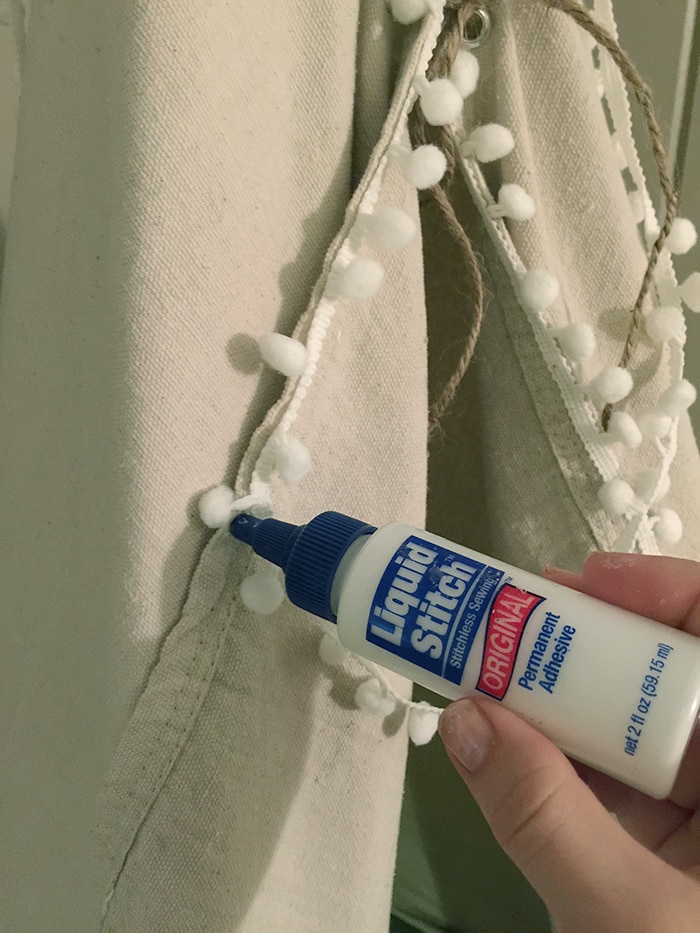
I also brought some extra pom pom trim I had lying around and secured it to the opening with liquid stitch.
 Another fun DIY project, in the bag…
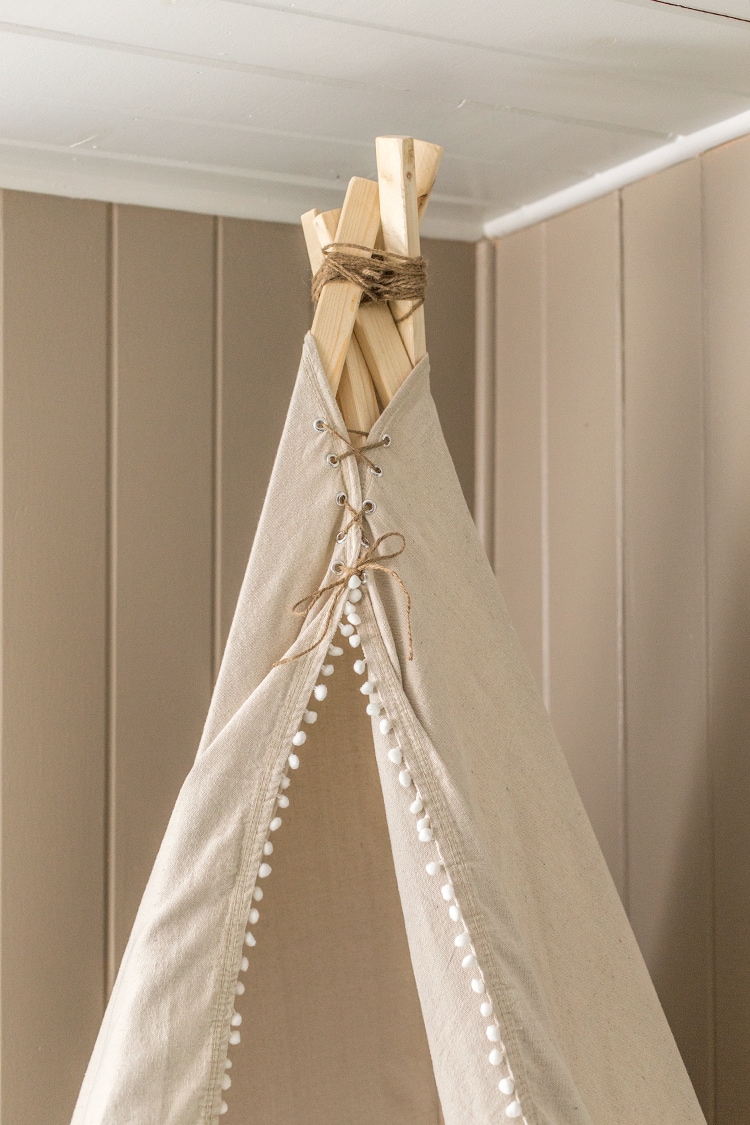
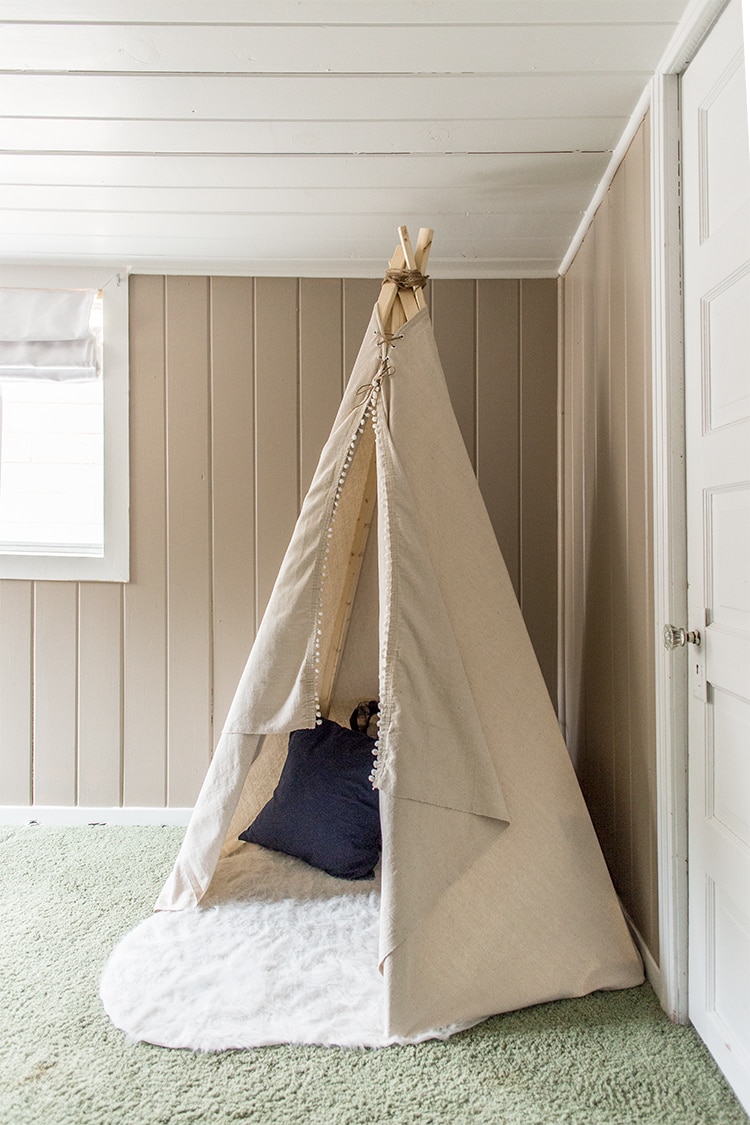
I found my makeshift sheepskin “rug” (cut from fluffy fabric, used underneath our Christmas tree last year) and thought it would be perfect inside the teepee.
 Cruz won’t see it until Monday… and I’ll be there with my camera to capture his reaction. I can’t wait!


Now it’s all about the finishing touches. I have a few small projects in the works and plan to finish setting everything up Monday before Cruz sees it. Hopefully I’ll pop in Tuesday with one more quick and easy DIY before the big reveal Wednesday. And now that everything has been bought, I’m happy to report that I came in way under budget. Can you believe it? I thought for sure we’d go over. I’m looking forward revealing the price breakdown on Wednesday to show you how a little creativity can go a long way.
Have a fabulous Friday & weekend! Next week will be jam packed with 4 days of posts, and one week from today I’ll be dropping a bomb of an announcement. You definitely won’t want to miss it…


Natalie says
Love this! I would like to make one for our playroom but we have limited space. Do you have an estimate on the floor space taken up?
jennasuedesign says
I don’t remember exactly but I was working with a very small corner! Couldn’t have taken up more than 4 feet or so.
Sarah says
Can you tell me where you purchased the material you used for the rug?
jennasuedesign says
I believe it was JoAnn’s if I remember correctly!
Sarah says
Thank you!
Lisa says
My daughters birthday is tomorrow. I bought everything yesterday. I going to set it up outside in a shady spot so i bought the heavier canvas, waterproofing spray and a green outdoor rug. Last night i painting the strips and sprayed the scotchguard on the canvas. Tonight is final assembly. I also bought a fabric basket, fabric flowers, chalkboard name plate, and decorative pompom garlands. I went a little over buget but I’m so excited to put it together! I hope she loves it.
Sally says
I’m making one for my 6 yr old granddaughter. Not sure how I’m going to decorate it. She is always wantin me to make her a tent.
Judy says
What a great idea and good tutorial. I saw a teepee at Hobby Lobby yesterday that was $99 and debated buying it (with a coupon of course!) for my 5 year old grandson for his birthday this month….glad I didn’t, I’ll have to try my hand at making him one. My 11 year old grandson loves forts so he might get one of these too!
Looking forward to your announcement!
Nikki C. says
Hey Jenna!
I just wanted to say I love your website and am saving up for one of your city scapes of Houston (I want to buy a large print). All 3 of your houses are so beautiful, you are a very gifted lady :).
And I would like to put in a guess on your announcement I hope that is alright haha. I don’t “expect” you to verify if my guess is correct or not, but I think you are ” “ing!!! (which is awesome so yay and congrats if so)
Looking forward to the room reveal and your announcement. Thank you for your Blog!
Nikki C.
Mary says
Recently discovered your blog and am loving what you do! The teepee is really cute but I was wondering if using bamboo poles would be easier to tie together than the furring strips. I don’t know about the U.S. but here where I live in Japan they can be found in the garden section of home centers and are super cheap! Can’t wait to see the finished room.
jennasuedesign says
Welcome Mary! Bamboo poles probably would be easier but the furring strips are only $1 and readily available here, so that’s why I went with them!
Tammy says
What a cute, fun and inexpensive project. I would like to make on of these for my grand children. I have a room at my house for them. This would be perfect to put in there or even in our downstairs family room.
Garden, Home and Party says
Jenna,
As the mother of two sons, I can guarantee my boys would have loved this. They now each have a daughter (and lovely wives, respectively) but I’ll pass this along. I could see this working for a girl with a few pink decorations. You are truly so talented.
Karen
Rebekah // Charming Imperfections says
Growing up we loved to find little forts and hiding places to hold secret club meetings 😉 This would have been so much fun!!! My son is definitely getting one of these in the near future. Thanks for the inspiration dear!
Crystal says
Very cute, painted stripes would add some color to it.
jennasuedesign says
I’ve seen others do that and it looks great too! She can always add to it in the future.
Dara says
I love this. You could also paint cool designs on the drop cloth before attaching it to make it more personalized. So many possibilities!
jennasuedesign says
Yes, that would be cute too! I might have gone for it if we had more time 🙂
Kelly says
I love this, would love to do this for my son, but he is still quite young, I worry about him pulling it over. Is it very stable?
jennasuedesign says
Hmm, if it’s set up in a corner you may want to consider securing the legs to the baseboards with nails or screws. The legs can definitely be repositioned with enough pulling but because the teepee is balanced on itself, it wouldn’t easily knock over — you’d probably have to grab it from the top to do that. Hope this helps!
Brittney says
I love this! I was going to buy my son, Rowan, a teepee for his birthday, but now I might just make one! Great job!
jennasuedesign says
Love that name! Good luck and have fun 🙂