This progress update feels long overdue after our big house announcement last month, but as mentioned in my Backyard Plans post, everything in the construction/building industry is moving in slow motion these days!
We’ve been waiting on quotes and answers from multiple companies which have put us in a holding pattern, but we’ve also started making decisions and as much progress as we can on our own. Here’s the latest!
Jump to:
Backyard
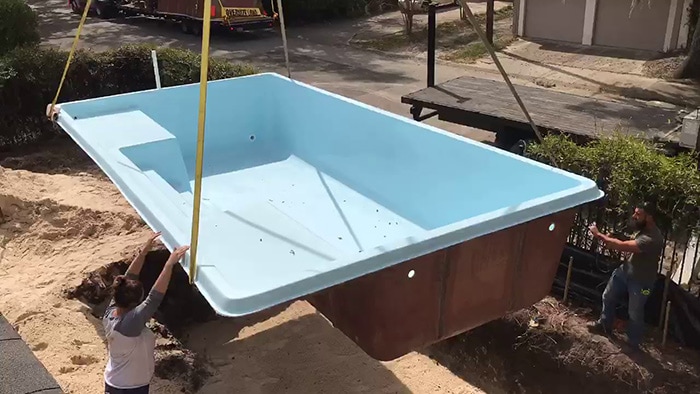
After publishing the last post, we landed on Big Splash Pools as our installer (for those in the area). Choosing a pool installer is a very big and important choice, but we feel very confident putting this project in their hands. They’re a local Tampa Bay Area company (although they are expanding to all of Florida) that has been in business for over 20 years with a great track record. They offer full design services to help navigate all the options as well as financing options if needed.
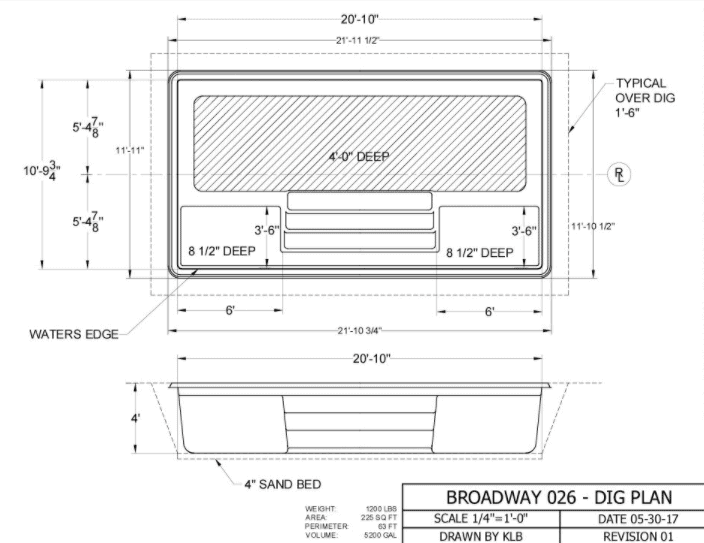
I also called the pool manufacturer, San Juan Pools, and they had nothing but great things to say about Greg (owner) and his team. It’s going to be a long wait until the install is complete (spring/summer 2022), but we are excited to get the ball rolling!
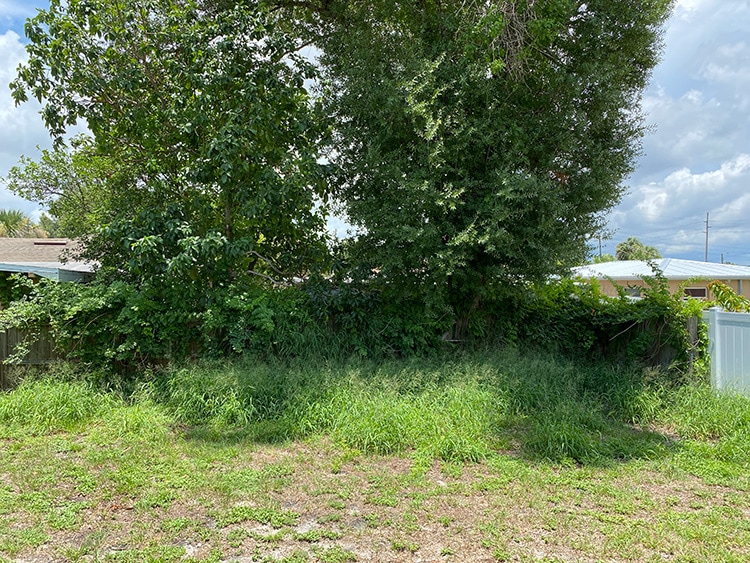
Meanwhile, the backyard is quickly becoming a jungle after two weeks of rain…
Tile
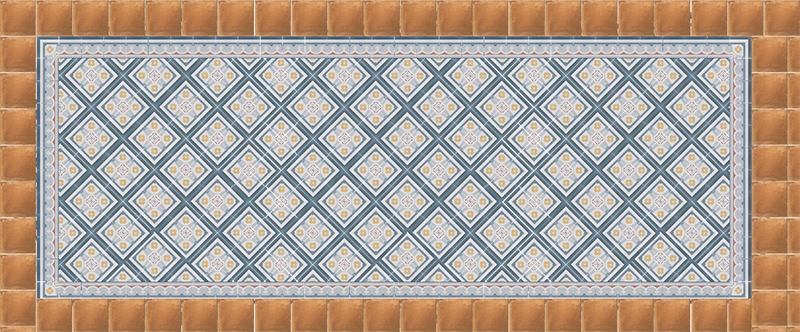
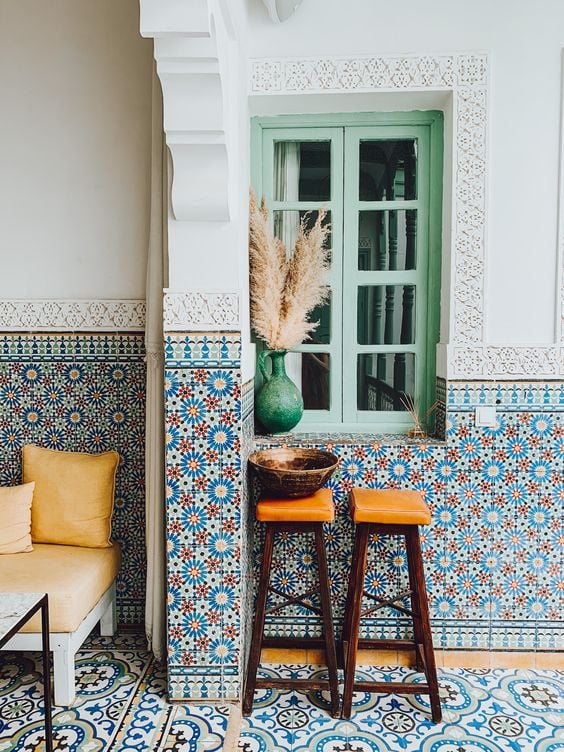
My favorite part of this update—I have chosen our outdoor tile! Whew, this was a long process. I’ve been mulling over this decision since April, trying to find a perfect combination for that “Spanish/Moroccan/Floridian” style mix…
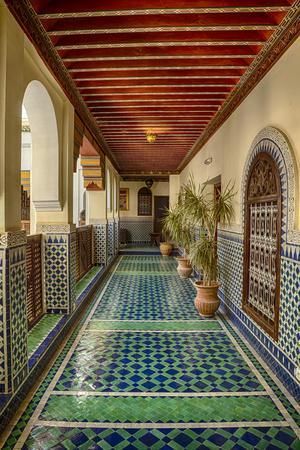
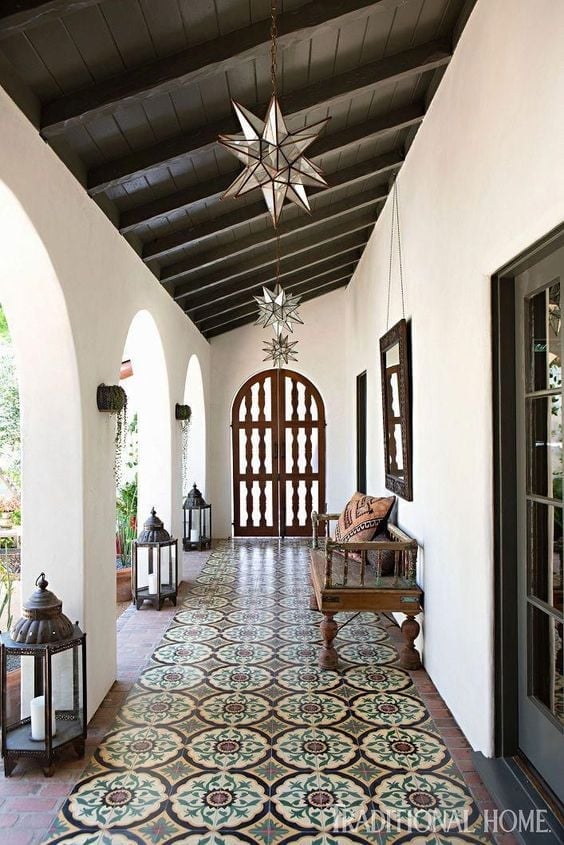
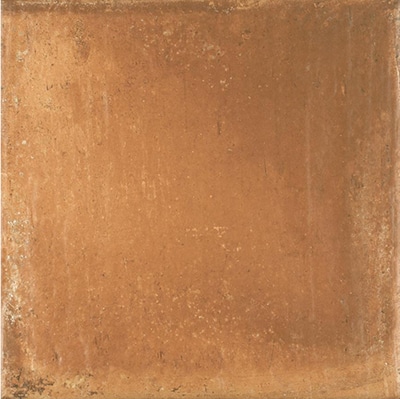
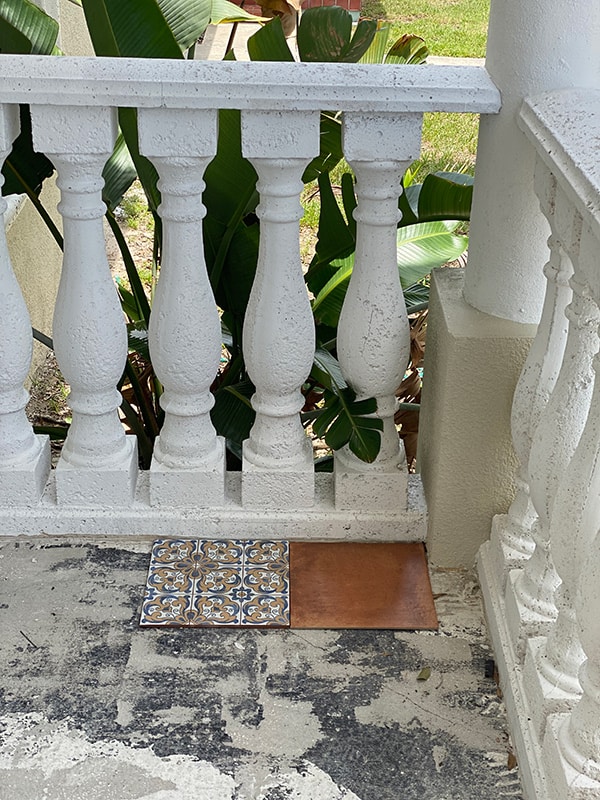
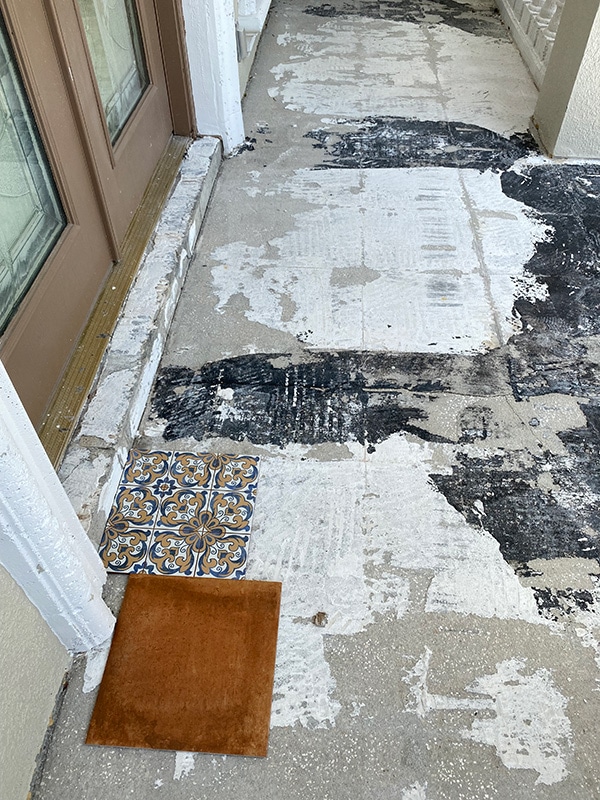
As it turns out, the outdoor-safe floor/wall tile selection is significantly less than indoor tile and harder to find. I eventually narrowed down to these Rustic Cotto tiles:
Paired with this Saint Tropez border and corner tiles:

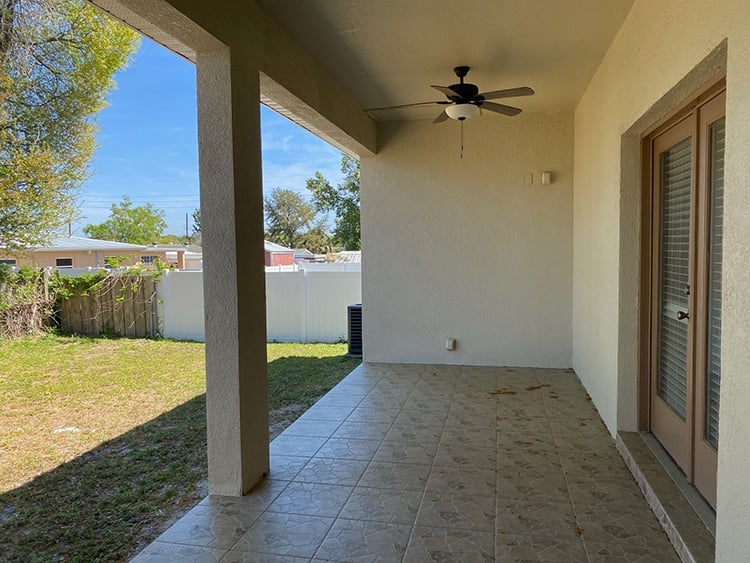
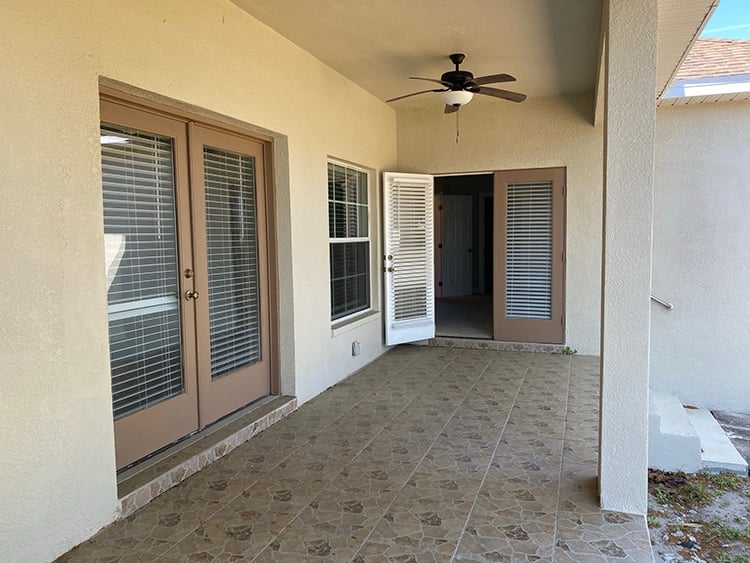
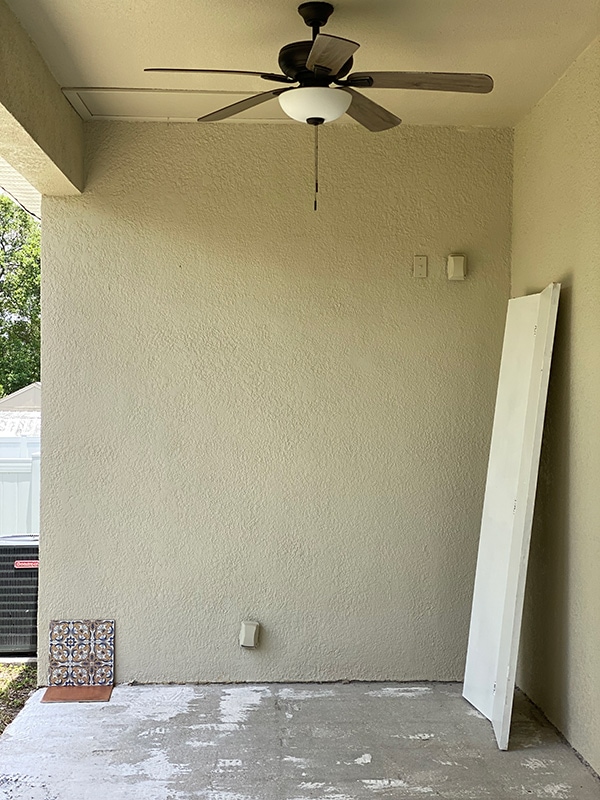
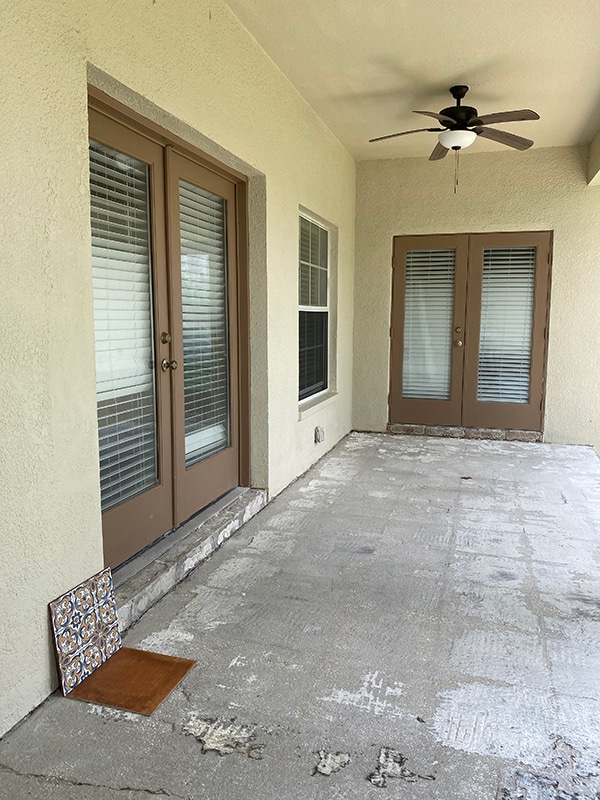
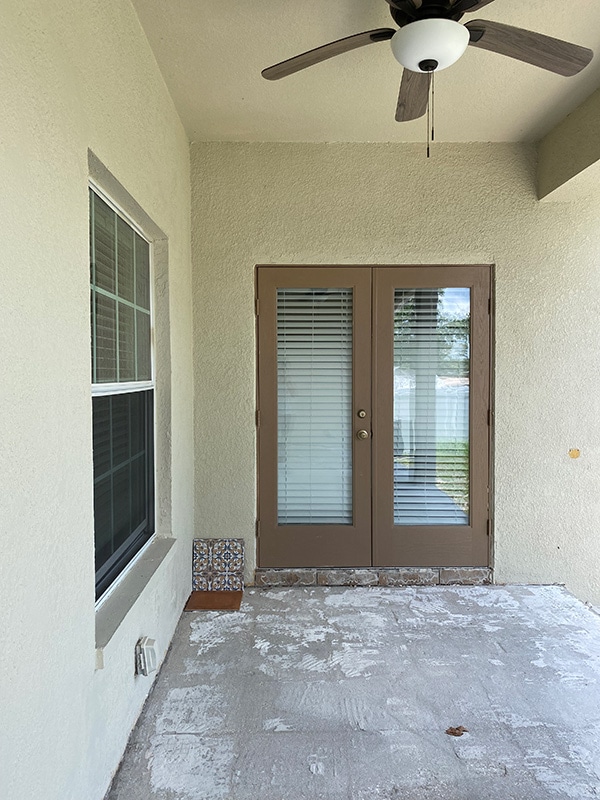
As a reminder, here’s the back patio Before:
I mocked up two different layouts—the first is a ’tile rug’ that I’ve been wanting to use for a long time (similar to the second inspo photo above):
I also loved the idea of a lattice pattern with a patterned tile accent:

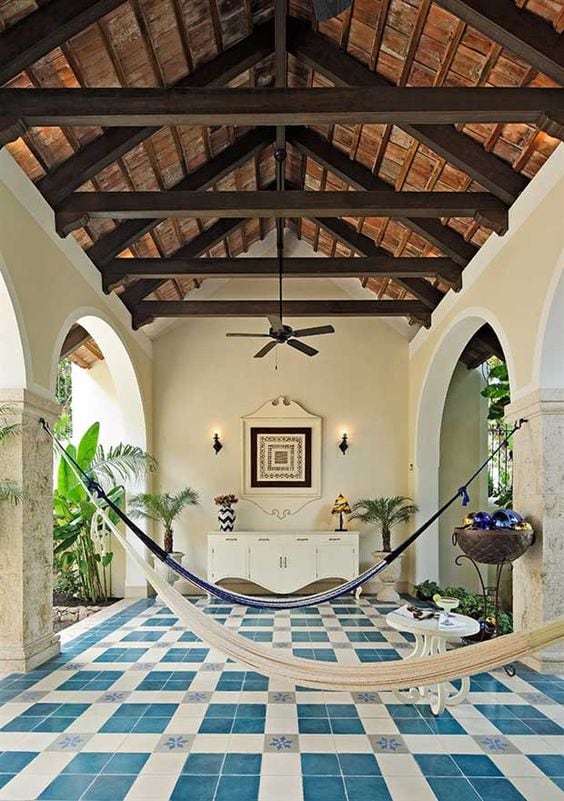
Here’s a real-life example of this:
I would have been happy with either of these options, but I wasn’t over-the-moon excited. Part of me had my heart set on using a patterned tile on the walls (Moroccan-style), but the tile I chose wasn’t right for this application…

So I reached out to Somertile (the manufacturer of the tiles I had chosen) to confirm the indoor/outdoor application for my specific region. Here in central Florida, it only drops below freezing once every two years on average (no snow), and indoor tiles are not made to withstand extended periods of frost. Somertile confirmed that the ceramic tiles I wanted to use should be just fine in my situation—HALLELUJAH! I knew there was a good reason I moved to Florida 😉
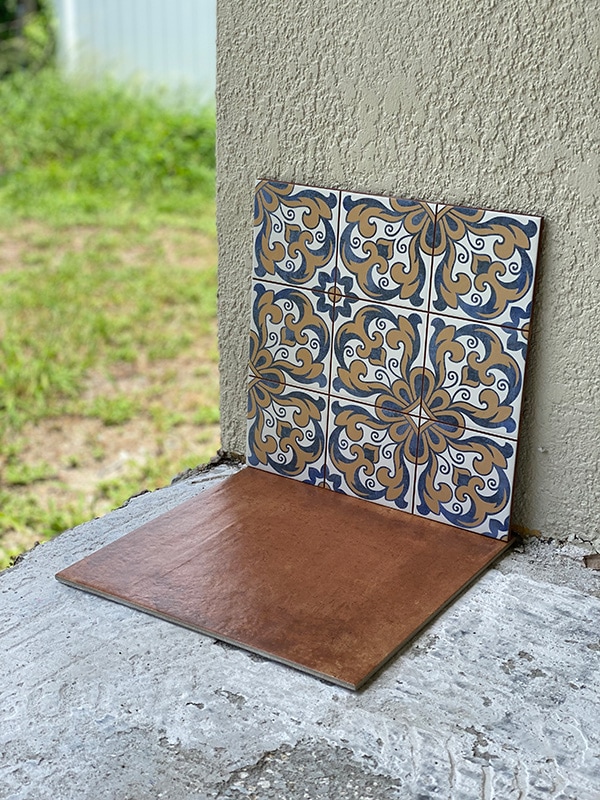
With a whole new world of opportunity opened up, I ordered a few samples to check out in person:
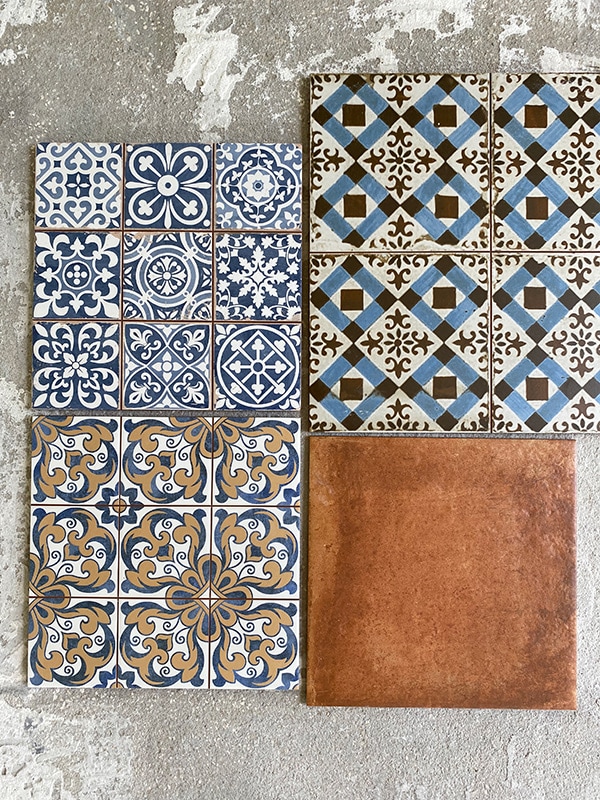
The Rustic Cotto on the bottom right was pretty much chosen already (these are also porcelain and designed for outdoors) and I was 95% sure I wanted to pair them with the Harmonia Royal Bloom on the bottom left.

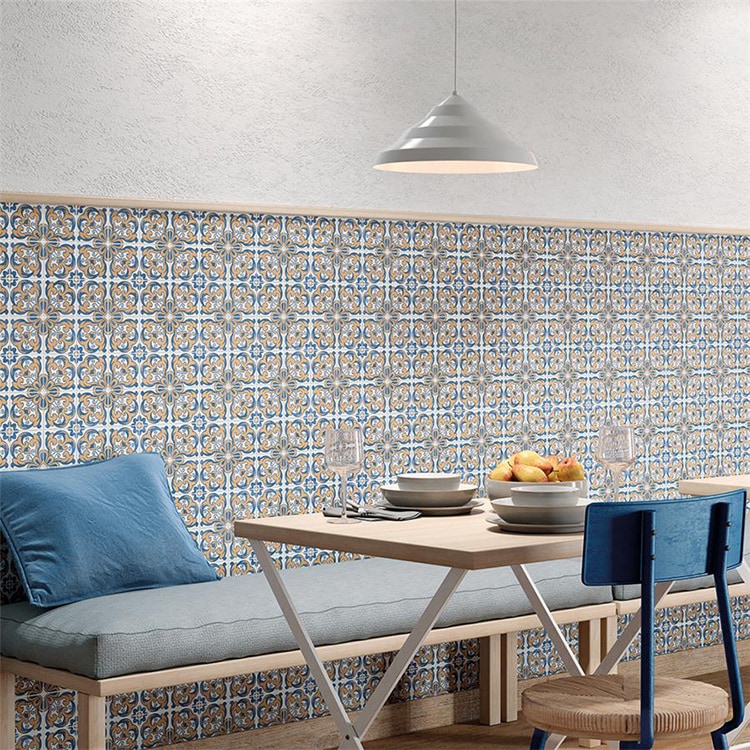
It’s tough to visualize with just one sample of each, so here’s a customer photo I found of the Rustic Cotto tiles installed:
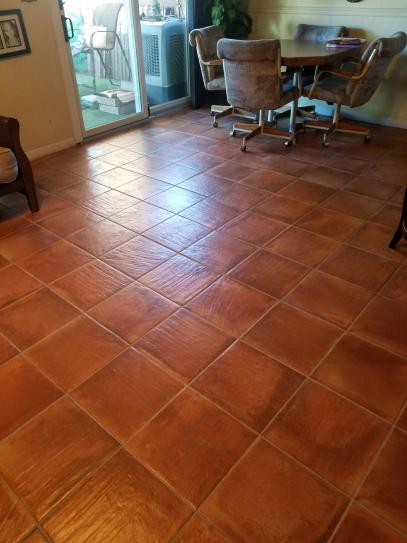
I love the old-world look and textured surface. Unlike raw terracotta clay tiles, these don’t have to be sealed, they wear beautifully and hide dirt/stains (all good things for a rental!)
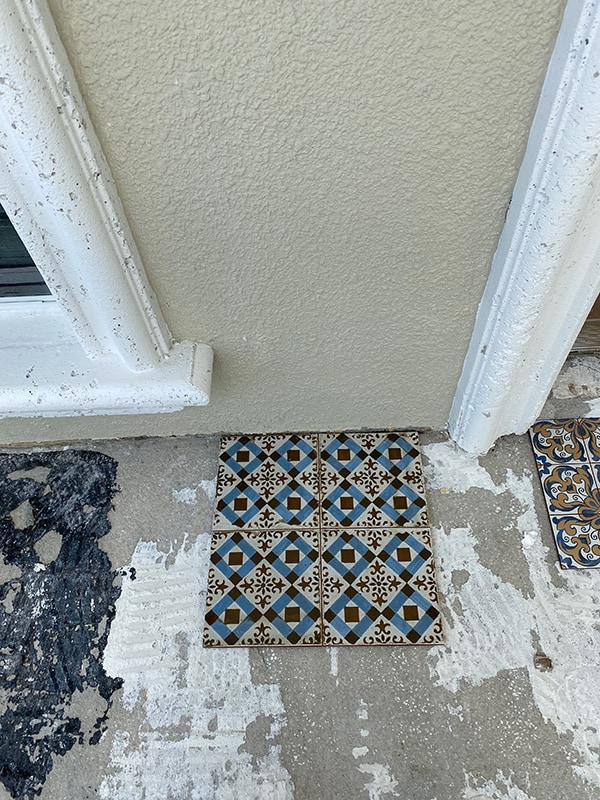
This patterned tile was my favorite option that both coordinated with the cotto tile, and worked well as a wall application on the patio.

Here’s a shot of them from a distance… can you picture it?
Photoshop to the rescue! Not the greatest rendering, but you get the idea. I think the pattern is a really nice mix of traditional Spanish design with a Moroccan flair.
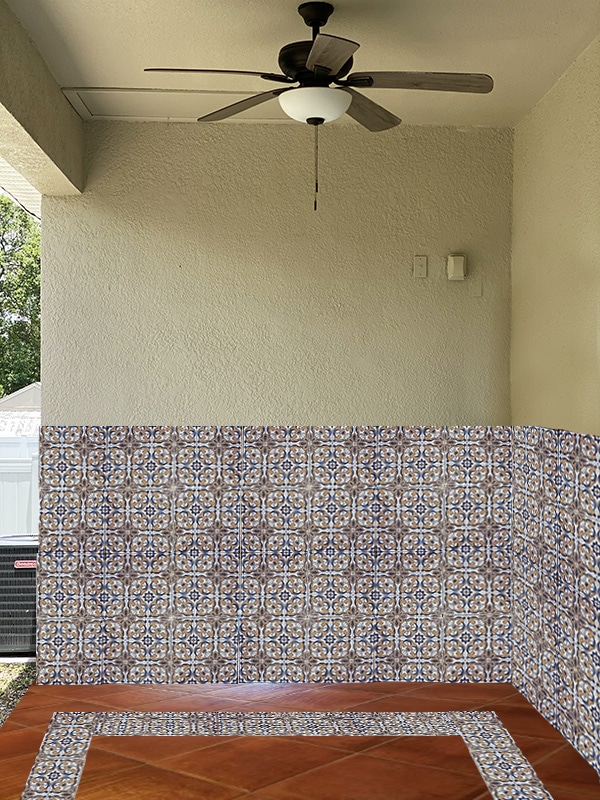
Here’s a mockup I made for the floor layout. I love the idea of using the patterned tile as an inlay rug outline, with the cotto on a diagonal pattern inside.
That way I still get my ’tile rug’ without it being too busy and competing with the wall tile. The patterned tile will extend around 4′ up the wall, and carry around the doors and windows:
I’ll use painted PVC trim to finish along the top edge, and I’m sure I’ll end up repainting the porch exterior white (the doors will also be painted dark). We’ll also be adding DIY dark wood beams along the ceiling.
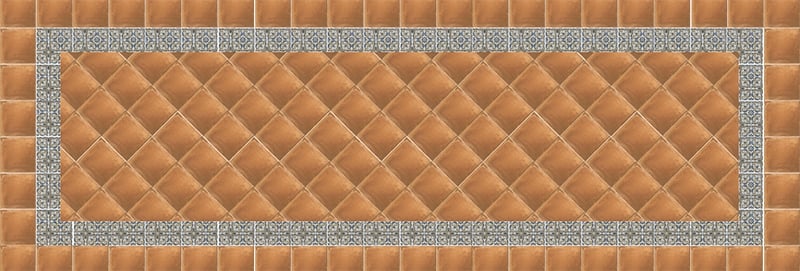
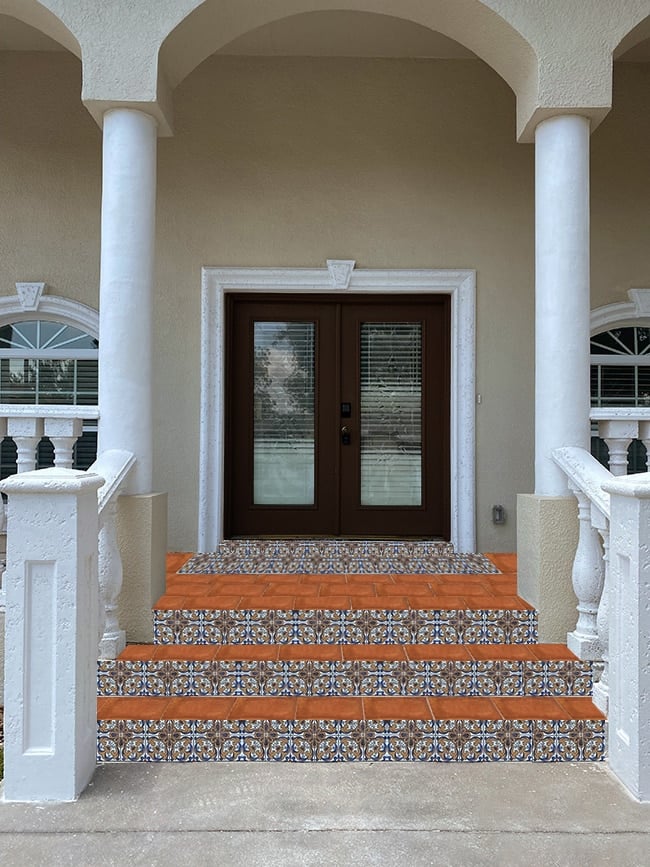
Over on the front porch, I’ll be using the same tiles…
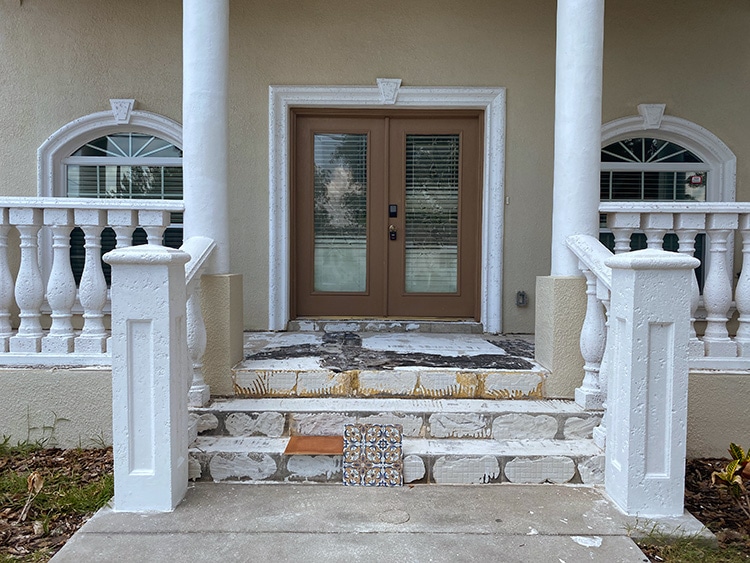
The cotto tile will take up most of the porch, but I’ll add a 7′ x 3′ patterned rug inlay in front of the doors…
And the patterned tile will also be installed on the risers:
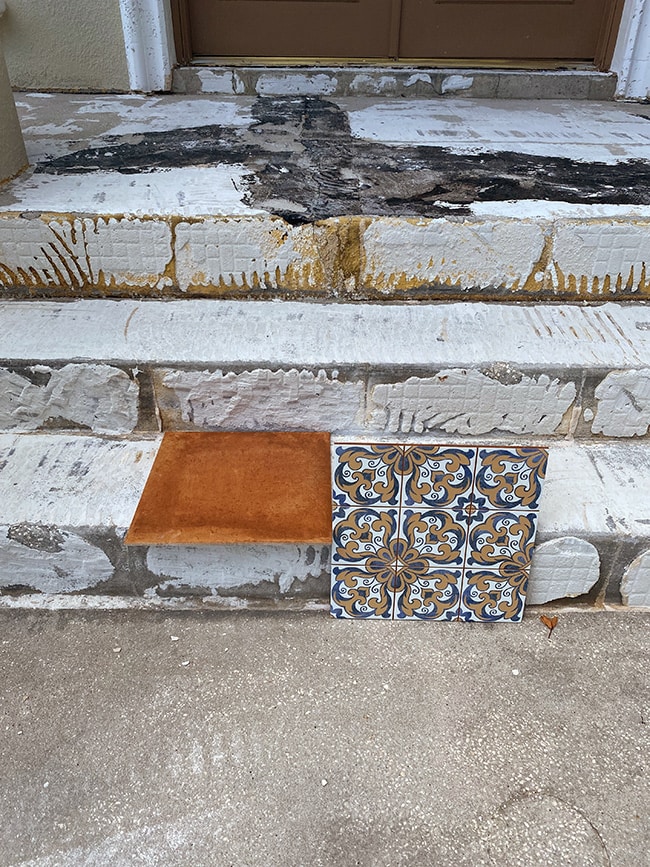
Can you picture it?
I really love this tile as well and may find a spot to use it somewhere else in the house…
Flooring
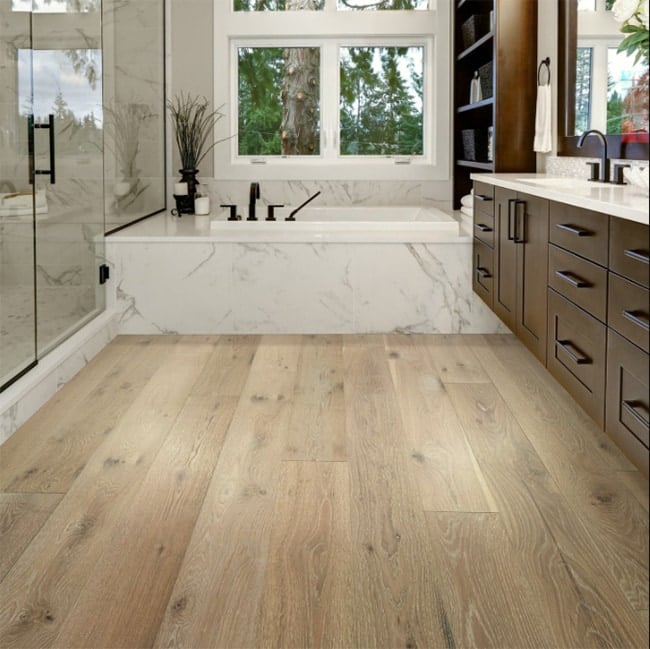
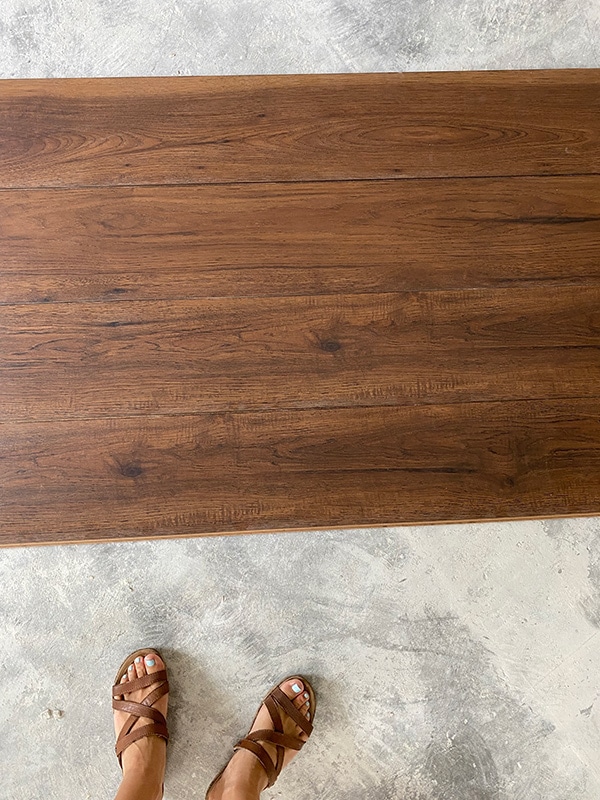
With the exterior flooring figured out, let’s talk about the interior floors! Thankfully this was a much easier decision. I knew all along I wanted to use a light-medium toned rustic style engineered wood floor. That’s what we have in our own home and it was one of the best choices we made—easy to clean, hides everything, wears beautifully and adds the perfect amount of warmth that goes with every décor.
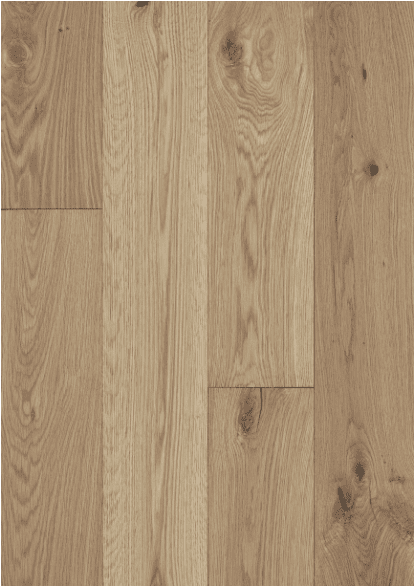
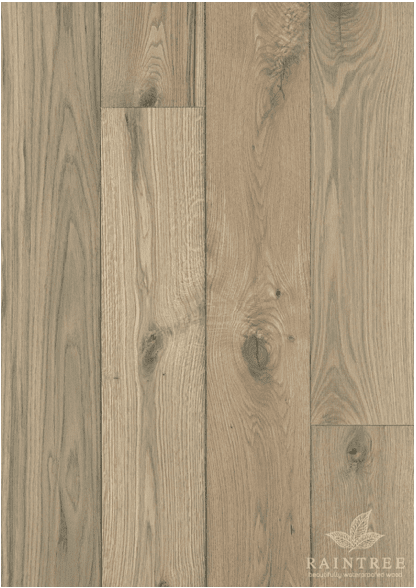
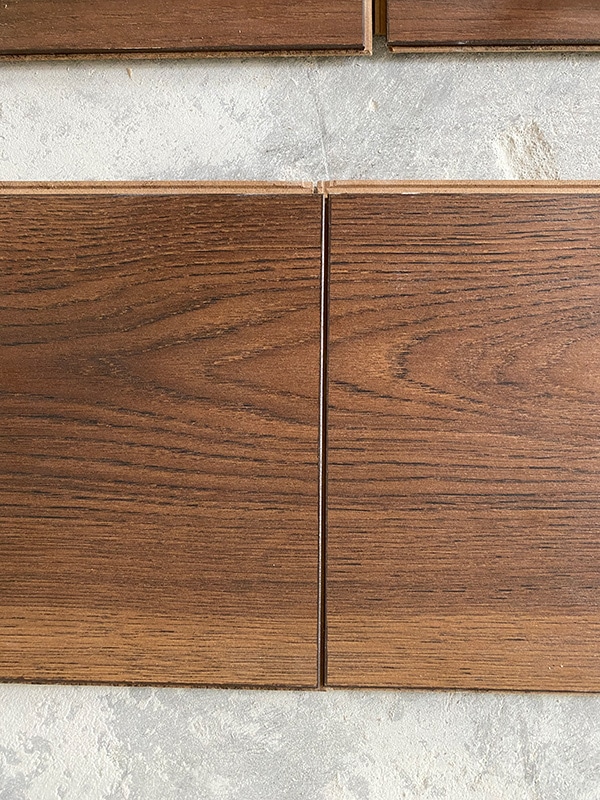
Naturally, I jumped at the chance when Raintree Floors reached out and asked if I’d like to partner and try out one of their flooring products. They carry exactly what I had in mind for this house—wide plank (7.4″), brushed European white oak in a matte finish (just like our current floors). The biggest selling point, though, is that they’re vacation rental friendly: 100% waterproof and scratch-resistant with a lifetime warranty. Yes, please! I narrowed it down to three choices, and I’m waiting on samples to decide in person but here are the contenders:
First Flurry – Aspen Estates Collection

Soleil – Laguna Vibes Collection
Sandstone – Laguna Vibes Collection

Based on the photos online (and other examples on their Instagram), I’m leaning towards First Flurry, but I’m anxious to see these samples in person! Once they arrive I’ll post an update in my stories along with the final decision (and I’ll be sure to document the install process in a future post!). Do you have a favorite?
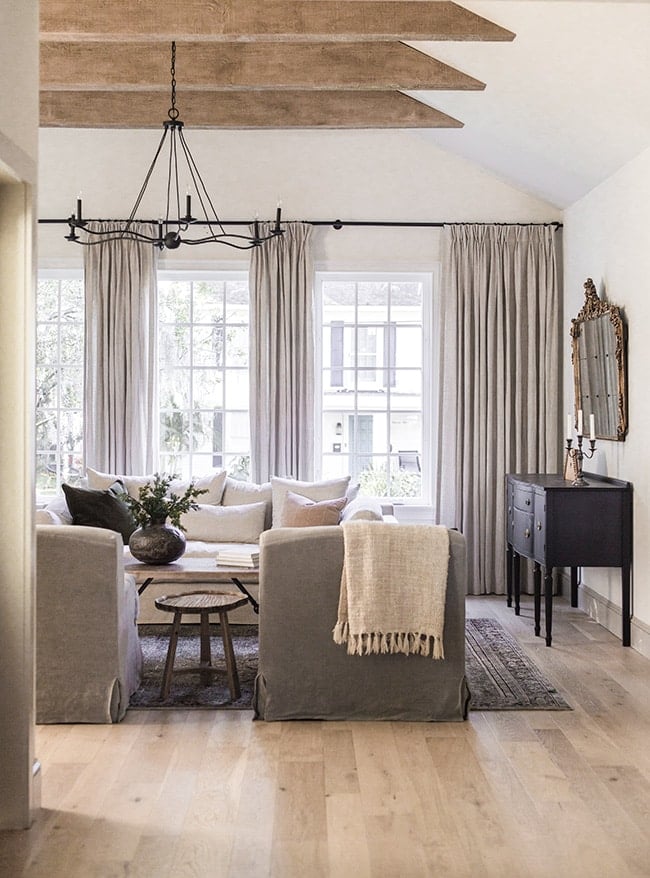
Ceiling
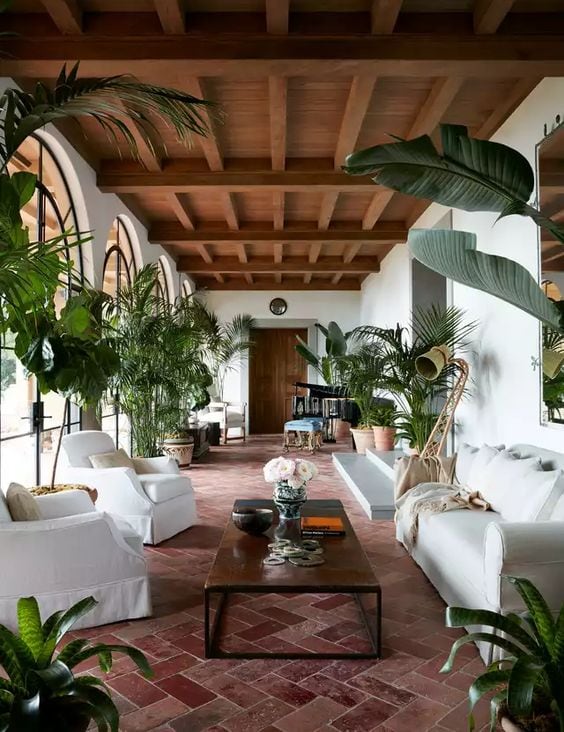
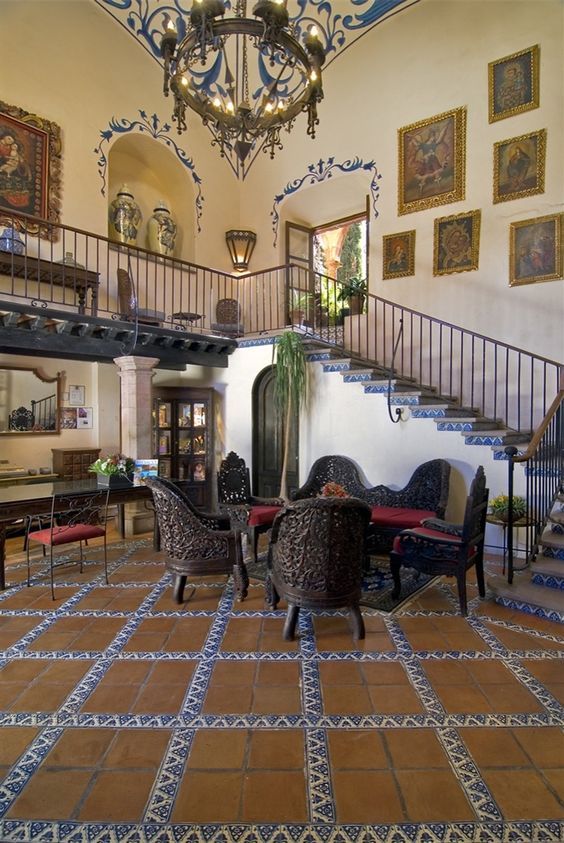
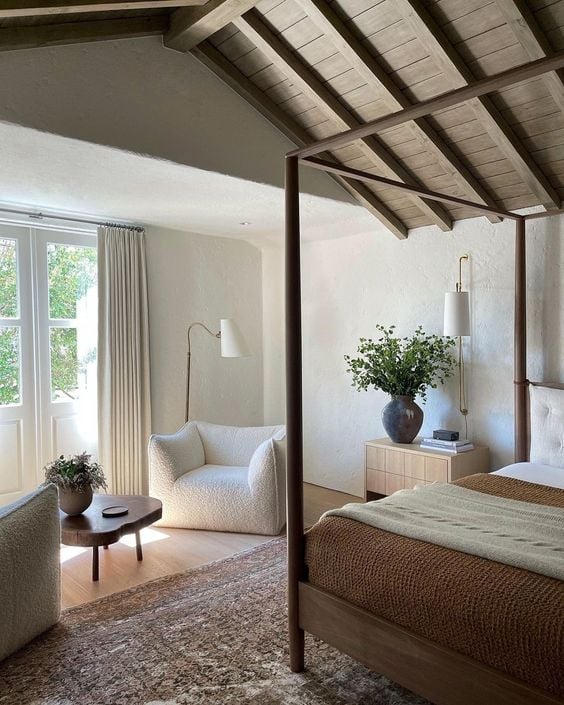
I mentioned in the very first post that the biggest project of this entire house would be our DIY wood plank + beam ceiling in the great room (dining, kitchen, living area). This is one of those non-negotiable design features that I was set on from Day 1—inspired by traditional Spanish-style homes (images from Amber Interiors):

The million dollar question was—how do we do it (for less than a million dollars?!) Hiring out something specialized like this would easily cost upwards of $20k, so definitely not an option. And we are capable of doing this… it’s just going to take forever and be the opposite of fun. But in the interest of saving thousands (and an opportunity to take you guys along on a big challenging DIY adventure) we have committed ourselves to it. Here’s the layout we came up with (beams will be spaced ~38″ apart with planks in between):
The first step was figuring out the best, most cost-effective and simplest way to construct these. If you’ve been to the hardware store lately, you might have noticed that the price of wood is about 270% higher than it was a few months ago (seriously… I wish I was kidding). I’ve built beams using 1×6 lumber before (anyone remember this popular tutorial from 2014?) but with the current cost of wood, that just wasn’t an option.

Not only that, but those 1x boards are often warped and difficult to work with, and we’d have to go through an extra step of staining every board to get the dark wood look.
After trying to think through every option under the sun, I finally settled on a new idea—using budget-friendly, dark ‘wood’ laminate planks. I found this Allen + Roth Adeline Hickory laminate and it was the closest match to what I was picturing.
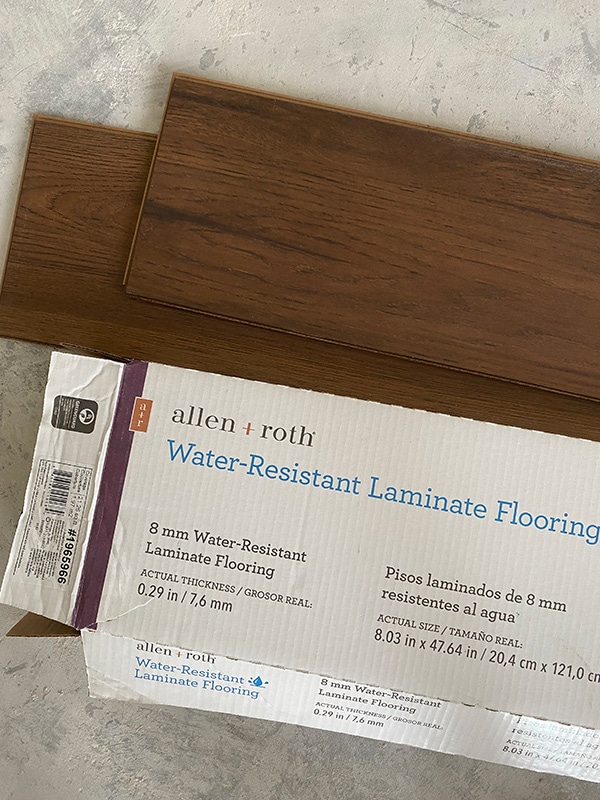
The perfect warm dark brown, extra wide planks necessary to build beams (8″), lightweight/easy to work with, and affordable at $1.59/sf. We needed 1800 square feet so the total came in just over $2900 with our 5% off Lowe’s credit card. Not inexpensive by any means, but still the most budget-friendly option for such a large area to cover.
One bummer is that the planks are only 48″ in length, so we’ll need to join multiple boards together for the beams. But there is a silver lining—the pieces are cut continuously and packaged in the same box (at least the one box I opened). We should be able to match up the pattern, bevel-cut the edges and join them together as seamlessly as possible.
I’ll explain every detail in a future post (and share the entire process on my Instagram) once we get to that stage. But first… more decisions to make!
Paint colors
This choice was also narrowed down before we even began—I knew I wanted the house (most, if not all rooms) to be a clean, warm white. I consulted the white paint expert (Amber Interiors) who shared BM China White and BM White Dove as her go-to warm whites. I also threw in one of my personal favorites, the color of our own interior walls, SW Alabaster.
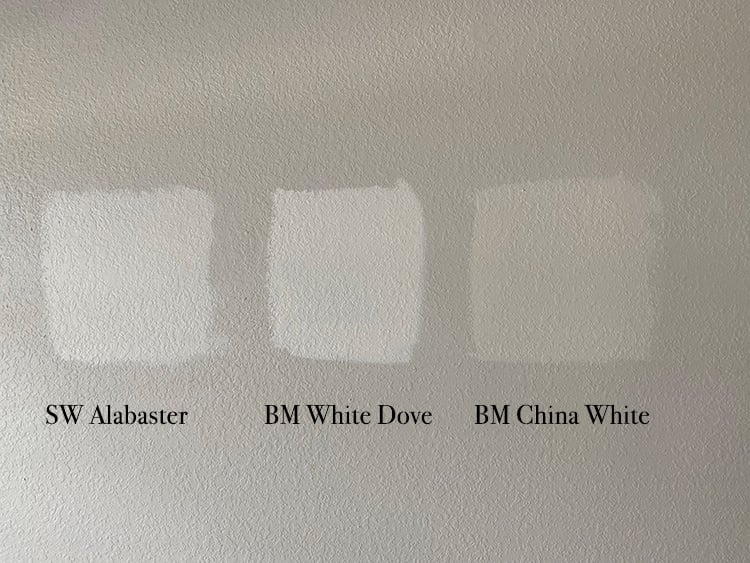
As you probably already know, colors look different in every house, every room, and every wall during different times of day and different lighting scenarios (and especially on different monitors). I painted these swatches (in the same order) throughout different parts of the house, and studied them carefully over time.
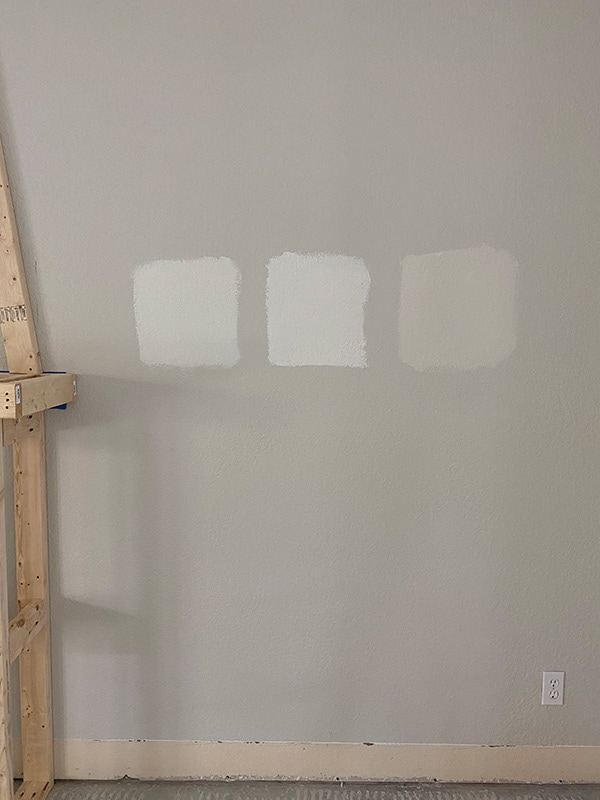
BM China White was surprisingly dark to me—almost like a beige, but that could be because it’s painted on a gray wall and this house doesn’t have an abundance of natural light. Alabaster also looked almost light gray which it is certainly not in real life. Here are the same colors, same time of day, different wall/lighting:
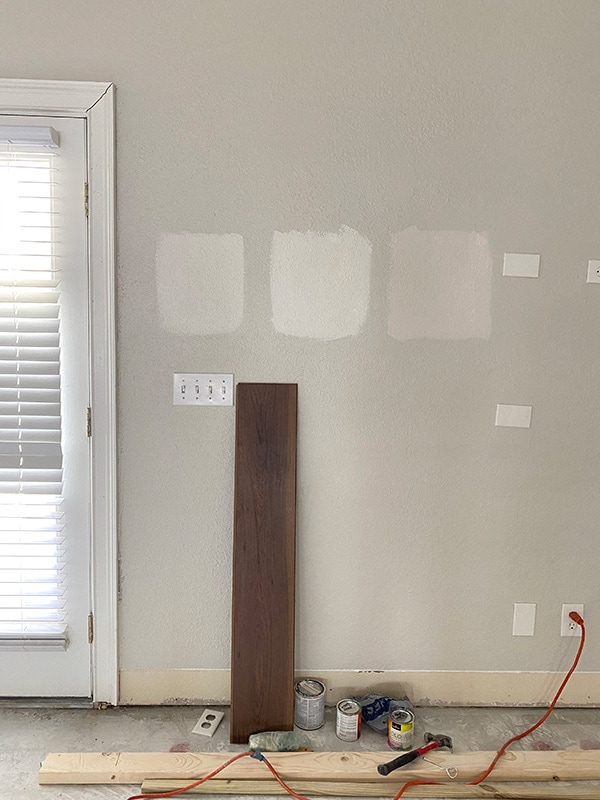
Dove White was definitely the whitest and brightest, but I worry that it’s too stark, and not the most practical choice for a rental (I’ll be using a flat sheen to help conceal the awful texture).
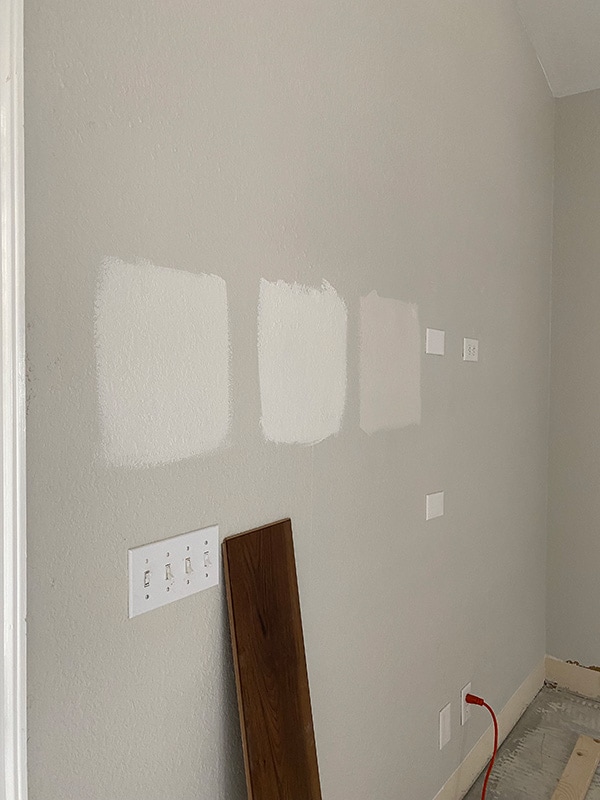
At the moment, I am leaning towards Alabaster as it seems to be a happy medium between the two. It has been tried and tested in my own house and I think it was the perfect choice to use there—I just hope that also translates in this house once the dark wood ceilings and light wood floors are installed. Do you have any other favorite warm white suggestions?
While we’re discussing paint… I think the plan is to keep the trim white as well, and paint the doors an accent color. We’re considering upgrading the cheap hollow core interior doors to this elegant solid core design, and painting them a pale sage/olive green:
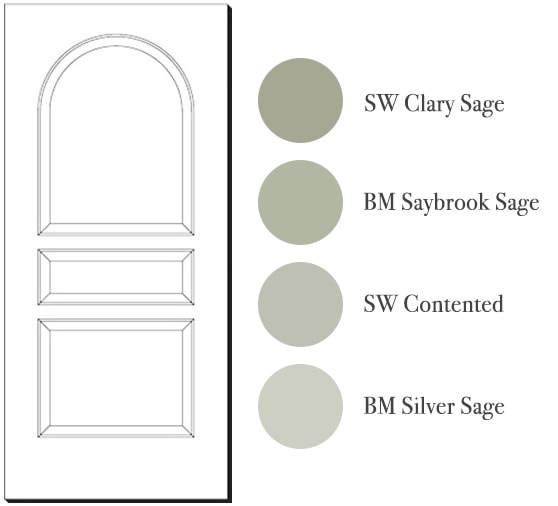
I’ll keep you posted on those final decisions!
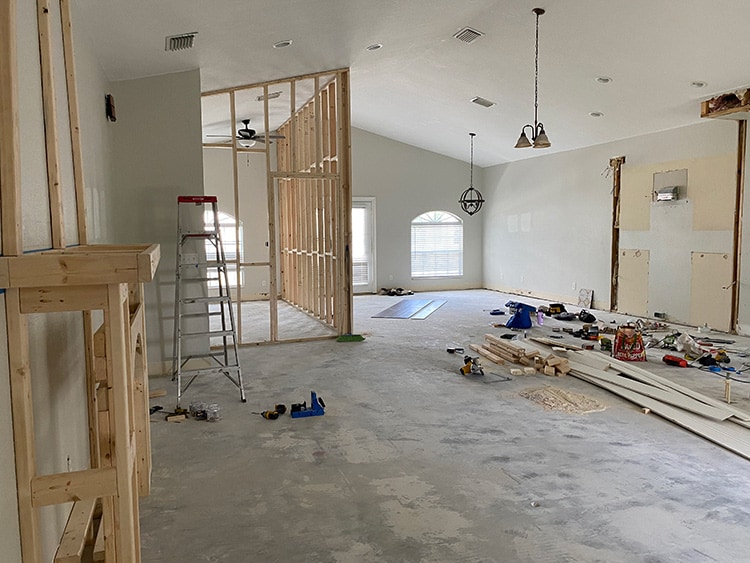
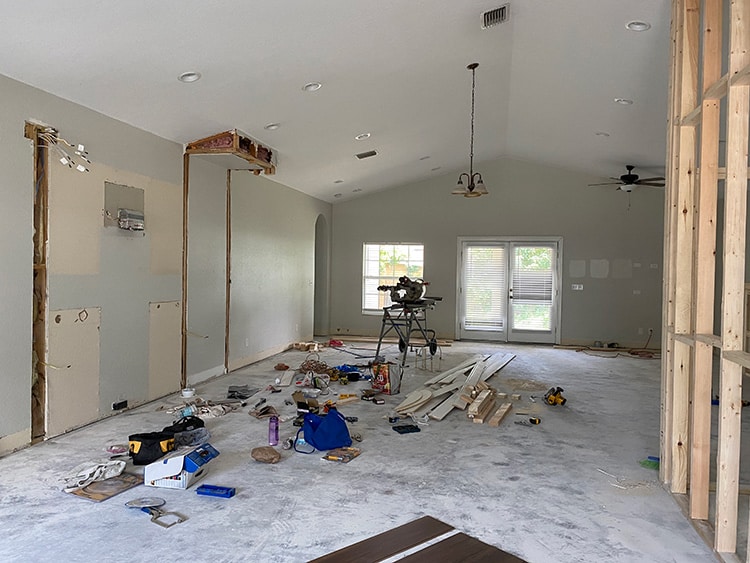
Construction
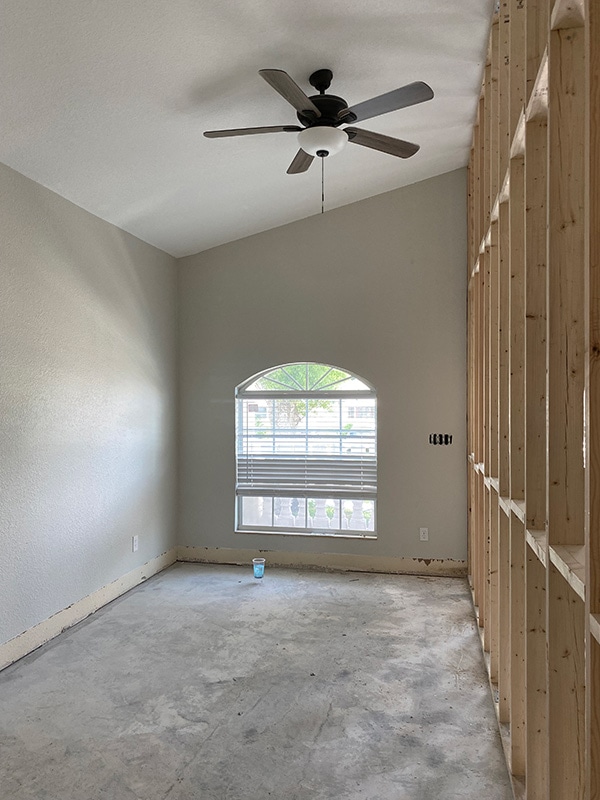
The first thing we did (after ripping out the floor tile) was start framing out the fourth bedroom. I shared a peek in the original blog post, but here’s a closer look:
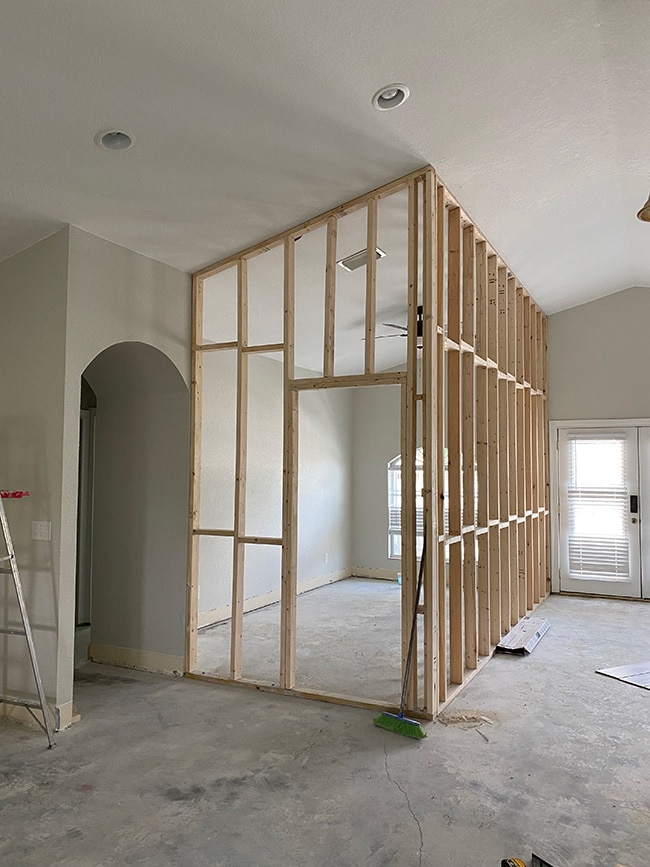
Lucas finished putting up the walls a couple weeks ago, and the next step is to run electric before adding drywall. We’re currently waiting on quotes for both and hope to get those started ASAP.
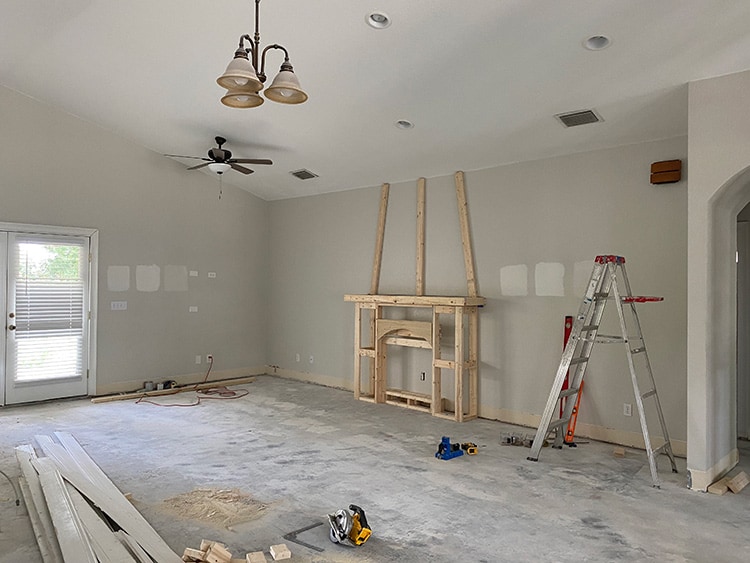
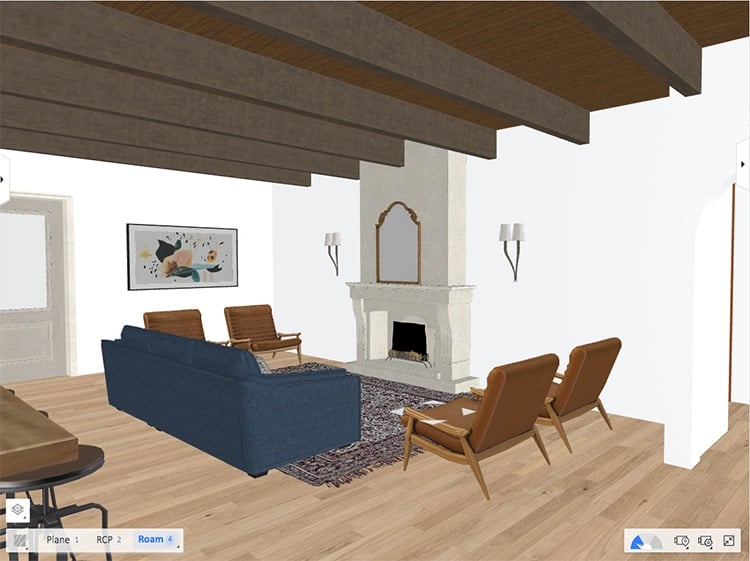
But there is one “fun DIY” project underway—the fireplace!
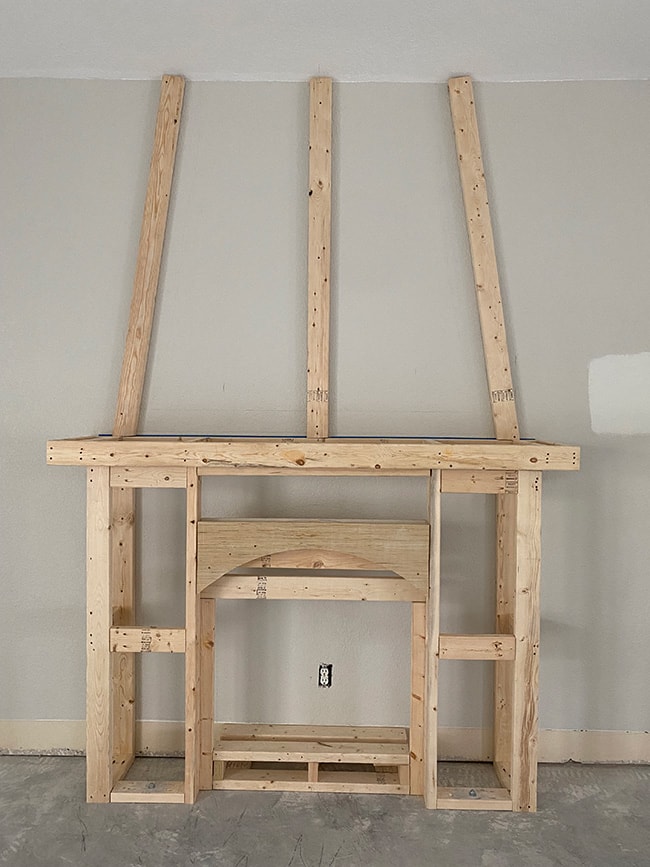
I won’t share too much now because I’ll be posting a big recap/tutorial soon (here on the blog and in my stories) but this has been a nice creative project to design and build (and the one thing we have 100% control over right now!)
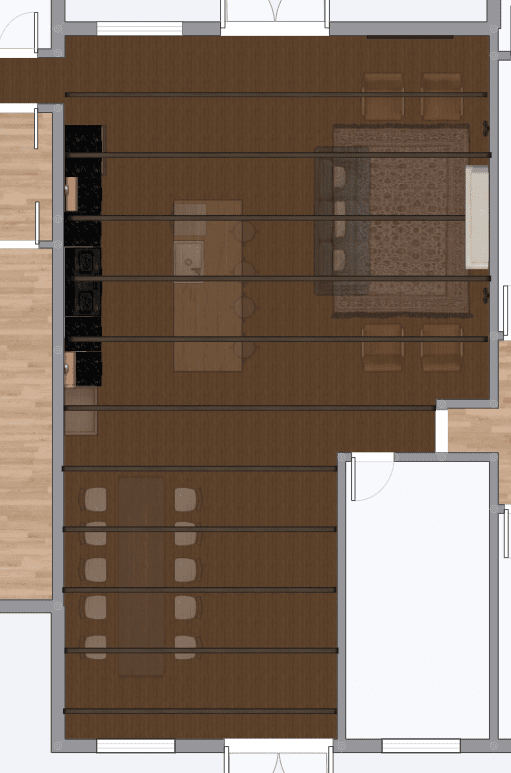
We had a long debate about the living room arrangement, where the TV should go and if it made sense to mount above the fireplace. Long story short, it’s not going above the fireplace (Lucas won that debate, although I agree with him now). My initial thought was to place the TV opposite the sofa/main seating, which would be above the fireplace:
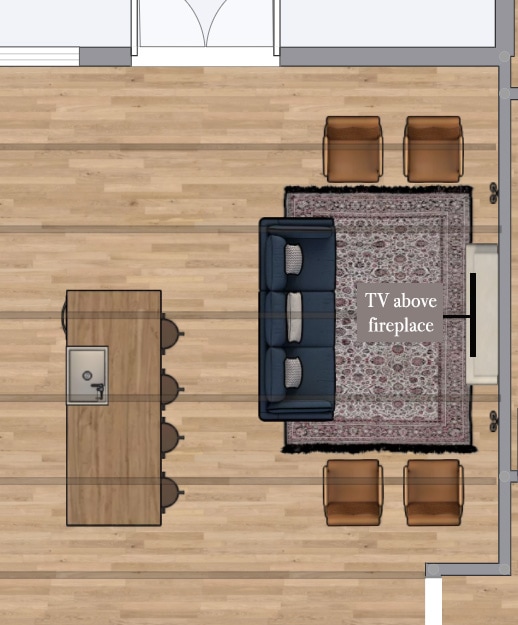
The problem is, the living room is quite narrow for comfortable viewing and TVs are typically too high when mounted above a fireplace. I would hate to install an extension mount (it would never be put back properly by guests/cleaners and end up broken I’m sure) and it would also really take away from the beautiful fireplace focal point. Instead, we decided to mount the TV on the wall next to the patio doors and frame it to look like art (like we did in our playroom).
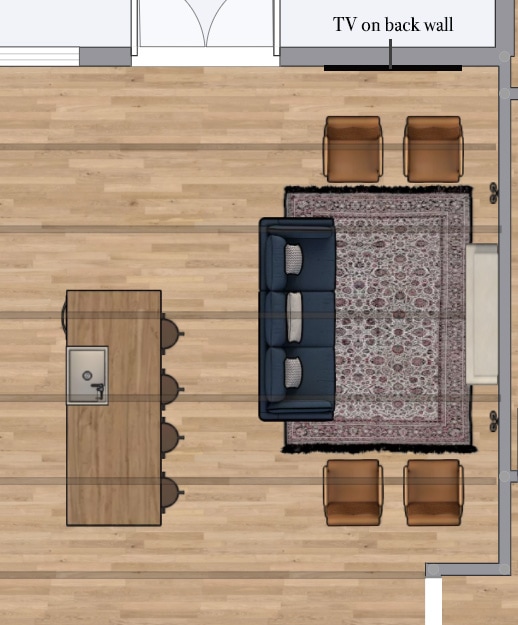
This option allows us to have a larger TV, which can also be viewed from the island bar stools. It will be facing out to the great room so guests can pull up a seat to watch it from a wider viewing area without being shoved into a corner. A flat, stationary mount will prevent people from pulling on it/fingerprints/one less opportunity for something to break. Also, this is a vacation rental, not a permanent residence, so decisions have to be made accordingly. Can you tell we’ve thought about alllll of the scenarios?
I’ve really enjoyed mocking up the floor plan, layout and furniture ideas in Homestyler and it’s making me real anxious to get to the decorating phase!
Up next…
What’s in the pipeline now? Much of our to-do list has to be completed in a specific order, and we are still waiting on some quotes/responses before certain decisions can be made. Here’s what you can expect over the next few months (if all goes well) in approximate order:
- Finish the fireplace
- Electric + drywall for 4th bedroom
- DIY wood beam/plank ceiling
- Run kitchen island plumbing/electric
- Install wood floors
- Interior trim + paint
- Start on kitchen
- Exterior patio/porch tile (can be done at anytime)
- Back porch ceiling beams + electric (can be done at anytime)
Whew—I think we’ve covered pretty much everything for now. I’m hoping to get the fireplace finished in the next couple weeks to share on the blog, so you won’t have to wait too long for another Hacienda update. In the meantime, make sure you’re following along on Instagram for the latest updates. Happy Summer Solstice week!


Lisa says
LOVE the tile choices!! I’m a big fan of BM Silver Sage. Can’t wait to watch the process along the way.
Jenna Sue says
Thank you Lisa! So glad you are excited about this project too! 😀
Leslie says
Such a fun post to read, Jenna! This was my favorite line:
“it’s just going to take forever and be the opposite of fun.”
lol lol lol!!
I am HERE for that wood ceiling!
Jenna Sue says
Hah! Can you tell how much I’m looking forward to this project? 😉 In all honesty though, I am pretty excited to see it come together!
Julie Rossman says
I’ll have to add my vote for Shoji White, I love it’s warmth but it’s not too yellow. Also, why not put the TV to the side of the fireplace?
Jenna Sue says
Hi Julia, we considered that but it would just be in an awkward spot, within a couple feet of one of the chairs and not great for viewing. We’re also installing sconces on either side of the fireplace, and it would throw that wall off symmetry.
Tracy Anderson says
Really diggin’ this style! This house is going to be beautiful when you are done. And having just done some DIY at our house… I truly admire you both for being willing to tackle all this.
In your rendering of the fireplace/living room, there are 4 brown leather (I assume) chairs. Are these just place holder images or actual chairs you are considering? It’s EXACTLY what I’ve been looking for but haven’t yet figured out where to find!
Thanks!
Jenna Sue says
Thank you Tracy! Those chairs are just placeholders but I am planning on using similar brown (faux) leather chairs. I’ve seen them all over the place– Amazon, Wayfair, Walmart and Target all carry good affordable options!
Ashley says
What about BM Swiss Coffee or SW White Flour?
Ashley says
Ooh! Or SW Greek Villa?!
Jenna Sue says
Forgot about that one, it’s a touch warmer than Alabaster so that could work! Plus, I’m just really partial to the name 😉
Jenna Sue says
Ahh there are so many whites to choose from, hah!
Karen says
The opposite of fun, huh? Oh how many projects my husband and I have had to really arm ourselves with grit and get it done! The end and beginning are def fun!
Cant wait to see this to the end! Y’all already amaze me.
Jenna Sue says
Haha agreed! We’ve been through these enough times to know the drill 😉 At least Lucas is much more excited about this project so he will have to keep the morale up when we’re in hour 139 ;D
Gina says
You are amazing! I cannot wait to see more!
Jenna Sue says
Thank you so much Gina! I cannot wait to get to the good parts! 😉
Carly says
That is Shoji White SW#7042
Carly says
Great ideas love the tile choice! 2 things, in doing multiple beams in a great room another option is a simple drywall beam that is then wallpapered in a wood look print. I have scene it done multiple times in a FL house and may do it to my great room. Also on white paint colors I recently did the entire kitchen in SW #7042 CShoji White. It was a warmer white with no yellow undertones. Check it out to compare! I had not used it before but the builder had been using it quite often when owners needed a slightly warmer white. I loved it!
Jenna Sue says
Thanks Carly! I think I actually tested Shoji white for our exterior and still might have a sample of it. I will give it a shot!
Lilly T says
This is so cool and exciting!!! I would love to see how Lucas framed that room!! I need to do that to enlarge our bathroom and I’m about to do it myself since I can’t find a contractor. Can you write a post? I’m sure it’s “easy” but I’ve never done it and would be helpful to see how you guys did it!!!
Thanks! <3
Jenna Sue says
Thank you Lilly! I think he just winged it (after his experience framing our garage and watching YT videos) so unfortunately he didn’t document that part. If we ever frame out a room again, I will make a note to share a tutorial for it 🙂
Noelle says
Jenna you and Lucas never cease to amaze me! I can’t wait to see the finished rennovation!
Jenna Sue says
Thank you Noelle! I think this one going to be real special when it’s done 🙂
Kat says
It’s going to be beautiful. We used a warm white called Soft Focus by Behr. It’s really lovely.
Jenna Sue says
Thank you Kat! I don’t have a lot of experience with Behr but I will have to check that one out 🙂
Rachel says
Love the direction you’re going with this. With kindness and love, can I point out that you have a faux beam dissecting the fireplace in a way that a real beam could not? I know faux beams can get away with this, but it tips off the brain that something isn’t quite right.
Jenna Sue says
Yep, I’m okay with that! The only alternative is not having beams (or spacing them apart multiple feet) and that is just not an option 😉
Brittany says
love all the updates and details!! really curious to see how all the tile turns out ?
Jenna Sue says
Thanks Brittany! I’m excited to try something completely different with this house. It has been fun to design!
Kimberly says
Wow that was a lot- Y’all are awesome! I’m really looking forward to the ceiling and fireplace projects ? the tile is beautiful and I love the Spanish look your going for, so fun!