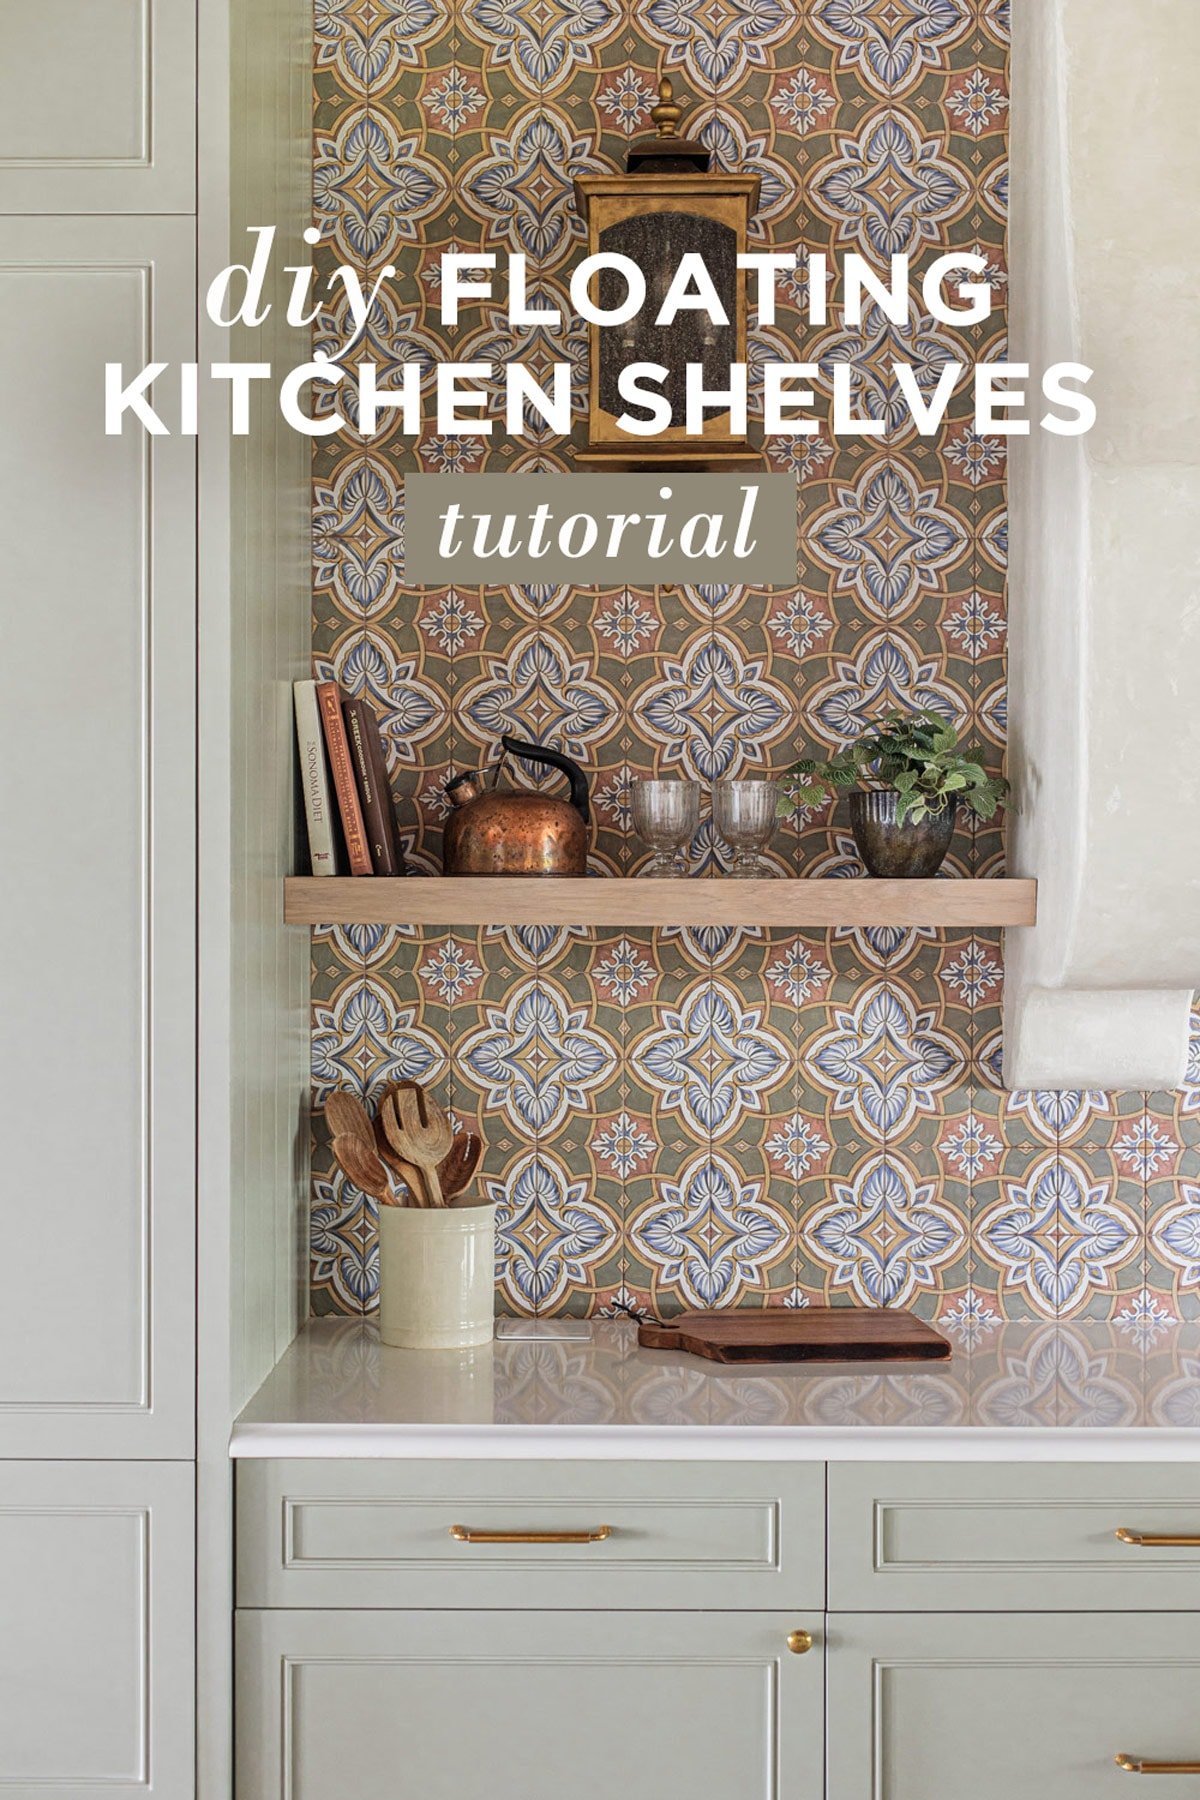
If you are looking for a simple way to install floating kitchen shelves without having to buy and drill for hardware, this post is for you! This technique will give you professional looking results, and ensure a perfect fit with no gaps. Keep reading for the full tutorial with my best tips and tricks!
If you want to add floating shelves to your space, there are many options and decisions to be made. Here are the main considerations:
Jump to:
Floating shelf choices
- How to mount the shelves
- Install before or after tile
- Thickness, depth, length and placement
- Wood species
- Stain or paint
You can purchase floating shelf brackets and use solid wood slabs, which we did in our Heights House kitchen. I’m happy with the way they turned out overall, but the install was tricky since they were enclosed on three sides that weren’t perfectly square. This resulted in gaps on the edges (and scuffed up paint & lots of cursing trying to shove them in place).
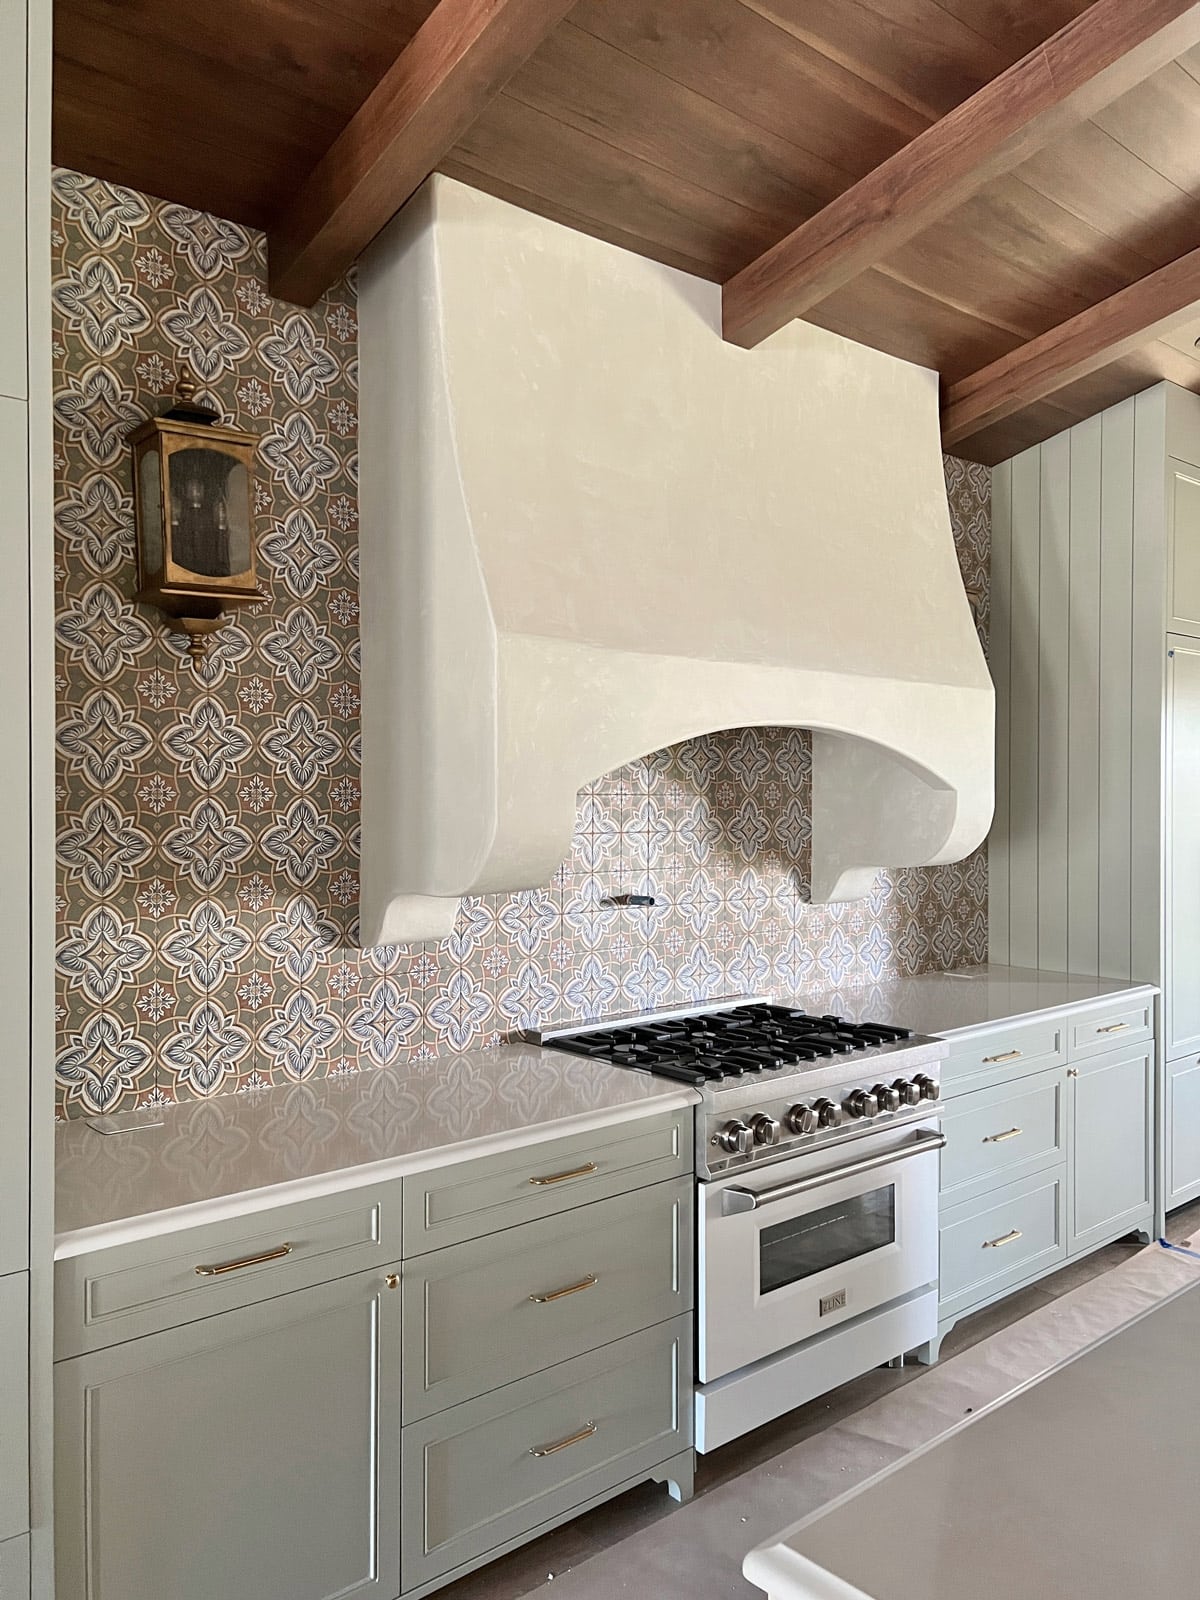
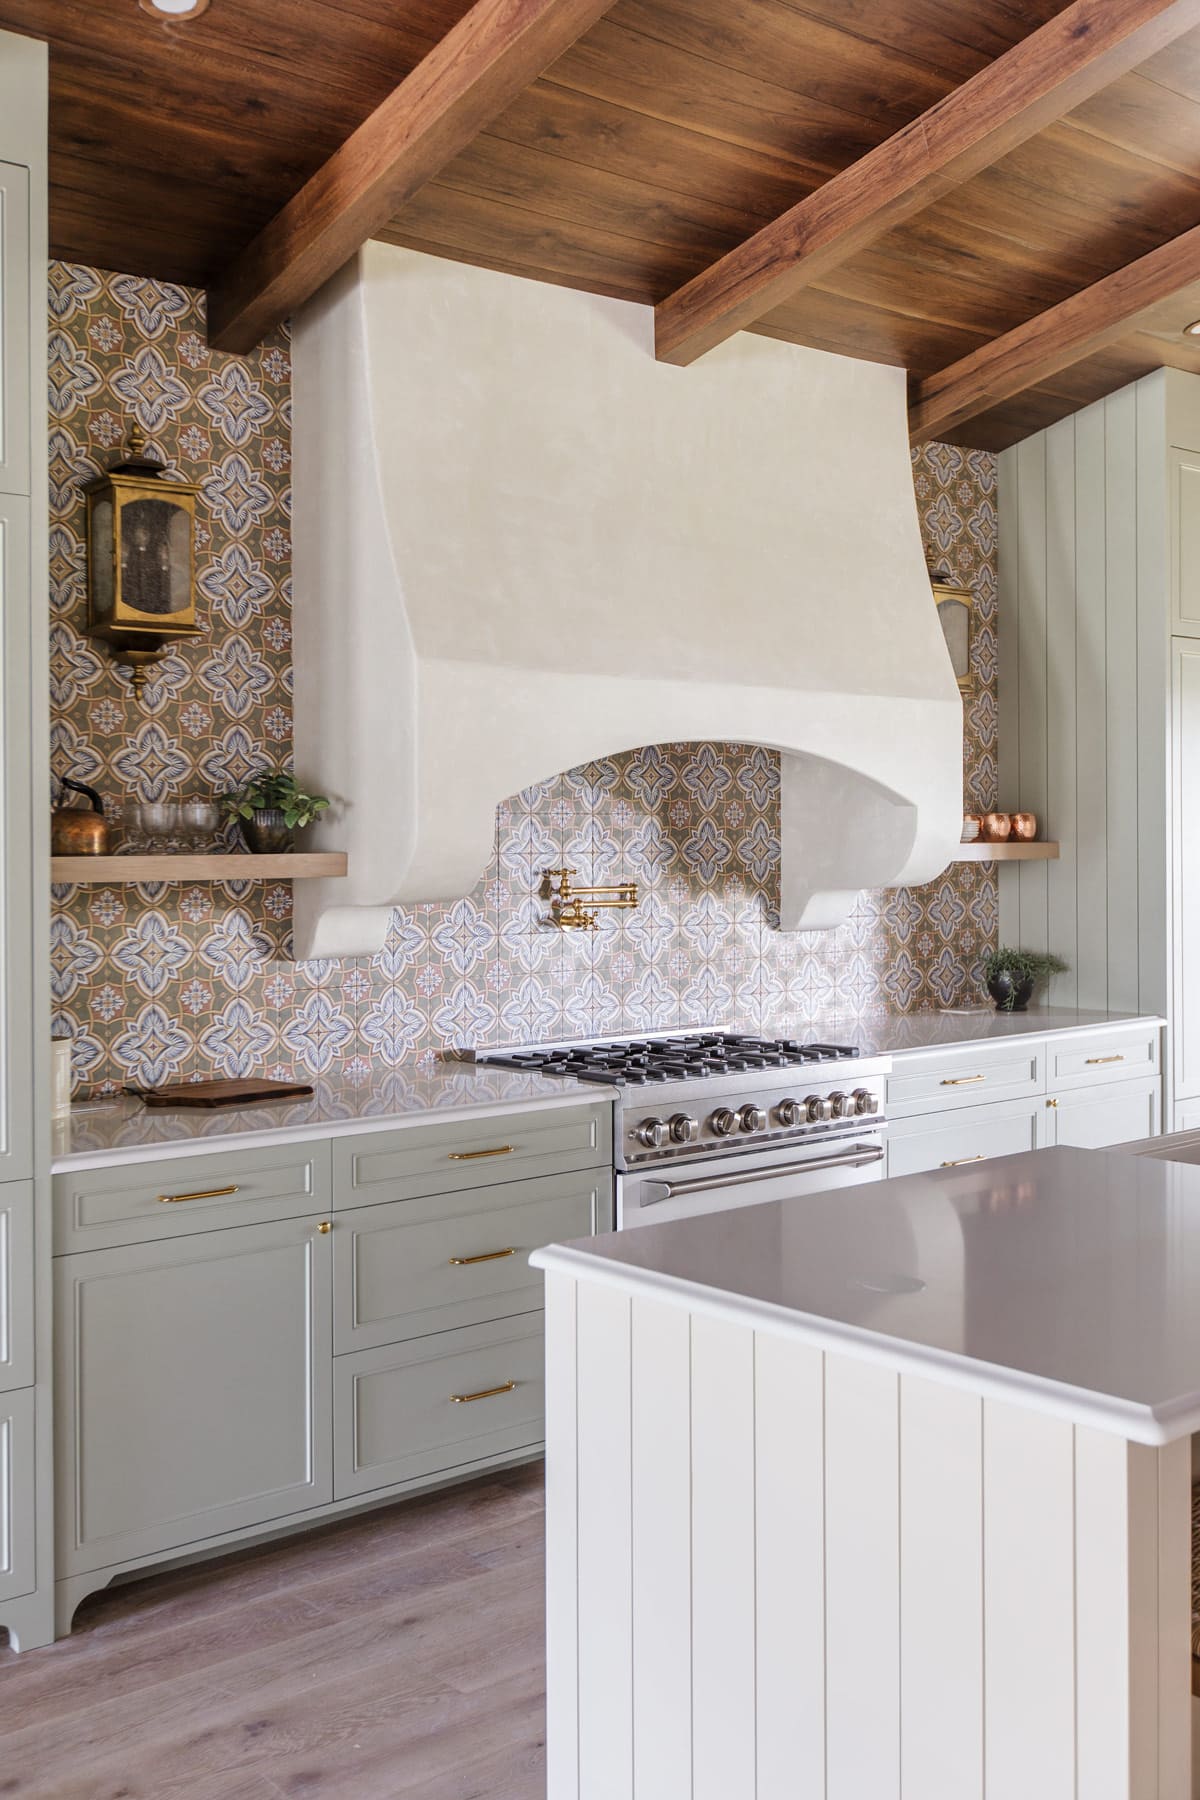
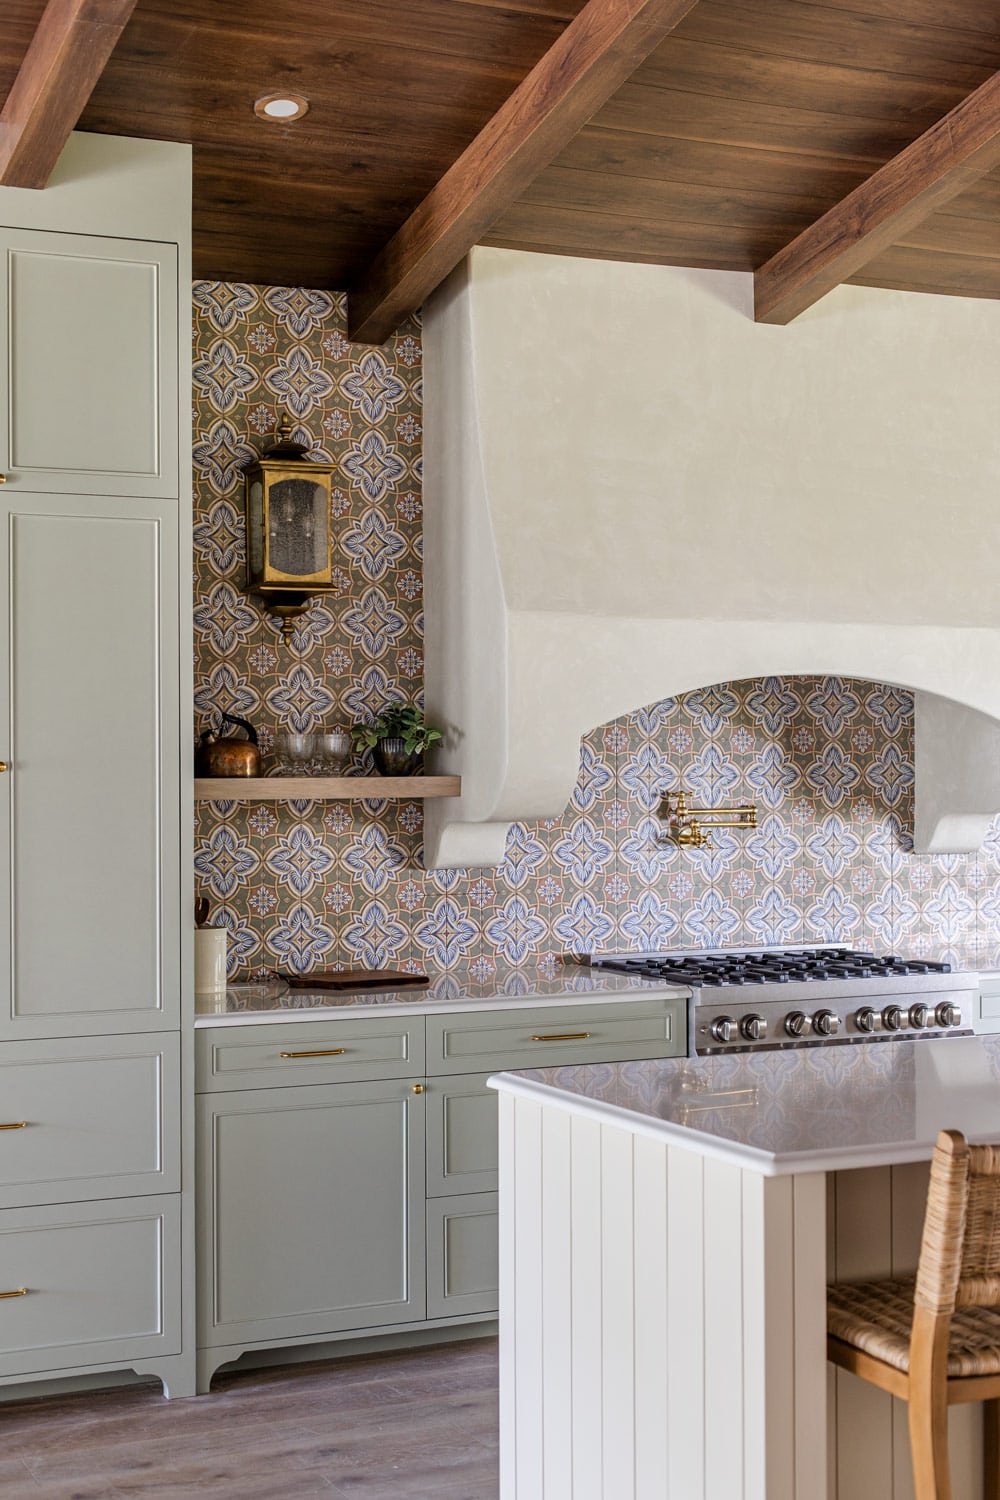
We had the same situation with the Hacienda kitchen—an alcove between the range hood and cabinets—so this time I wanted to try a new technique. In order for the shelf to fit perfectly in a not-perfectly-square alcove, we had to assemble and build the shelves in place.
Fortunately, this method is easier, and I’ll show you just how we did it!
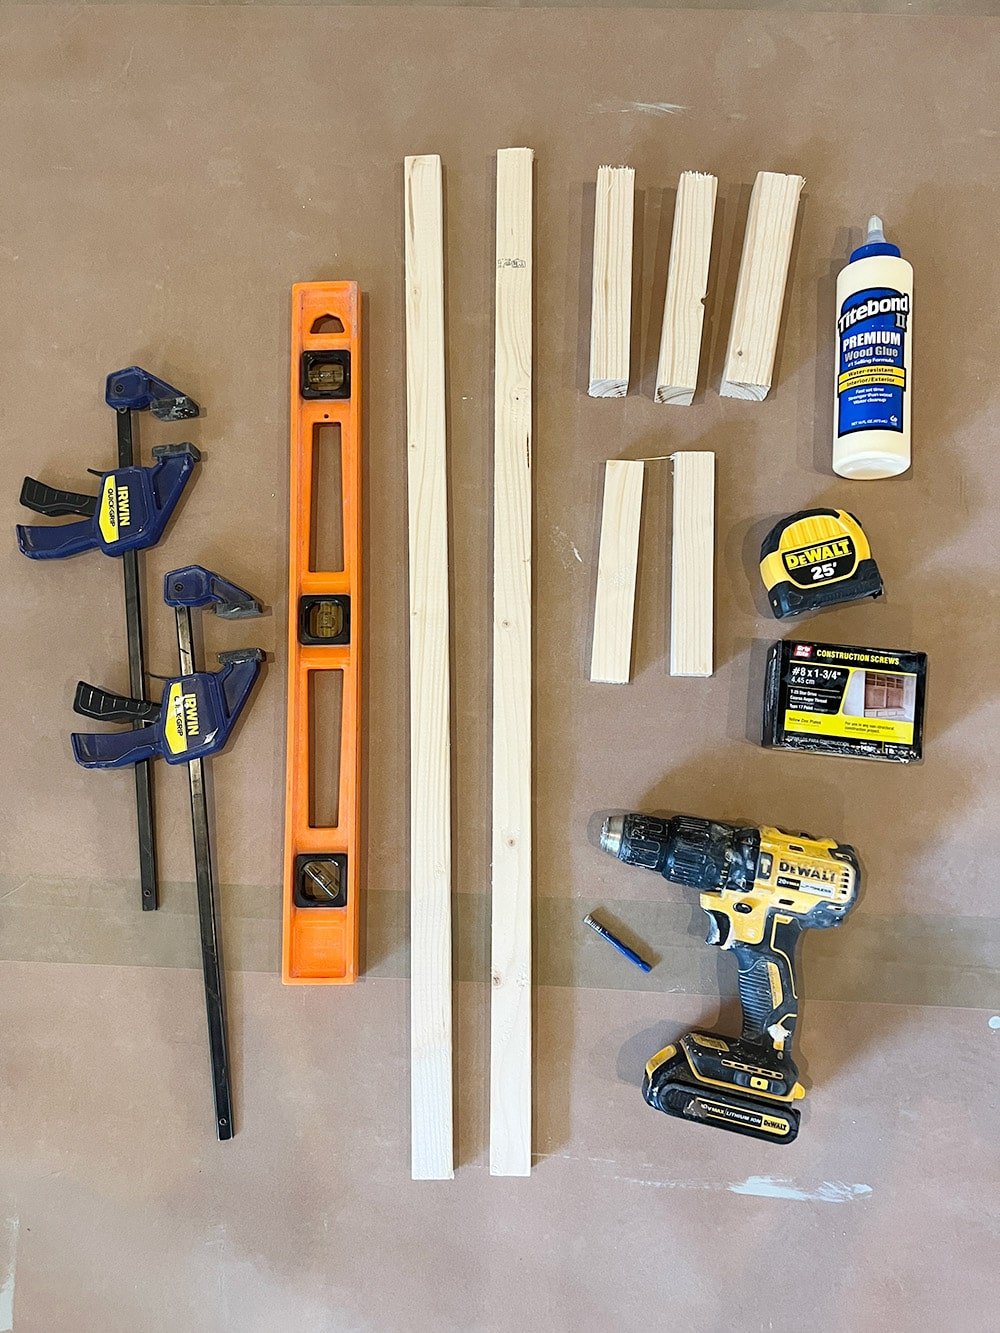
Materials
(for one 10” x 3’ shelf)
- ½” 2×4’ white oak plywood panel (you could also use ¼” white oak)
- (2) 1x2x8′ board (or a 2×4’ ripped down)
- Wood screws (we used 1½” – 3″)
- Wood glue
- Wood stain and sealer
Tools
- Drill
- Impact Driver
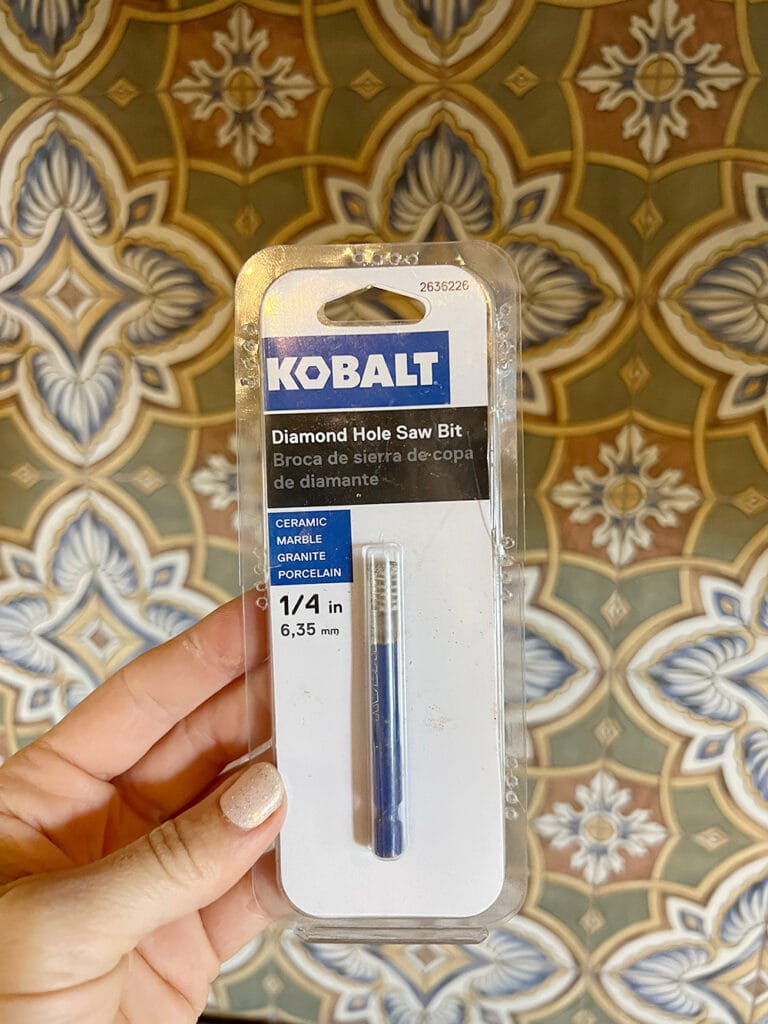
- Diamond or carbide bit (if drilling into tile)
- Miter saw
- Table saw
- Kreg jig
- Sander
- Clamps
- Level
- Stud finder
Step 1: Locate the studs and shelf placement
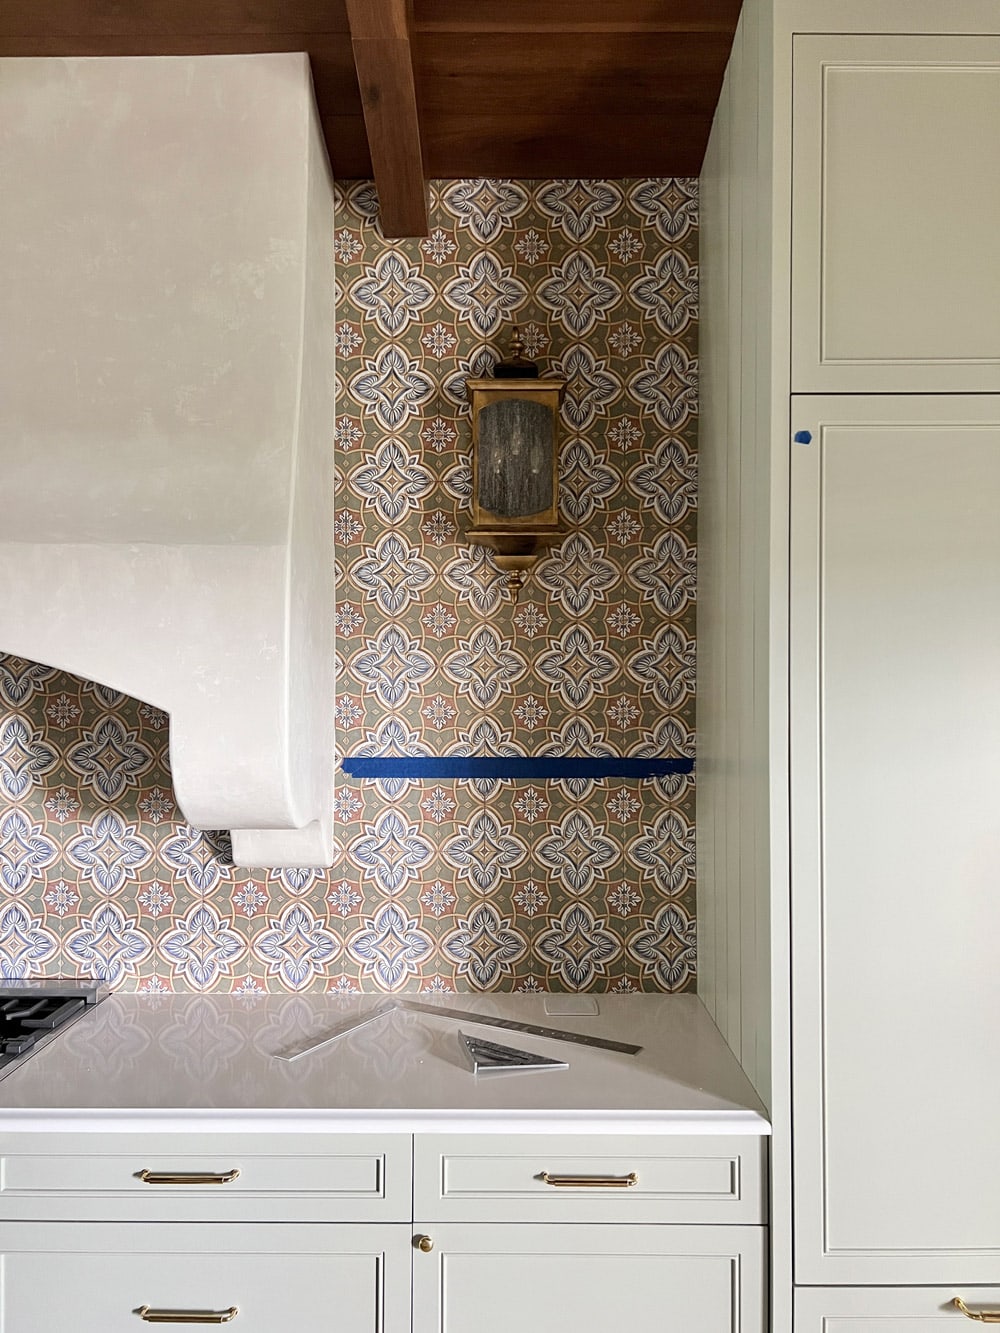
Our walls are tiled up to the ceiling, so we planned ahead and marked their locations beforehand. If your walls are tile, try using a stud finder above or below the tile and mark a plumb line. You can also try using a special deep sensor stud finder, but they aren’t always the most reliable.
If your walls are drywall, lucky you! Use a normal stud finder to mark each one on the wall. You want to hit as many studs as possible (at least two). If that’s not an option for whatever reason, you can use heavy duty toggle bolts.
Decide how far up you want to mount the shelf. I chose 20″, which is a comfortable height for accessibility, but not low enough to get in the way of countertop items.
Step 2: Measure and cut 1×2’s for frame
You can use pretty much any type of wood to build the support frame. If you don’t want to have to make rip cuts, 1×2’s are your best bet.
We had scrap 2×4’s lying around, so we ripped those down to 3/4” x 1¼” strips (and 1¼” x 1¼” for the 3 center supports). This would give us a total thickness of 2¼” using ½” plywood, and I didn’t want the shelves to be any thicker (just personal preference).
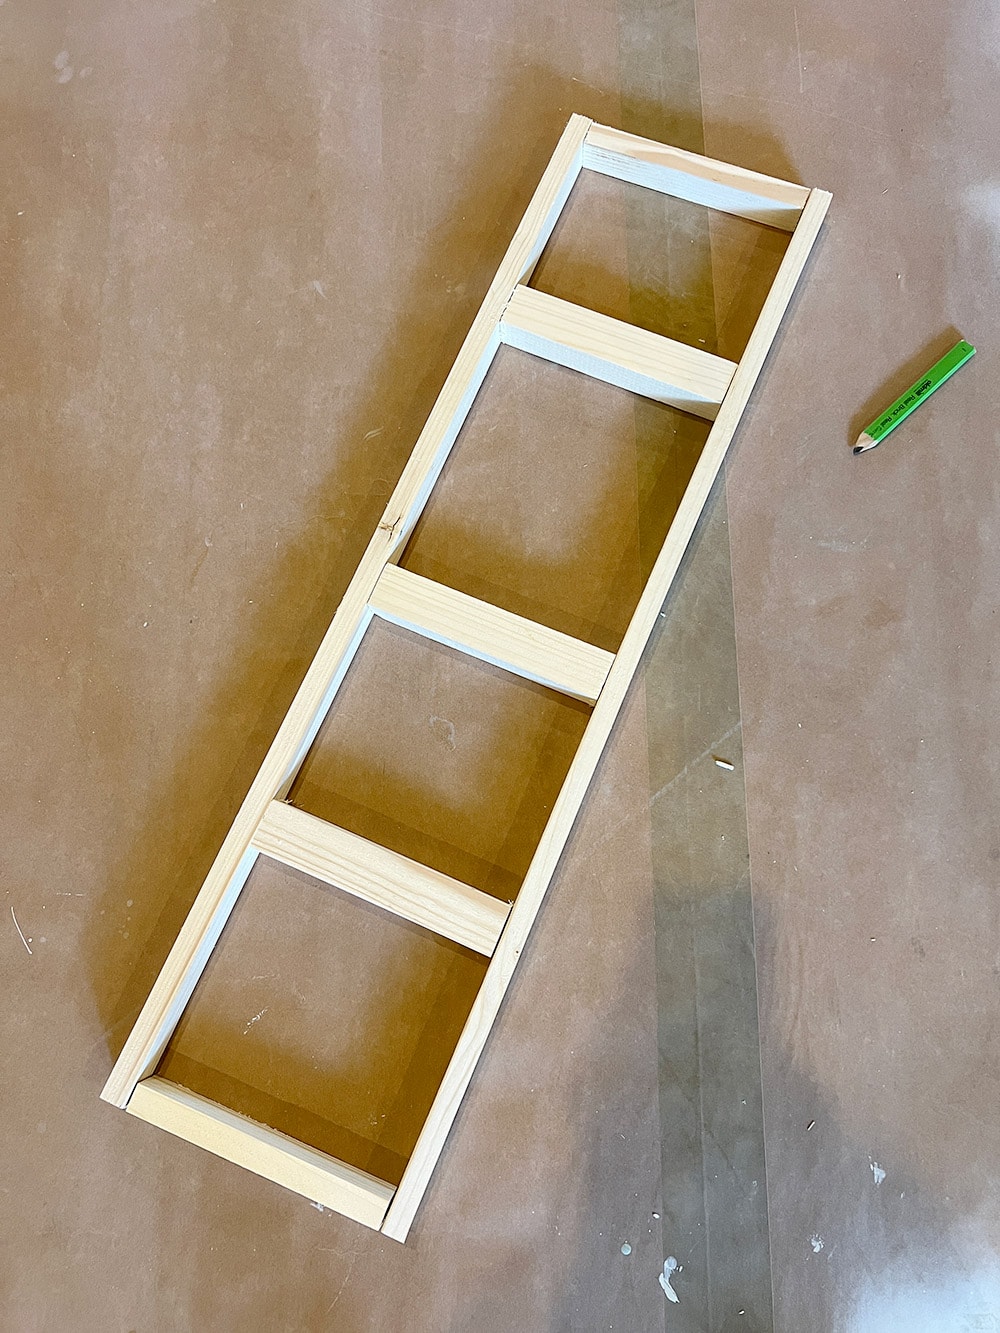
We decided on a final depth of ~10″, so we made the frame 9″ deep, and the alcoves were approximately 34″ wide. Note that the depth of your frame only needs to be ~⅔rd the depth of your total shelf to support the weight.
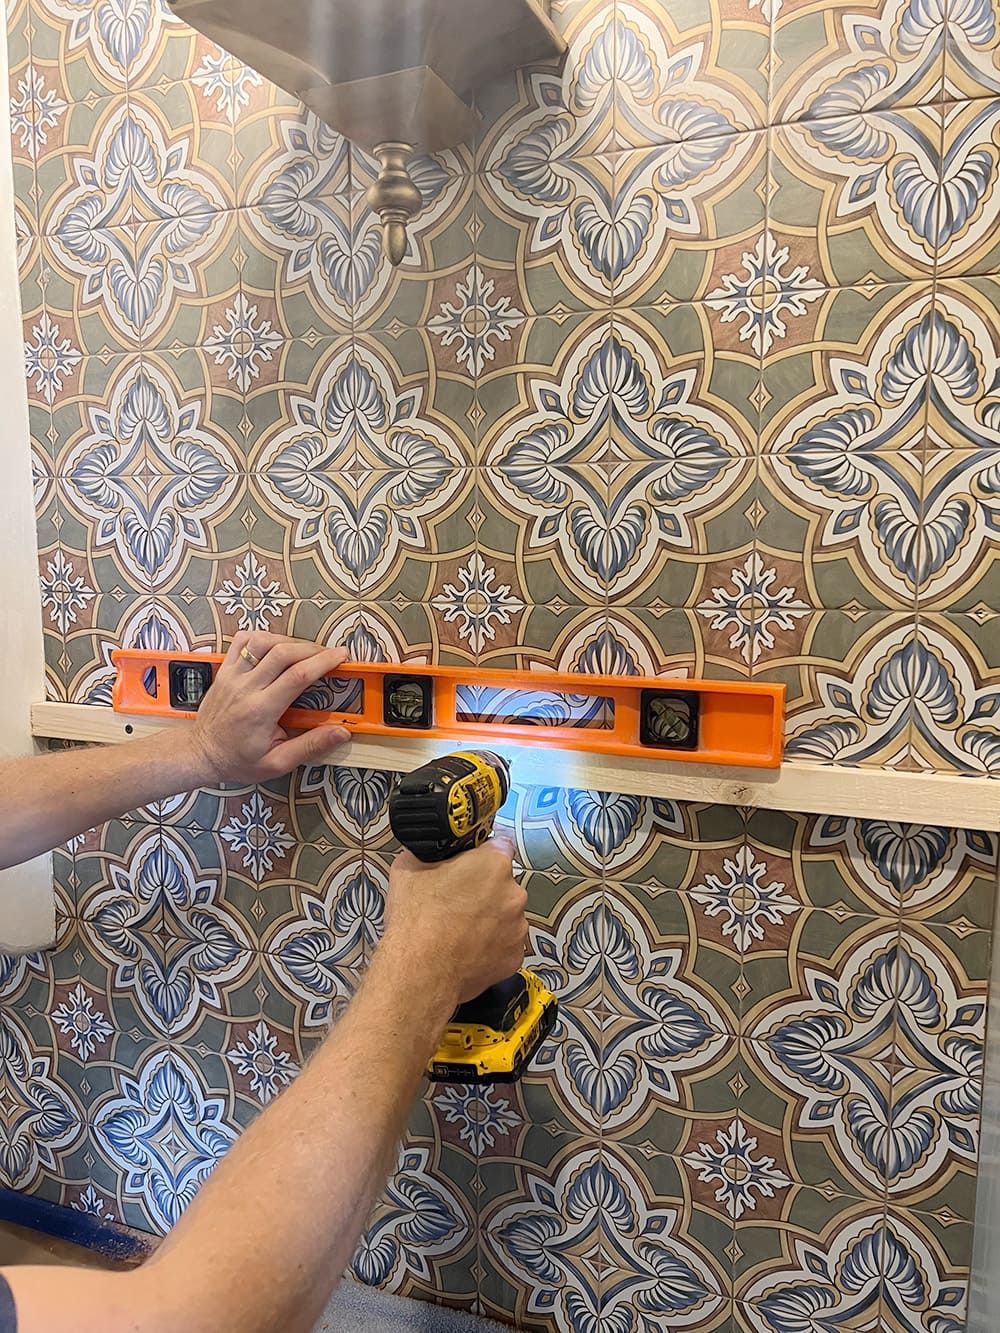
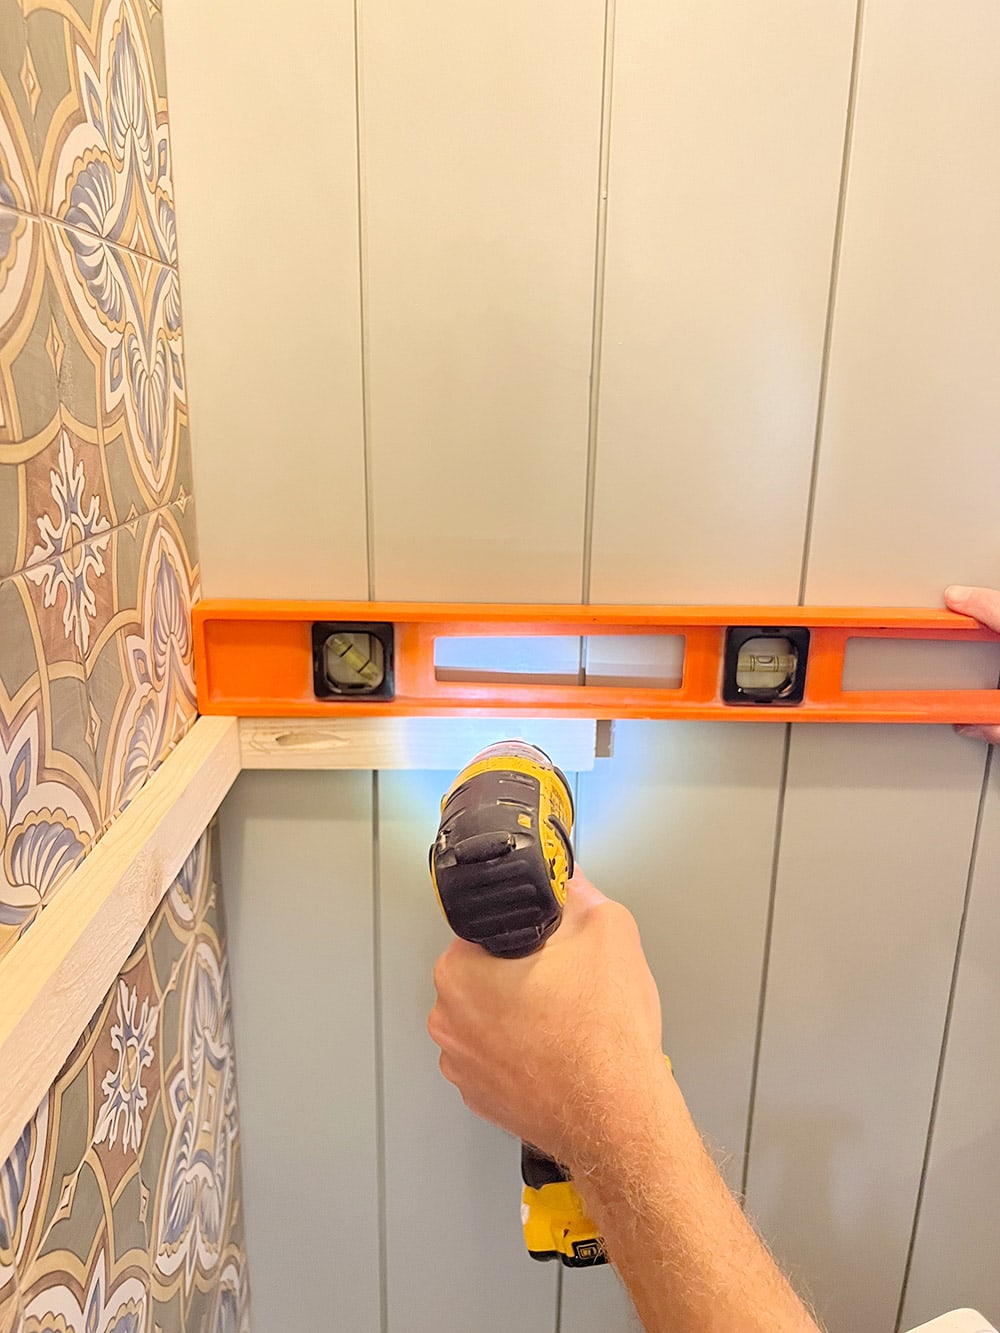
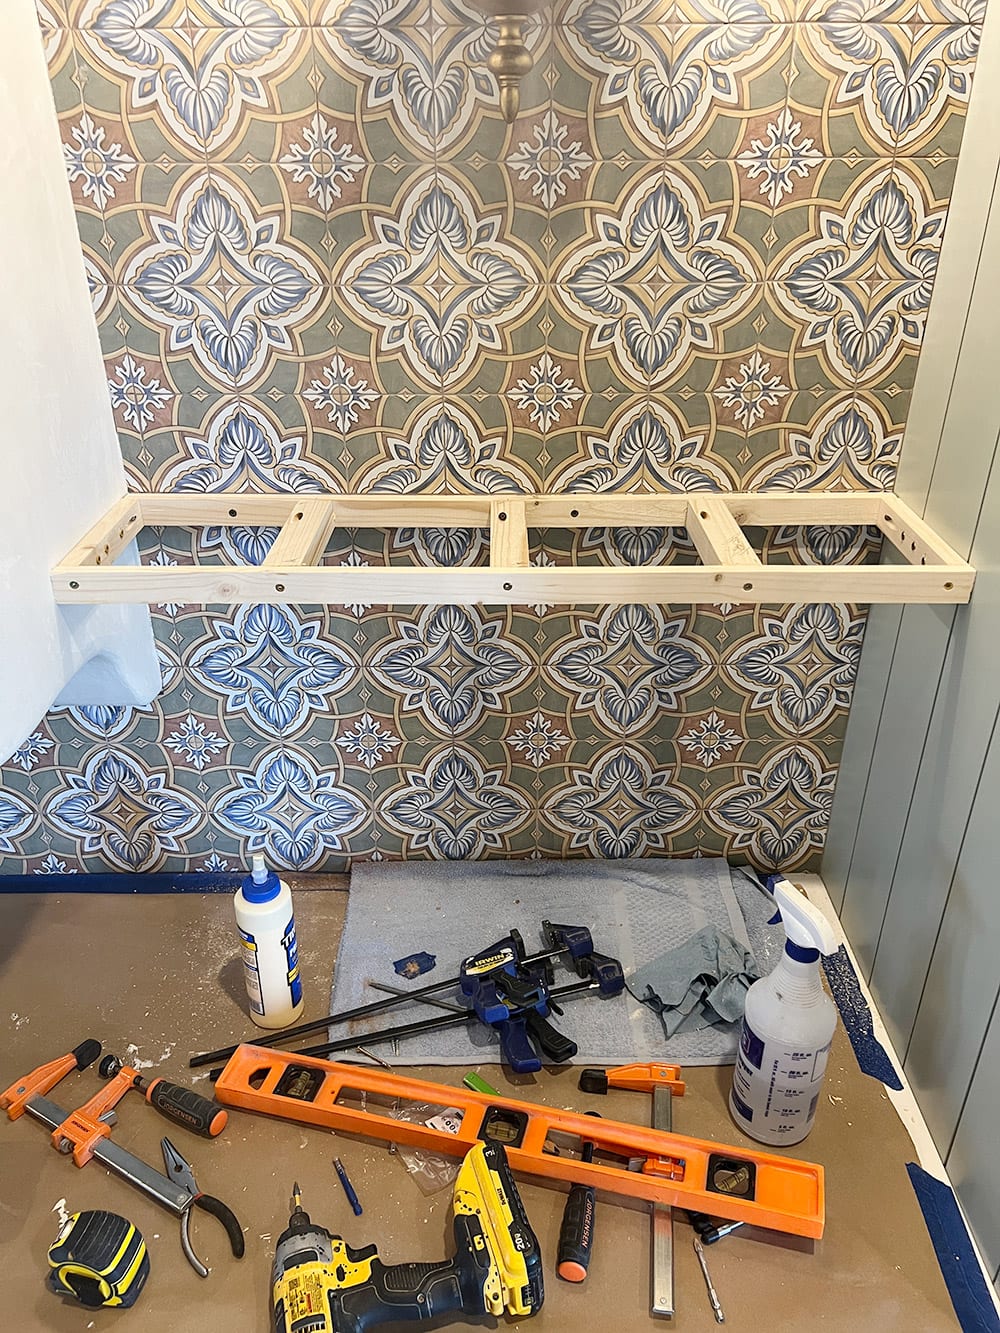
Step 3: Attach back support into wall
First, drill pilot holes into the back support piece where it aligns with the studs. Hold it up in place against the wall with a level, and drill through the pilot holes with a small bit to mark the screw locations. We used painter’s tape underneath to help with this:
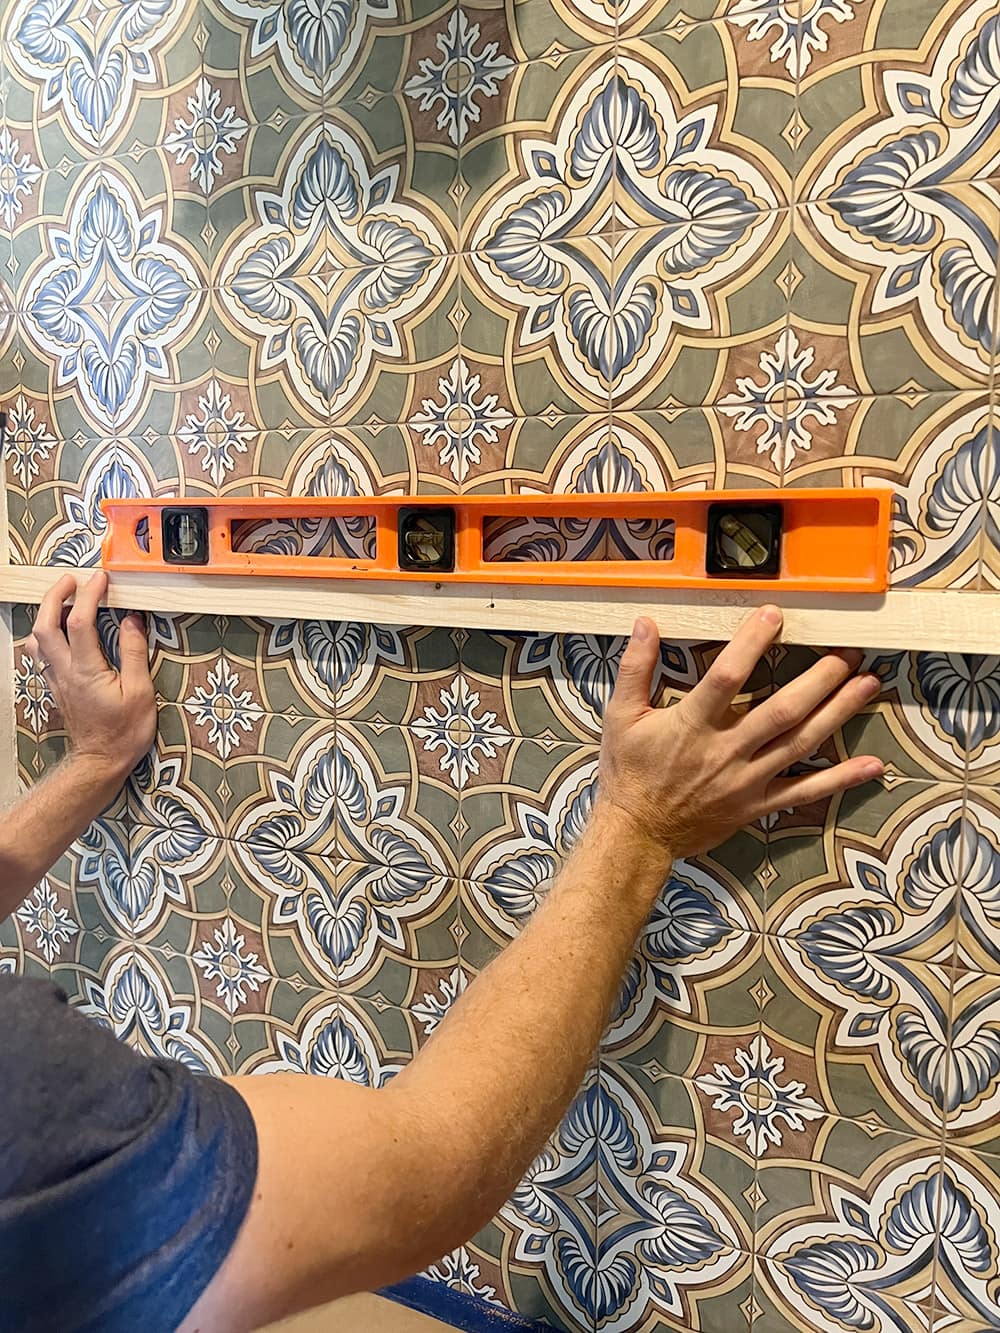
If you’re attaching the shelves to drywall, you can skip the painter’s tape and simply screw the board into the studs.
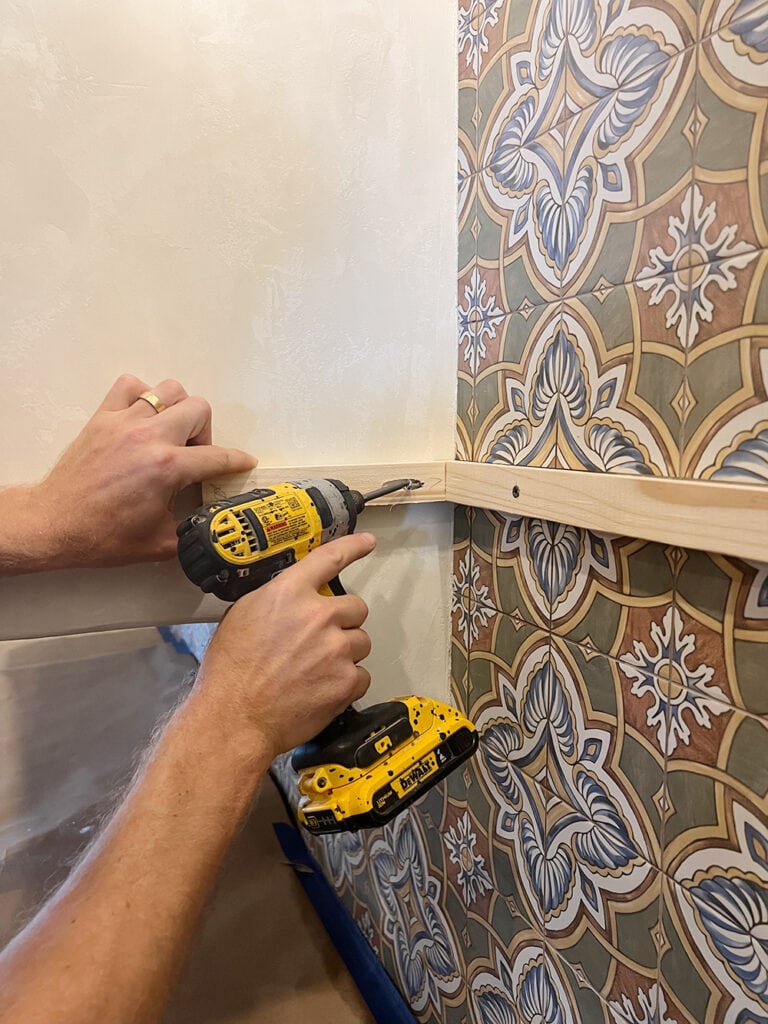
If your wall is tiled like ours, you’ll need to drill a hole into the tile first (larger than your screw thickness). We started with a carbide bit until the tip broke off (oops! Carbide isn’t strong enough for porcelain tile) then we switched to a diamond bit.
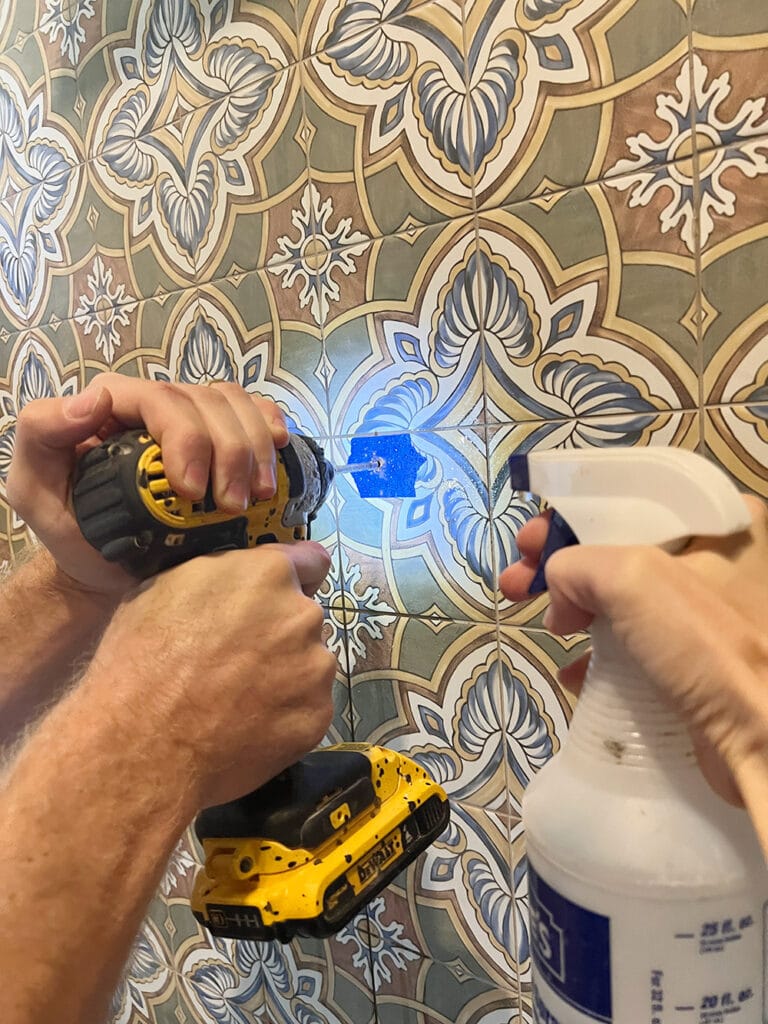
Use an impact driver and go slowly. Drilling through tile creates a lot of heat, so it’s a good idea to spray it down with water to help keep it cool.
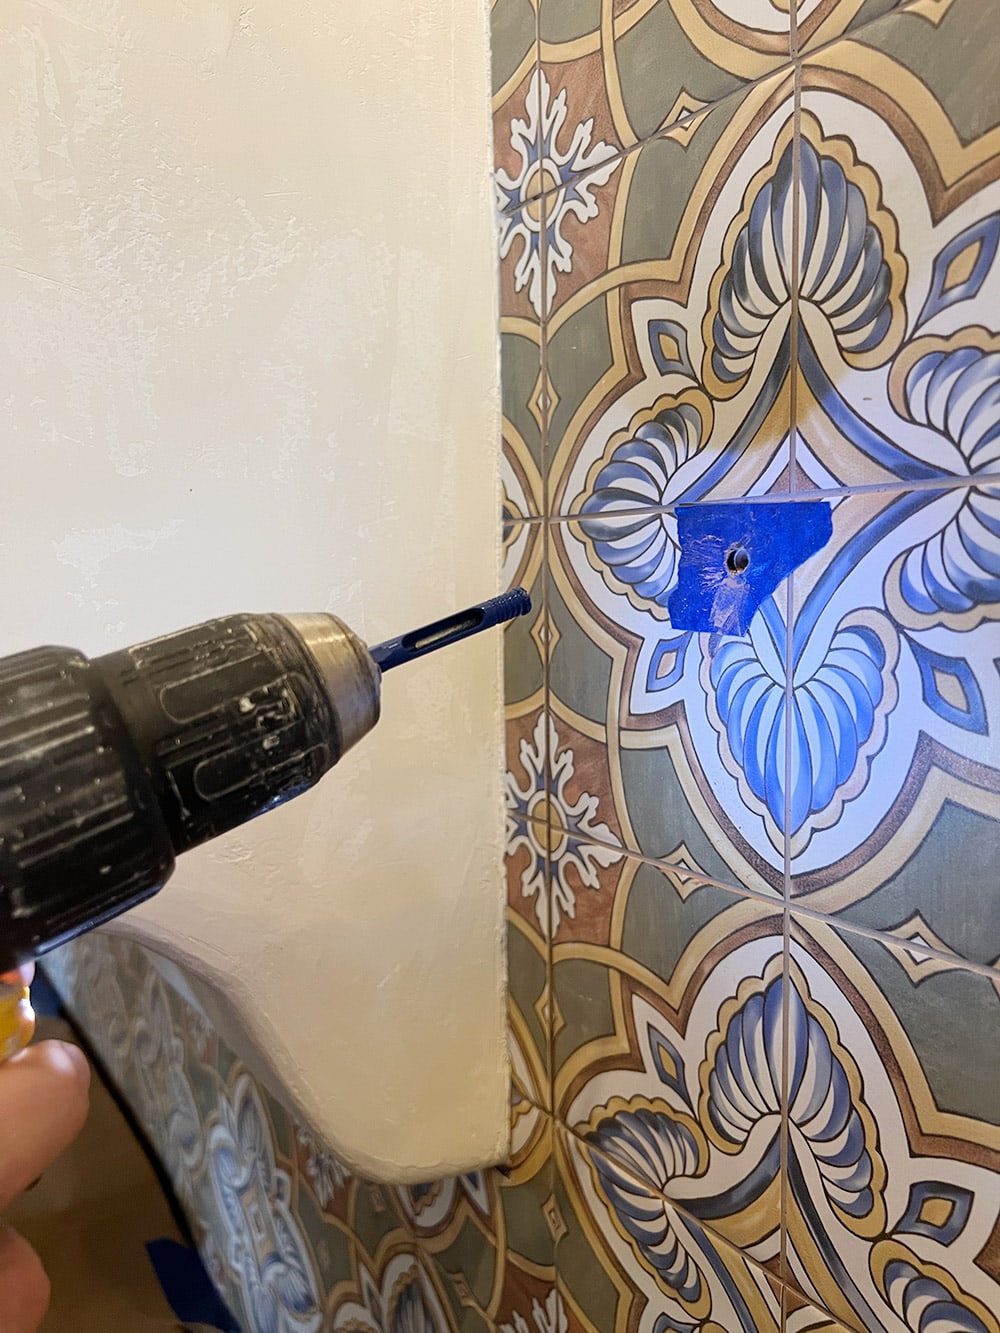
Once you reach the studs, you can stop drilling and secure the support into the wall with 3″ screws. Use a level each time you add a screw, because things can shift around!
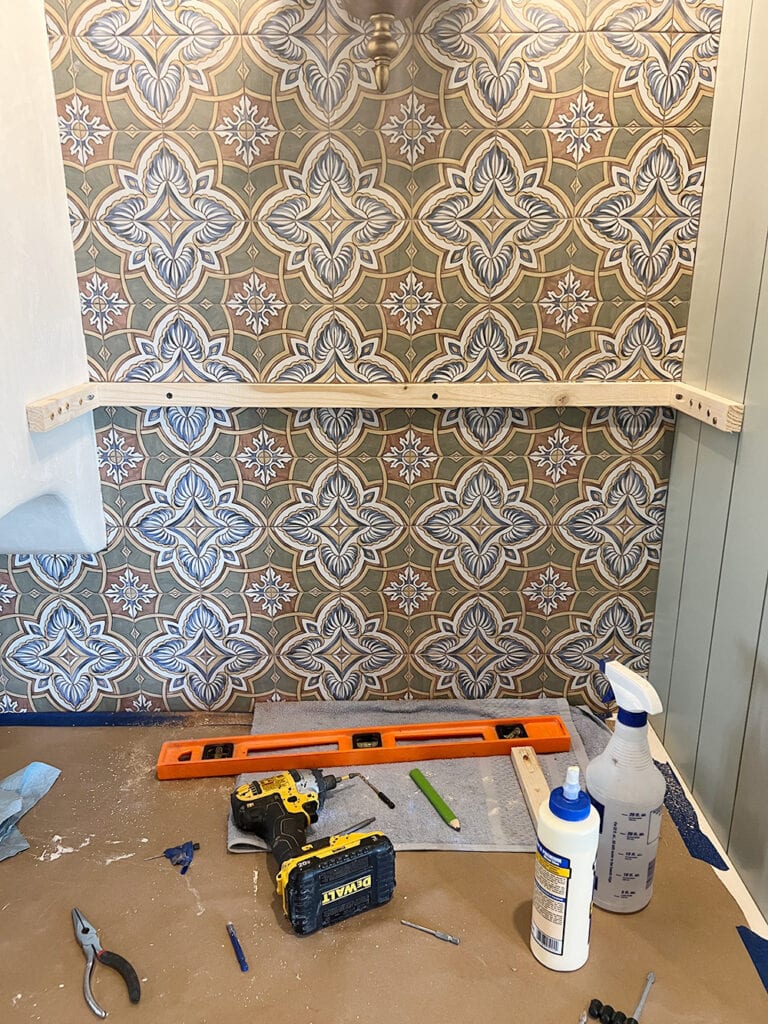
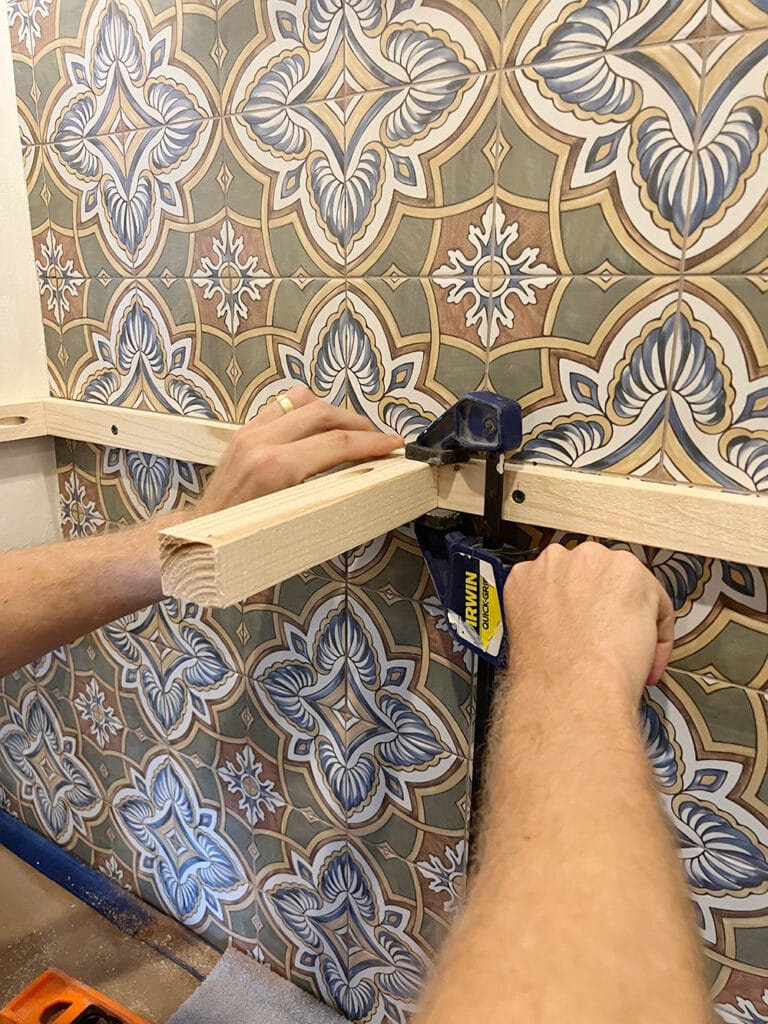
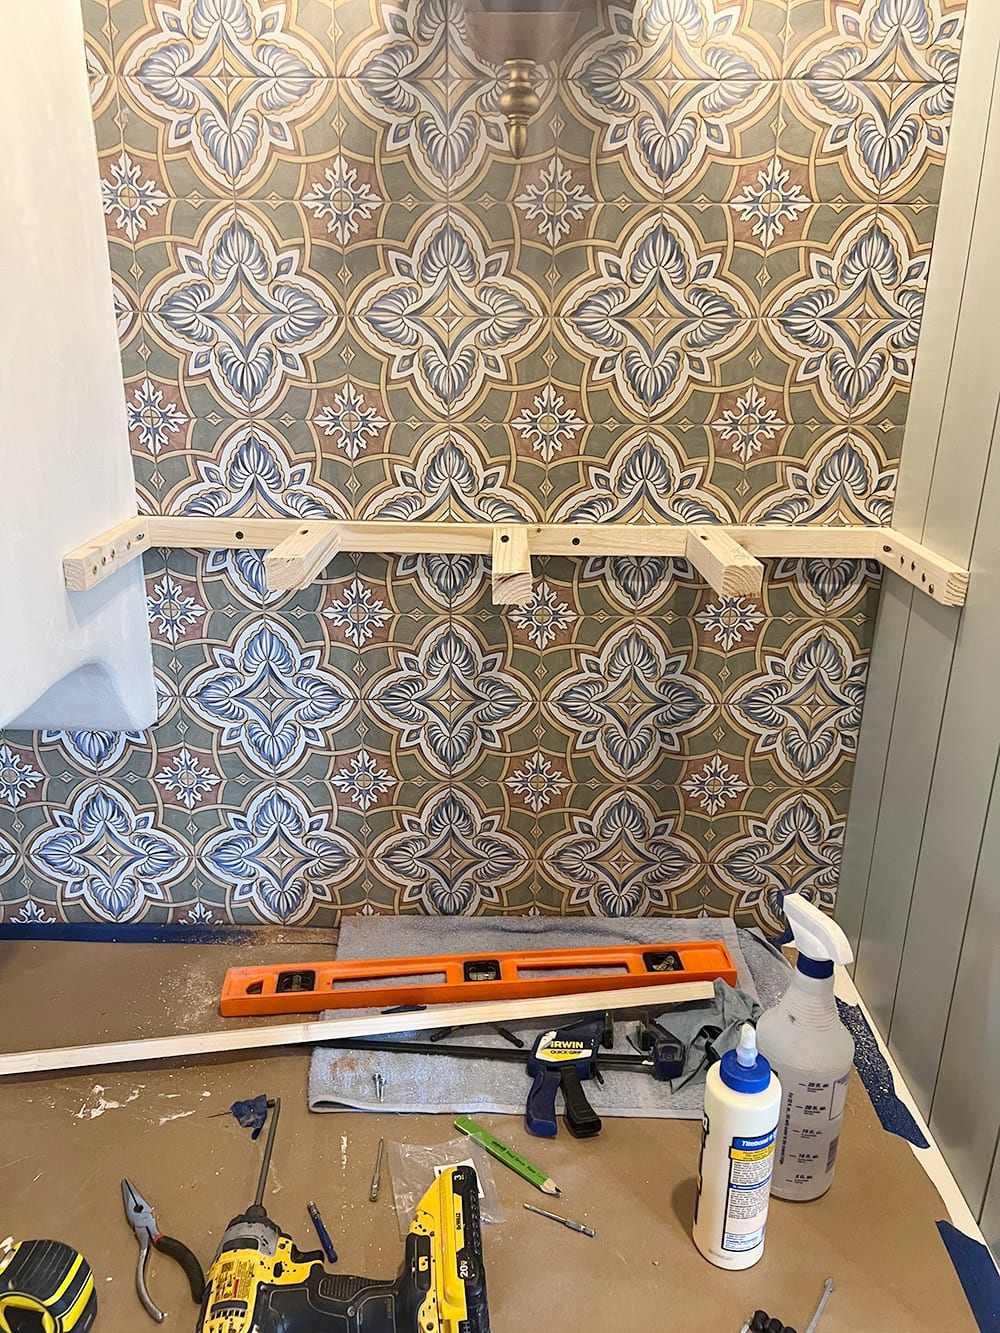
Step 4: Attach side and front supports
If there are any studs along the sides of your shelf, make sure to hit those. We had wood to drill into on both sides for extra support. If not, you can use heavy duty anchors or toggle bolts depending on how much weight you plan to add.
We also added a pocket hole to attach the side supports to the back piece. Not necessary, but always a good idea.
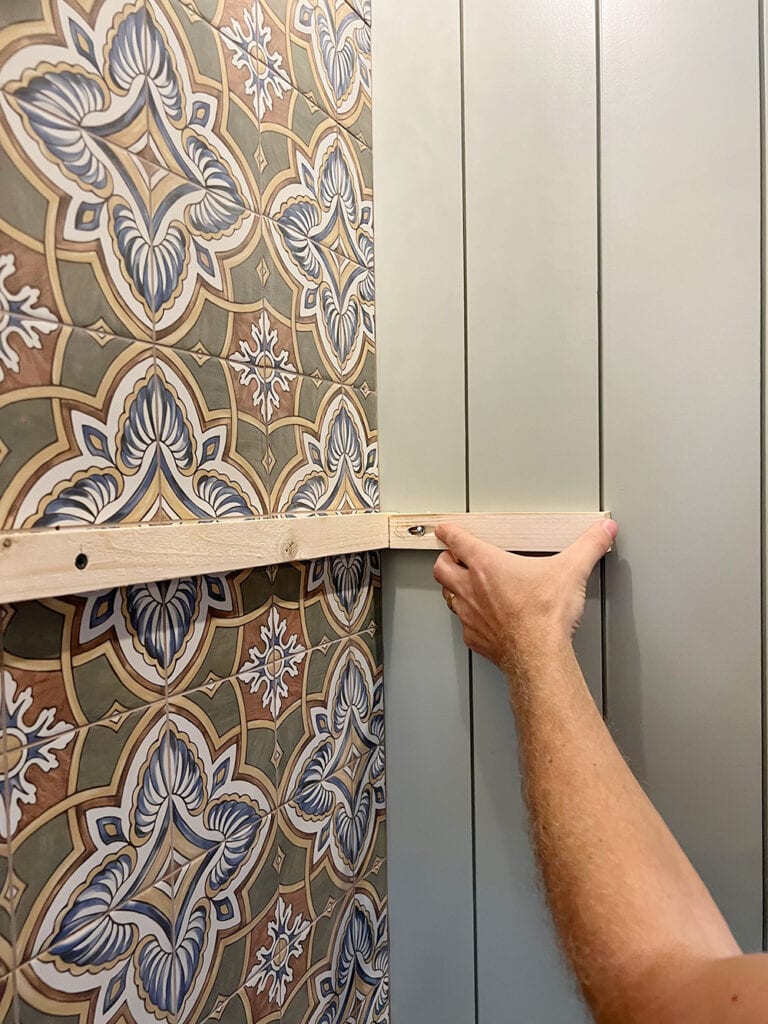
Two or three screws into the sides should be plenty, but it doesn’t hurt to add a few extra 😉
Step 4: Attach side and front supports
The side supports will be attached using pocket holes. We used our Kreg Jig which makes this process quick and easy (highly recommend if you don’t already own one!)
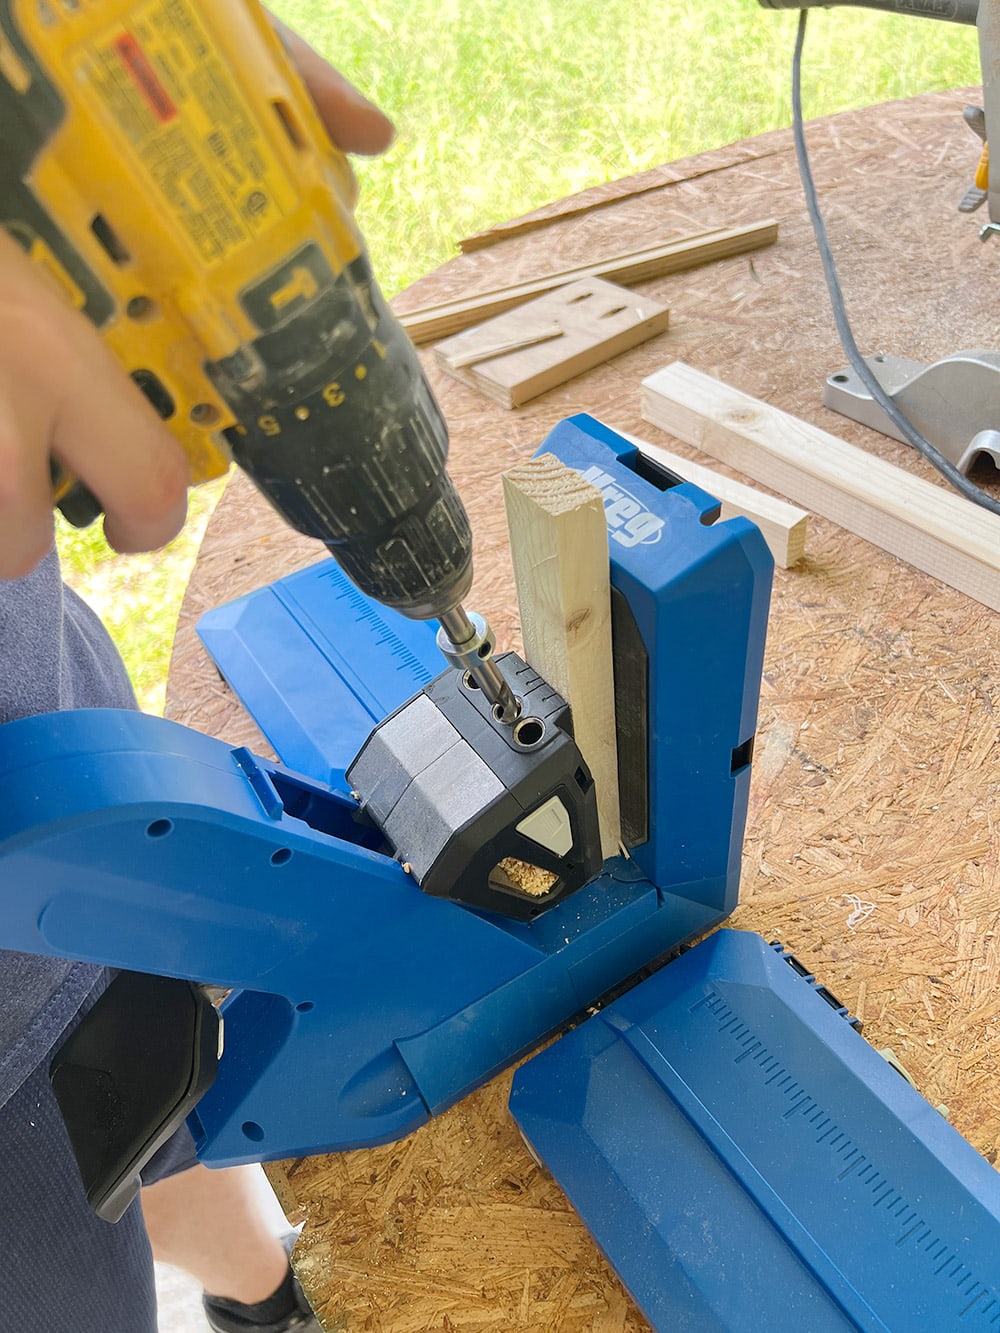
We added two pocket holes on the end, one on top and one on the bottom. Use a clamp to hold it in place while drilling (and always use wood glue at each joint!)
We decided on three center supports (around 7″ gap between each) which should be plenty for a 34″ shelf.
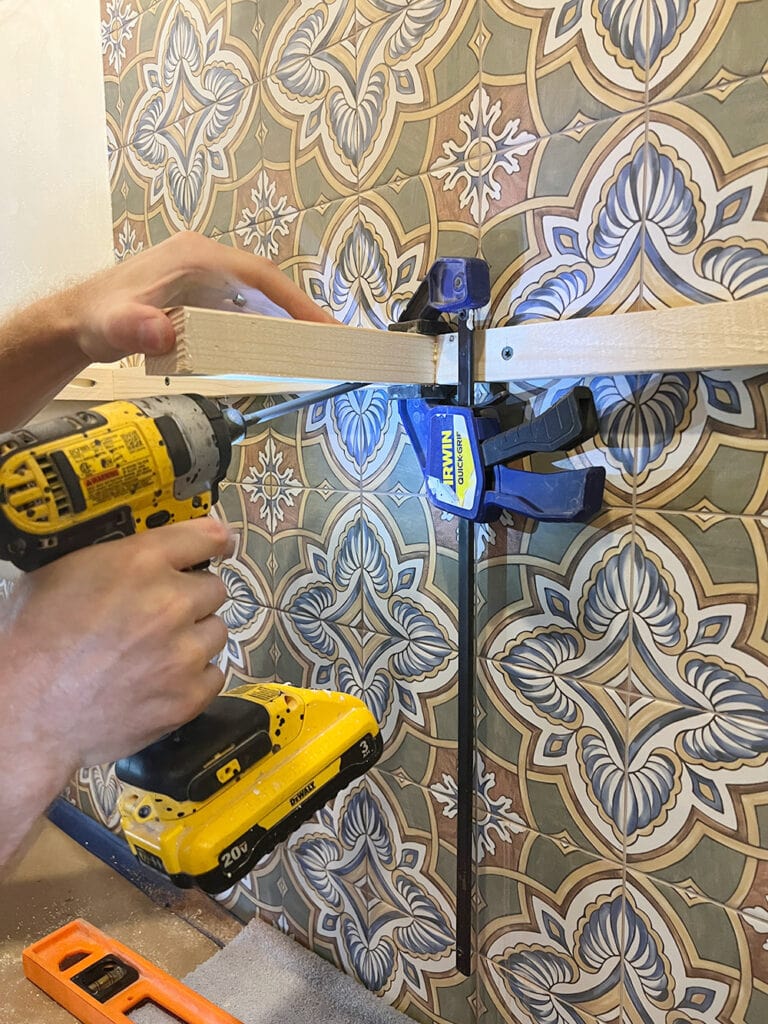
Finally, attach the front support using wood glue and a 2″ screw through the front (again, make sure to pre-drill first!)

It’s critical that the front piece lines up perfectly to the edges of each support, so you can use a clamp if needed.
Step 5: Cut and bevel plywood panels
Measure the alcove size both at the front and the back, and rip down your plywood to the largest length (or slightly longer).
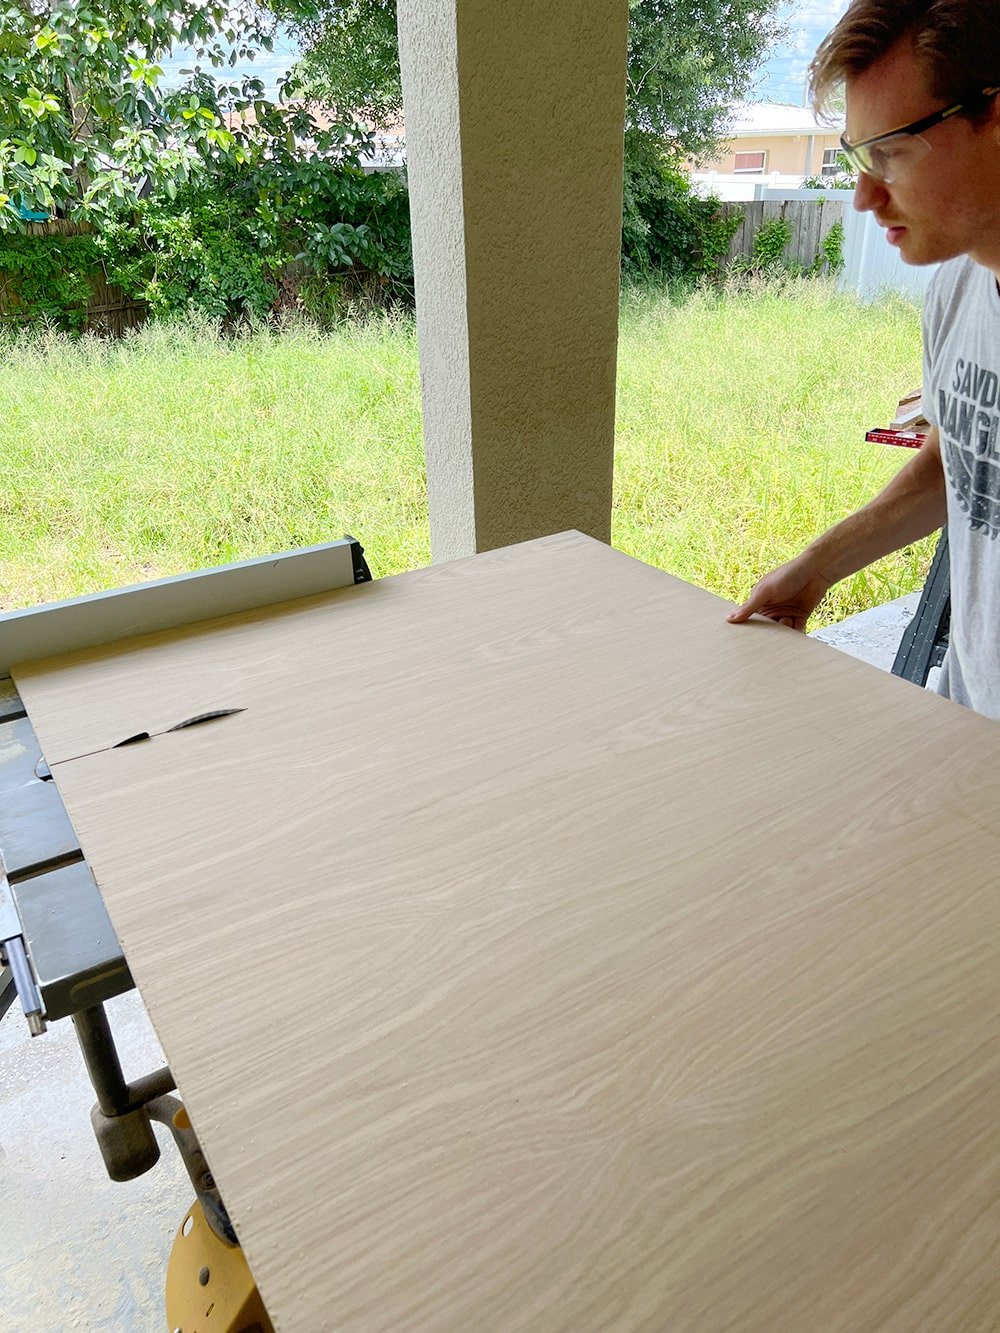
Once you determine your shelf depth, set your table saw blade to 45º and adjust the gate to your desired size. We found it easiest to measure to the inside cut line.
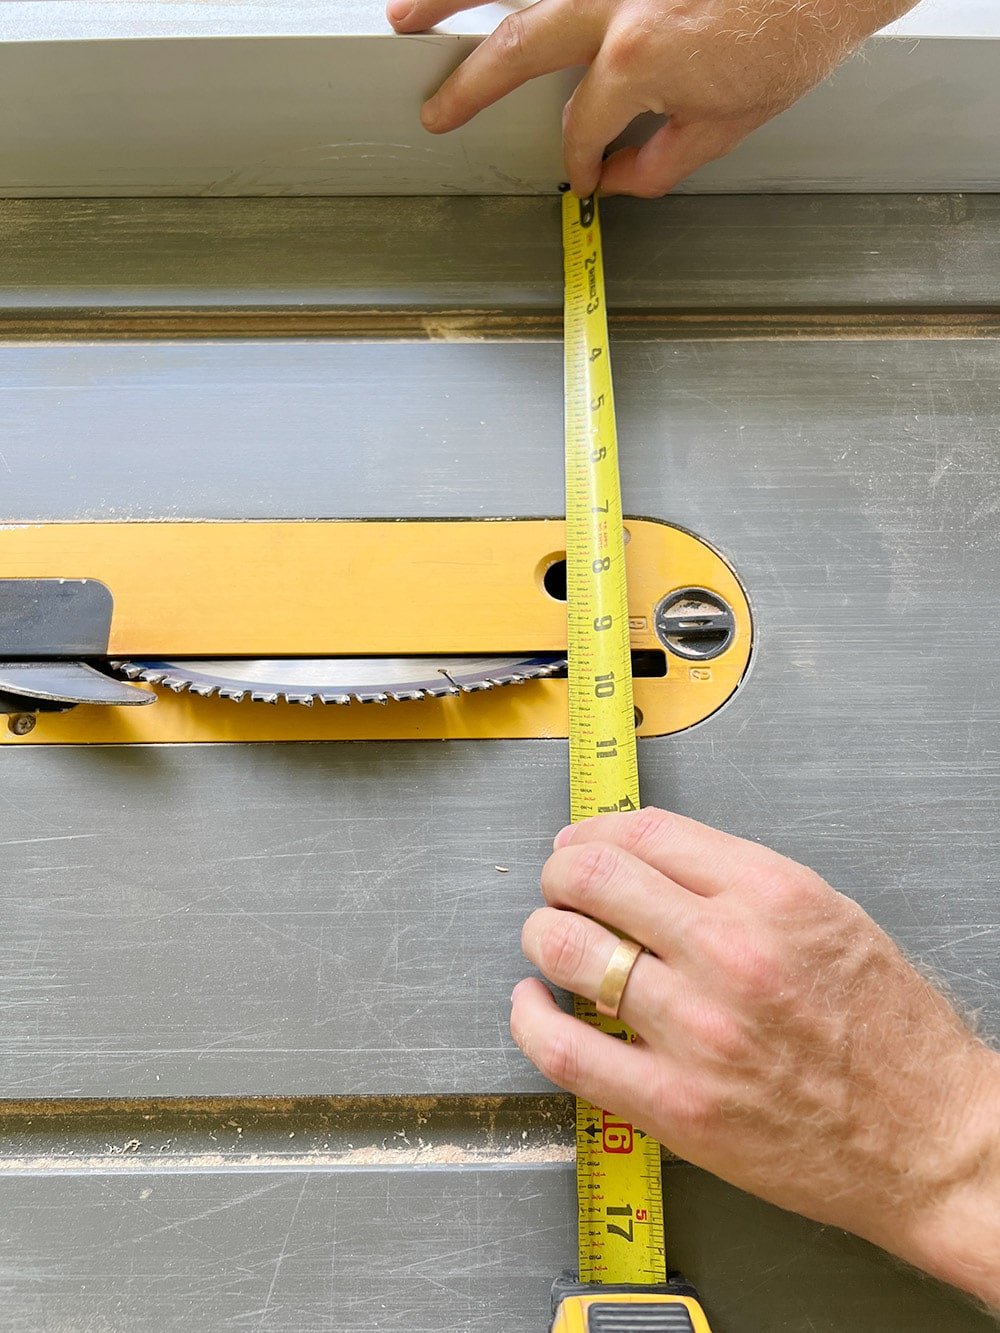
Next, run your plywood through to create your miter cut. Try to keep the board as steady as possible! This part is probably the most difficult step, but it’s easier with a sharp blade and practice.
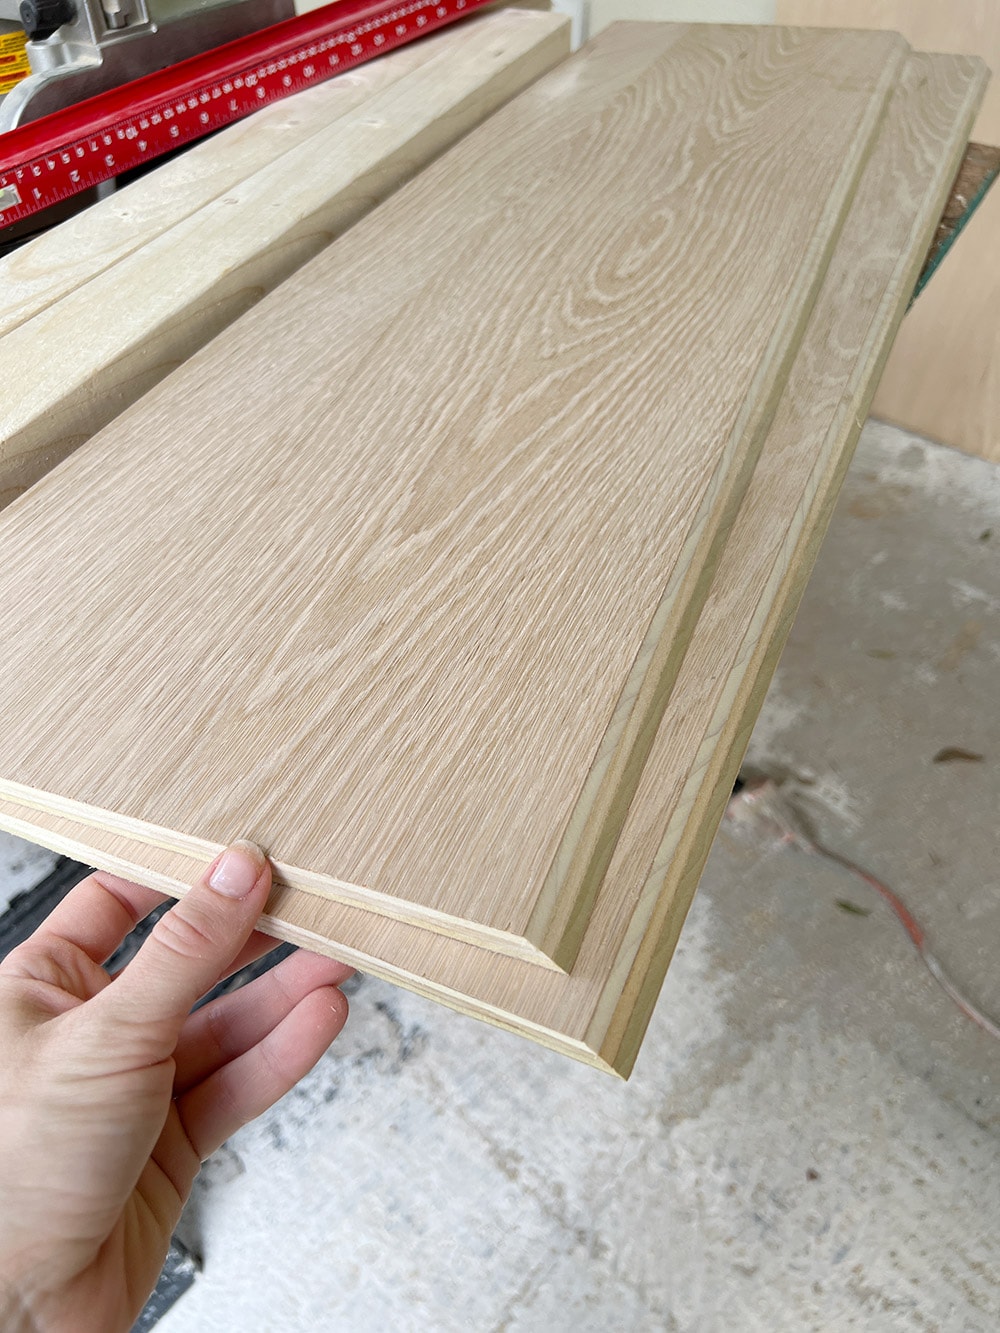
Note: you don’t have to miter the edges (especially if you’re using 1/4” plywood) but it really does look cleaner and more professional if they are. I wouldn’t skip this step!
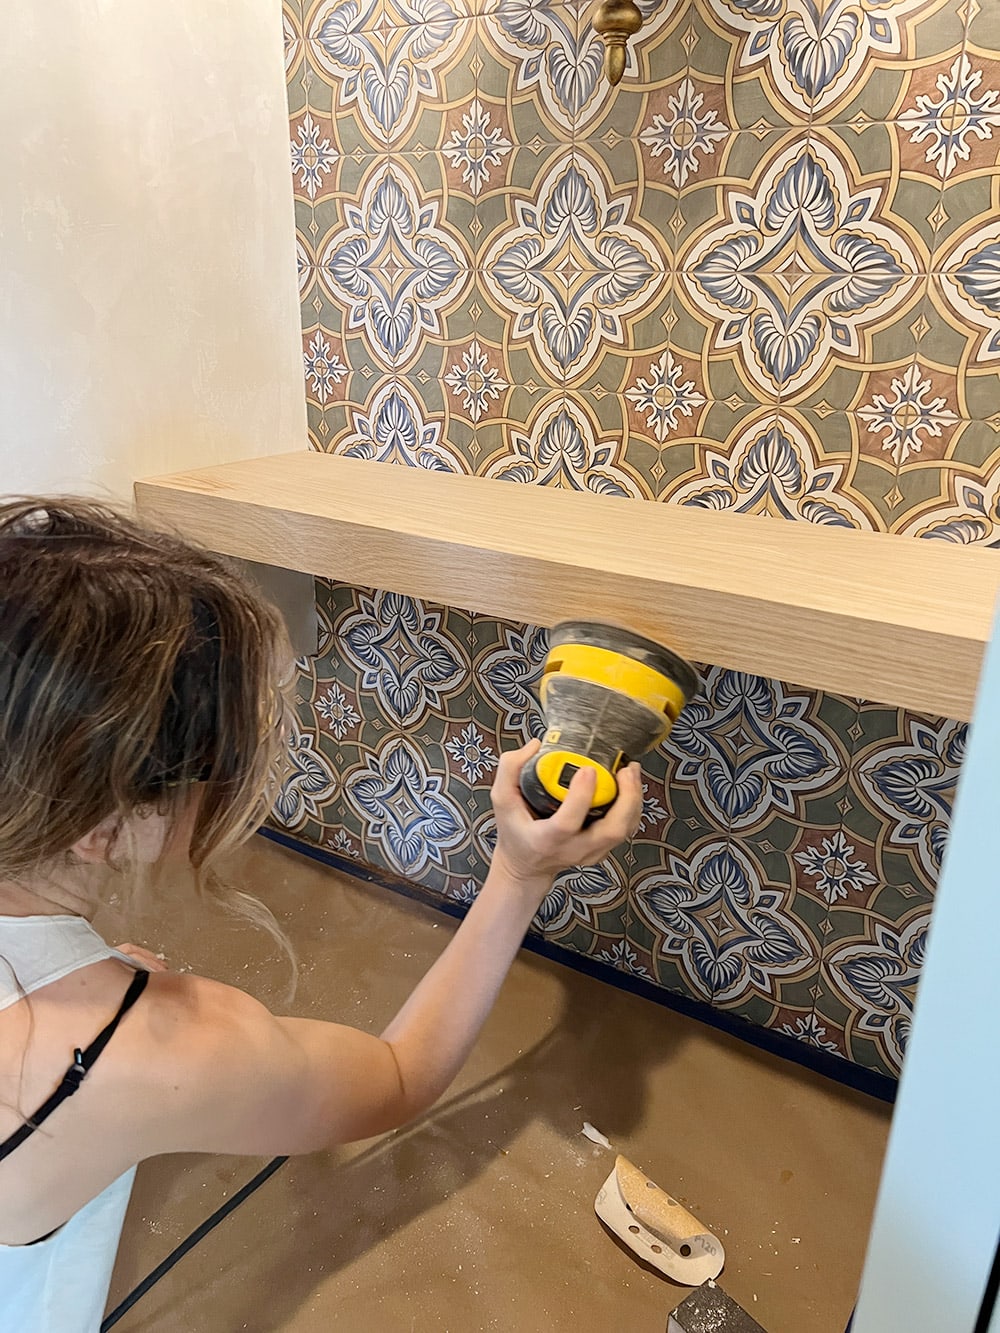
Once the top and bottom pieces are cut, it’s time to do a test fit. More than likely, it won’t be a perfect fit, so make a note of where the wood hits the sides and sand that area down.
You could also use a contour gauge to trace the exact shape, but ours wasn’t too bad so we just needed a little sanding to get a tight fit. Make sure to use an electric sander for this (orbital or detail). This process can take some time, but it’s worth it to get perfect, professional level results.
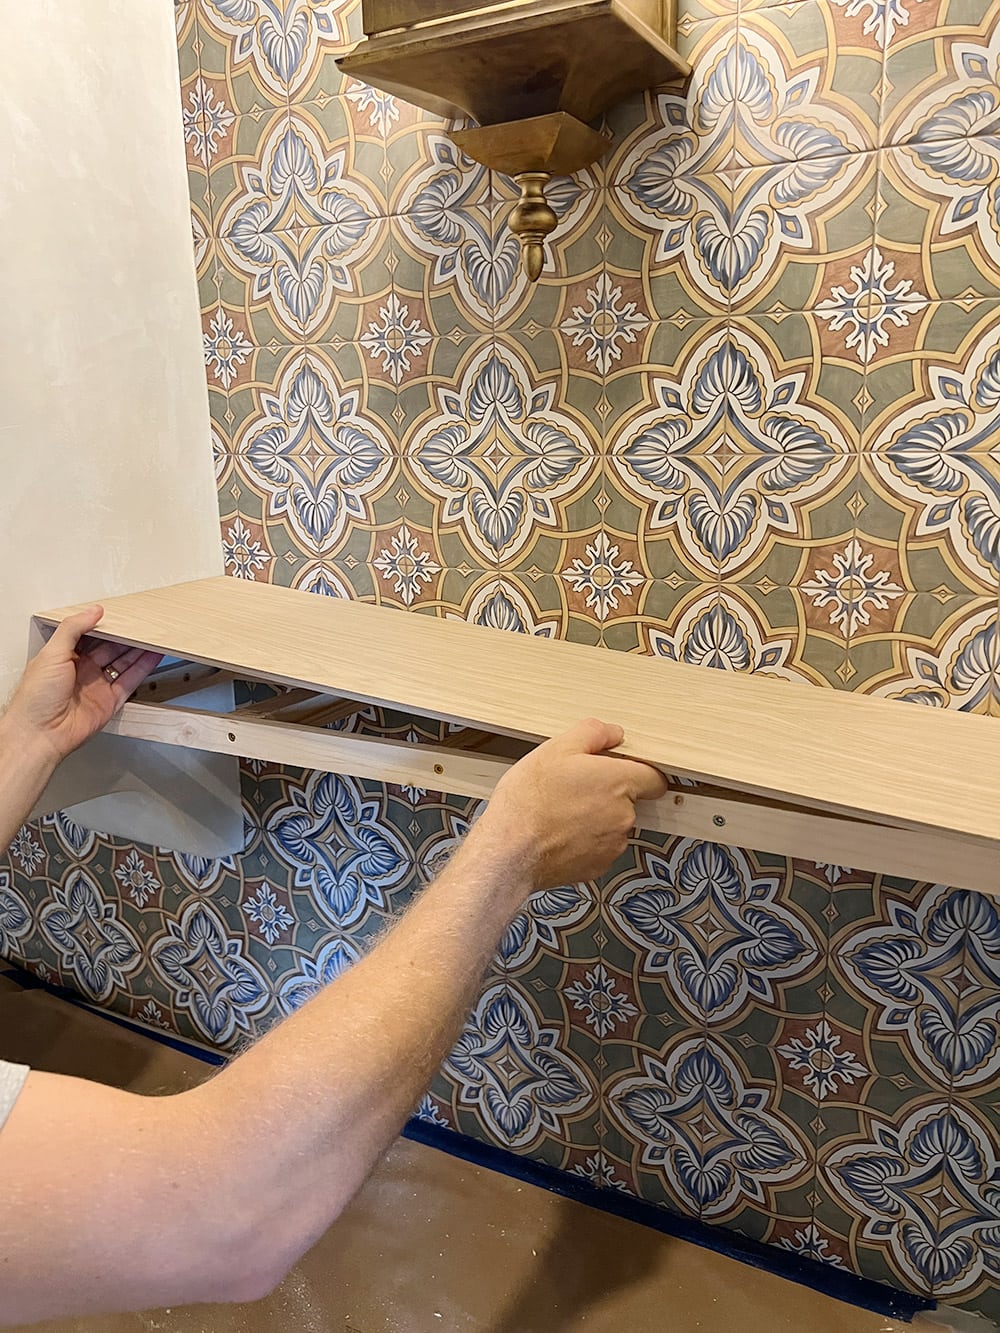
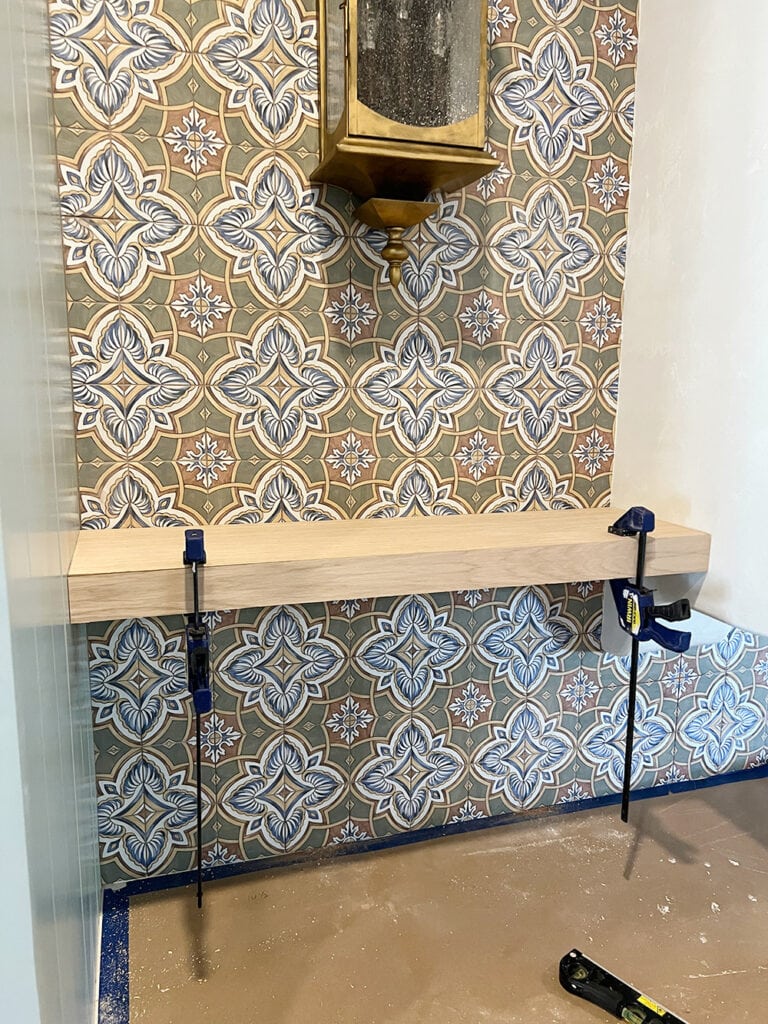
Once the top and bottom fit snug, clamp them in place and measure for the front piece.
Then, rip both edges down at a 45º angle (opposite facing miters).

Test fit time: not too shabby! Don’t worry if it’s not 100% perfect—there are ways to fix this later!
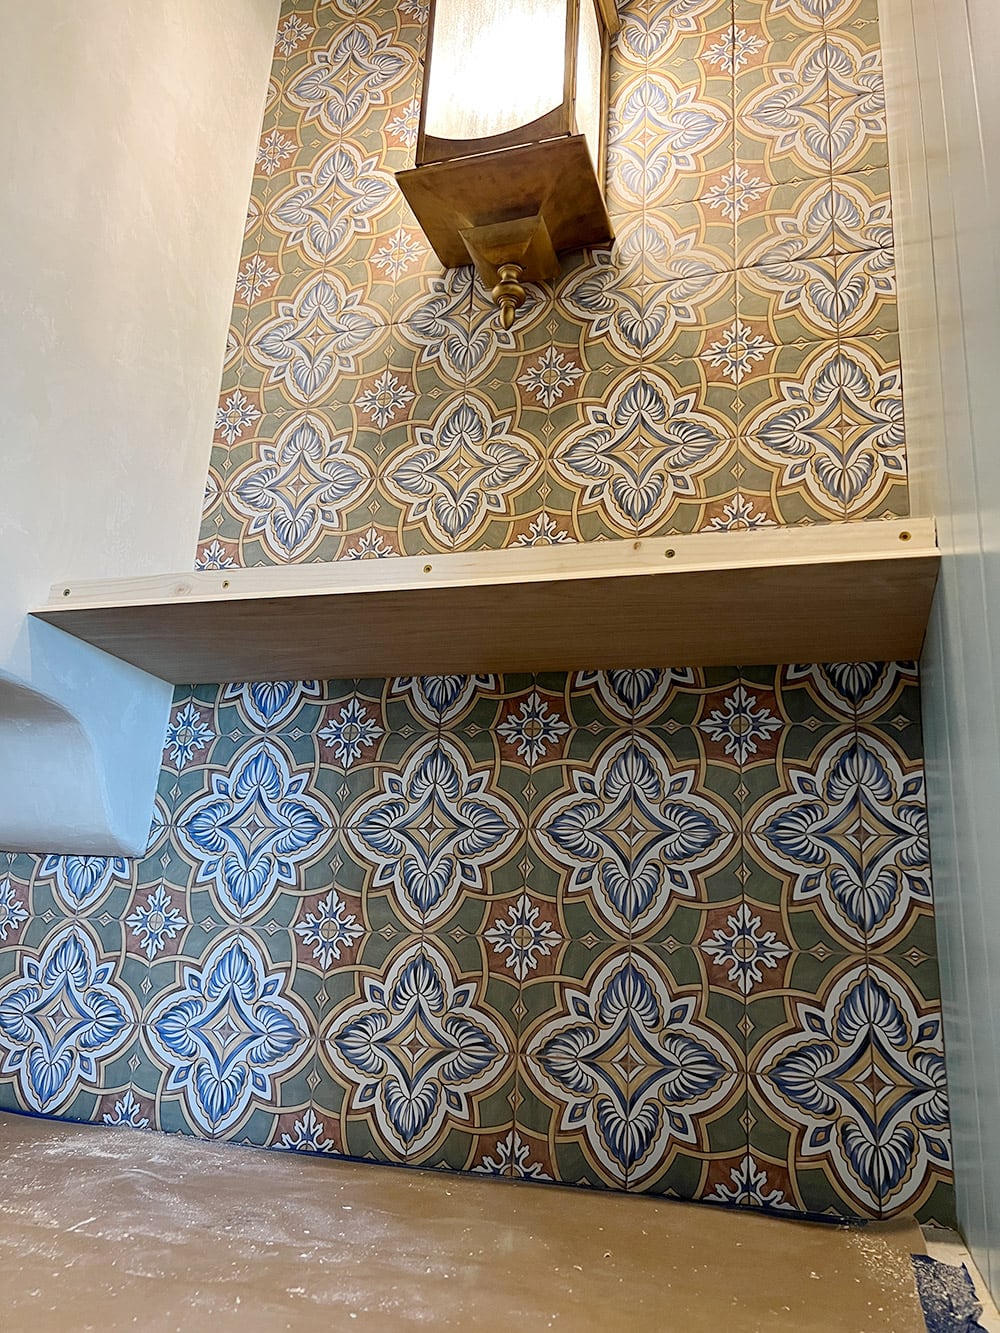
Step 6: Glue and clamp plywood panels
Now that all of the cuts are made, it’s time to attach everything together. If you plan to paint the shelves and don’t mind filling nail holes, that would be the quickest way to secure the wood.
However, if you plan to stain the shelves, wood glue is your best bet. Fun fact: wood glue is stronger than nails! When used properly, the glue will bond two pieces of wood together essentially into one solid piece.
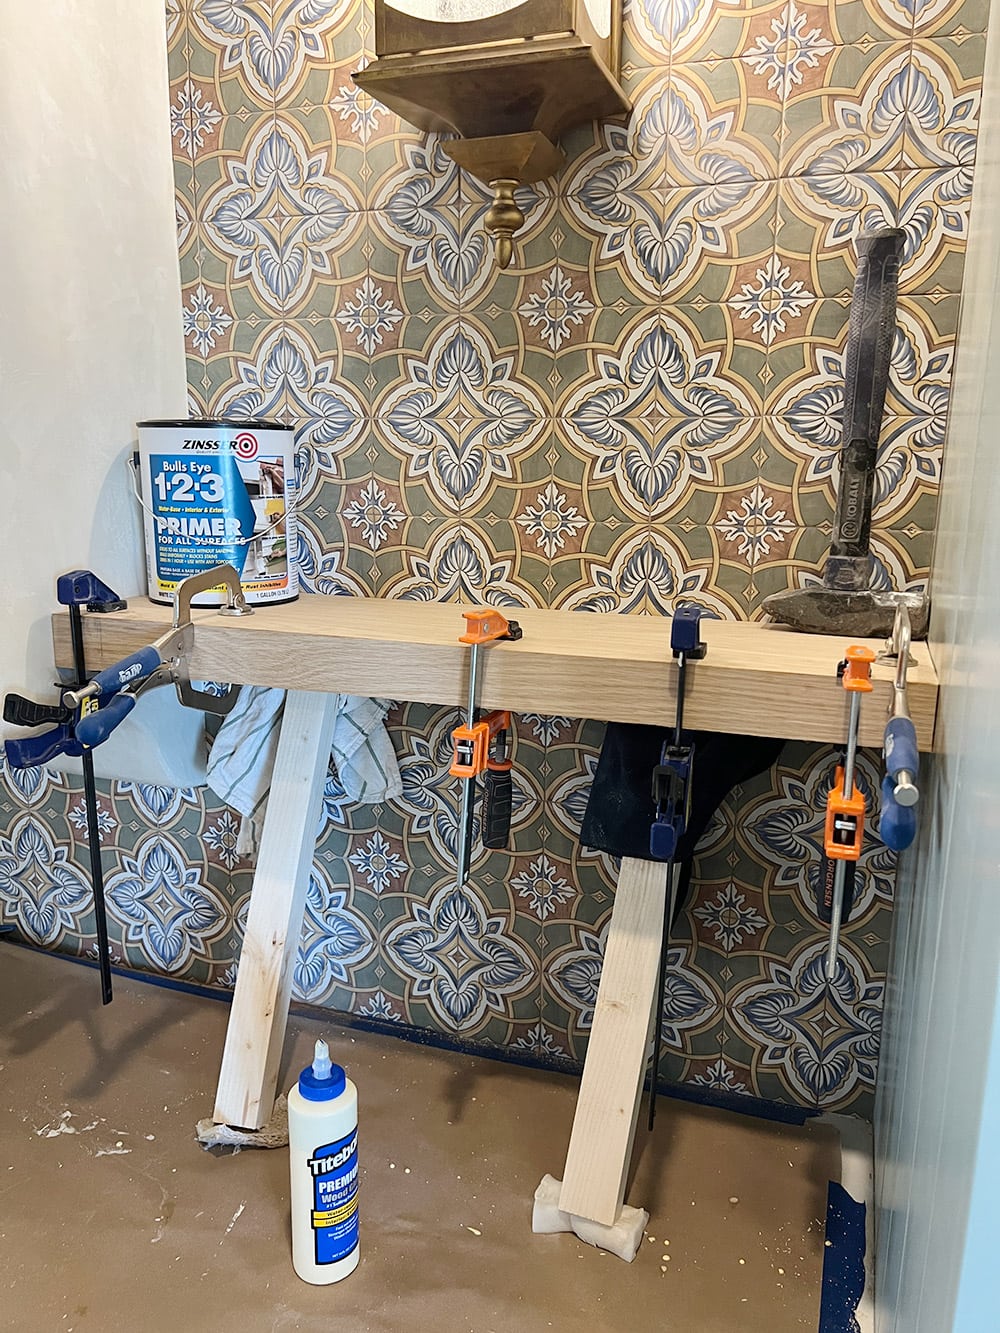
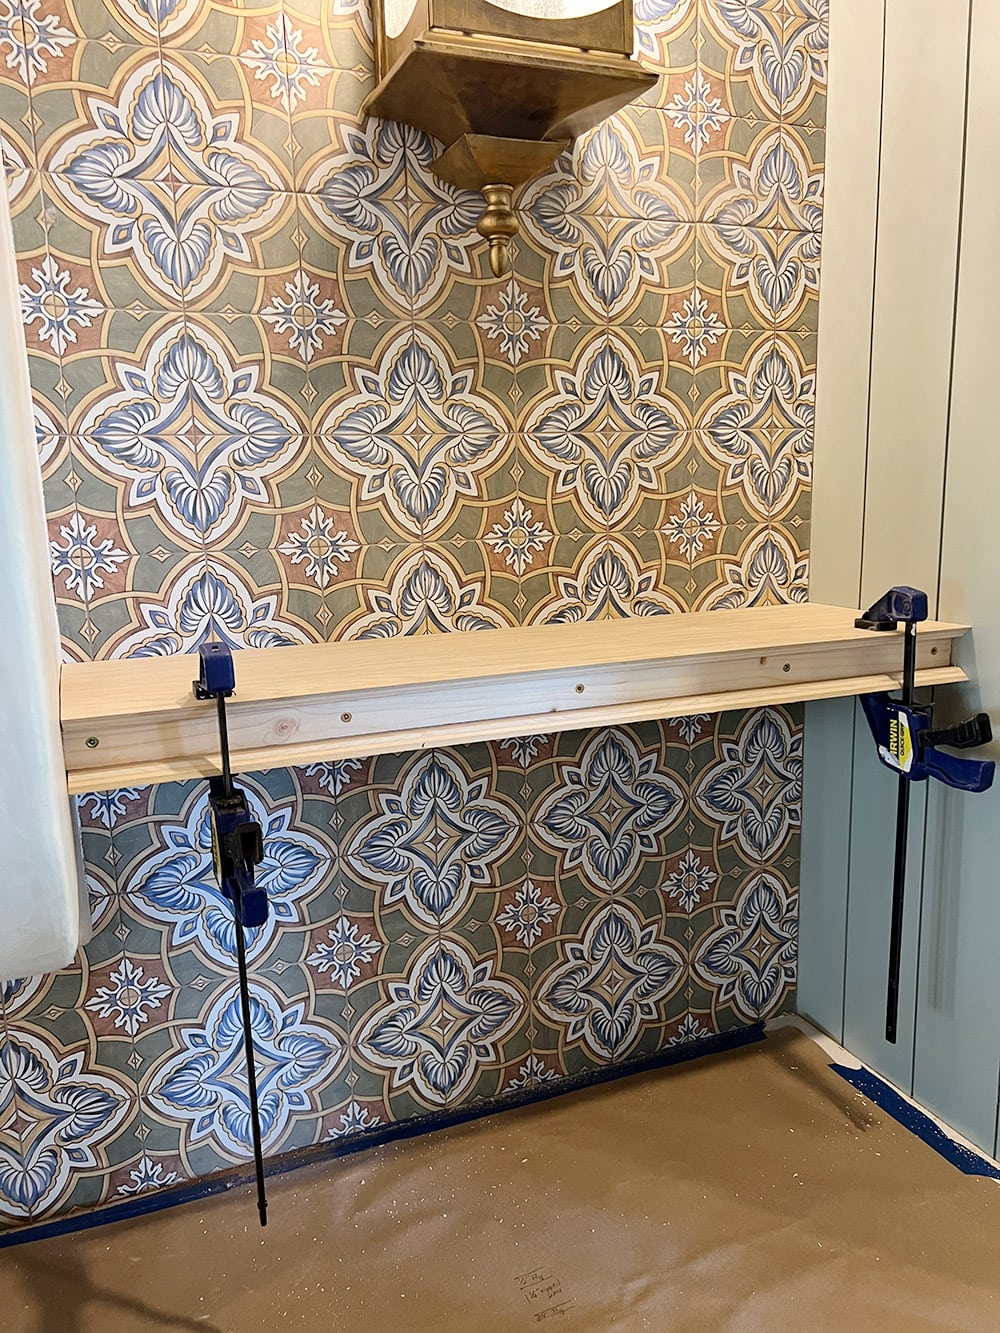
We applied a generous amount of glue along the entire frame (top, bottom and front) and held it all in place with clamps, wedges and heavy objects. Make sure to push the clamps tight to the front piece to hold it tight against the mitered edges (that’s the only thing the front will be attached to!) Extra deep clamps would be ideal here, but we used what we had on hand:
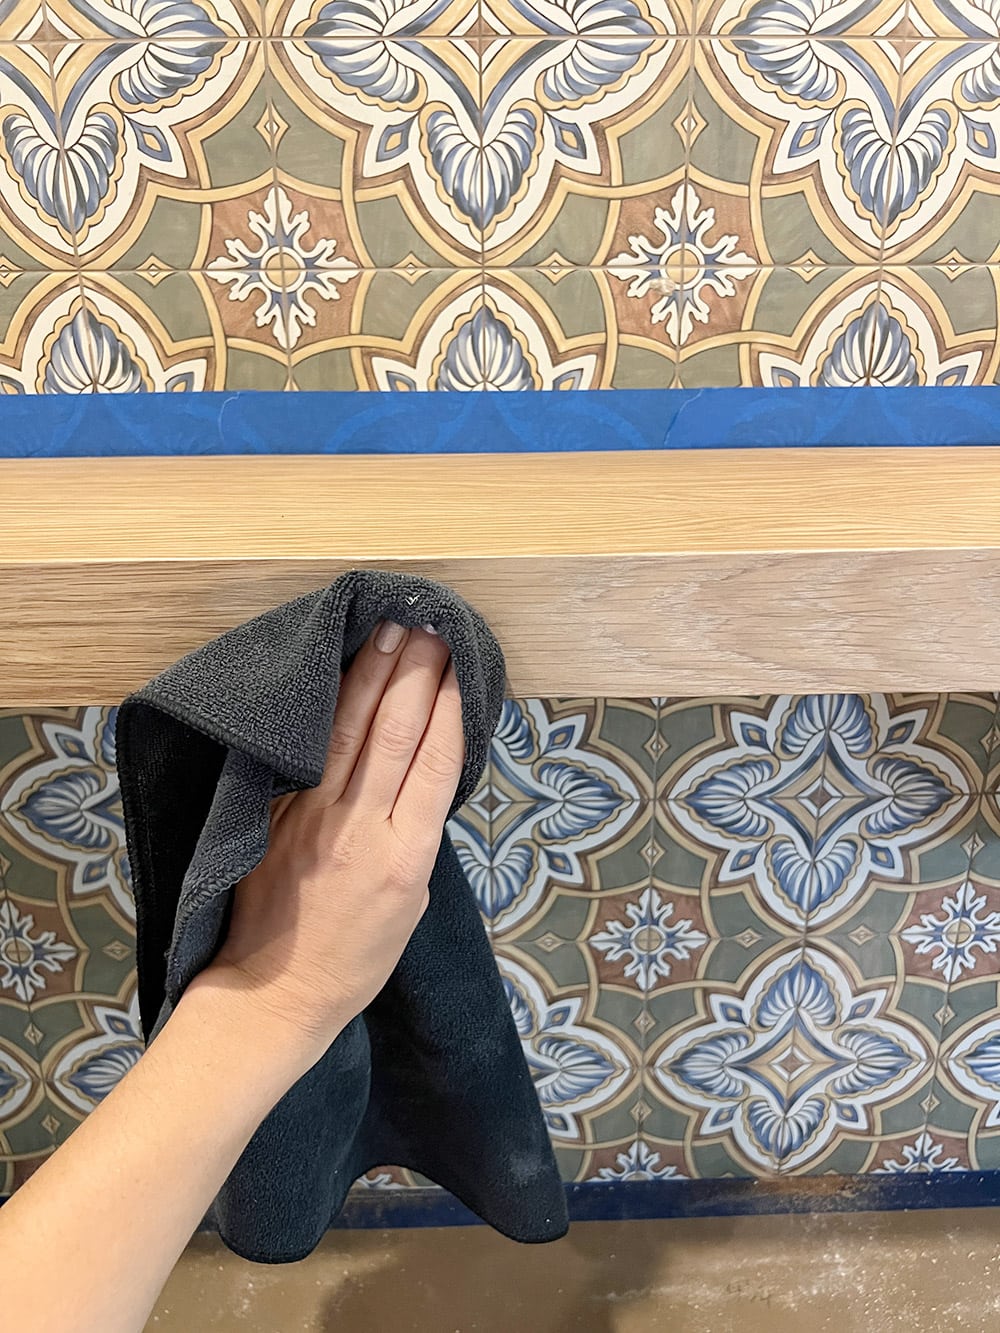
If you used enough glue, it will spill through the miters when you clamp it down. Make sure to wipe it off completely with a damp rag, as it will be harder to sand down once it’s dry.
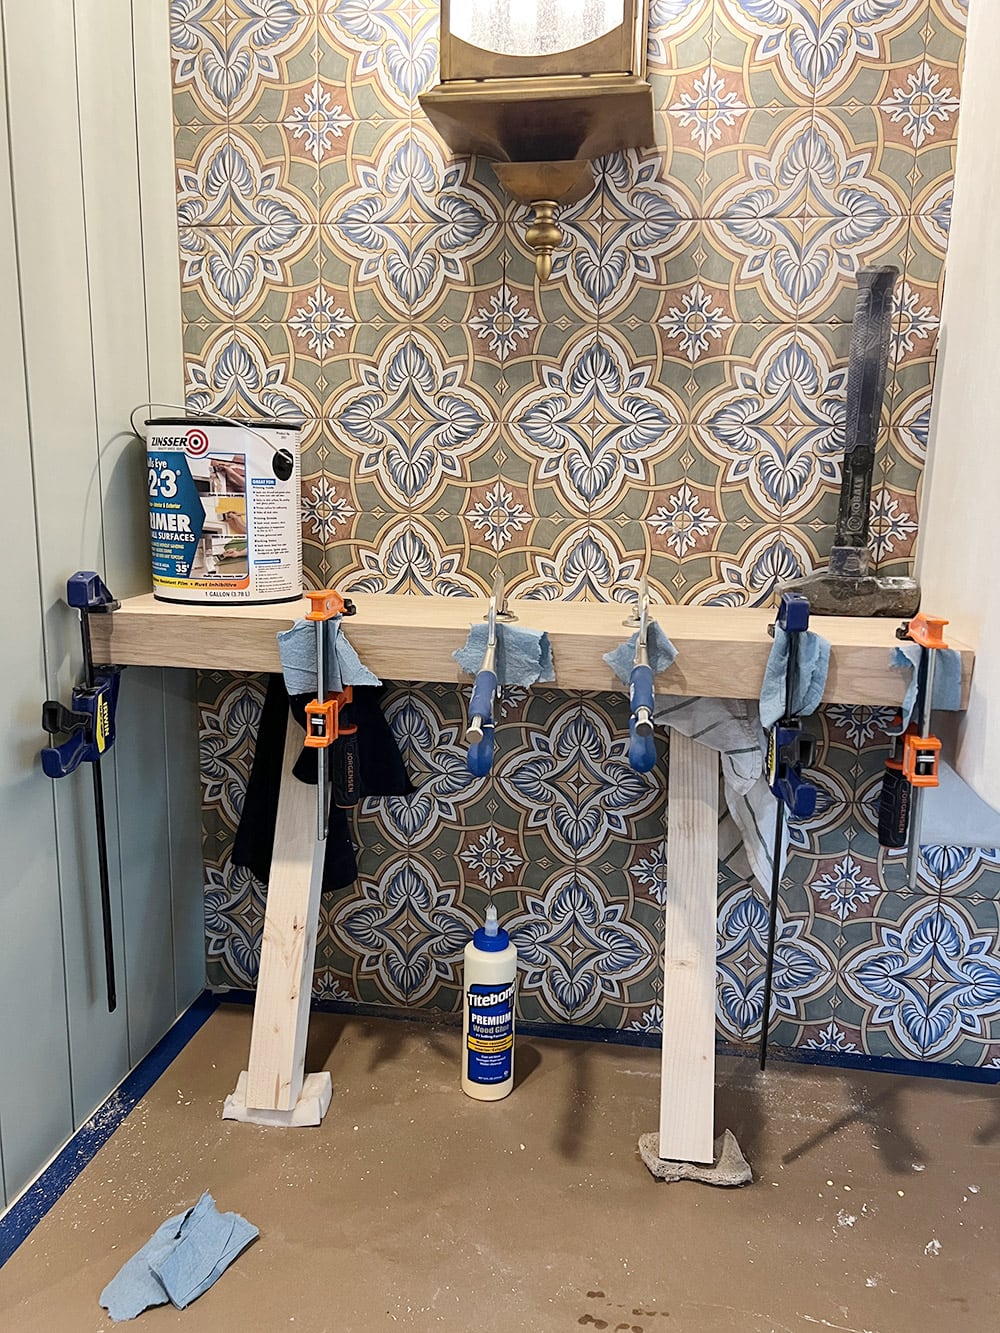
The glue only takes an hour or so to dry, but we let ours sit overnight to be extra safe.
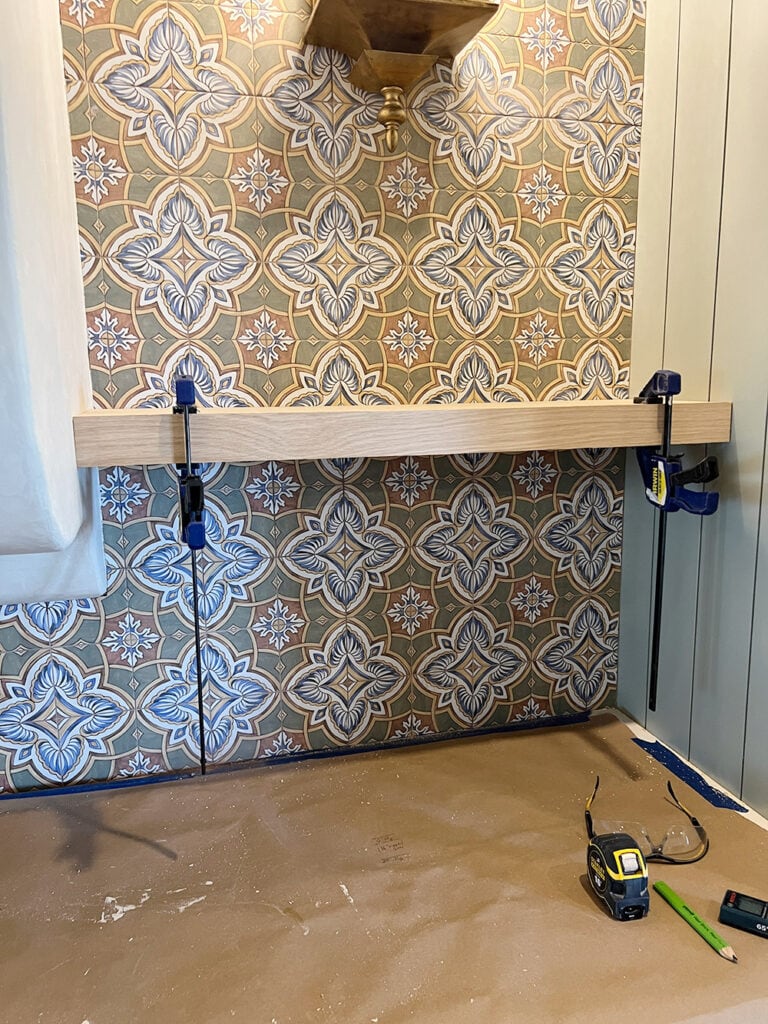
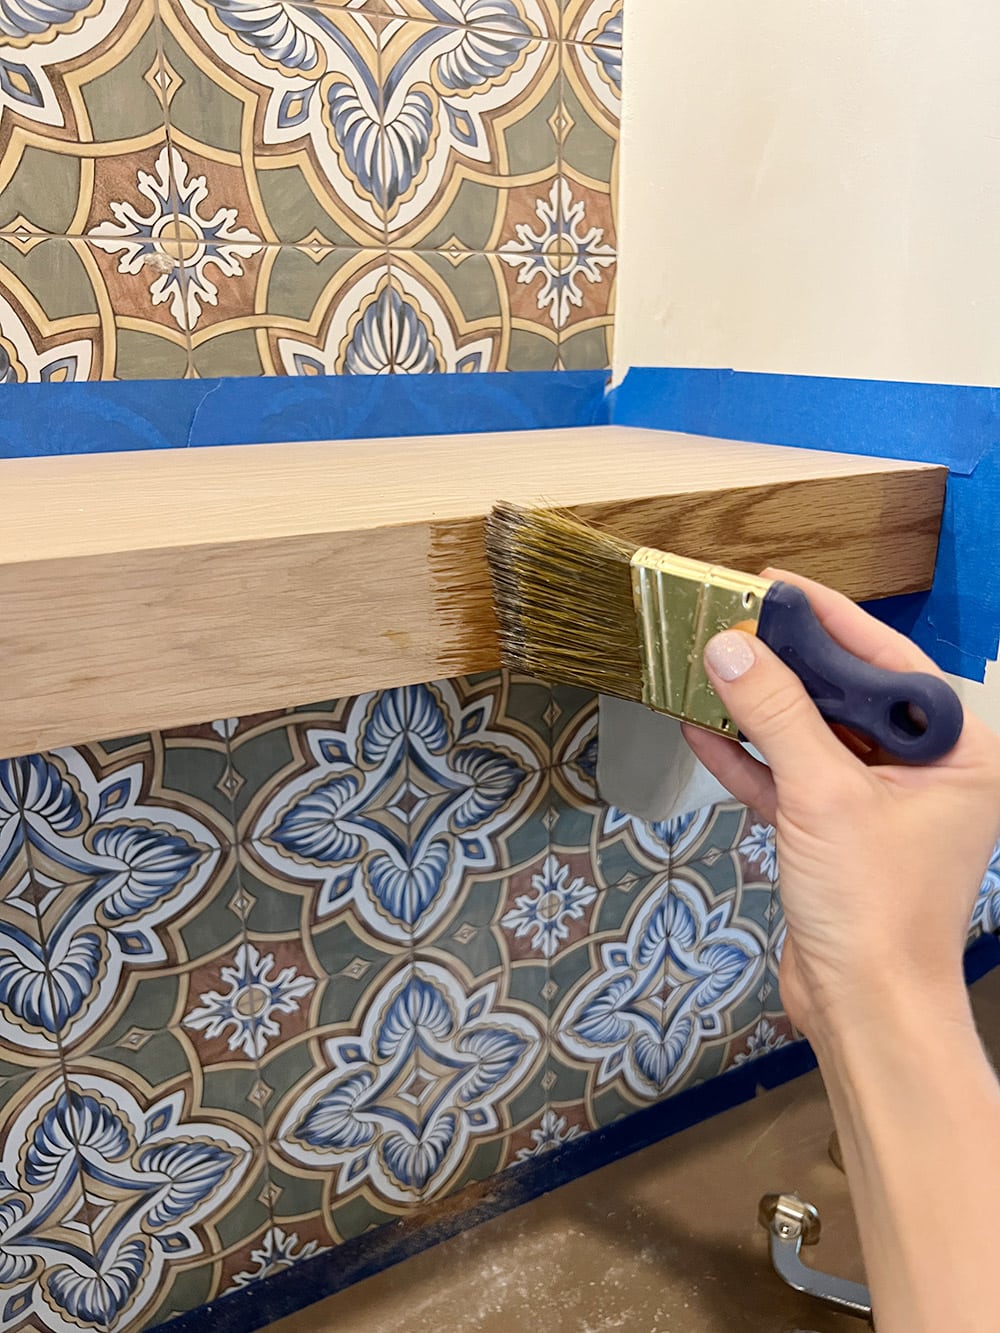
Step 7: Sand, stain and seal
After removing the clamps, there were a few stains from the glue that had to be sanded down, but nothing major:
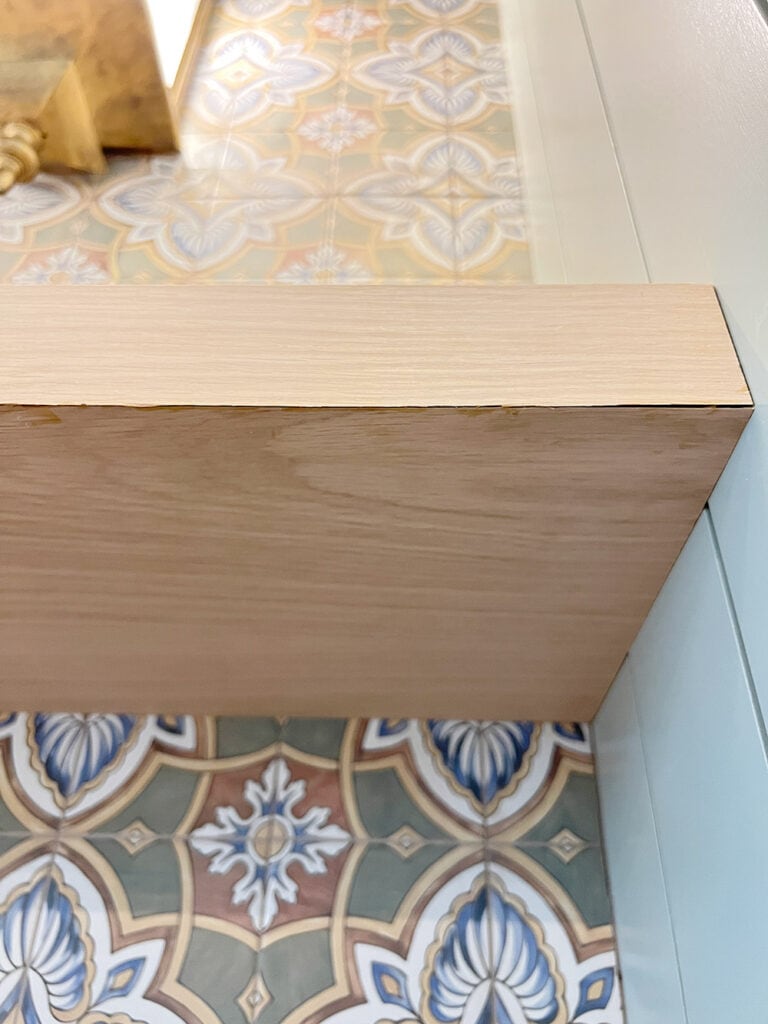
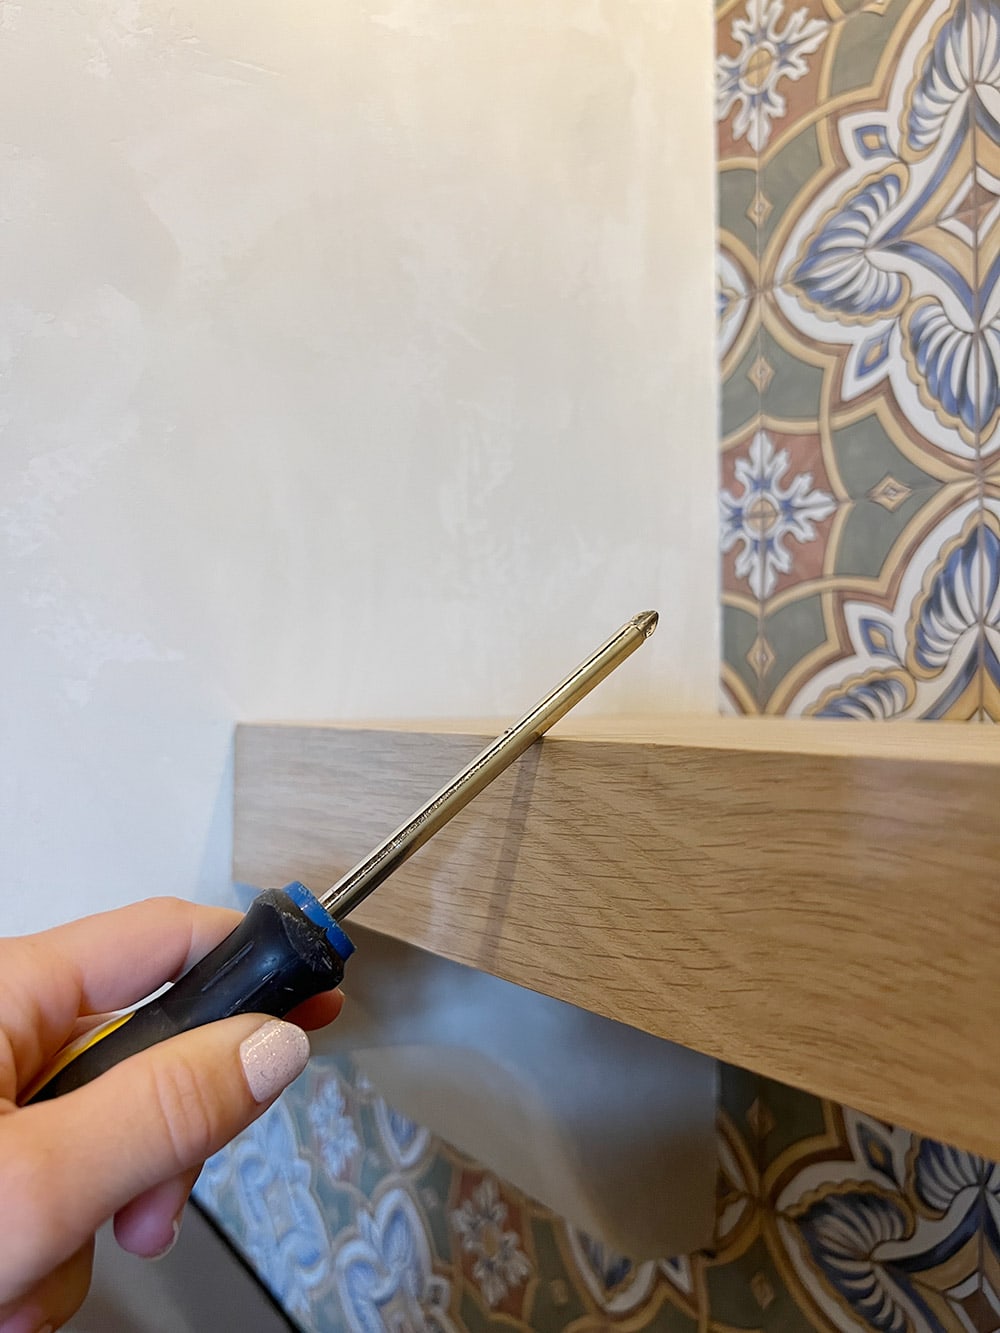
To close any small gaps along the edges, you can run a screwdriver (or a hammer) along the corner. This will help make it look like one solid piece, and round off any sharp edges. If you still have a gap after doing this, use stainable wood filler in a shade that matches your natural wood color.
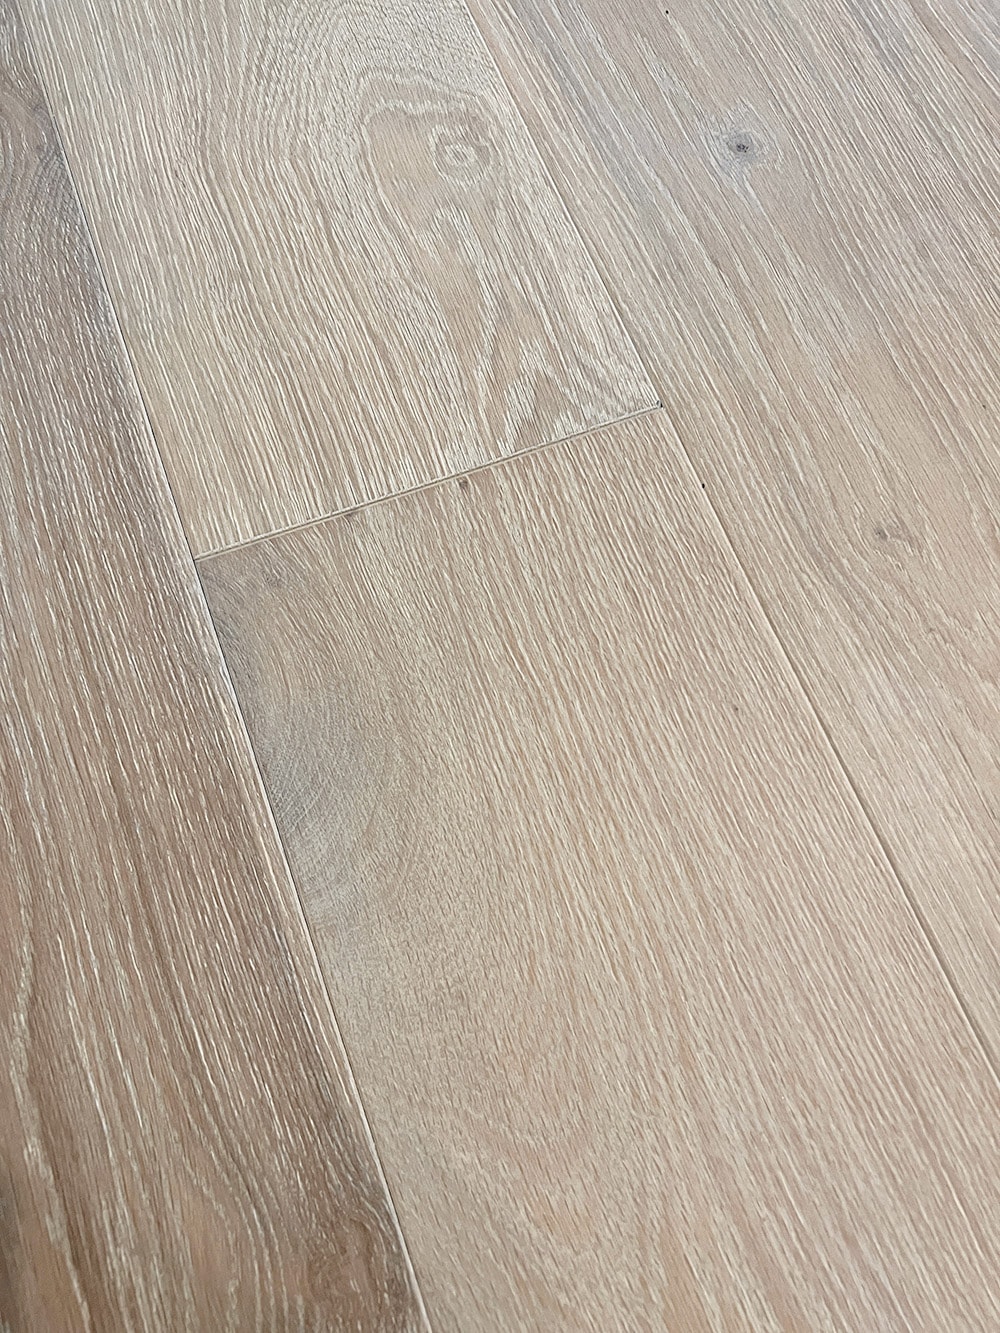
Now, let’s talk about stain! It’s important to note that the wood species you choose is the most important factor in the final appearance—you just can’t replicate the same wood grain and tone with stain. Knowing this, I paid a premium for white oak to get a close match to our European oak floors.
I tested a few different stain options, and landed on a coat of Minwax Driftwood, followed by a light coat of Minwax Simply White.
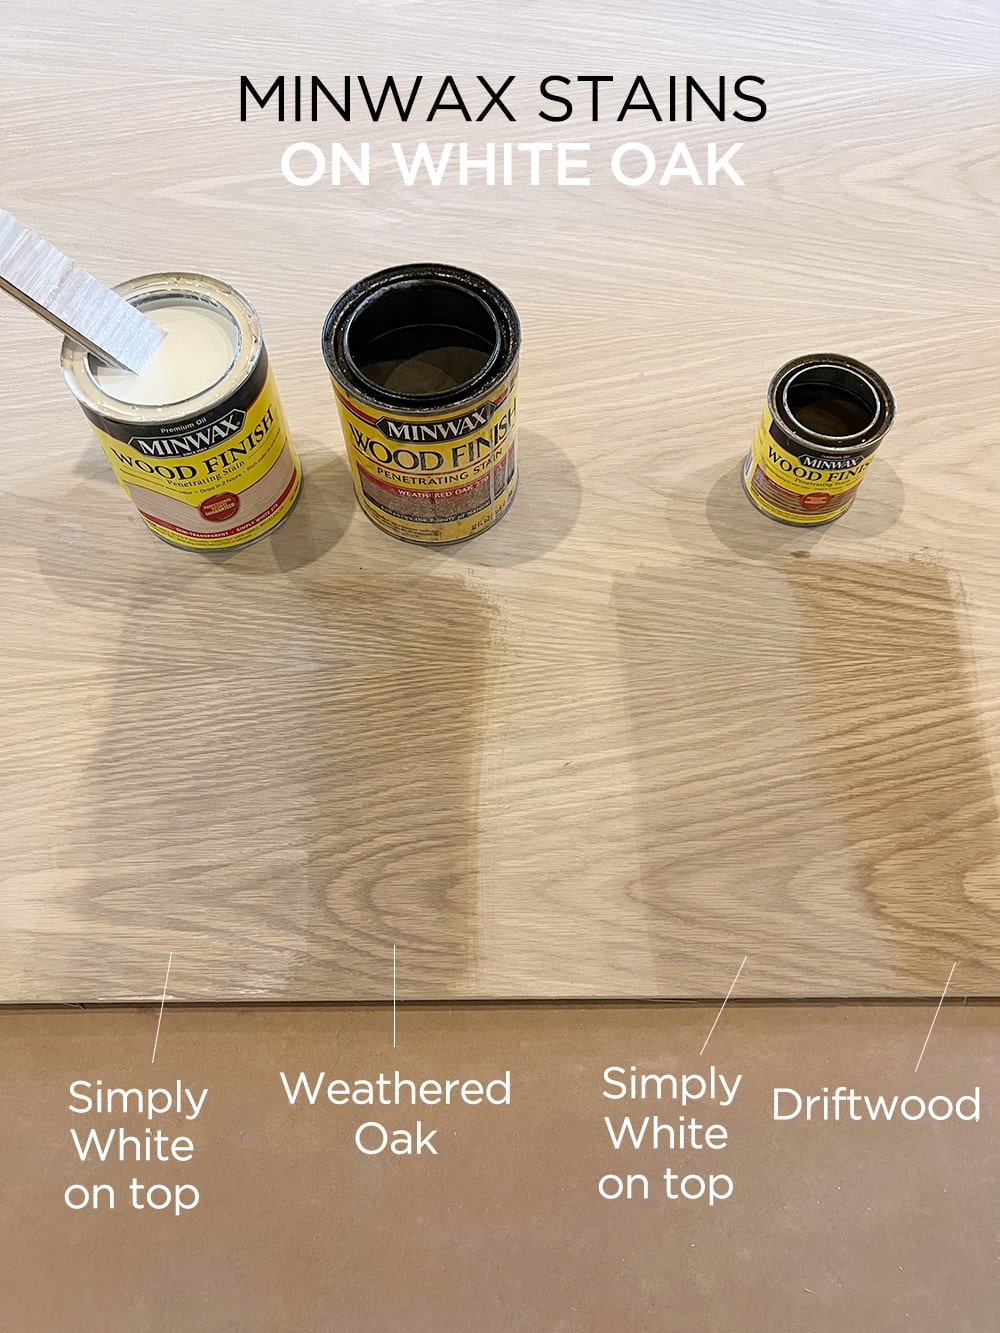
The Driftwood stain enhances the grain and gives us a nice, neutral brown base.
After the first coat is dry (two hours) it’s time to apply the second coat. Simply White is more opaque (almost like paint) so I only let it sit for 10-15 seconds before wiping it off.
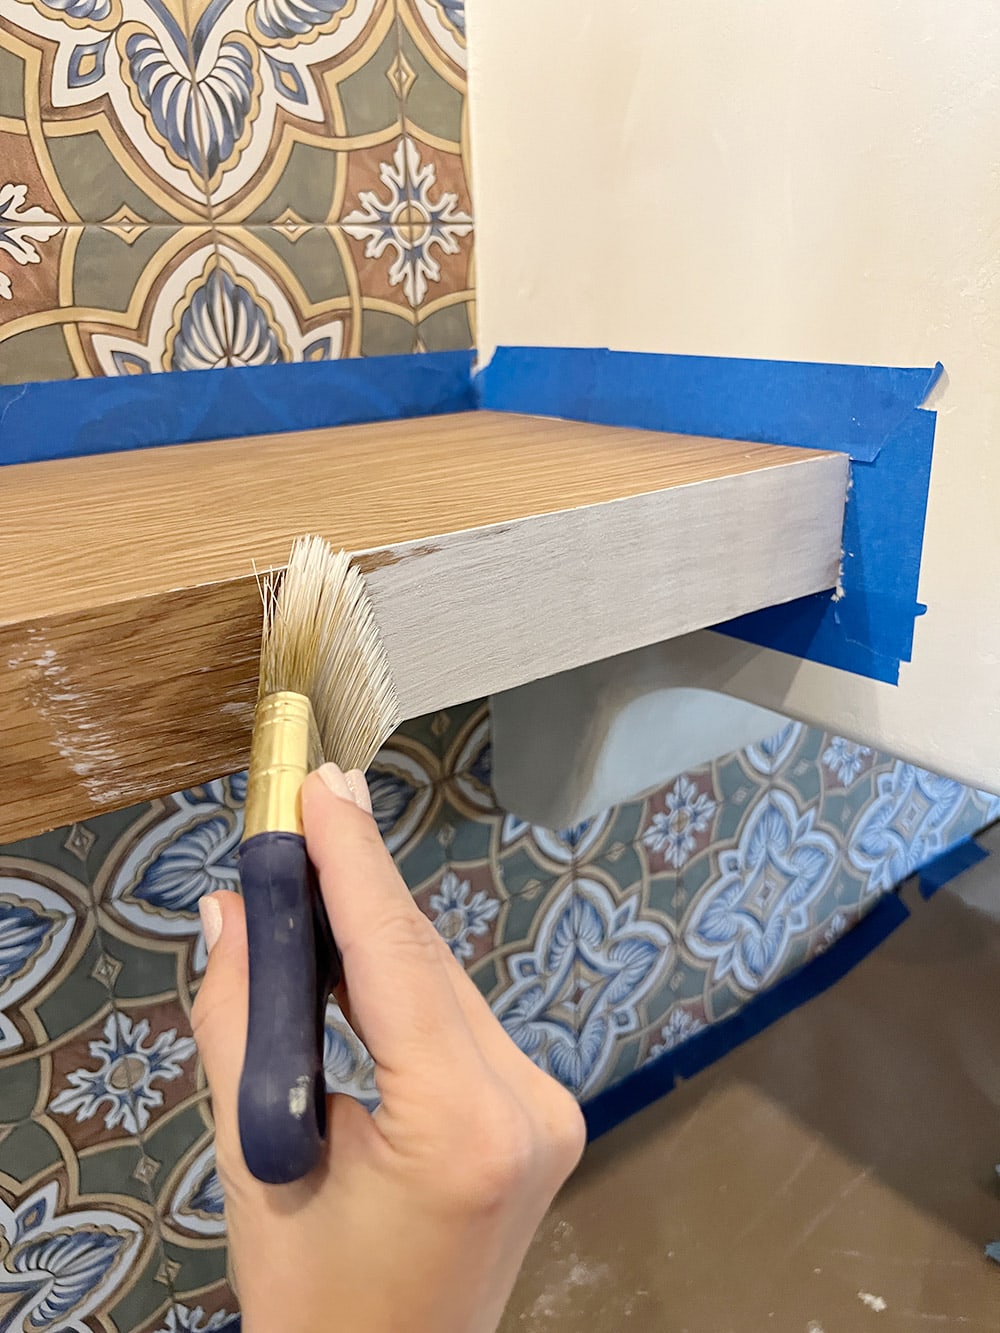
The white pigment settles into the grain, enhancing the texture and providing color contrast, just like our floors. Pretty neat, huh? I love layering different stains for a dimensional look.
After the stain is dry, make sure to seal the shelves to protect them! I applied three coats of matte polyurethane.
Reveal
The reward at the end is getting to style these beauties!
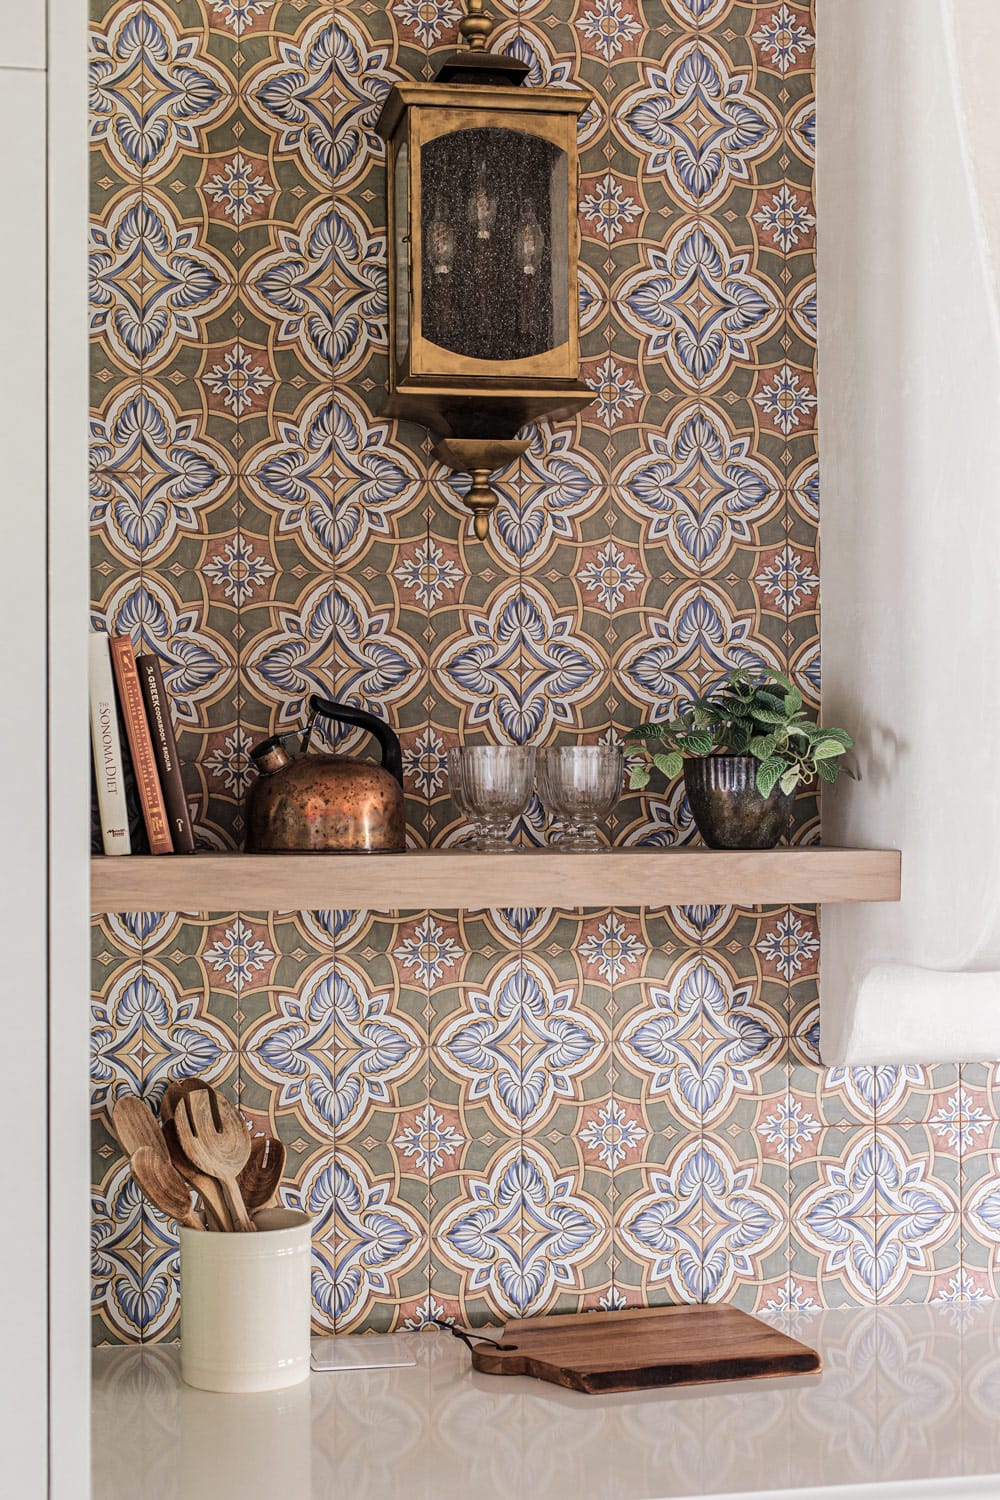
These are only temporary props I borrowed from our own kitchen, but permanent goodies are on the way.
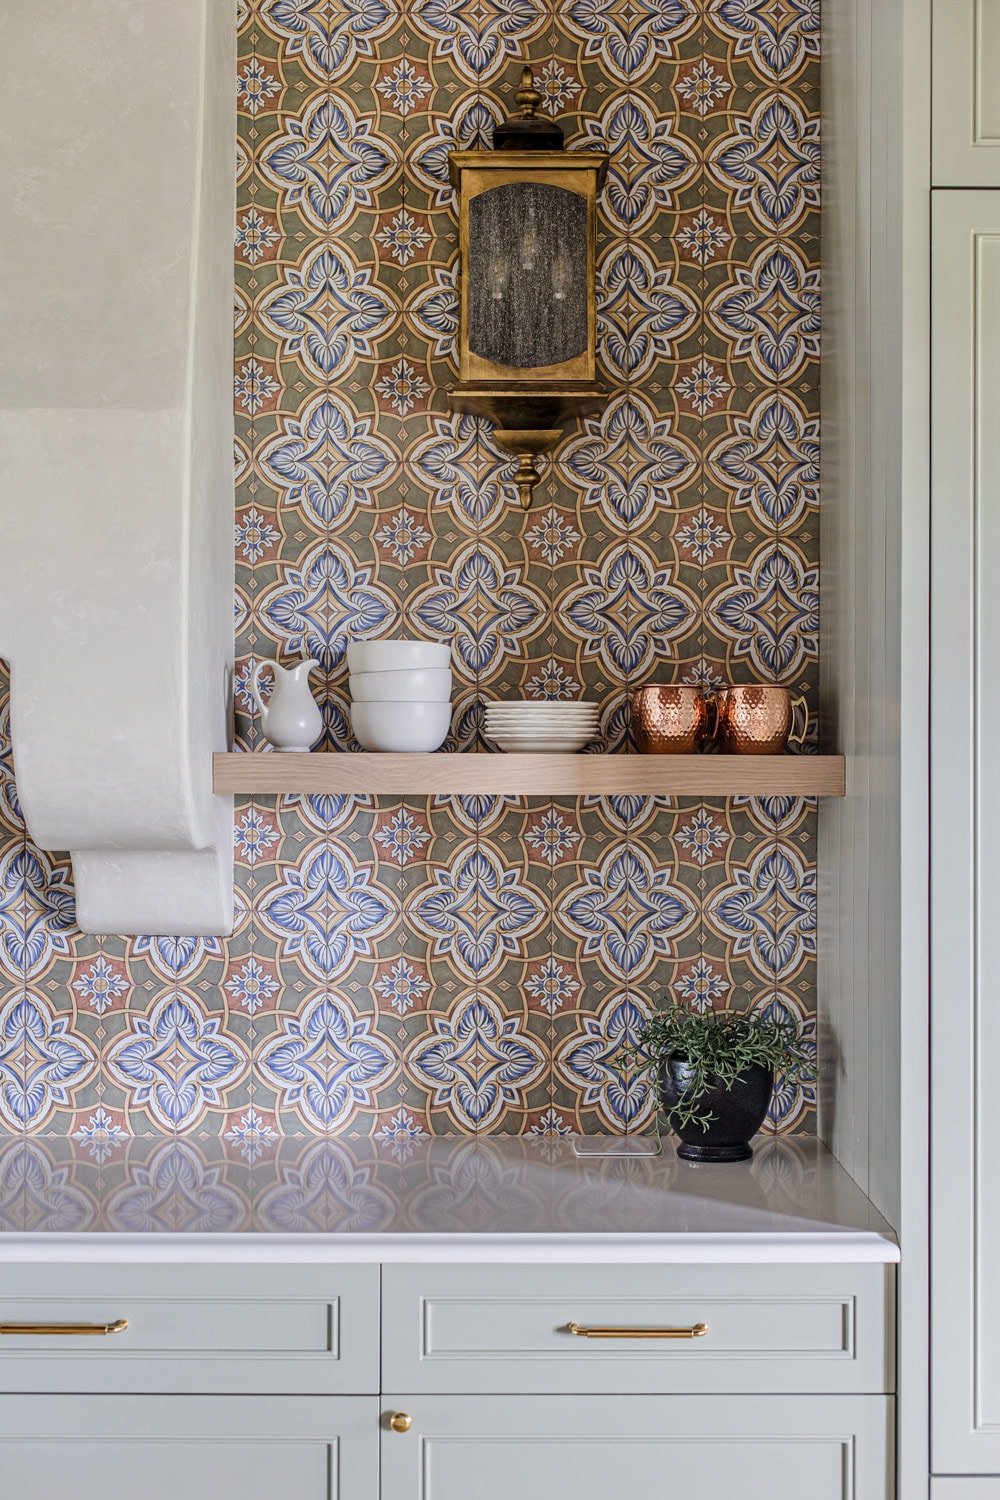
The original plan was to add brass pot rails underneath the shelves, but now I’m second guessing this choice. I still love the idea of them, but worry it would look too busy with objects on the shelf and hanging against the wall… what are your thoughts?
Installation Tips
- Select your wood carefully. If you are trying to match your floors (or another wood surface), try to find the same or a similar species. Stain alone will not replicate the wood grain and tone!
- Always pre-drill. When working with smaller pieces especially, wood is prone to splitting if you do not pre-drill properly.
- Always use wood glue. Don’t forget to apply it at every joint—this will ensure a solid bond that won’t separate over time.
- Check for level often. Wood has a tendency to shift around, so make sure to check for level each time you secure it.
Frequently Asked Questions
This will depend on the overall size, supports/hardware used, and how it is attached. Metal brackets are the safest bet for super heavy duty weight. As long as you hit multiple studs (especially on all three sides), wood glue and screws at each connection point, and the shelves aren’t too long and deep (more than 12″ x 4′ or so), you should have no problem stacking heavy dishes.
While it’s recommended, hitting studs isn’t necessarily a requirement. I once used these heavy duty toggle bolts to install kitchen shelves, and they worked great with reasonably heavy dishes. Those are also the same bolts we used to attach our faux beams to our ceiling, and they’ve held up perfectly.
It can be done both ways! The benefit of installing the shelves before tile is that you can avoid drilling into the tile. The tile will also hide any uneven gaps along the wall. However, this makes tiling slightly more difficult as you’ll have to cut it to fit around the shelves.
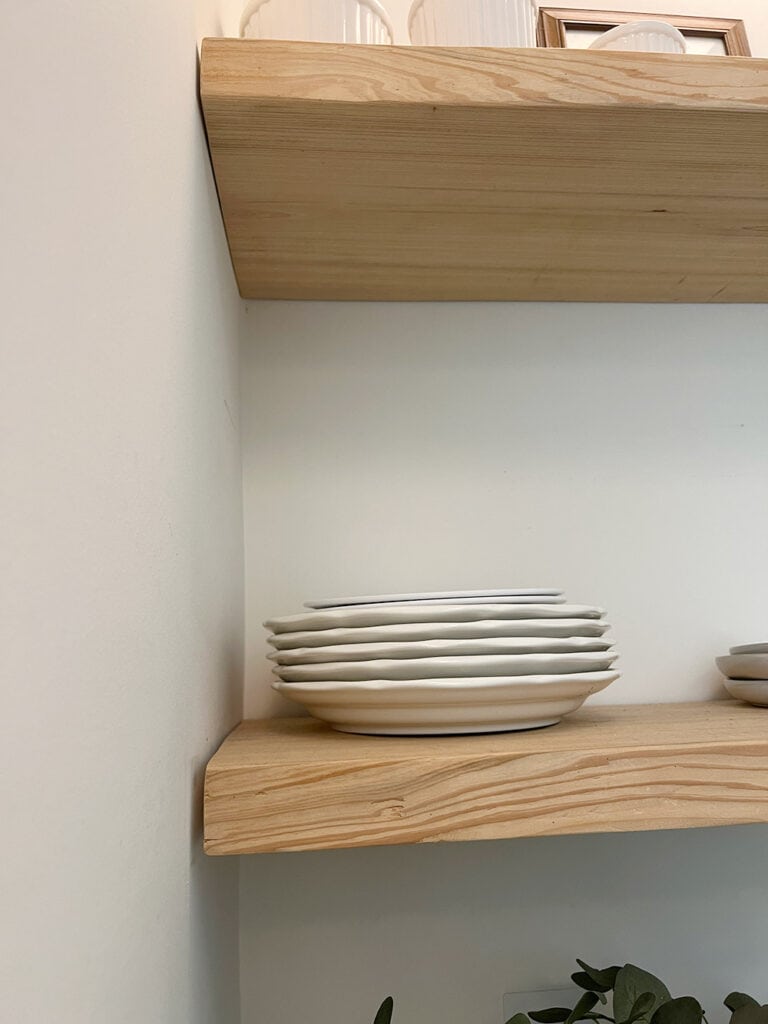
First, decide what you plan to display on the shelves. Standard dinner plates are 10-12″, so your shelves should be at least that deep if you’re storing plates. Everything else is typically smaller, so 10″ should be sufficient for bowls, drinkware and salad plates.
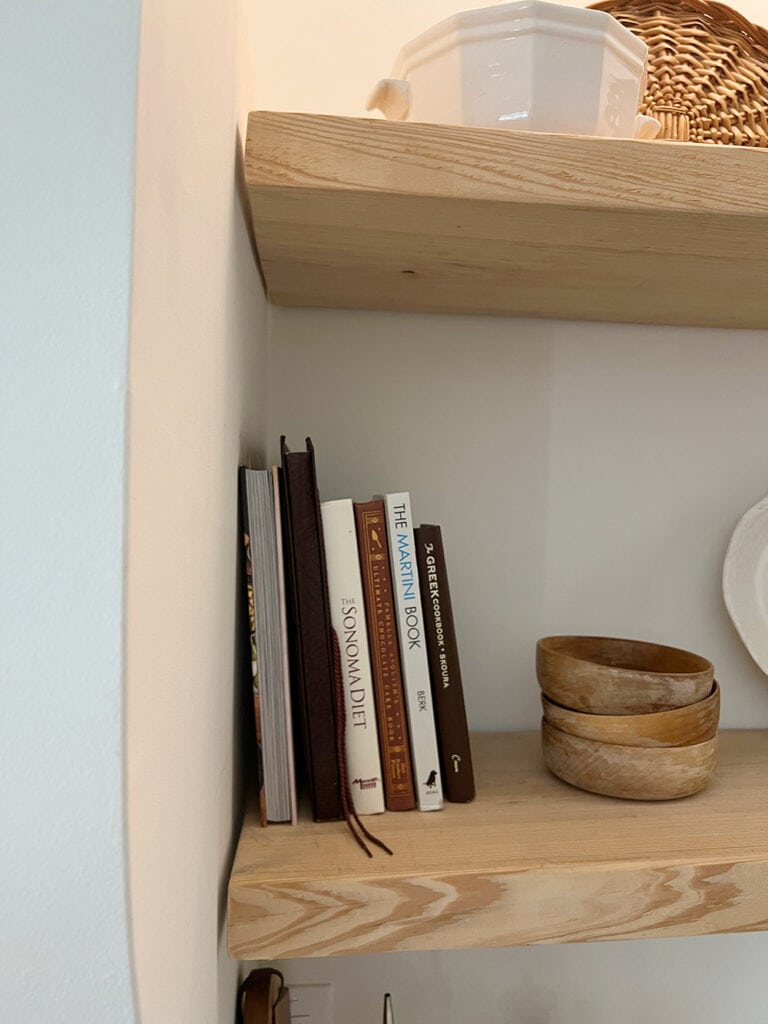
You should have at least enough room for the tallest item on your countertop (ie coffee maker, cutting boards, etc). If you are installing more than one shelf, this will impact placement. Consider what’s an accessible height for you and your family, and how often you’ll be reaching for the items.
That should cover it! Did I miss anything? Let me know if you have any other questions in the comments below. We’re checking off a few final to-do’s in the kitchen this week, and then it will be DONE! Can you believe it? Stay tuned for the big final reveal next Wednesday!


Pam says
Great…..thank you for letting us know.
LilyP. says
If you love the idea of brass rail do it on the top of your shelves ( something like ChrisLovesJulia did). This way you will have the brass element without busyness of hanging items.
Elizabeth Martinez says
Hi Jenna, Everything looks beautiful, love how the shelves came together! Can you tell us more details on the tiles, I love them!!!
Gavin says
Thank you for this! What happened to your backyard? Is your lawn really that long haha
Jenna Sue says
Haha! We’re getting a pool put in soon so we have not bothered to mow it 😀
Heather says
The floating shelves look amazing along with everything else you two do! You are incredible!
Jenna Sue says
You are too kind, Heather!
Lindsay says
I agree that hanging pots would look too busy. Visible pots in a kitchen always make me think it’s lacking storage, but there is plenty of storage space here, especially for a rental.
Jenna Sue says
Thanks for sharing your thoughts, Lindsay!
Michele M. says
This kitchen is amazing, your tutorial is genius and I looooove how it looks. No pot hanger.
It’s sheer perfection. You guys are freaking amazing.
Jenna Sue says
So glad it was easy to follow Michele! Appreciate you 🙂
Carly says
Maybe my favorite kitchen you have done. Do not add pot racks, it would be way to much stuff going on. As a rental I would not want people potentially banging a pot against the tile and cracking a tile. Your design is just perfection, and will last the test of time.
Michele M. says
I completely agree.
Jenna Sue says
Thank you, Carly!
Elle says
I the ink a brass rail would be pretty, but pots would be maybe too large and distract from that stunning tile. Maybe a whisk, a soup ladle, a bundle of dried herbs, or something visually lighter. Totally bare is unrealistic but my God, that tile should get as much attention as it truly deserves, great job!
Jenna Sue says
Thank you Elle! I would definitely keep the hanging objects minimal 🙂
vicki says
All your choices here are just perfect. Beautiful job on the shelves.
I love the idea of the brass rail just to add a bit more dimension. You don’t have to hang too much on it if you feel it looks too busy. ❤️
Jenna Sue says
Thanks so much for sharing your opinion, Vicki!
Robin says
Oh my gosh! This home gets more and more beautiful with each project! I love the shelves—-and everything else you’ve done! It’s simply amazing!
Jenna Sue says
I’m so glad you like it Robin!
Cynthia Solomon says
As usual, just perfection!! These shelves beautiful and functional!! Thank you for the step-by-step instructions and pictures, very helpful! That tile is just gorgeous!
I think you made a good decision not to put the brass pot racks under the floating shelves…I agree it would be too busy!
Jenna Sue says
Thanks so much Cynthia, and for weighing in about the pot rack! It’s a tough decision.
Kathleen says
so beautiful. I wouldn’t want to cover up that beautiful tile anymore with the pots hanging. Though it would look amazing. That’s a hard decision.
Jenna Sue says
I am torn too! I think it would work out either way.
suzanne says
Thank you! You answered a few questions I was curious about. Stunning kitchen.
Jenna Sue says
So glad it was helpful, thanks Suzanne!