You know the feeling when you have this perfect dreamy vision in your head and then it comes to life?
![]()
Well, I do! We’ve had one heck of a week around here, but it all came together at the end and this was the cherry on top that made the effort worth it.
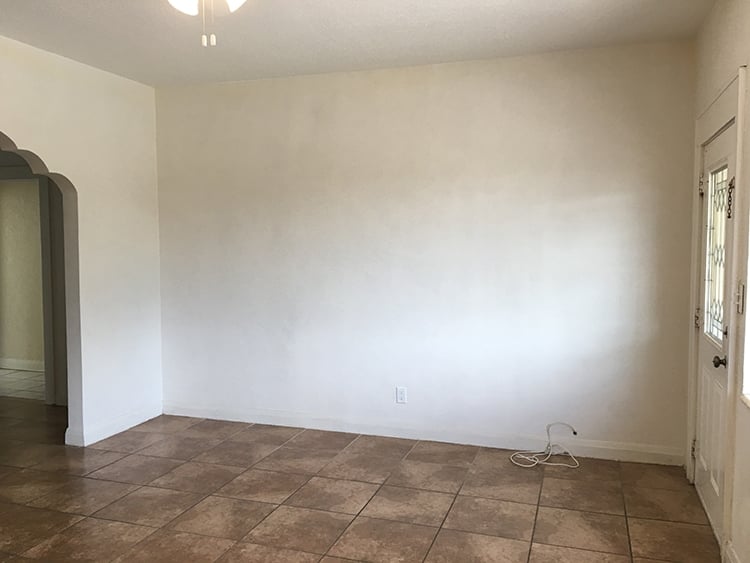
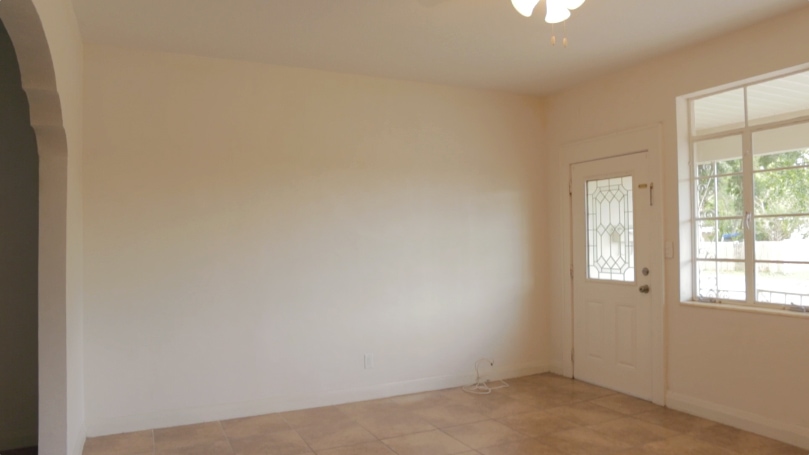
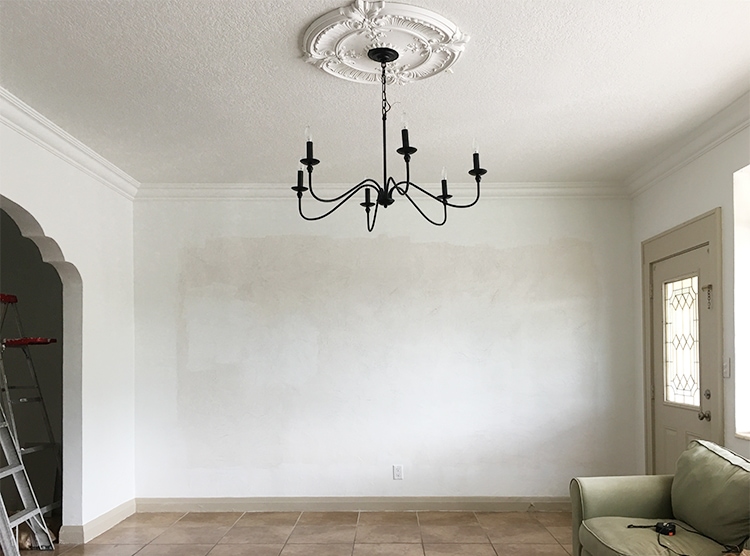
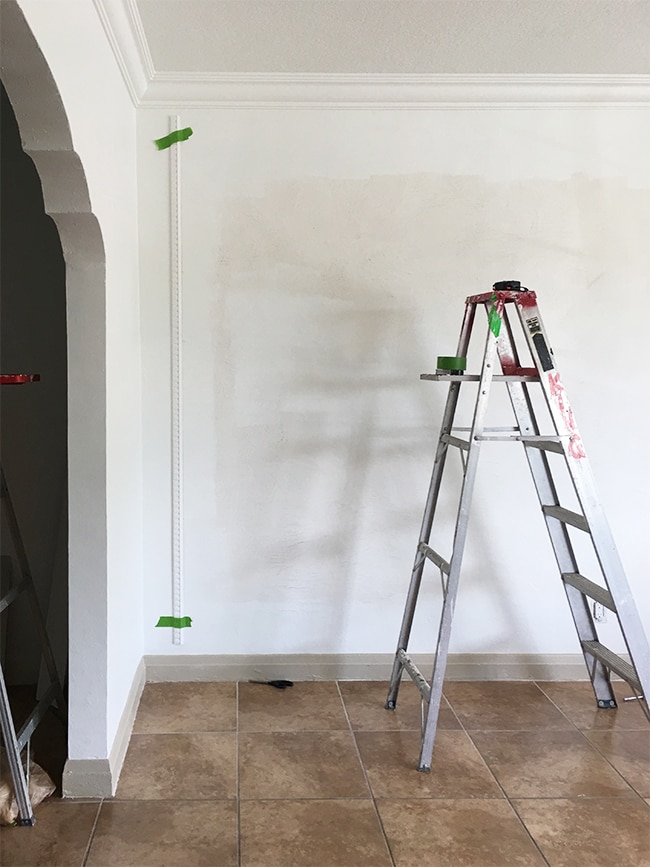
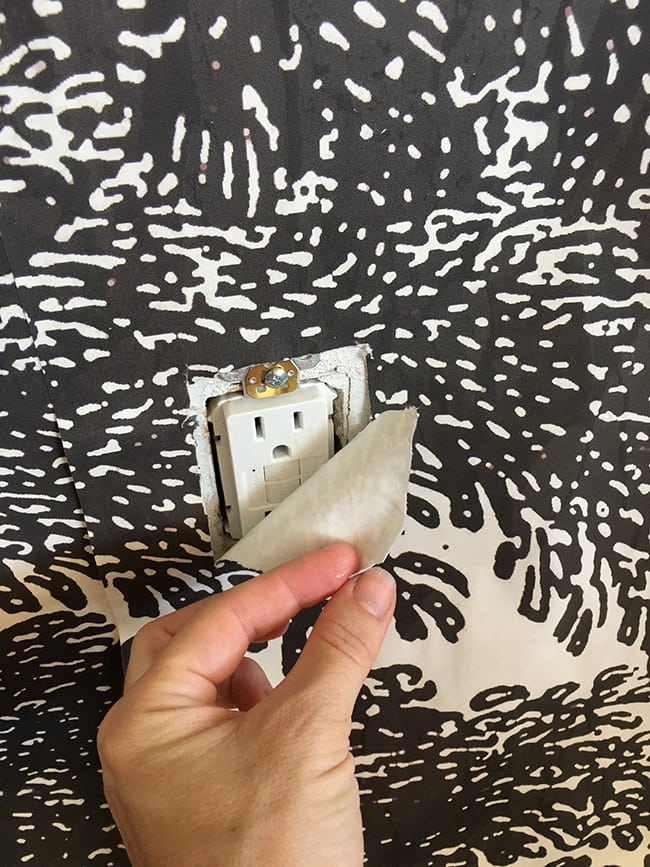
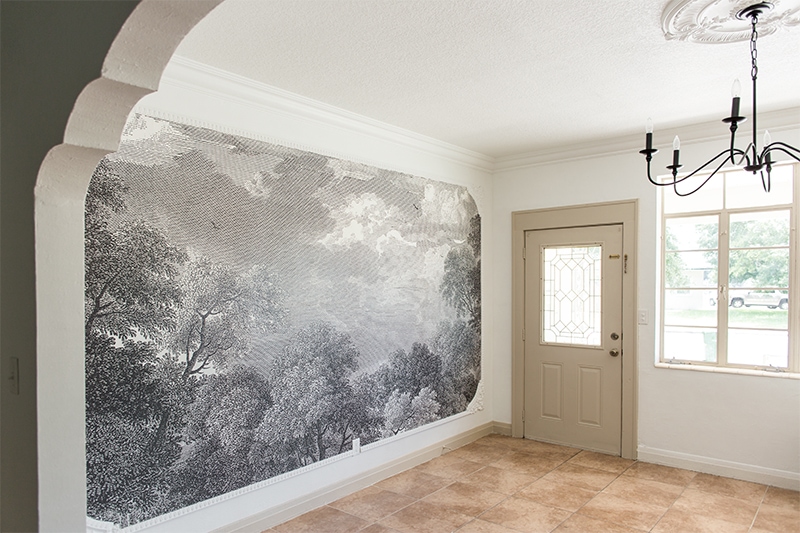
Let’s back up a second and recall what this wall in our living room looked like when we moved in last month:
In the last few weeks we’ve painted and added crown molding (tutorial on that and more details/photos coming next week), but today I want to talk about our latest project we wrapped up a couple days ago: installing a wall mural, framing it out with trim, and our new ceiling medallion & chandelier.
Last month after weeks of research, I purchased this Anthropologie wall mural (I scored it on eBay for $250 shipped, unfortunately it’s no longer available there). I still think it’s well worth the retail price.
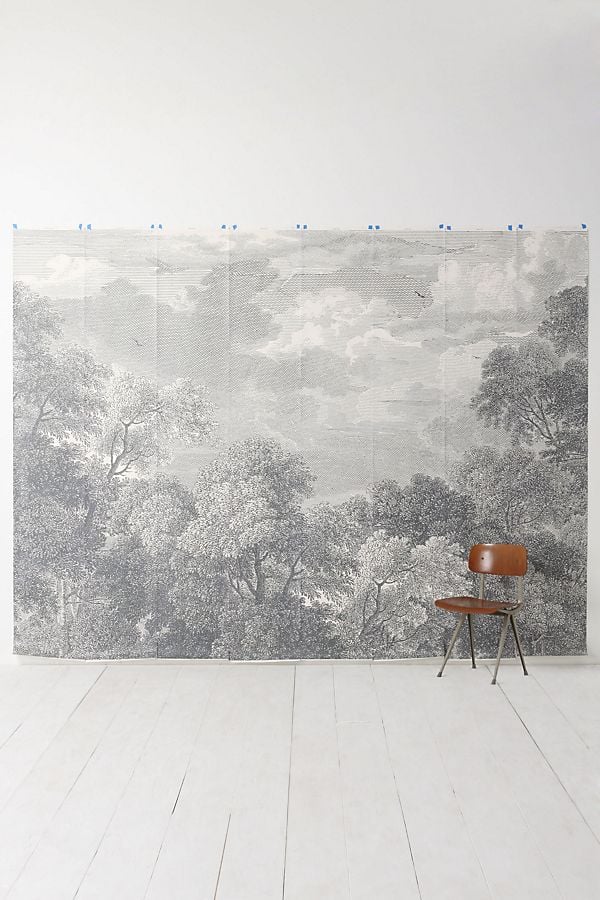
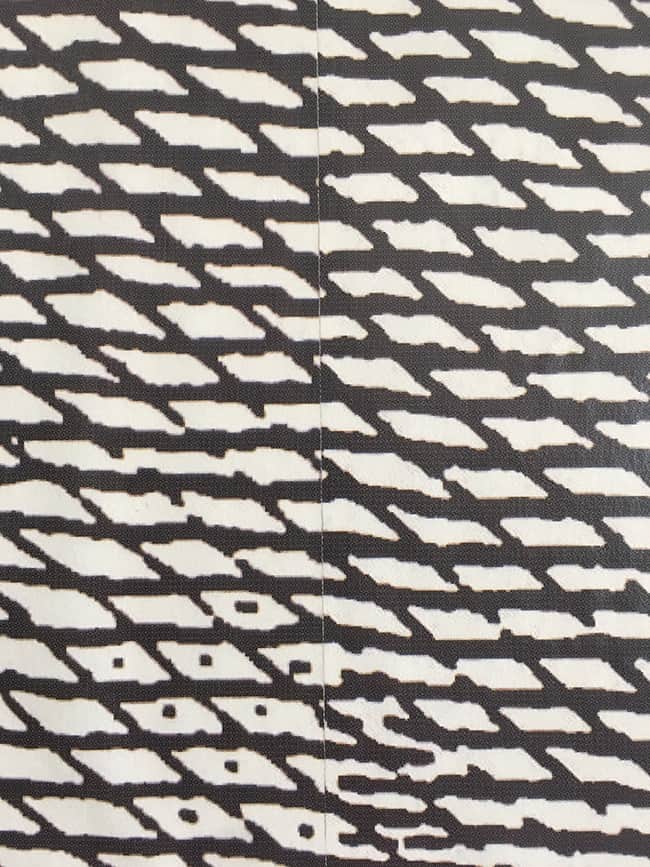
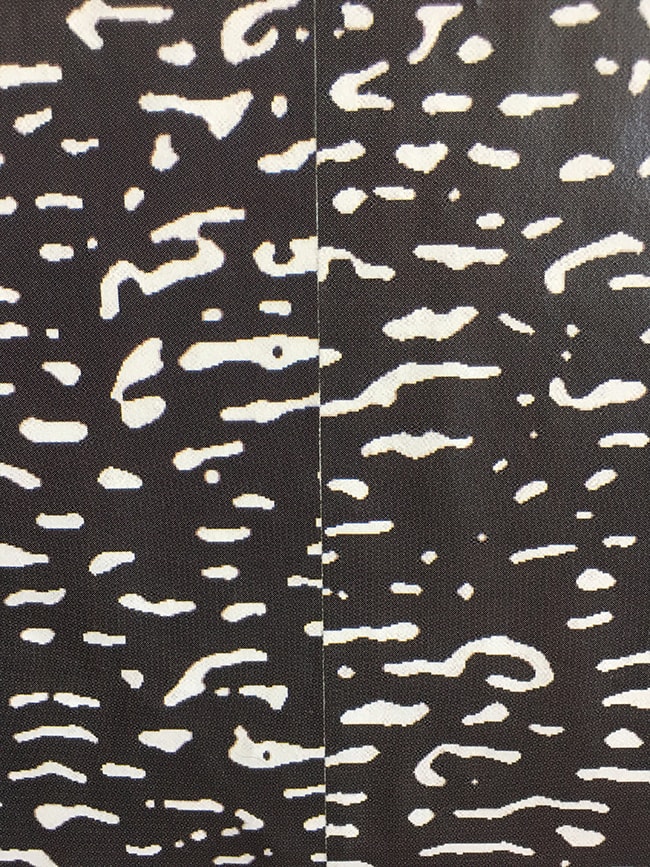
I love this design for so many reasons, and think it’s neutral and classic enough to go with any style and won’t look trendy in a few years.
Originally I had envisioned the mural covering the entire wall, but our wall is 159″ wide and the mural was only 144″. I almost didn’t buy it because of this, but I loved it so much that I figured out a way around that—which has now become my favorite detail of the room. And that is how you turn lemons into lemonade!
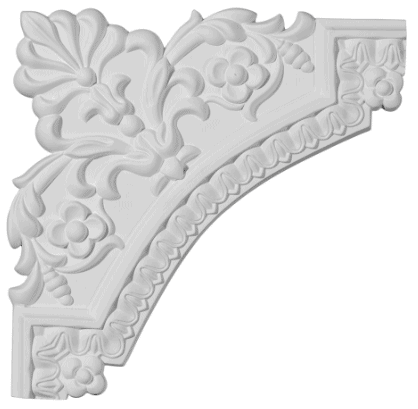
I’ve been so inspired by classic European architecture and history through our travels last year (see what I’ve been obsessing over on this Pinterest board) and have been especially drawn to decorative molding—on walls, ceilings, doors, furniture, you name it. This project was the perfect opportunity to test it out!
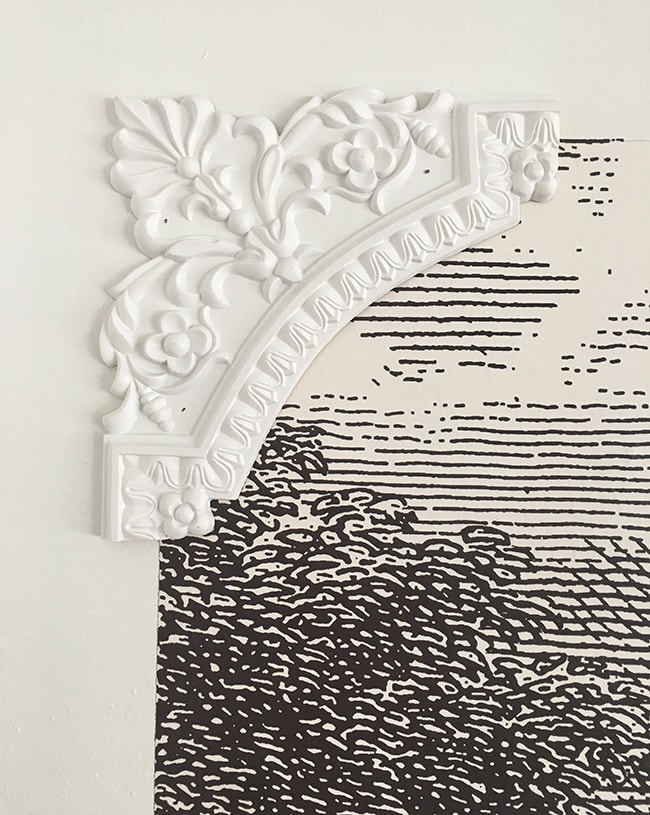
I found these corner pieces from Ekena Millwork on Lowe’s—aren’t they gorgeous?
Ekena specializes in lightweight polyurethane molding (I’ve used them in the past and love their products) with a huge selection in their online catalog. From there I was able to find the matching connector pieces and locate them by part number on Lowe’s:
For this project I needed 4 corner pieces and 5 connector pieces (they come in 7.88′ lengths). I also bought this same setup to use on the dining room ceiling, which we’ll be installing soon!
All of the molding was delivered last Wednesday, and before anything was installed I made sure to paint it (very important to do this first!) I used Sherwin Williams Pure White in their Matte finish, which looks somewhere between a flat and eggshell, and it’s washable. Satin or semigloss is more commonly used on trim, but I wanted mine to blend in with the walls and crown (also painted in the Pure White Matte) to keep things simple and cohesive. There’s no right or wrong on the finish you choose, it’s just a personal preference.
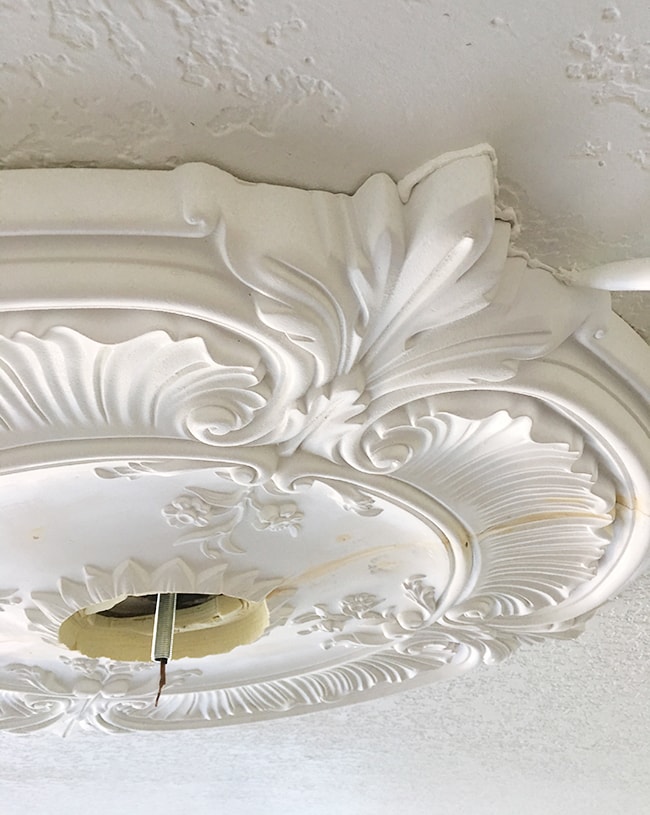
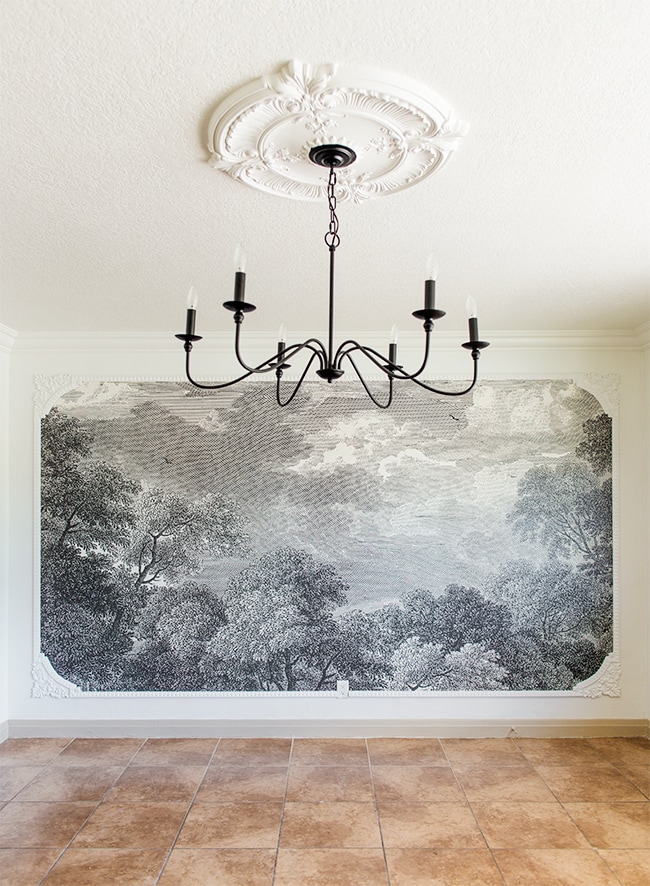
If you watch my Instagram stories, you may remember seeing this:
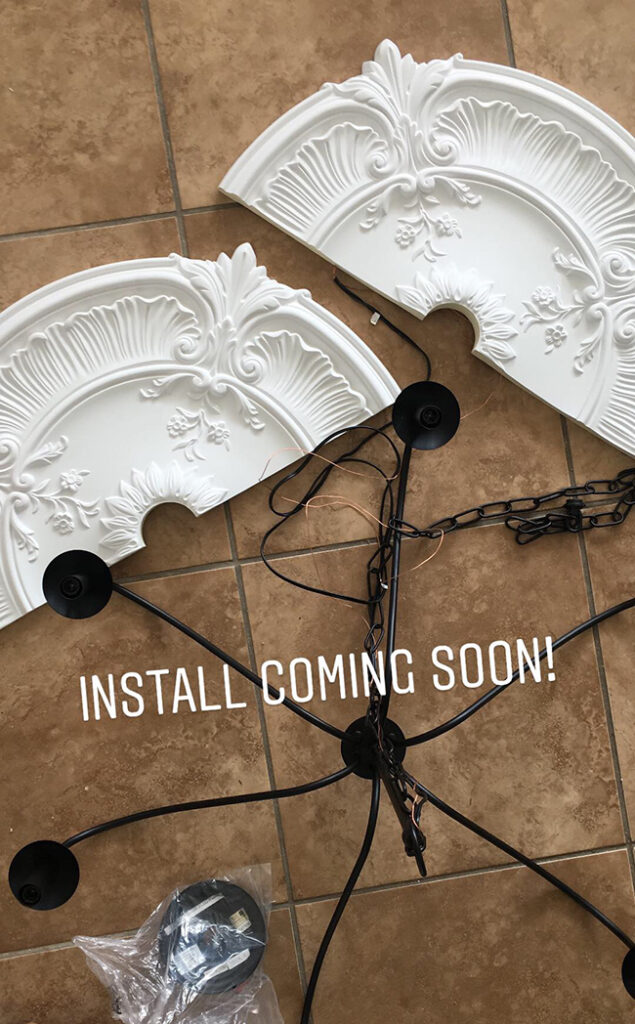
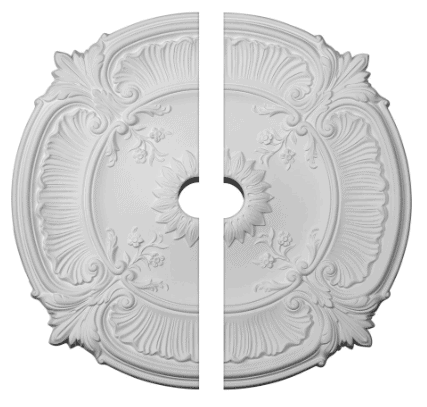
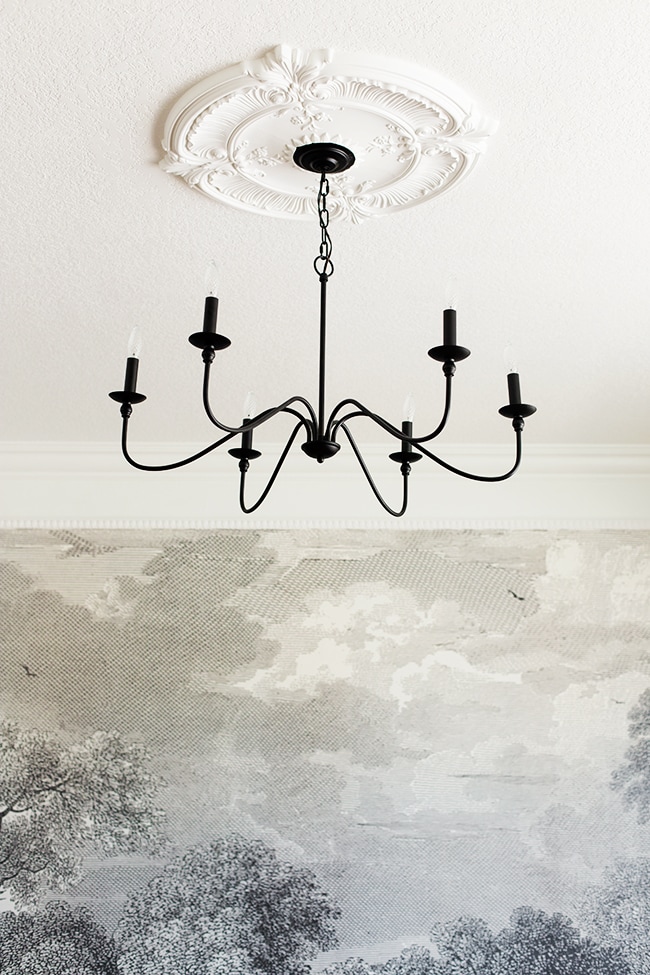
That gorgeous ceiling medallion is another Lowe’s find from Ekena Millwork, and it’s something I’ve always dreamed about using…
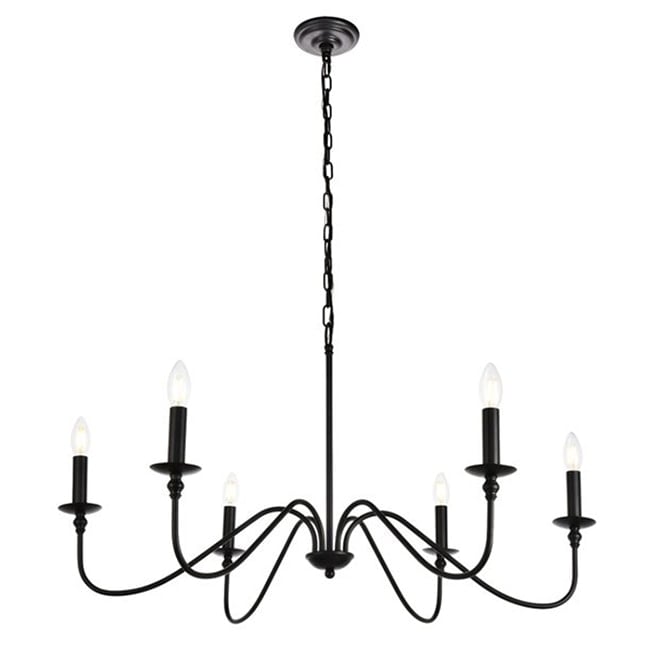
The chandelier is a Wayfair find I scooped up on sale for $101—it’s huge and has to be one of my favorite bargains ever!
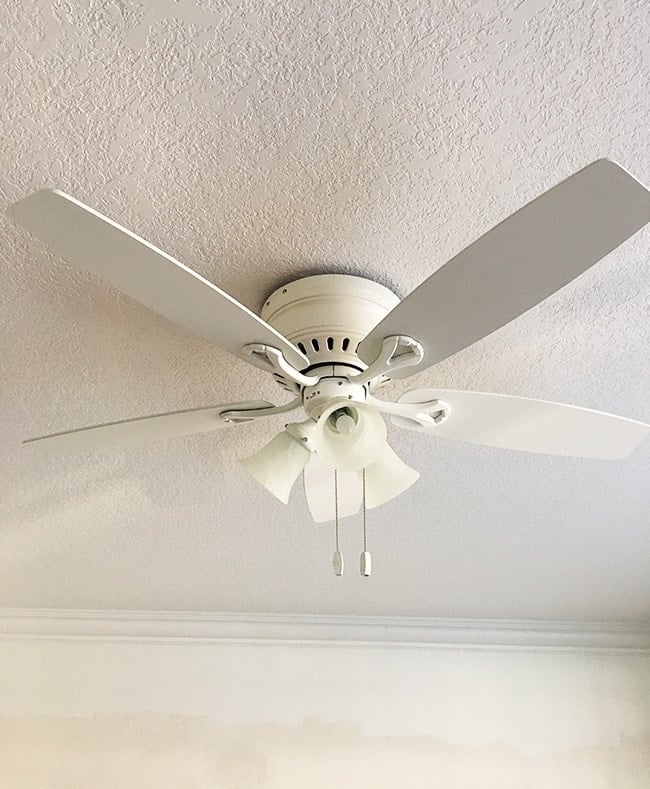
First thing’s first—get rid of this fan situation:
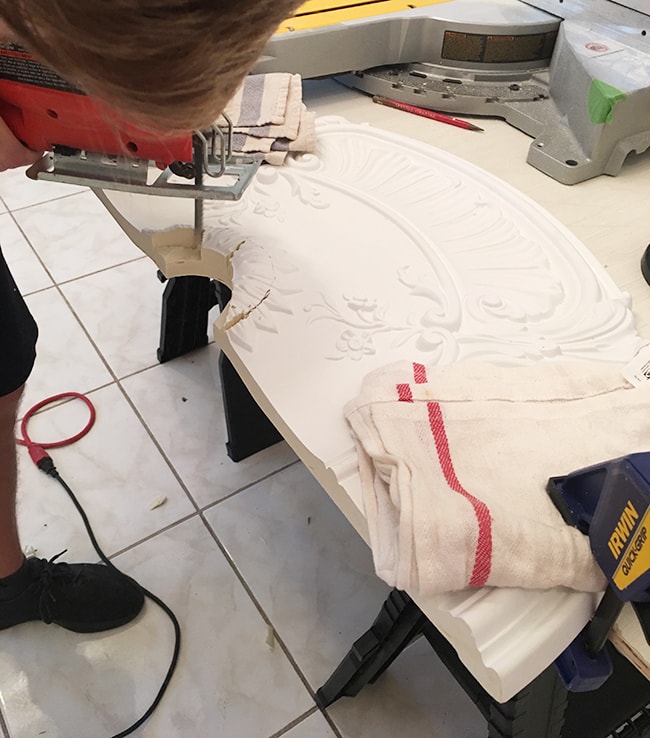
There was one small problem—the canopy of the chandelier was larger than the 3″ medallion opening, and the threaded rod that connects the chandelier to the ceiling wasn’t long enough for the canopy to sit on the outside of the medallion. Fortunately, the foam-like material is super easy to cut into, so we went at it with a jigsaw:
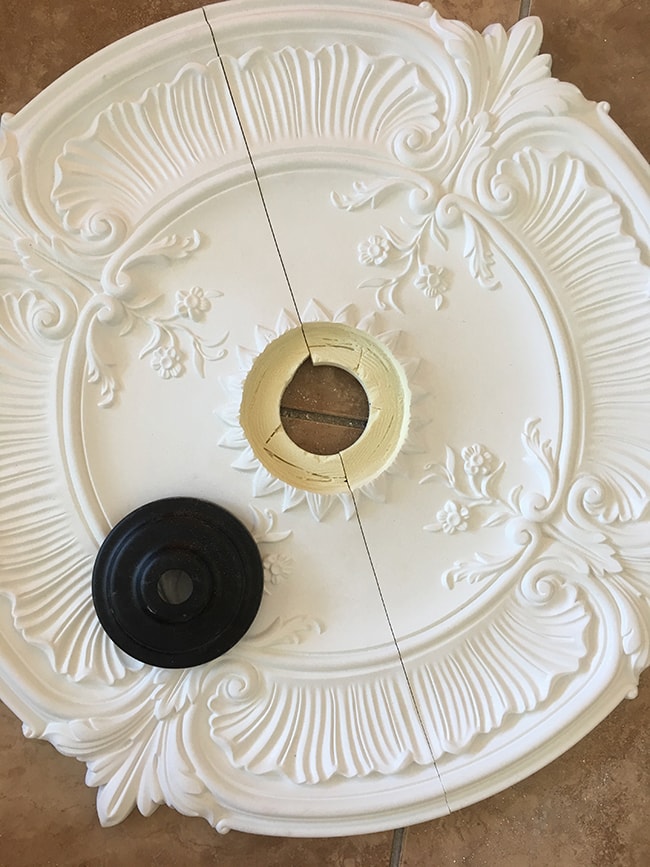
In no time at all we had our little shelf for the canopy to sit inside:
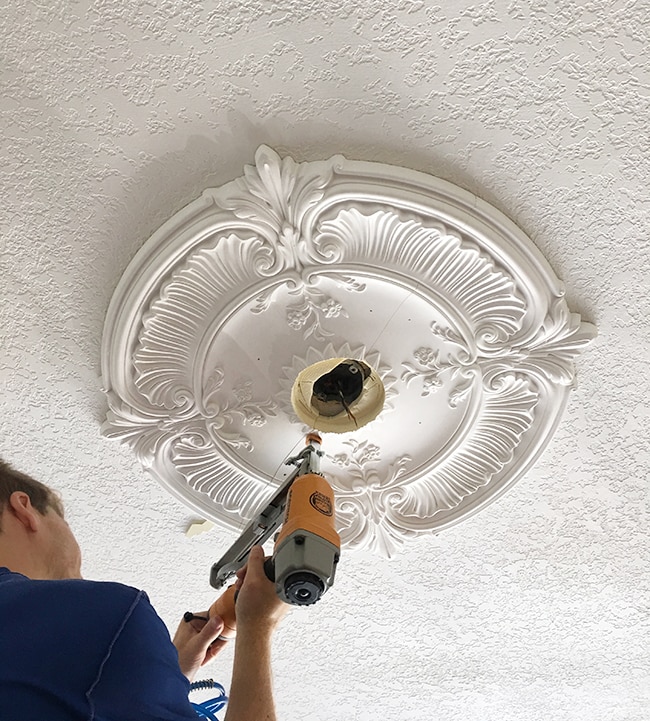
Our ceiling isn’t perfectly straight, so we had to rotate the two halves of the medallion until they were as flush as possible. Once we got them into the proper position, we applied liquid nails to back and shot a few 16 gauge nails into the medallion (no studs needed, the ceiling grabbed just fine):
Later I went back and filled the holes and seam with putty (you could also use caulk if you don’t have any big holes or seams) and then caulked around the perimeter where it met the ceiling:
A test fit of the chandelier—and we have lift off!
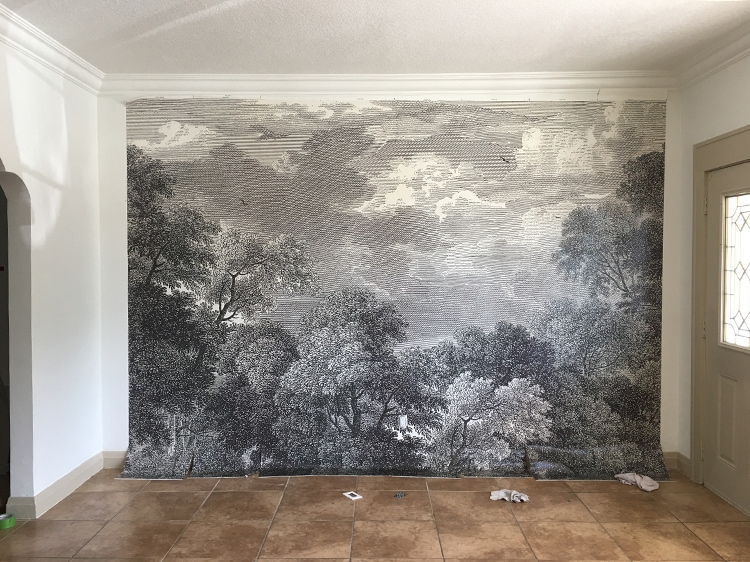
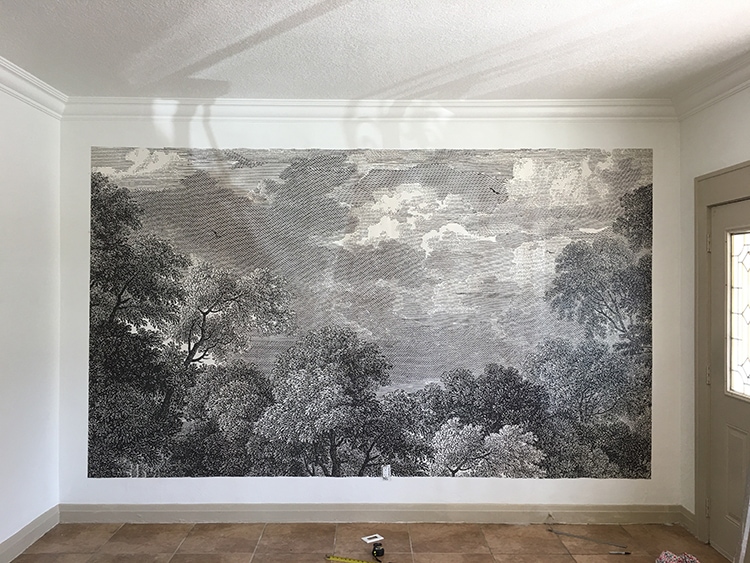
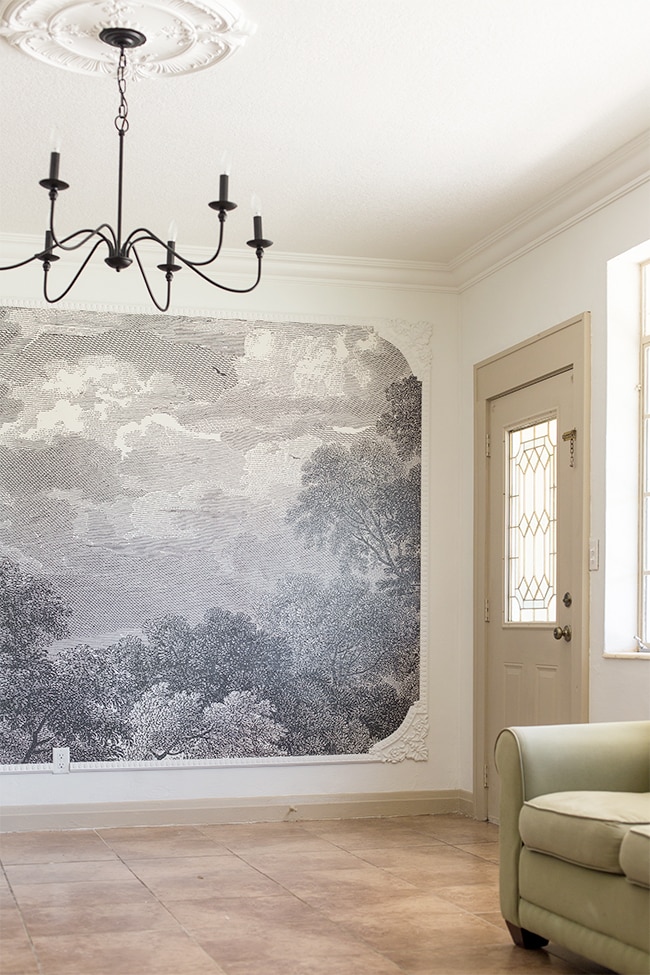
Alright, now let’s get to the good stuff. I’m talking, of course, about that dreamy wall mural.
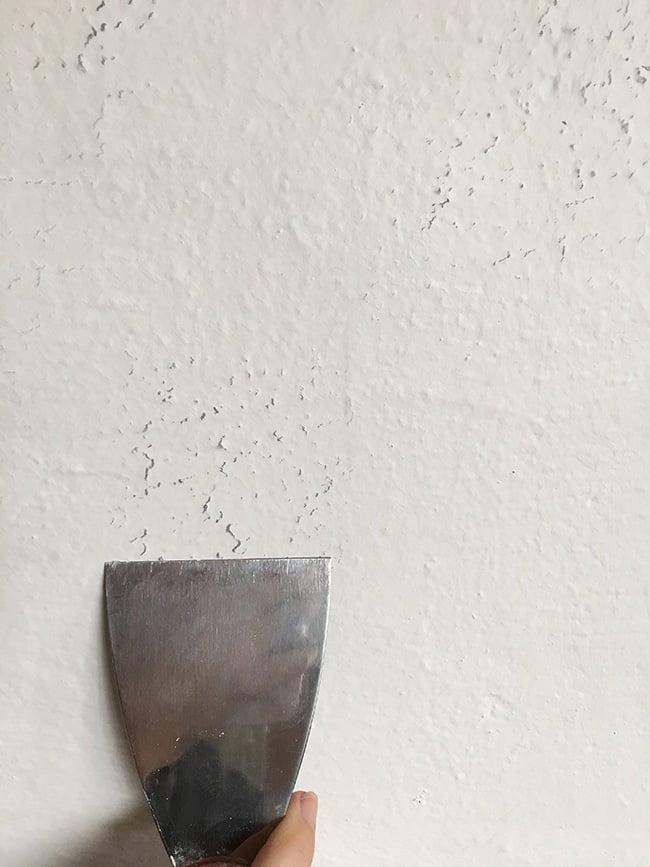
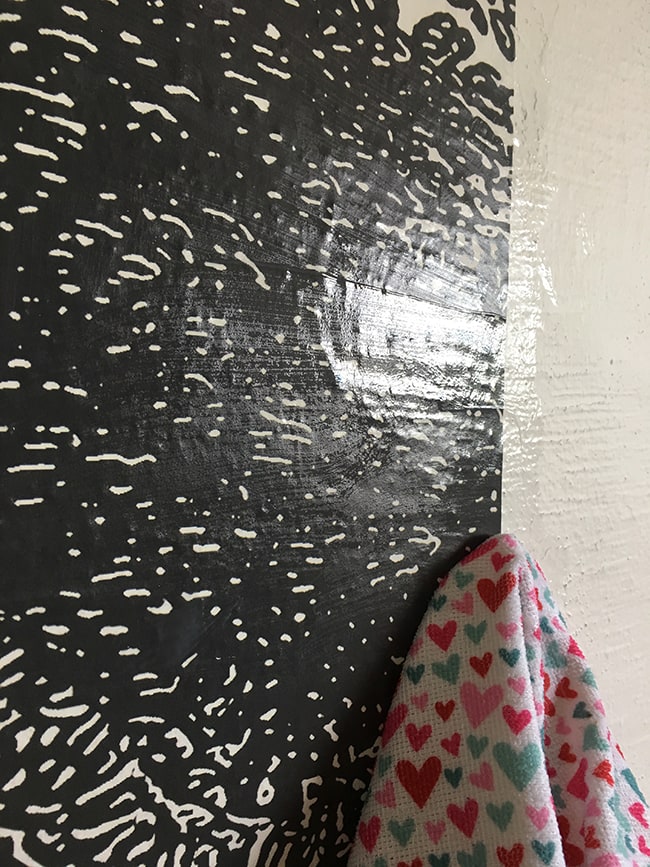
It’s advised to hang murals/wallpaper on smooth walls, because you’ll be able to see bumps and texture through the paper. Our wall isn’t super textured, but it’s not smooth either:
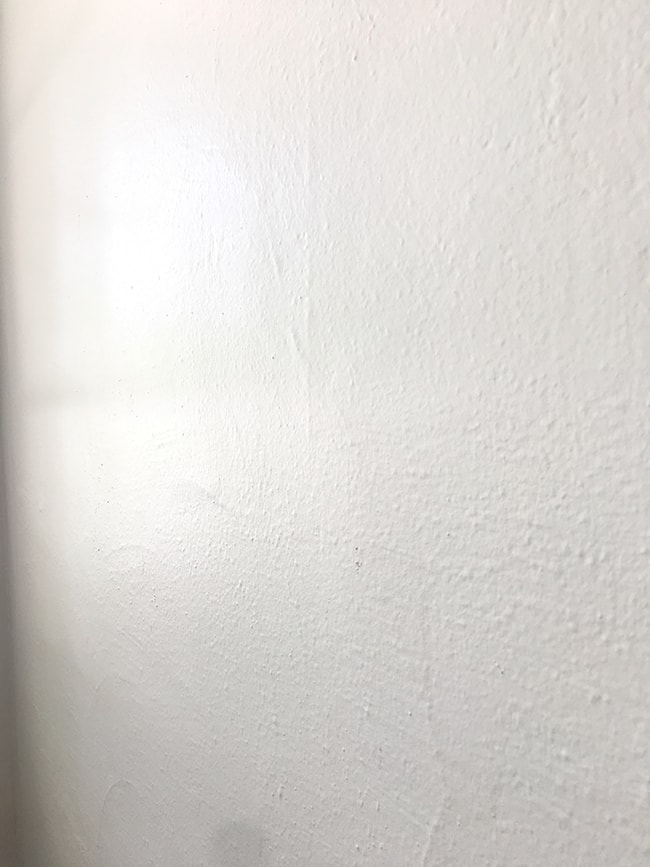
I figured the pattern would camouflage most of it, but just to be safe I used a putty knife to scrape down the bumps as best as I could.
Here are the supplies I gathered for this job:
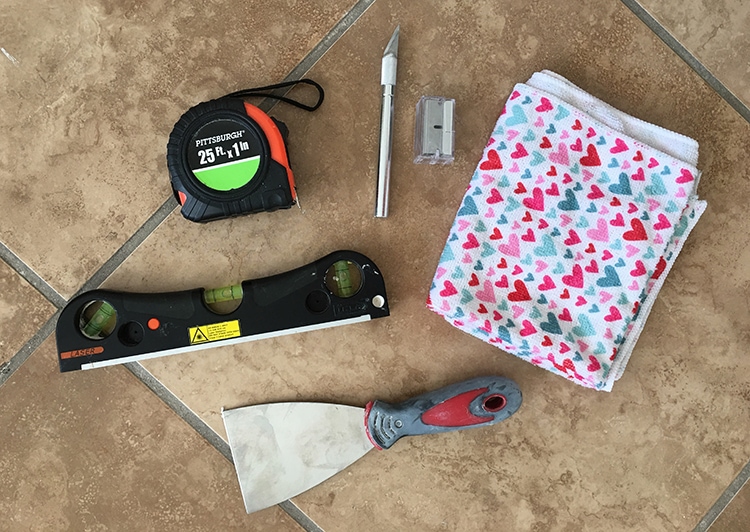
You’ll also need a tub of water large enough to hold one roll, and extra rags/sponges are very useful. That black thing in the middle is a laser level from IKEA which is also nice to have (and recommended), though we certainly could have done without it.
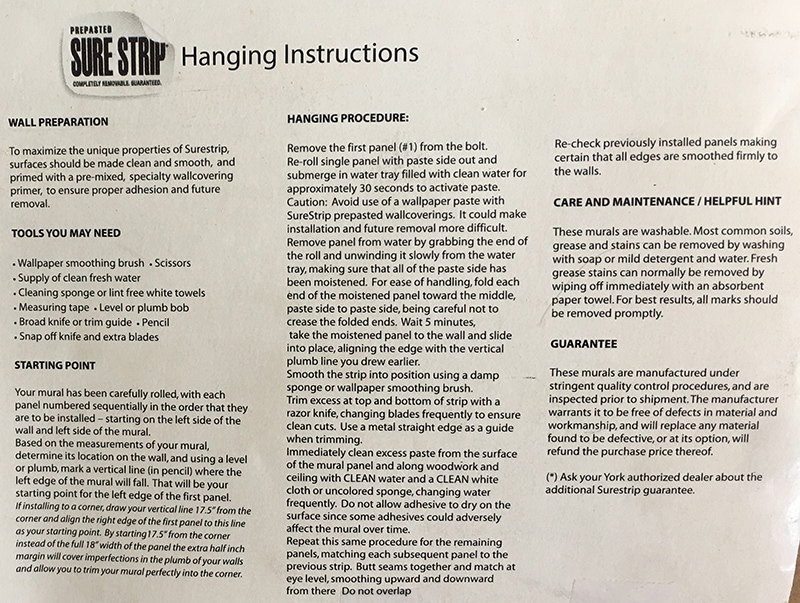
Here are the instructions that came with the mural:
We ignored the “prime with a pre-mixed, specialty wallcovering primer” part after watching/reading a ton of tutorials that say it’s not necessary—even the SureStrip instructional videos didn’t use it, so I think we’re safe. I did wipe down the wall with a damp sponge to ensure a clean surface.
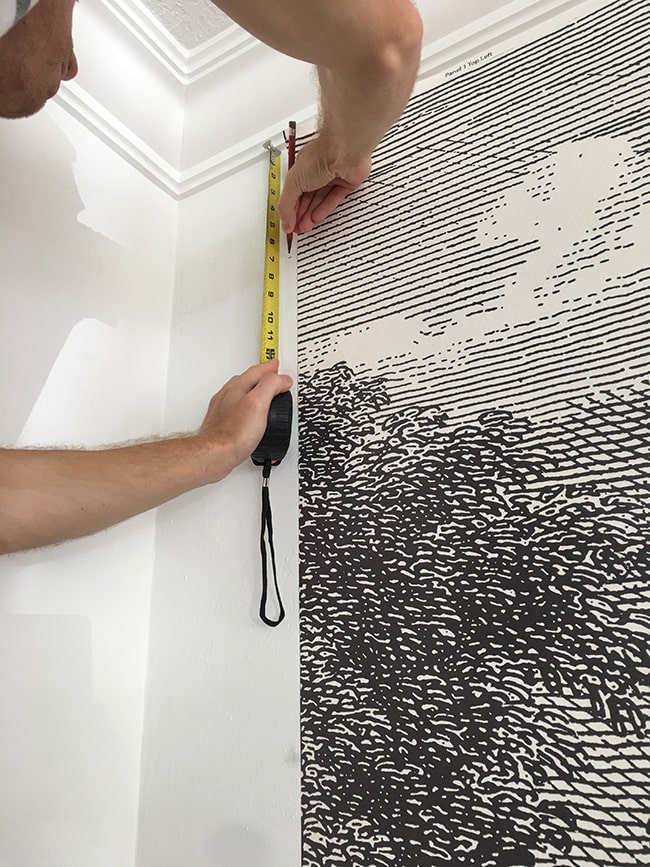
Since the mural wasn’t going to fill the entire wall, we had to mark a line where it would start. Our wall is 15″ wider than the 144″ mural, so we split the difference and decided to start the mural 7.5″ in from the left side.
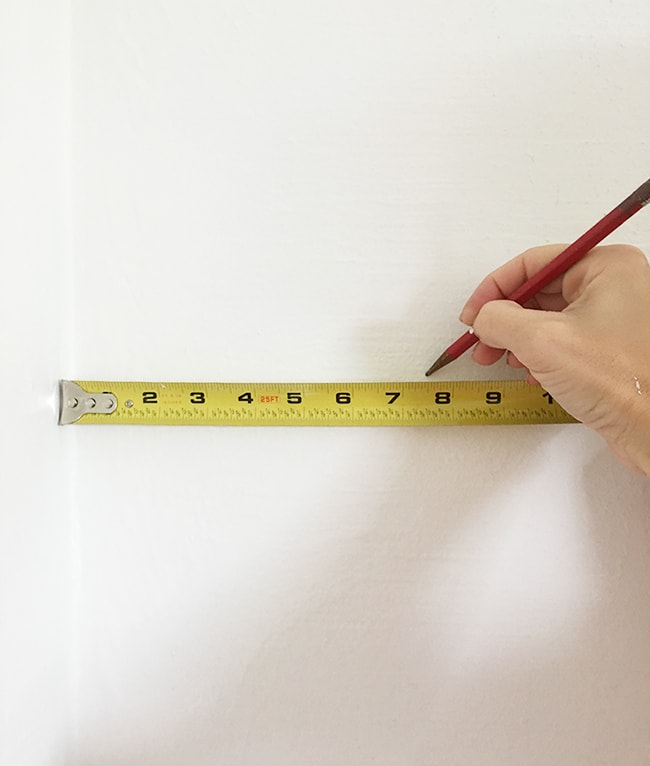
We marked that measurement at the top, middle and bottom, then used a laser level to compare:
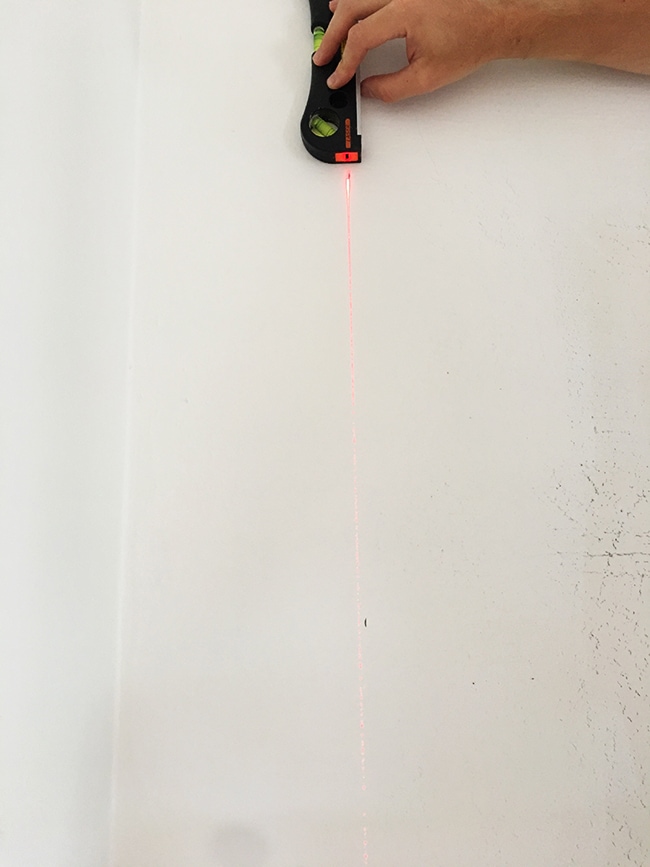
Way off! I know most walls aren’t perfectly straight, but I didn’t think ours was that crooked. We taped up a piece of trim along the laser level line and stepped back for an analysis.
The wall still looked straighter than the laser level (at least in person, this photo is deceiving), but surely a level is more accurate than my eyes, no? Against my better judgment, I decided to use the laser line instead of the wall line.
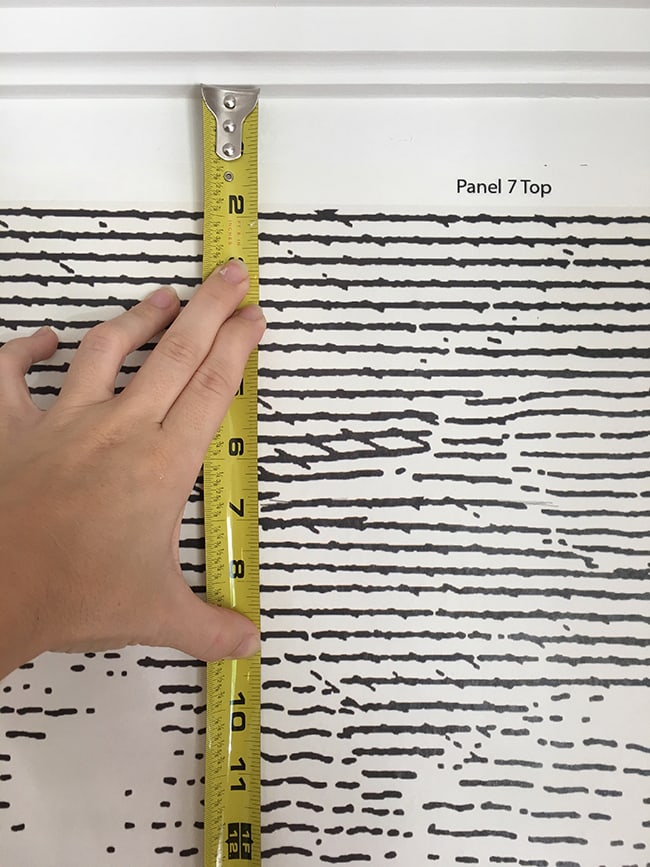
This was our guide for the first panel, and the only mark we needed to make since we’d be trimming off the top and bottom of the mural.

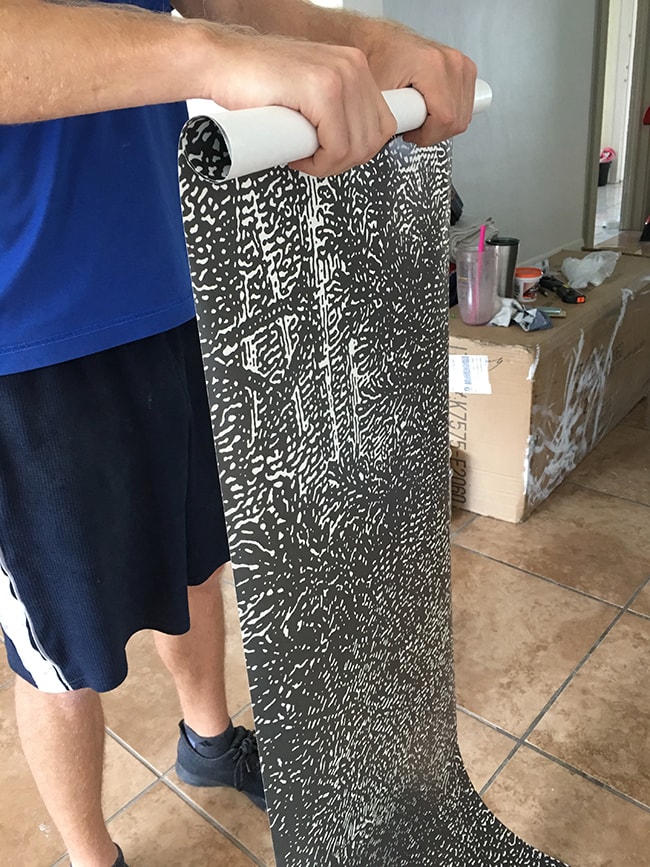
With the wall prep complete, we rolled out our paper, trimming each panel as labeled:
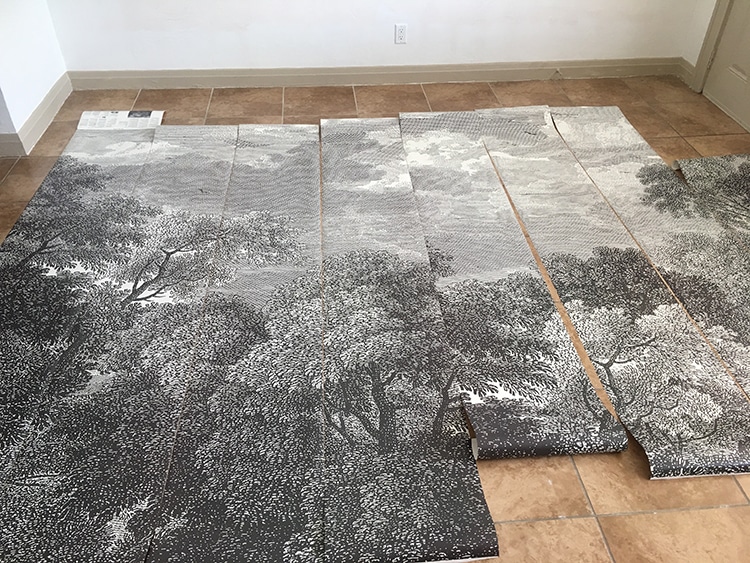
Since we’re only installing one at a time, we rolled each labeled panel back up and set them aside.
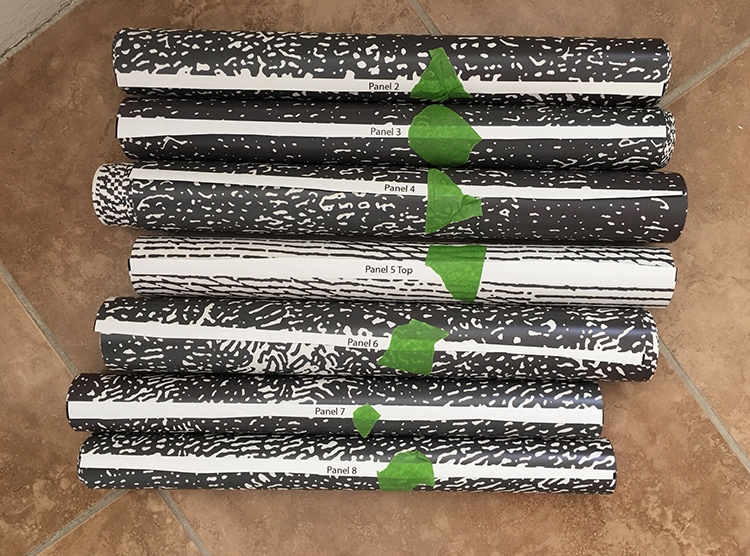
The panel needs to be re-rolled with the adhesive side out, so that it can easily unroll in the proper position when you remove it from the water.
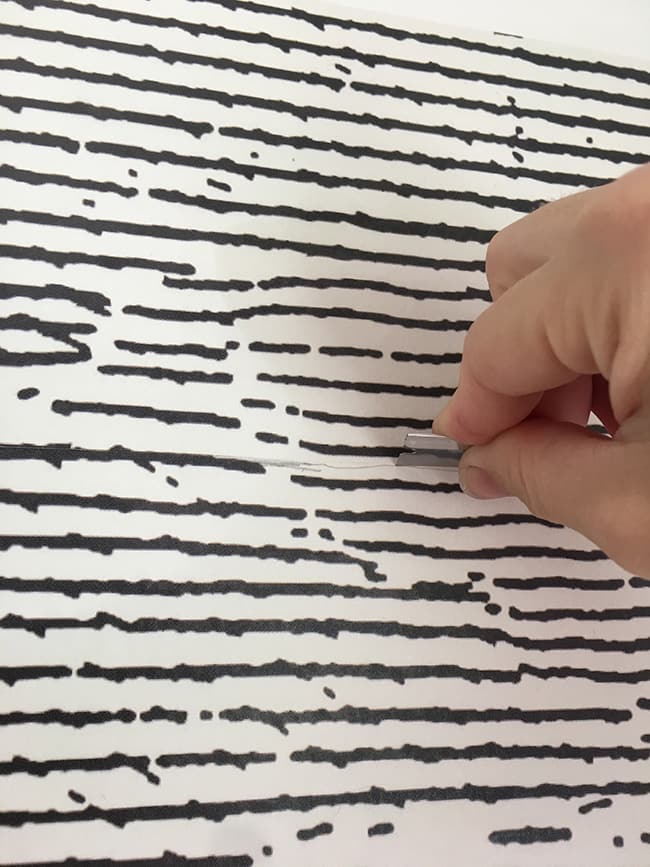
The next part is easy—submerge the panel into the water and count to 30.

The adhesive is immediately activated, and you can then grab the panel from the top and let it unroll out of the water.

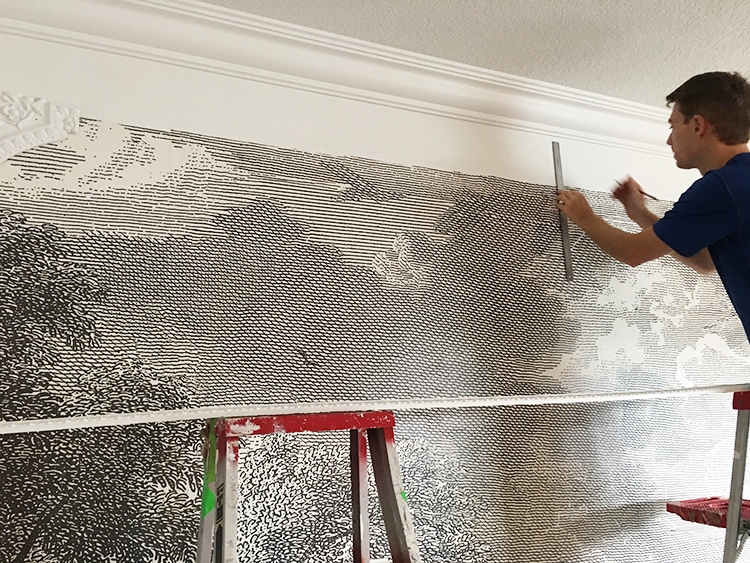
It seems like this part would be slightly nerve-wracking, but this paper is so easy to work with. You can fold it any way you want and it won’t get stuck or damaged—the adhesive is thick and goopey and takes a long time to dry. Lucas stood on the ladder and positioned it at the top, while I made sure it lined up to our mark at the bottom.
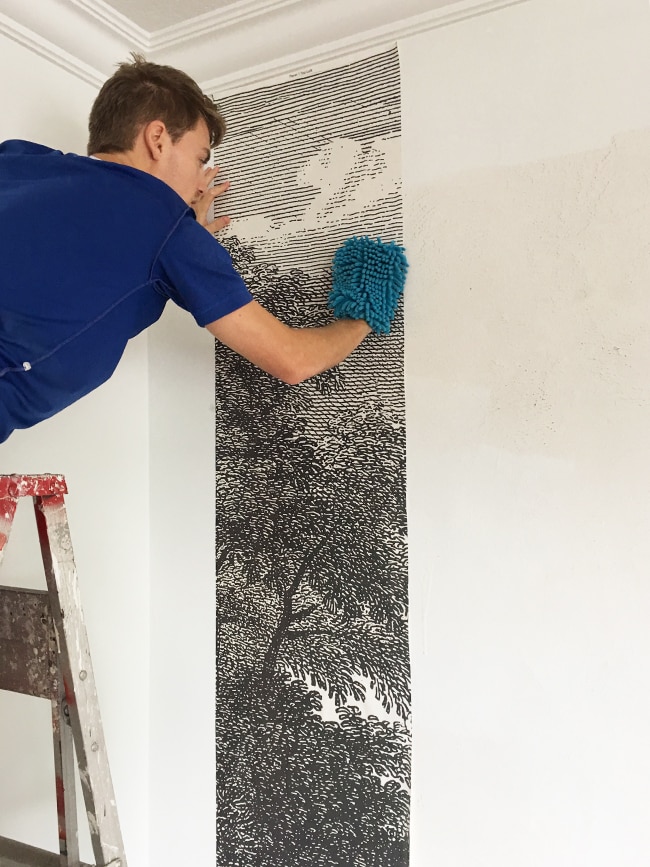
You can position and reposition it as many times as you want—it easily slides across the wall without any struggle. And I’m not kidding when I say this adhesive stuff is gloopey globby.

Be prepared for a mess of goop and water all over your floor.
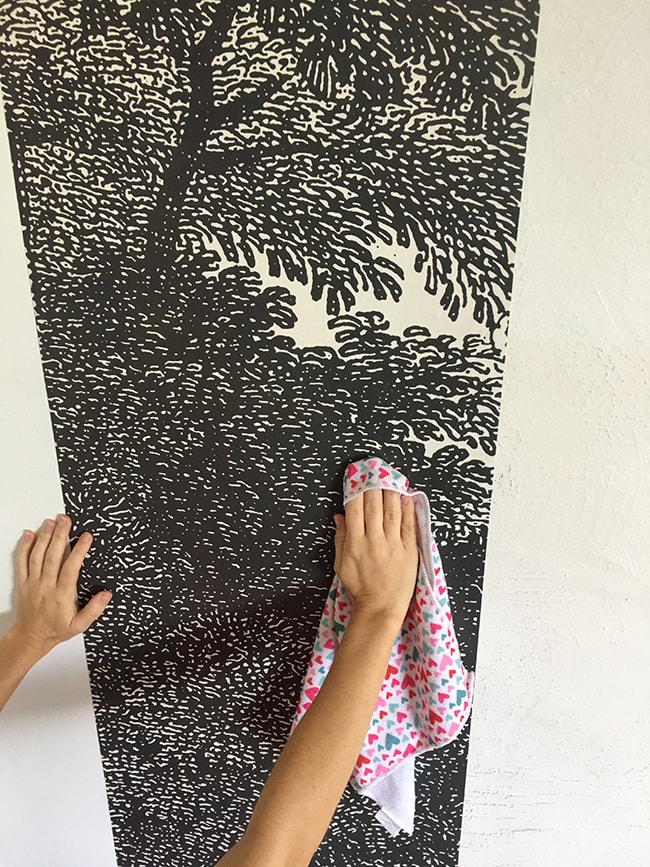
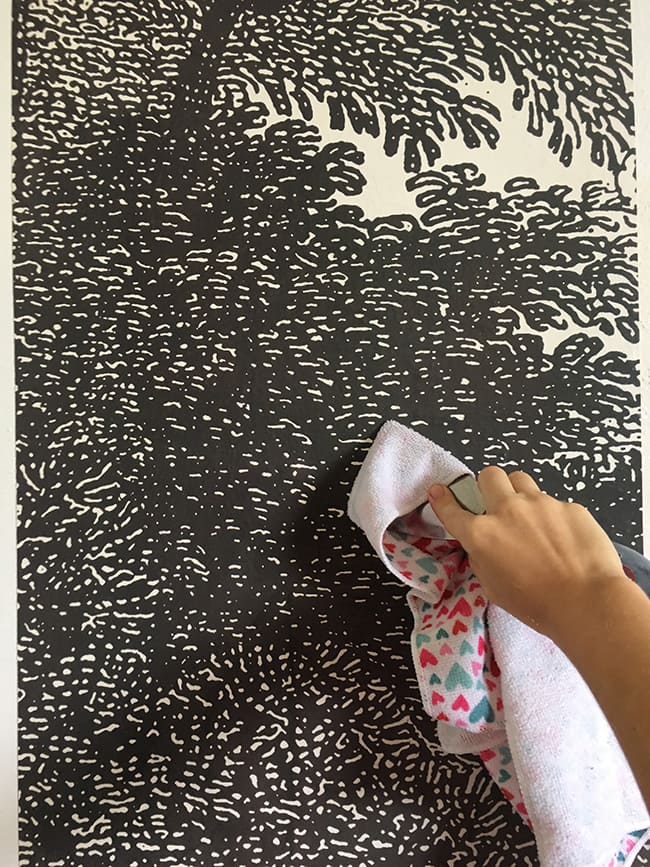
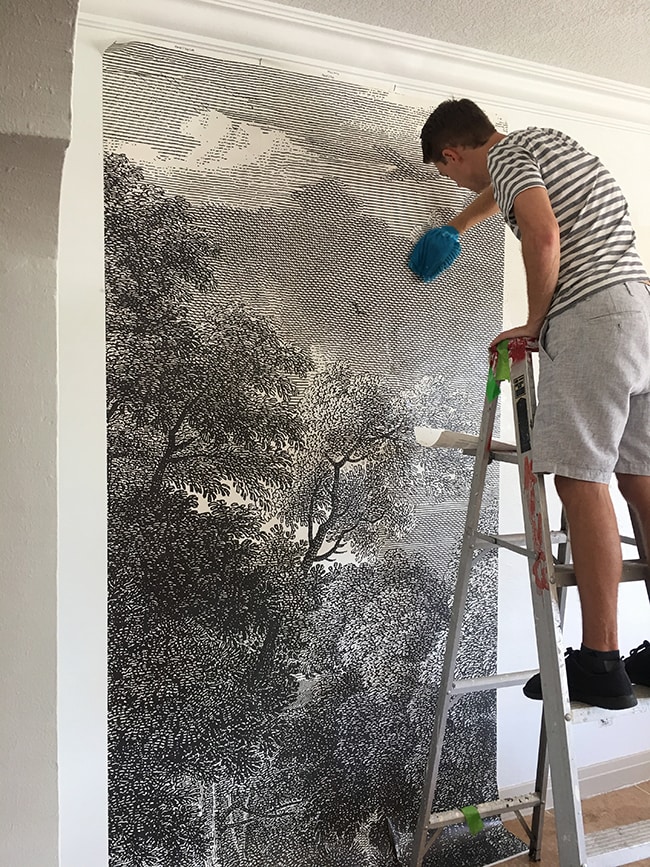
Once the panel was in position, we both smoothed it to the wall from left to right (doesn’t really matter which way you go, as long as you’re pushing out the glop and air bubbles). We used a combination of our hands (with a sponge glove) and a putty knife with a damp rag. Whatever you have to do to make it look smooth.
I have to say—if this wallpaper were a solid color, our textured wall would be pretty noticeable underneath. This pattern conceals every little bump and even air bubble—it really is the perfect design for a wall application and I’m relieved I chose it over anything else. Food for thought if you’re shopping for wallpaper.
We gave it one final wipe down with a clean, damp rag and after around 10 minutes, our first panel was done!

For the next panel, all you need to worry about is lining up the pattern with the first and butting up right next to it without overlapping. We got our pattern lined up perfectly at the top…
but then noticed it was off at the bottom:
Assuming it’s not a defect from the manufacturer, this told us that our panels weren’t perfectly level. Dang you cheap IKEA level, I knew you were wrong.
But alas, when we stepped back, we couldn’t tell at all. So we carried on.
When we encountered an obstacle, a razor blade easily did the trick. Note that your blade must be extra sharp, because the paper is thick and snags easily.
By the time we neared the end, each panel took under 10 minutes. Hanging them is the easiest part!
When we got to the end, we discovered that the 144″ total width advertised on the paper was inaccurate, it’s actually a few inches wider. I’m assuming this is because you’re supposed to allow for extra width on the edges for a buffer to trim it to size. Just an FYI!
When we took a step back, it was clear that our laser line was not straight (you can see how much lower the top of the right side is) but fortunately, it didn’t matter because the edges would be covered with trim. Not only that, but the horizontal lines in the pattern are wavy so you can’t tell if it’s hung straight (yet another reason to love this mural).
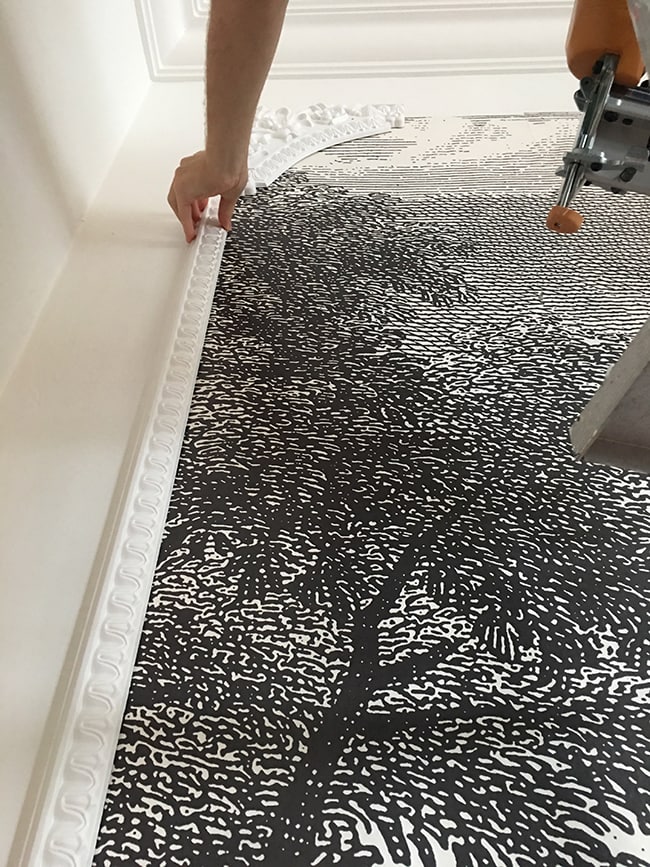
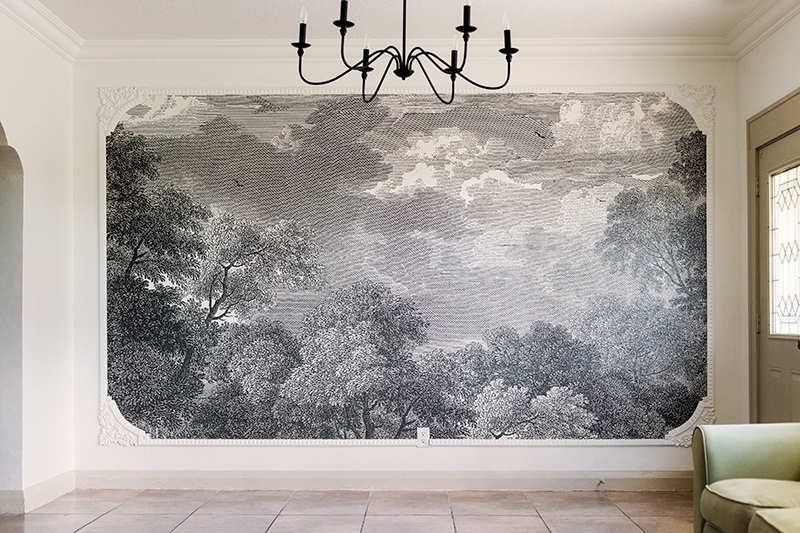
The plan now was to frame the edges of the mural, and I wanted there to be an equal gap on all 4 sides (from the bottom of the crown and top of the baseboard). So we simply measured and marked 7″ all the way around (we added slightly extra to be safe and overlap the trim with the mural).
I worked on one panel at a time, measuring and marking by hand.
The cut didn’t have to be perfectly straight since it’d be covered up by trim.
By the time I trimmed the first panel, it had been on the wall for a few hours, and it came off SO CLEAN! It slid off like butter and the wall was completely dry and smooth. Not that I’d ever dream of removing this mural in my lifetime—but it’s nice to know that it’s a temporary paper (hello renters!) This next photo shows one of the last panels where the adhesive is still wet (removes just as easy):
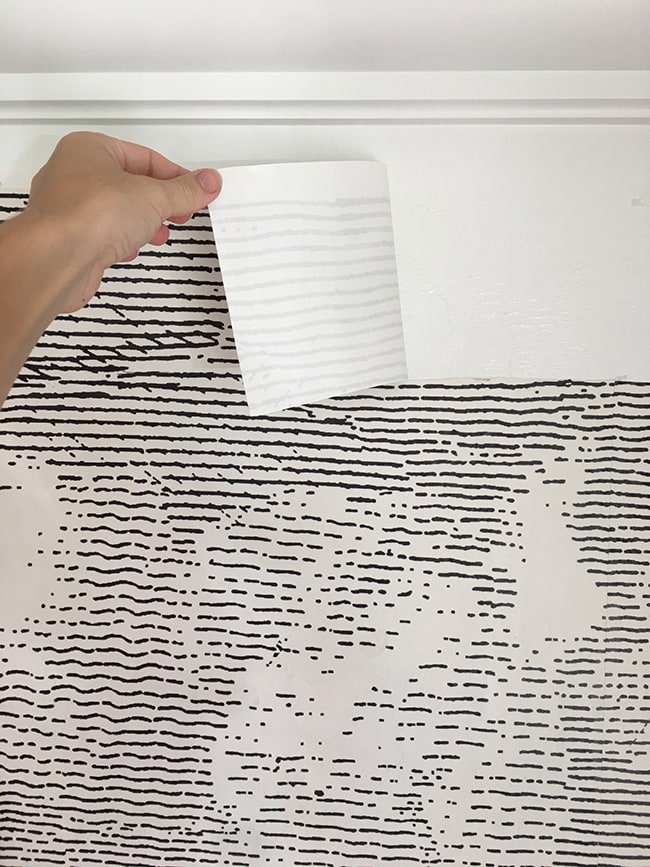
All trimmed and ready for the next phase!
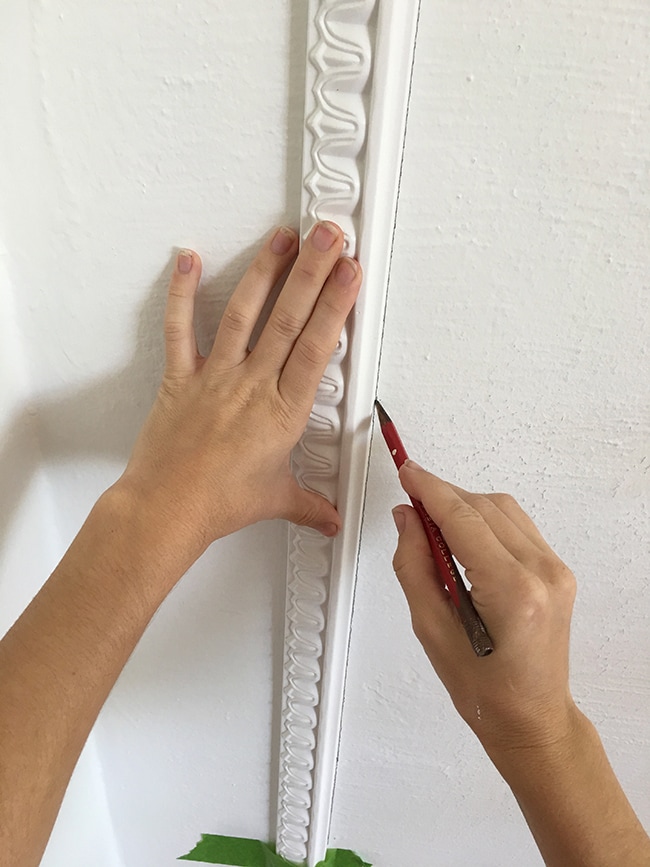
I laid one of my corner pieces down next to two connectors:
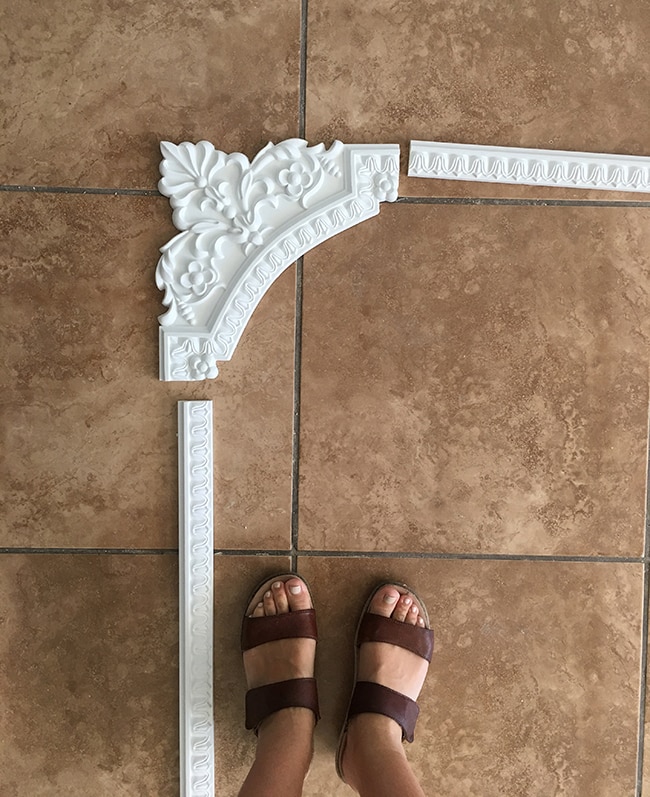
(yep, travel sandals still going strong, now they’re my DIY sandals)
The cut edges of the molding aren’t perfectly straight and crisp from the factory, so we had to trim off just a teeny bit with our miter saw to get them to fit together nicely. We also tried to match up the pattern so it looked like one continuous piece. Once the corner piece was trimmed and ready to go, we applied liquid nails on the back:
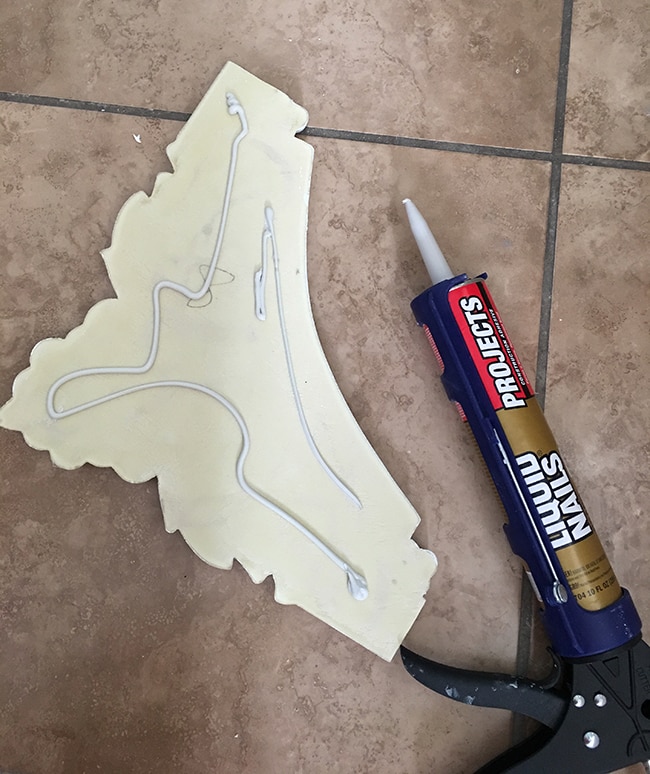
And attached it to the wall with a few 16 gauge nails. This baby is going NOWHERE.
Before attaching, we measured from both the wall & crown molding, and marked the wall to ensure it was lined up evenly.
Then, we attached the first connector piece, ensuring it was also evenly spaced from the wall (we gave up on the level after it failed us, and decided that it was more important to be visually centered from the edges).
Rinse and repeat for the bottom corner…
Making our marks for the top pieces:
And measuring for the final piece:

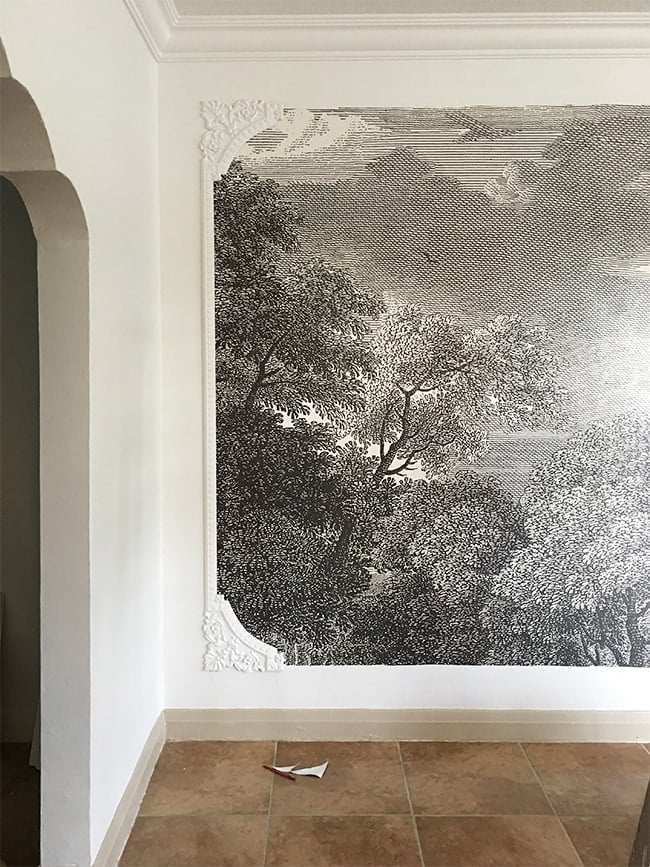
Finished with daylight to spare!

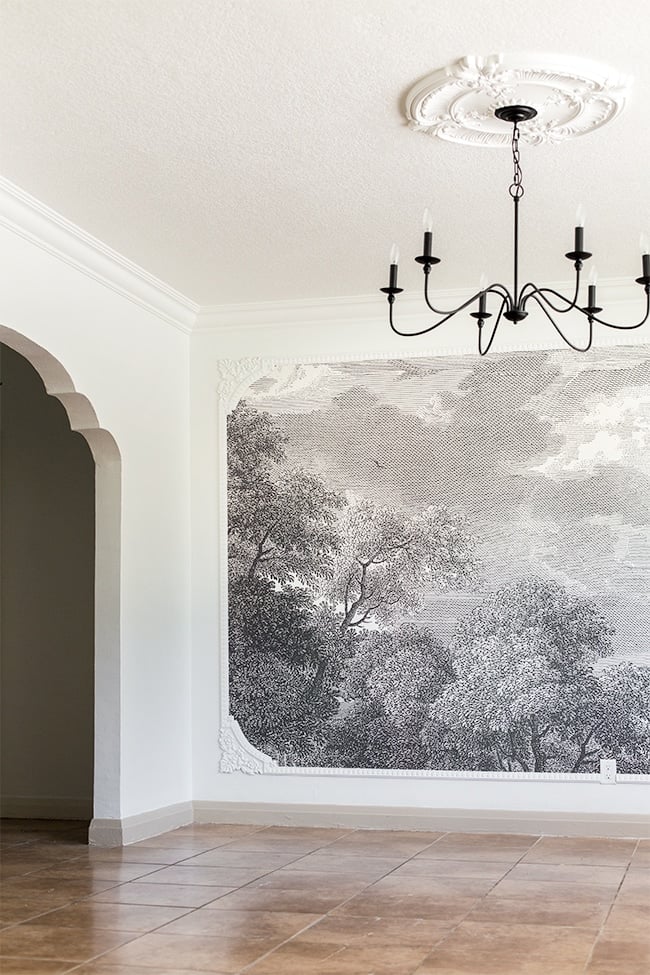
The next day I went back and filled the holes & seams with caulk, a little touch up paint and the masterpiece was complete:
Be still my heart.

Please ignore those floors—those will be gone in a few weeks!
How bout that view from the dining room?
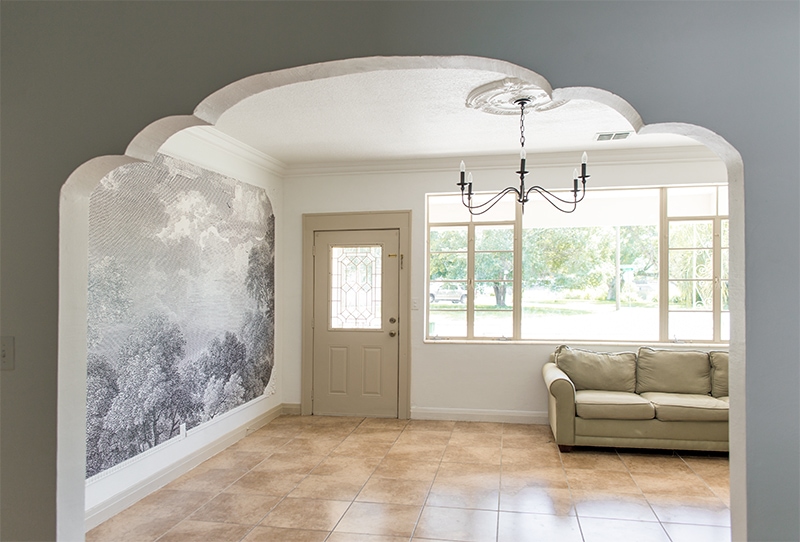
I’m loving the new trim color (SW Loggia) next to the black & white tones. We plan to replace all of the old baseboards and those will be repainted in Loggia as well (still a work in progress folks, don’t judge these photos too hard).
Can’t you just picture an emerald green tufted velvet sofa in here? Because that’s what’s coming soon 😉
Medallion, chandelier, mural—the trifecta:
Next we’ll add a long wood bench (DIY) with storage baskets and wall hooks above. I’m hesitant to screw anything into this mural but this is technically a “foyer wall” and it has to be practical. I might chicken out.
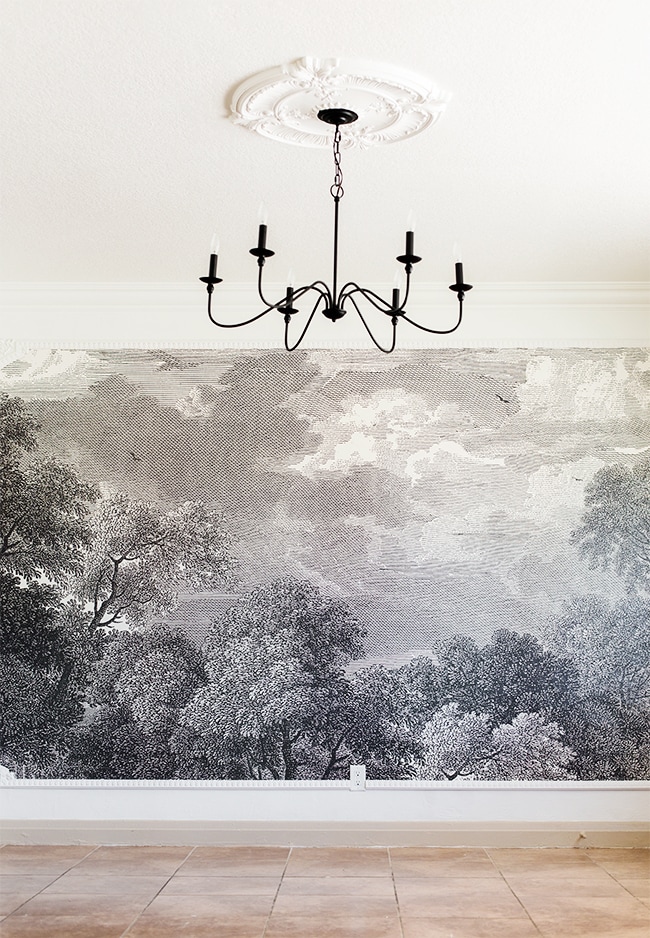
I could stare up at this view all day…
Can I just say how great it feels to finally be making some real, tangible progress? Everything we’ve been working on this year is all preparation, planning and businessy/behind the scenes stuff but it’s nice to have something to show you. It’s finally starting to pay off! PS—checkout the install timelapse on IG if you haven’t seen it yet!
I promise this is just the beginning. I have an endless supply of new projects and never before seen designs I’ve been scheming up, and will be working on those 7 days/week with no end in sight. LET’S DO THIS!


Kate says
You’re a genius! This is exactly what I need in my dining room. There’s a giant blank wall and on the other side lots of cabinets. I think something big like this will balance it. Thank you! This is gorgeous. Well done!
Penny Walker says
Beautiful! Thanks for sharing every detail.
jennasuedesign says
Thanks Penny!
Ann says
I really like this! I wanted to recommend a standing bentwood coat rack at each end of a fairly long bench…no hooks on the wall! I see others have had similar suggestions.
BJ Elmore says
Floor coat rack. We have one at Mountain house and with double hooks all around, it hold lots of coats, hats aprons We have snow, rain, and cool weather, and it’s efficient. It’s metal, so no issues with tipping.
kristenEff says
Yes, dude. The framing makes it so much more of a statement but won’t dominate. Back pats all around. It reminds me of those triangle shaped photobook corners over an old photograph. The pattern would probably forgive you if you put a few holes in it and had to remove it later, but I’d be scared too because I love to try new things all the time. Maybe a different creative solution to a drop zone/hanging zone? Hey is that chandelier at head-bonking height?
jennasuedesign says
Yes, it reminds me of those too! So vintage ?
The chandelier clearance is a little over 6′, but there will also be a coffee table there so no one should be directly underneath it.
Teddee Grace says
What a lot of work, but totally worth it! Just gorgeous!
Jodi says
GORGEOUS. LOVE the idea of framing it with molding. I haven’t seen this done before, and it is just stunning.
Vanessa says
It did look doable, but I am still too frightened to try anything like wallpaper. Well done.
jennasuedesign says
This wallpaper is temporary, no need to be scared! 🙂
Theda says
That wall is just STUNNING! Beautiful work, great tutorial!