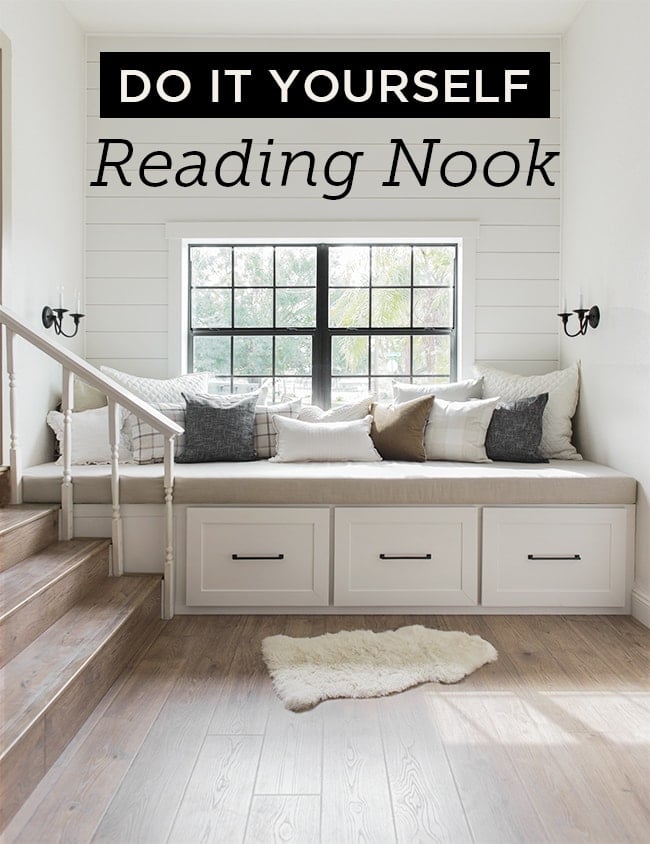
Now that we’ve got tiling, wallpapering, and crown molding under our belt here at the Riverside Retreat, we thought we’d take things up a notch and test our skills by building a custom bench seat/reading nook. Watch below to see what happened:
This video shows the highlights of this multiple week process, but as you can imagine, it was a lot more involved than what I could squeeze into 5 minutes. I’d consider this a medium-to-advanced level DIY project, and while there were times we thought we couldn’t pull it off, I’m so happy we stuck it out because the end result surprised us both!
One of the most challenging, but certainly most rewarding projects we’ve ever taken on. But that’s true for most things in life, isn’t it? 😉
With that preface, if you’re feeling confident to take your DIY skills to the next level, this tutorial is for you!
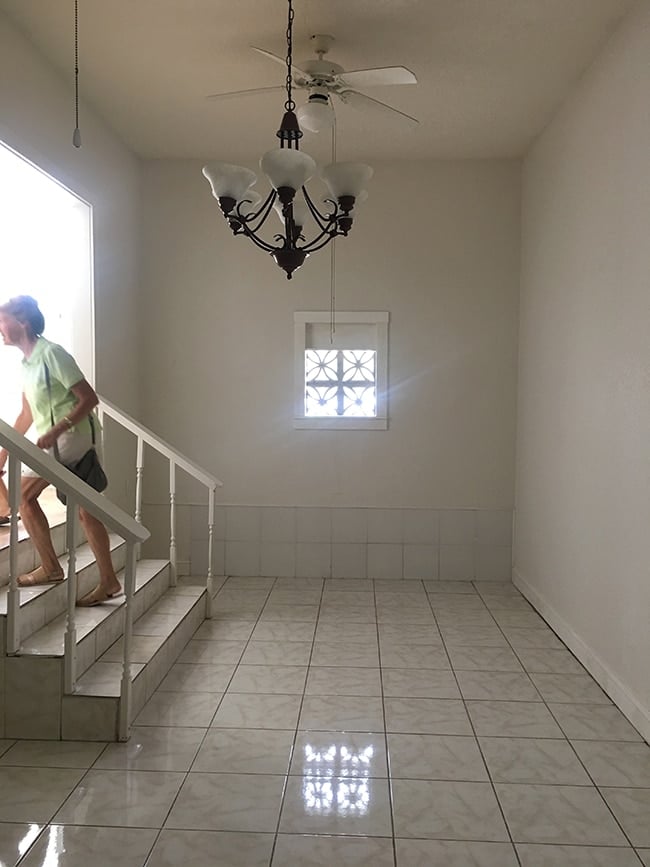
Here’s how the wall looked in this carport conversion when we moved in this past summer:
We intend to utilize this long narrow room (just off the living room) as a lounge/media/game room in this future vacation rental home. That back wall was basically dead space, and we liked the idea of adding another lounging area that would increase our guest sleeping capacity and provide much needed storage.
A built-in daybed/bench seat was the way to go, but there weren’t any standard sized cabinets or drawers that would fit perfectly. Custom was our only option!
To be perfectly honest, I wasn’t looking forward to this project after a failed DIY drawer attempt in a laundry room years ago. I loved the idea of drawers and the way they looked/functioned, but I didn’t trust our ability to pull it off. Even though Lucas is a brand new DIY’er, he was confident we could make it work and agreed to take charge of the operation while I focused on finishing the dining room. I reluctantly agreed after several warnings about the complexity of this project and our short timeline, and a few days later he presented a spreadsheet with our build plans.
Instead of attempting to describe it, I’m just gonna attach those for you here…

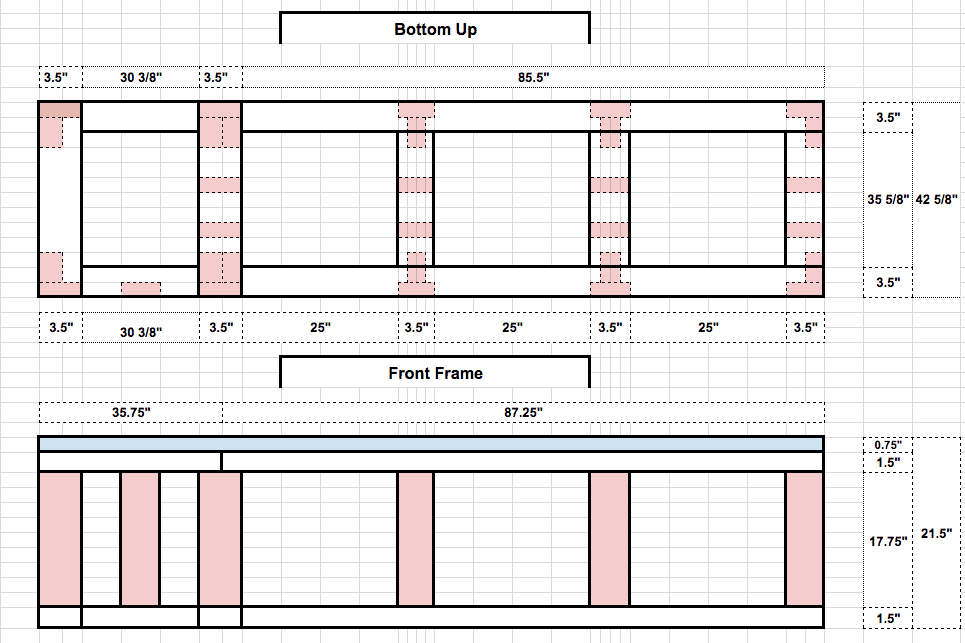
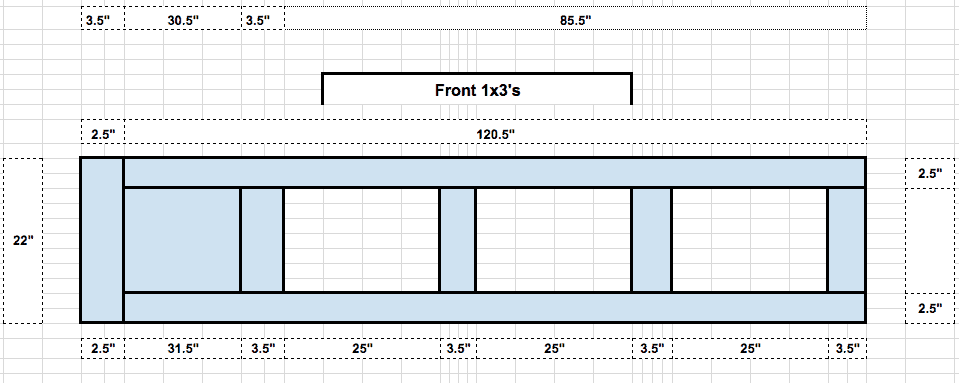
These might be more confusing than helpful, but the exact measurements aren’t important since every bench will have to be custom made to fit your space.
Before we get into the steps, lets go over the materials and tools needed:
Materials Needed
- 2×4’s for the frame (we used fourteen 8′ boards)
- Paint/stain grade 1×3’s for the face frame (we used three 8′ boards)
- Paint/stain grade 1×4 for the face frame (we used one 8′ board)
- 1/2″ plywood for the drawers (we used three 4×8′ sheets)
- 3/4″ plywood for the drawer fronts + bench top (we used three 4×8′ sheets)
- Drawer slides (we used three packs of 22″ ball bearing slides)
- Drawer hardware (we used three of these 9″ bar pulls)
- 3″ construction/wood screws
Note that we ended up having leftovers of some materials and not enough of others—there were a few trips back and forth to Lowe’s during this process!
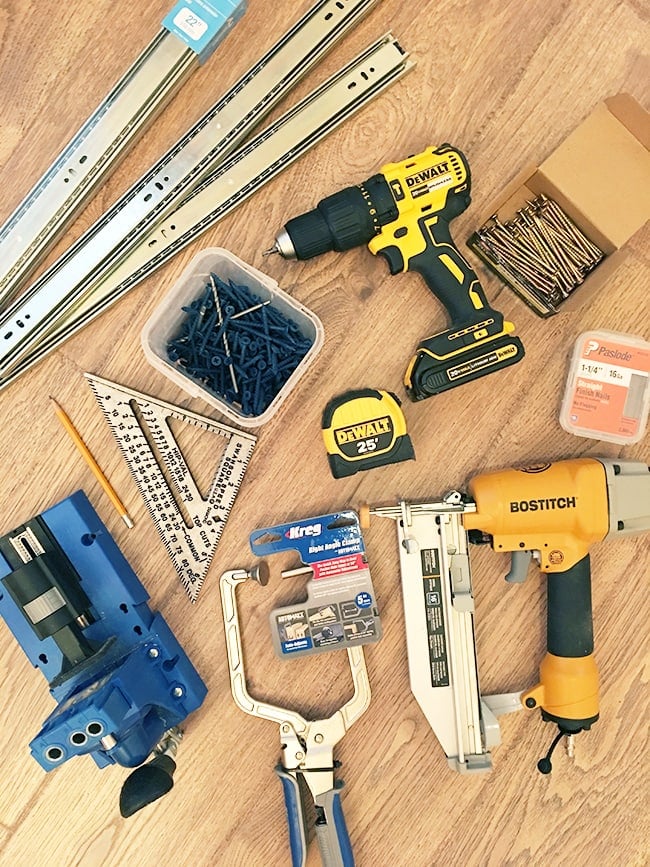
Tools Used
- 10″ Dewalt table saw (a must-have for a mid-advanced level DIYer)
- Dewalt 12″ miter saw (Love our Dewalt)
- Dewalt cordless drill (our most used power tool, and it’s $60 off right now!)
- Bostitch nail gun + nails (ours is great for beginners + easy to use)
- Swanson speed square (an essential in your tool box)
- Kreg Jig + screws (for building the drawers)
- Kreg clamp (optional, but useful for 90° corners)
- Basics: tape measure, pencil, wood glue, patience
Something I’ve learned over the past decade of DIYing is that quality tools and materials matter. They’re the difference between a frustrating, failed project versus a positive experience and professional level results. This principle can be applied to many things in life, and it’s especially true here, so if you envision lots of DIY projects in your future: do yourself a favor—invest in high quality tools and use the right materials. That’s my tip of the day!
Okay, back to the tutorial!
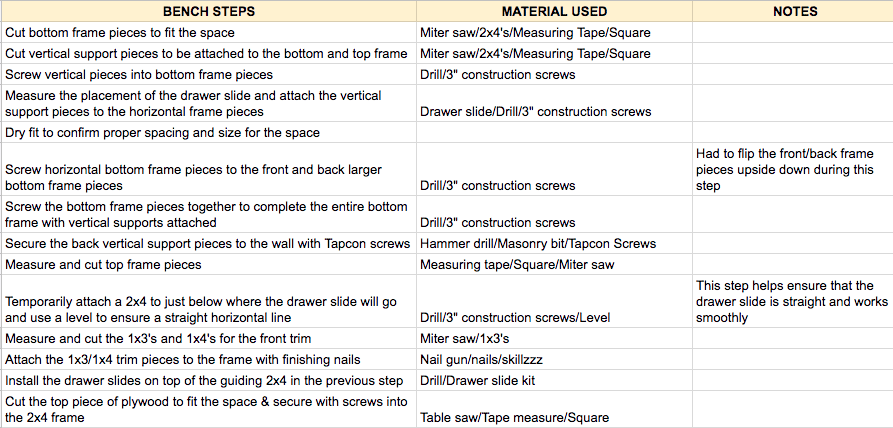
I asked Lucas to write down each step as thoroughly as possible, since he was the man with the plan:
Feel free to direct any and all questions to @lucasleblanc 😉 <-no but really though, he’d be happy to answer your DMs.
I’ll keep my rundown brief so this post isn’t too long of a novel—we’ve got a lot to cover.
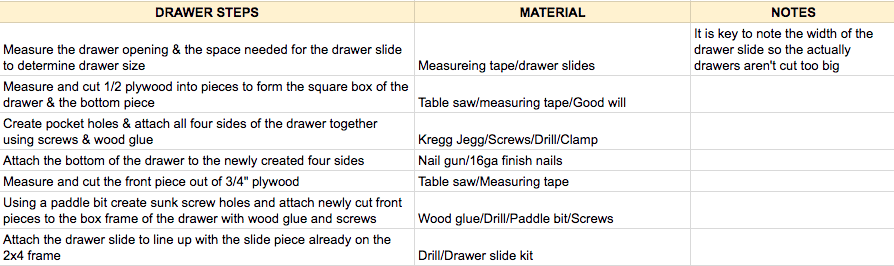
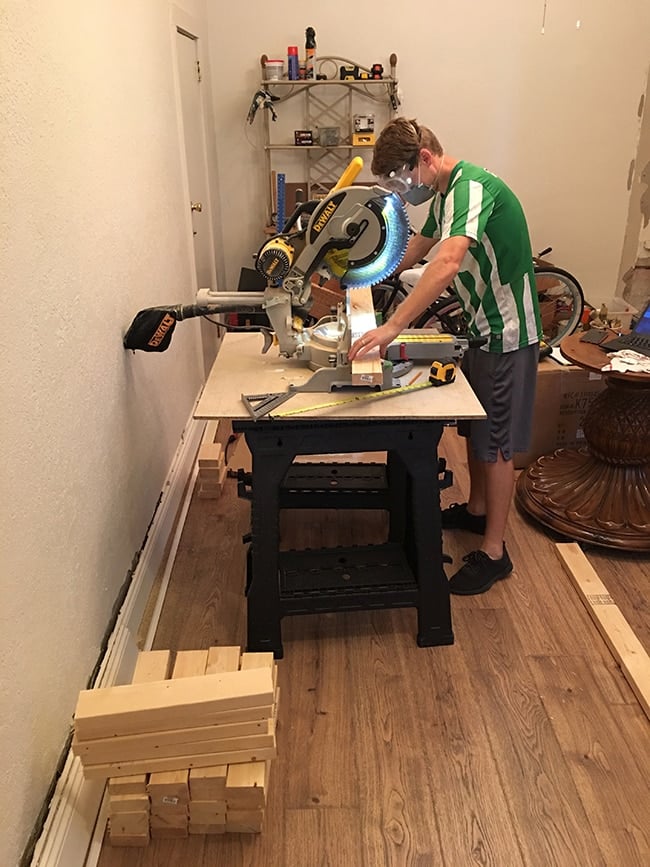
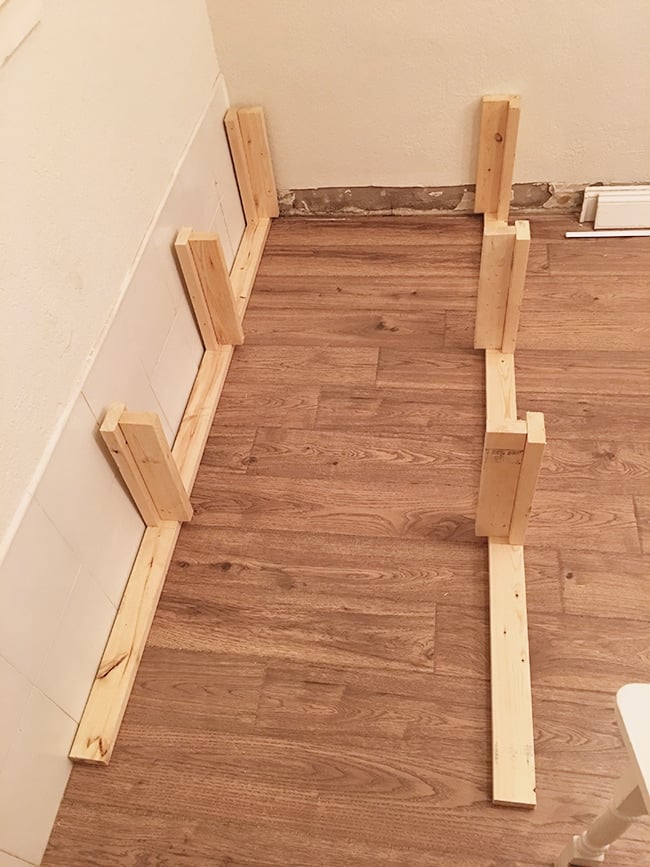
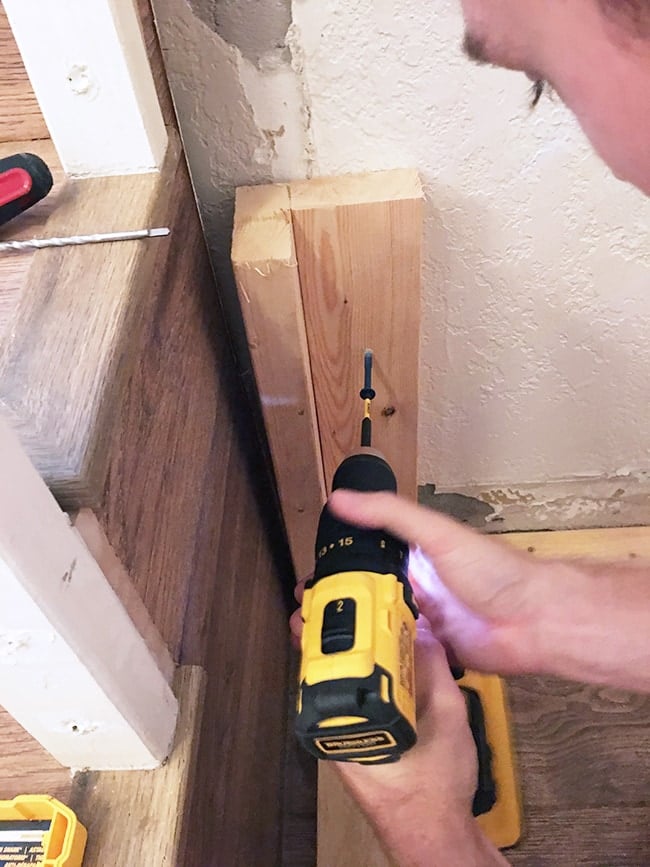
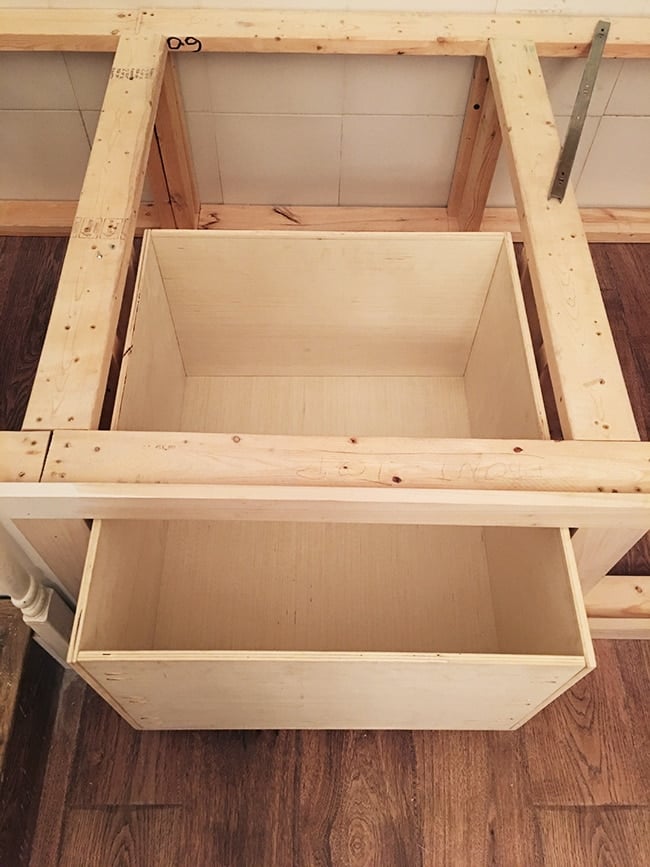
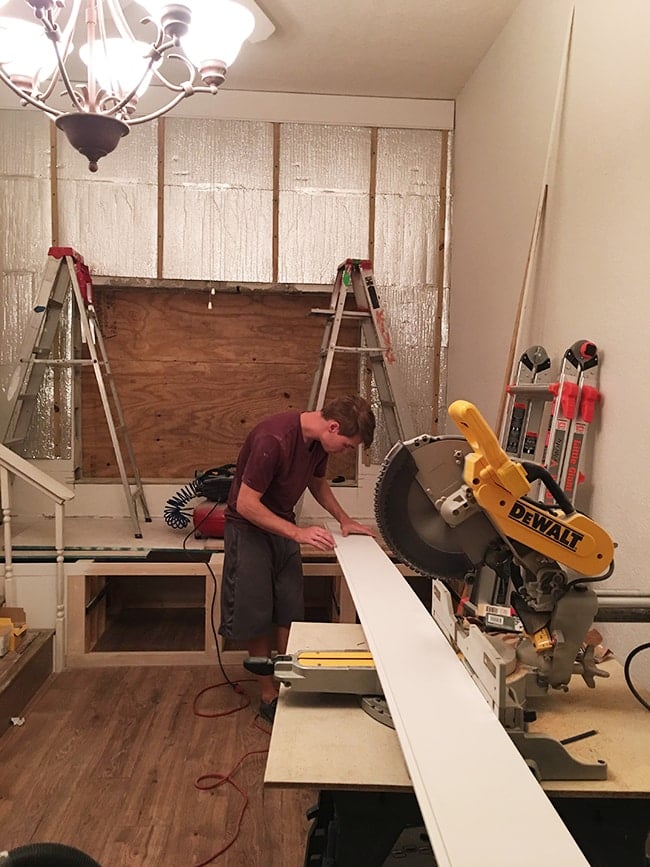
First: build the bench frame out of 2×4’s. This is a lot of cutting and measuring. We set up shop right there in the bonus room (thanks to our lack of a garage or covered porch) and after a couple weeks, even after nailing a sheet over the doorway, sawdust had spread to every corner of the house. We just can’t escape the mess!
The vertical supports were attached with two screws to the bottom of the horizontal pieces.
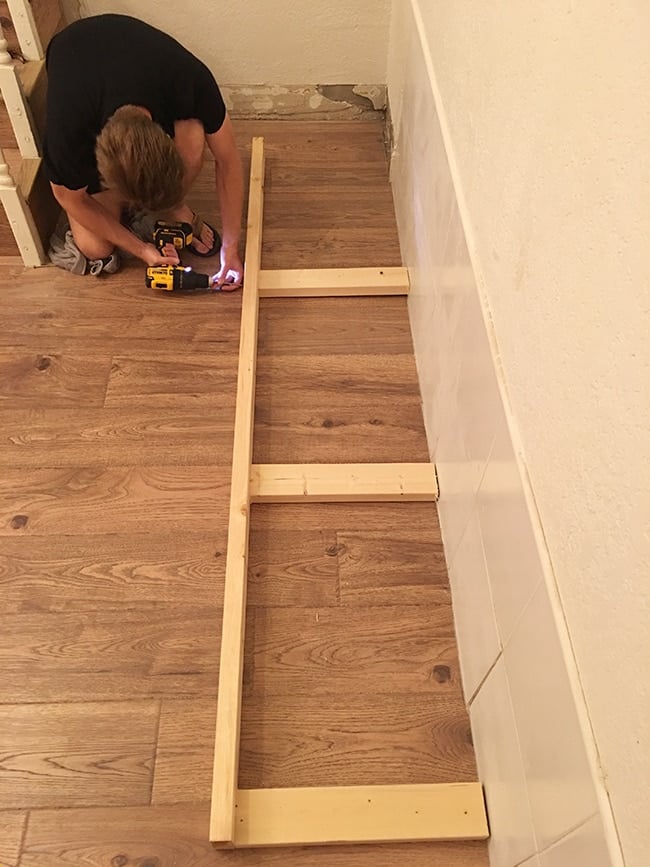
A square is critical to this process—especially since there are drawers involved. It allows you to mark straight lines and check your corners for 90° angles. Sidenote: make sure to check for square after every corner. If the drawer frames are even a couple degrees off, it’ll throw everything out of whack and they won’t close properly. We learned this the hard way!
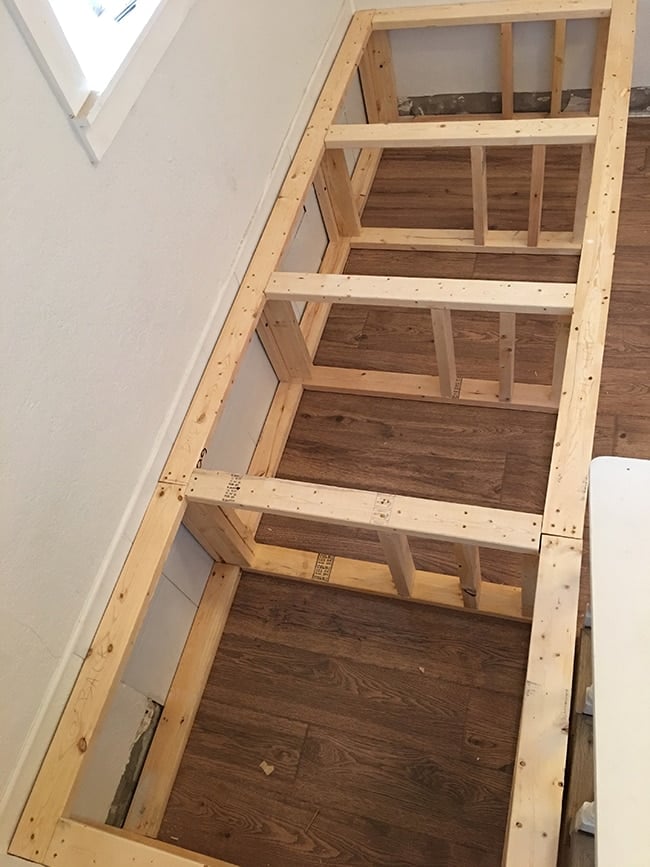
The front and back rows were assembled first, with equal spacing for three drawers:
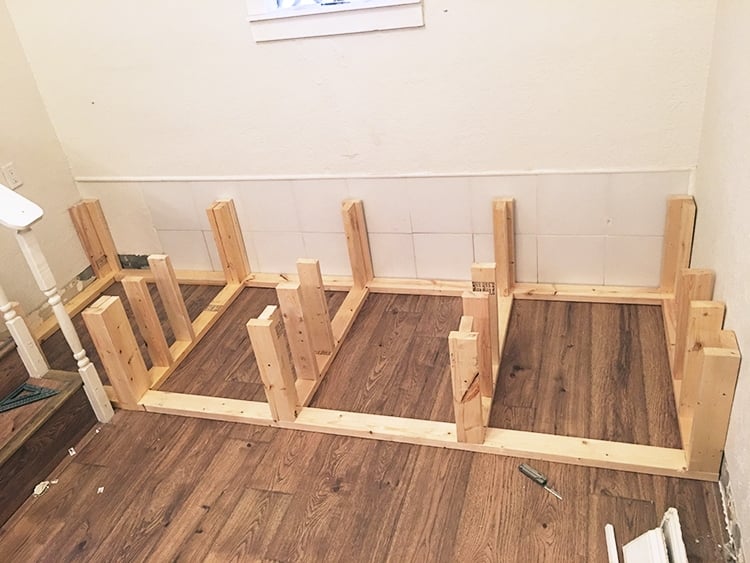
Then it was a matter of attaching all the other boards together like pieces of a puzzle—the order isn’t particularly important.
We had to add additional vertical supports for the drawer slides to attach to, and checked the spacing beforehand:
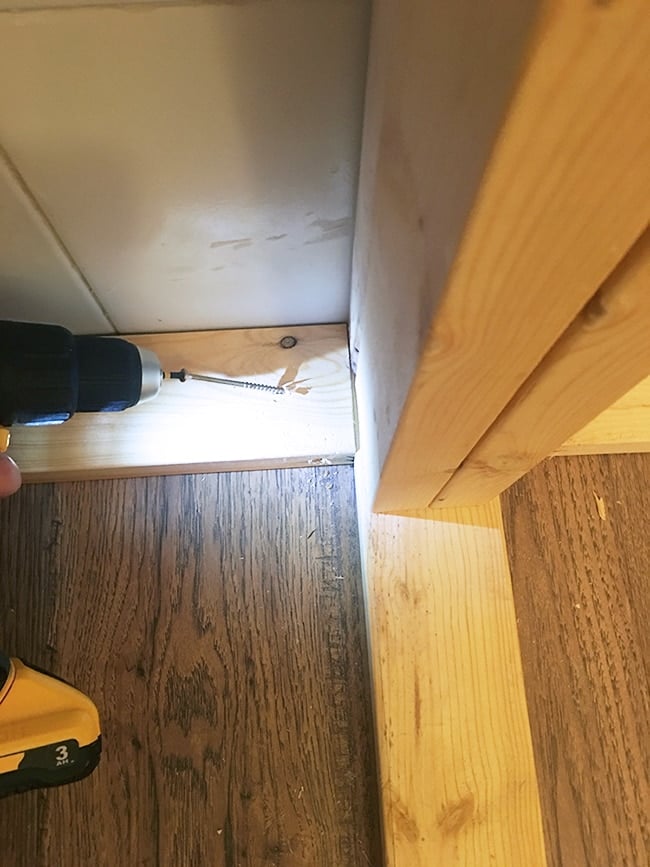
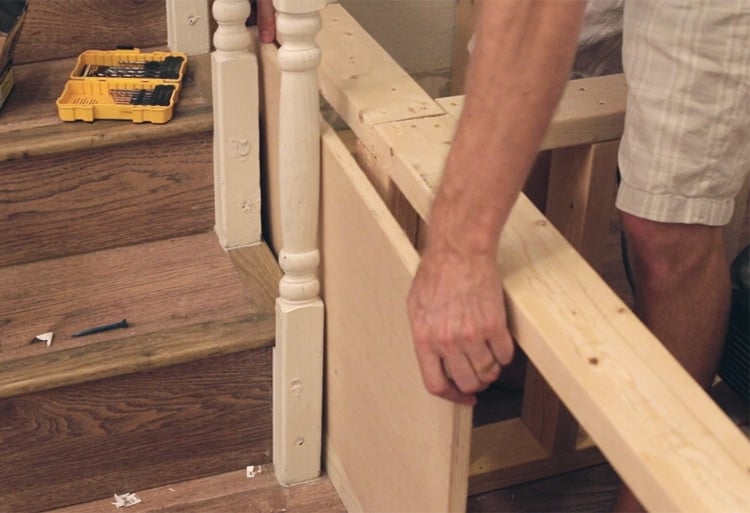
Once the base of the frame was built, it was simply a matter of screwing the pieces together and then screwing the entire frame into the wall (our walls are concrete so we used heavy duty Tapcon concrete anchors and a hammer drill).
Then the top 2×4’s were added, which were essentially a mirror of the bottom of the frame.
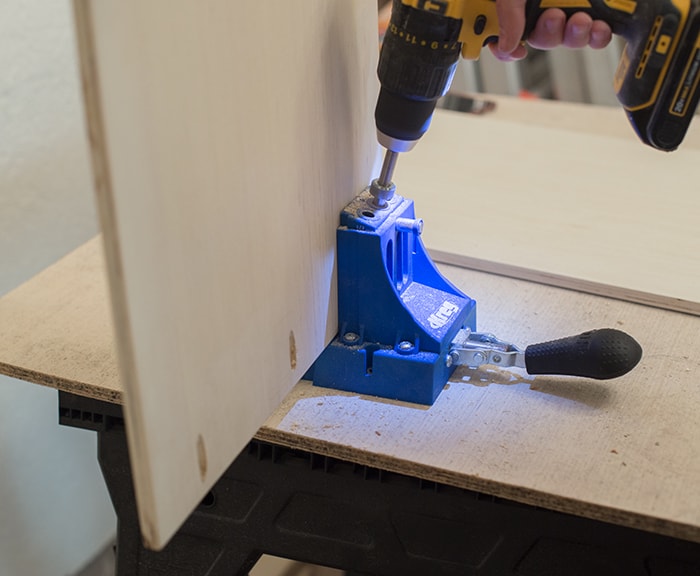
Step 1 done! Now it’s time to attach our face frame, to hide those unsightly 2×4’s. We used paint/stain grade poplar 1×3’s for the horizontal pieces, and 1×4’s for the verticals.
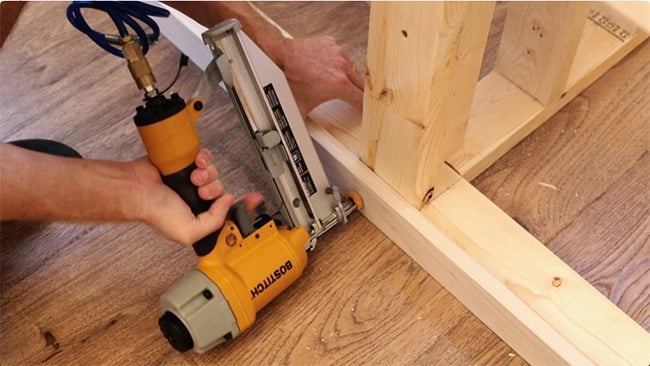
A piece of 3/4″ smooth plywood was cut down to fill in the gap behind the stairs and attached to the frame.
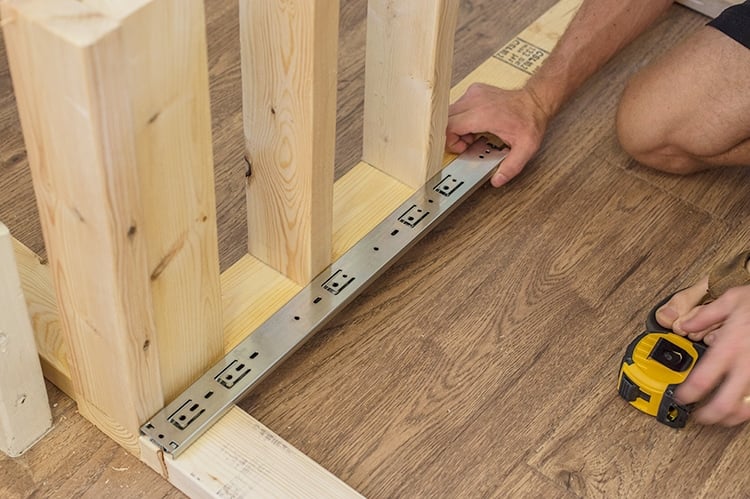
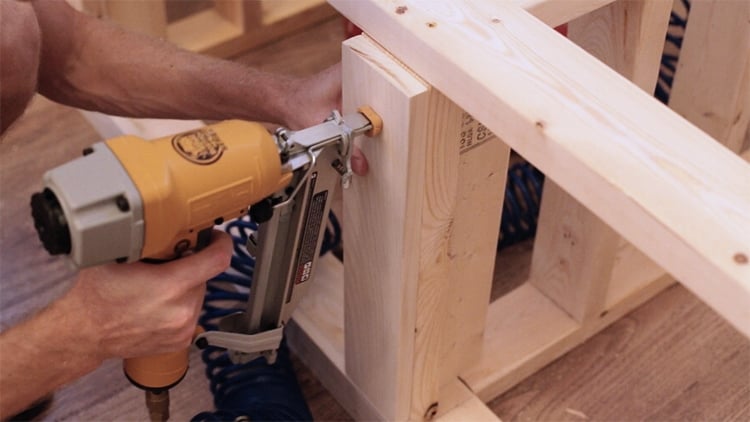
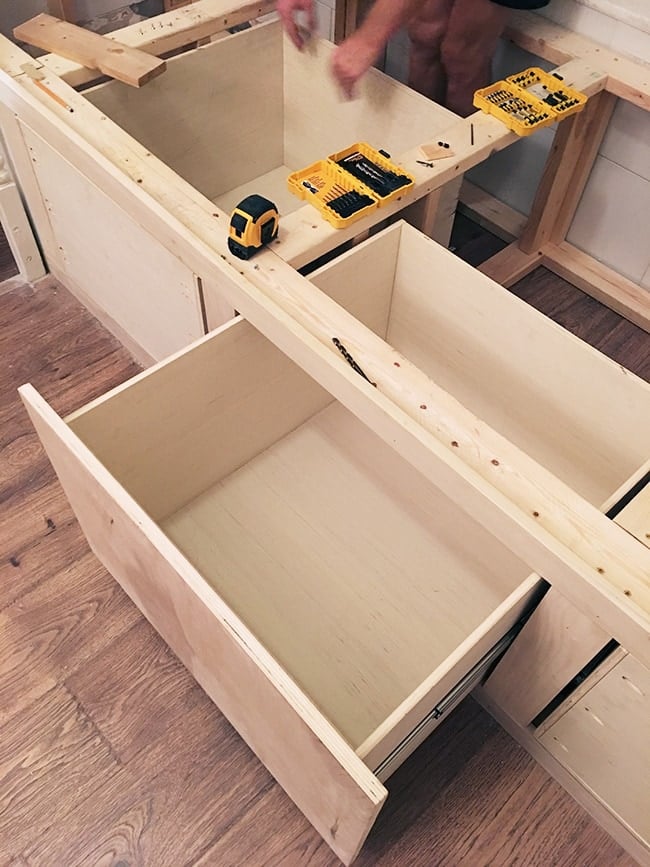
Next came the drawer slides. The key to success here is careful measuring, and making sure the slides are perfectly level. We used a scrap 1×3′ as a guide to make sure the slide didn’t shift when attaching.
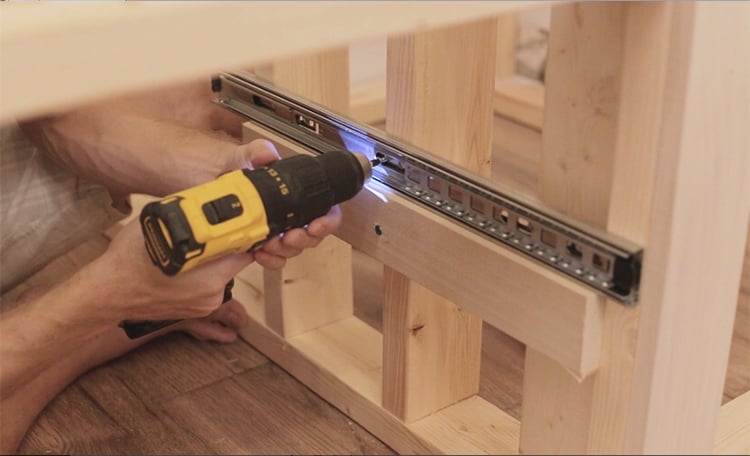
You also have to make sure all the drawer slides are precisely the same height:
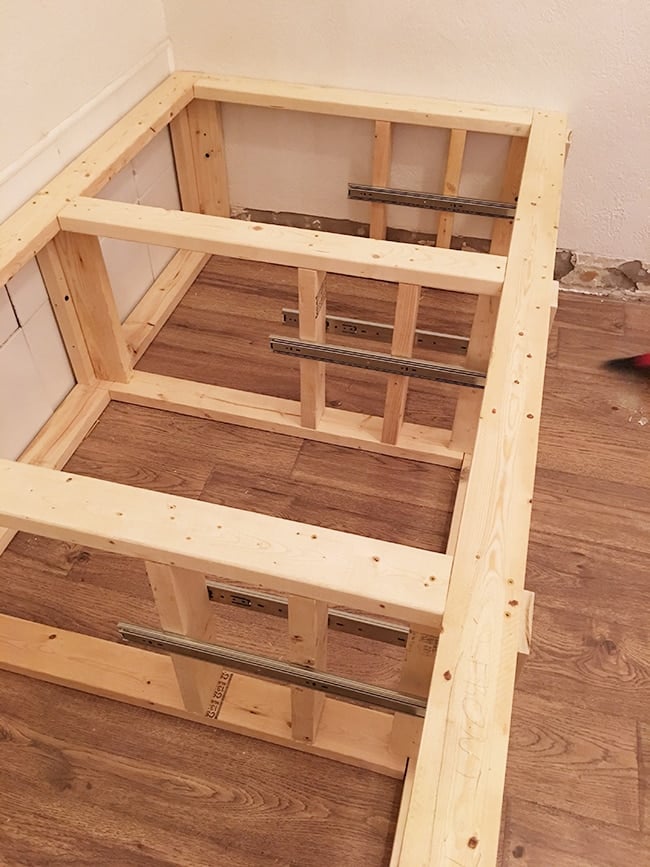
Congratulations, your frame is done! Time for the drawers, and to test out our new table saw…
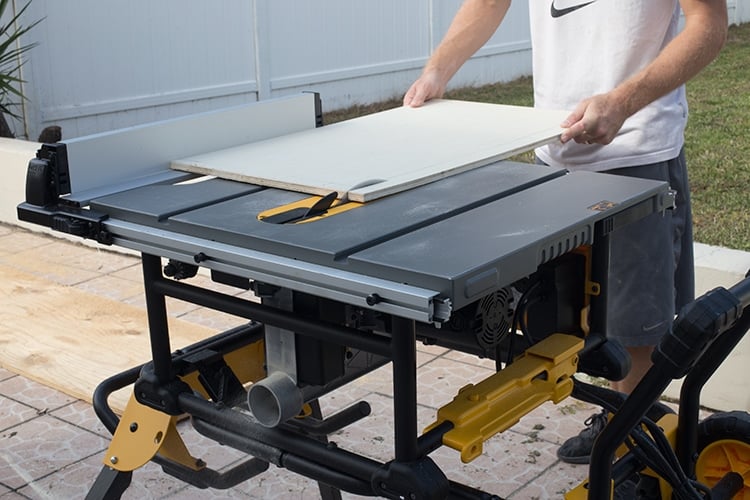
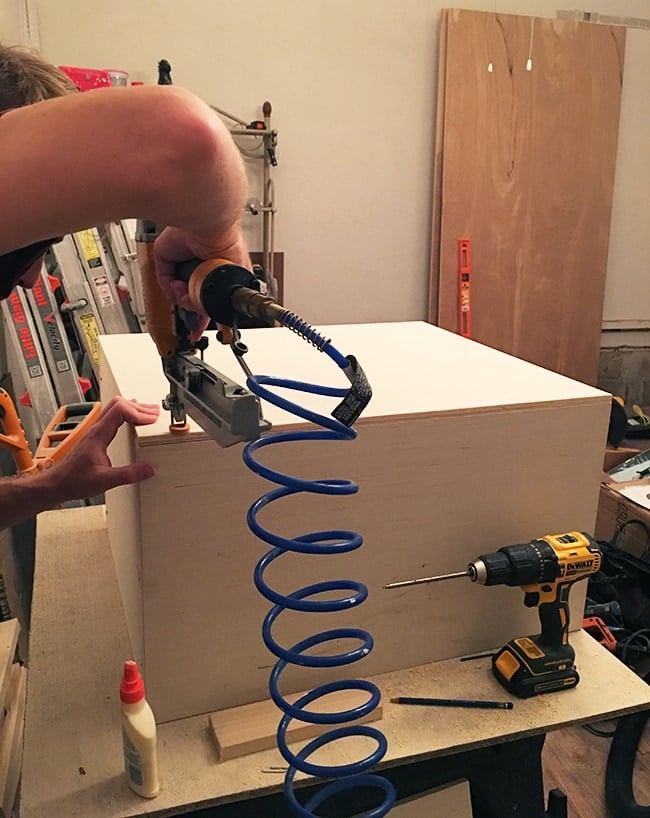
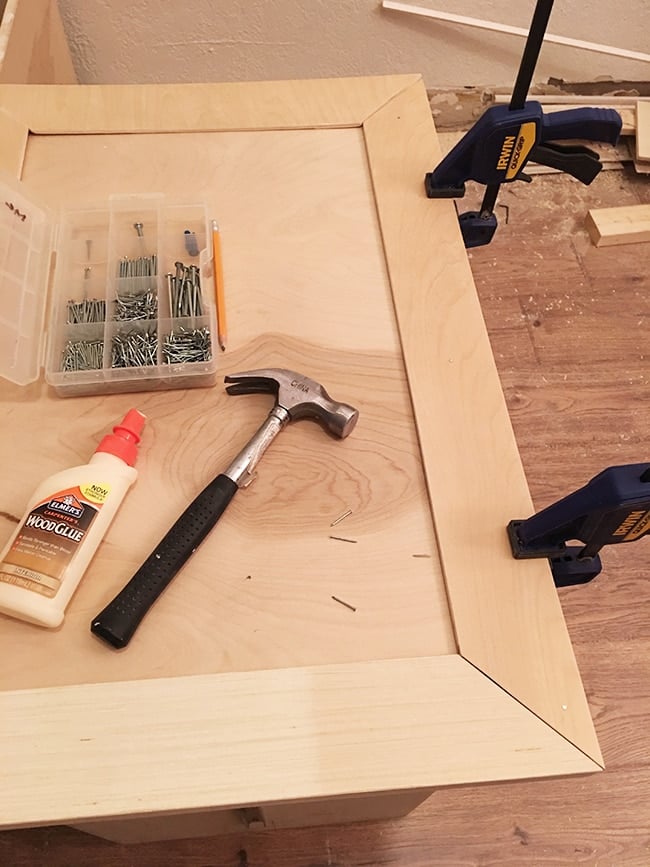
The drawer boxes were built with 1/2″ smooth plywood, and we made them extra large to maximize the storage. After all the pieces were cut, they were assembled with pocket holes & screws using our Kreg Jig:
I’ve had this tool for years (remember back when I first started building furniture?) and pulled it out of storage for this project. Lucas wasn’t sure about it at first and it took him a couple tries to get the hang of it, but now he’s sold!
With the help of the Kreg clamp, the drawer boxes were assembled in one evening. The bottoms were attached with wood glue and finish nails.
Next came the drawer slides. These must match up with the slides attached to the frame, but fortunately there is a bit of room for error with these slides (I made sure to read all the reviews and get the most user-friendly product I could find!)
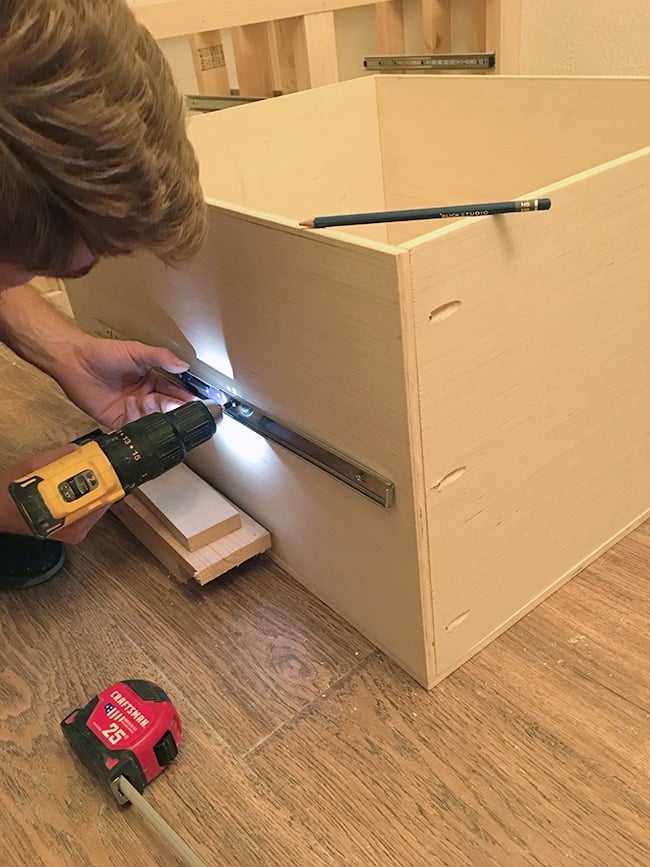
Again, it comes down to careful measuring and patience (sensing a theme for this project?)
It took some finagling (and by some I mean several attempts to reattach the slides and forceful whacks with the hammer when that didn’t work) to get things to work properly, and it still isn’t 100% perfect, but now that it’s finished, you can’t even tell.
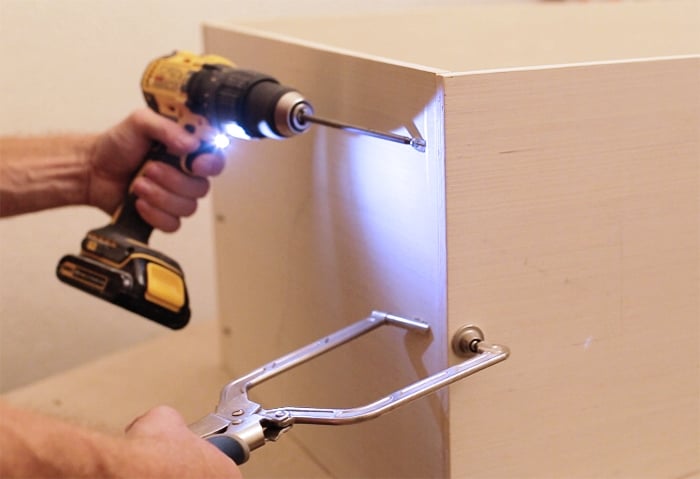
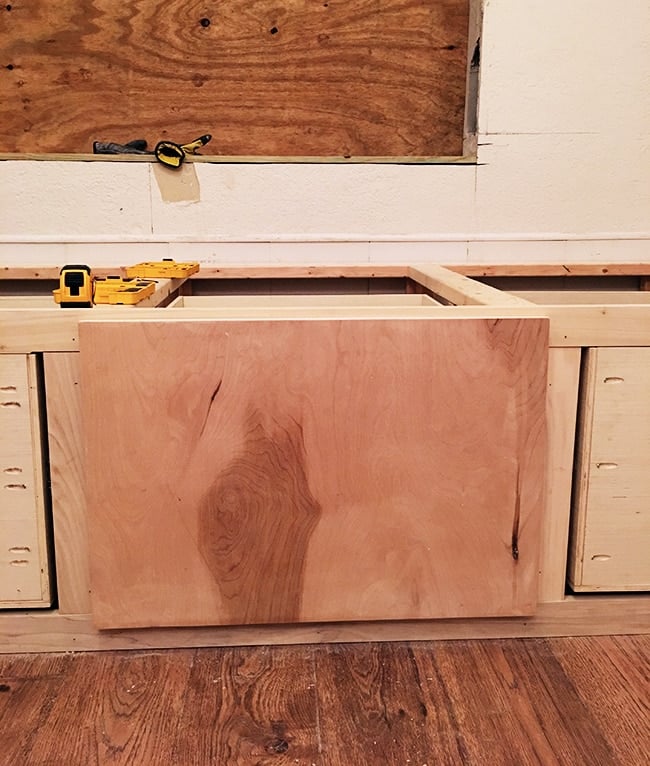
I had just assumed this would all be a disaster and was pleasantly surprised when the drawers fit on our first attempt. After all three were tested, we added the drawer fronts made with 3/4″ smooth plywood, attached from the inside.
With the hardest part out of the way, we focused our attention on the wall above it.
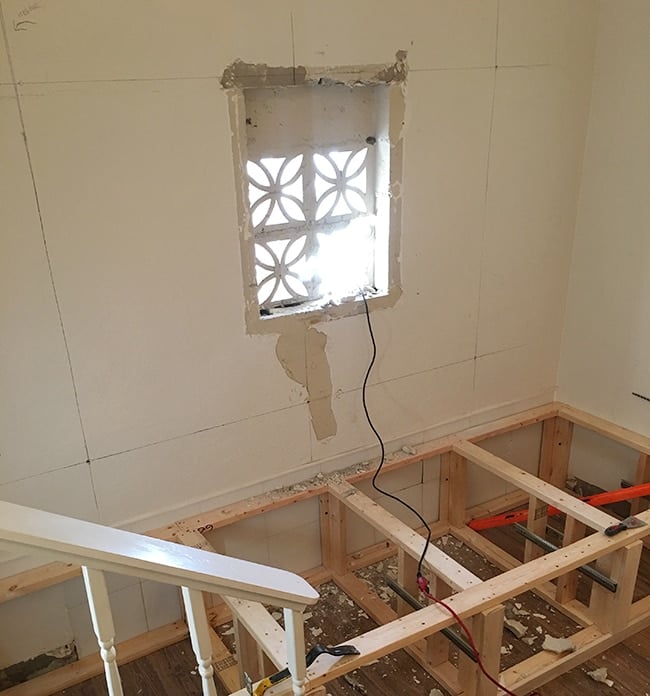
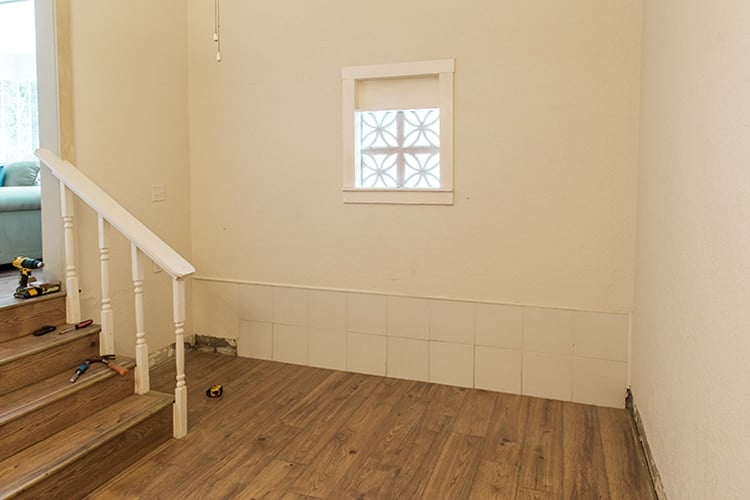
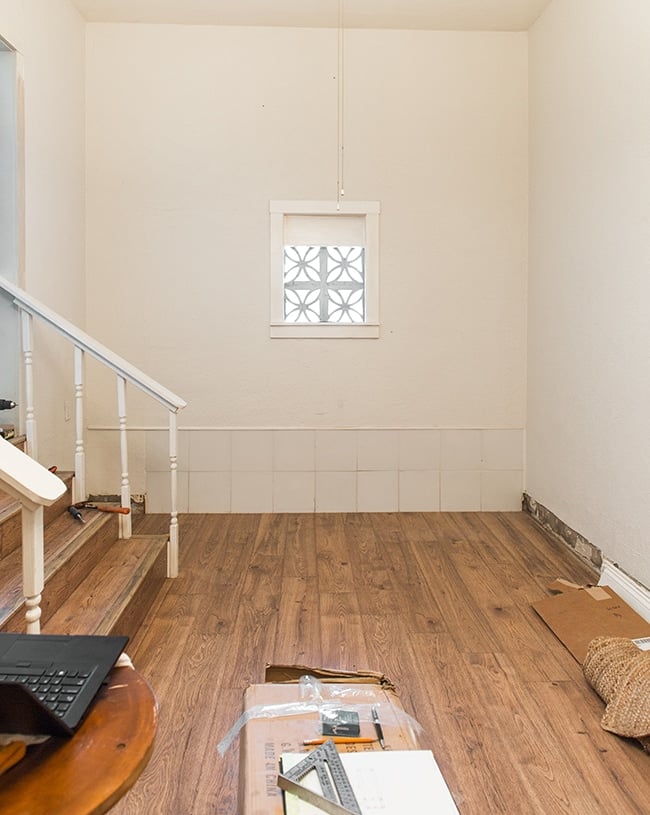
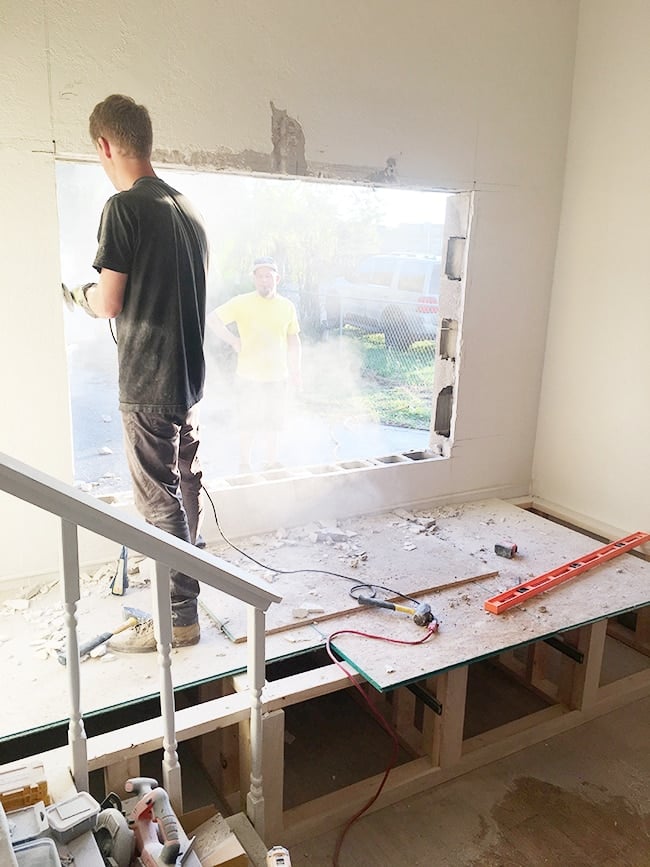
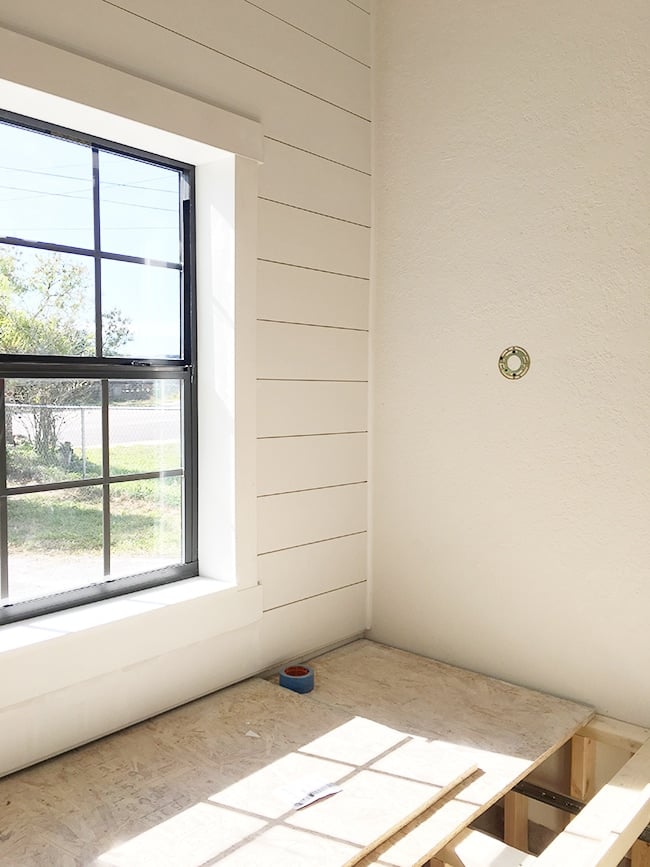
The only source of natural light in this room was from the holes in these cement blocks, with a piece of plastic behind it. The energy inefficient jail cell vibe is not the look we were going for, so I found these nice black windows in-stock at Lowe’s and had two delivered the next week:
Our handyman came over and Lucas helped him cut the rough opening. LET THERE BE LIGHT!
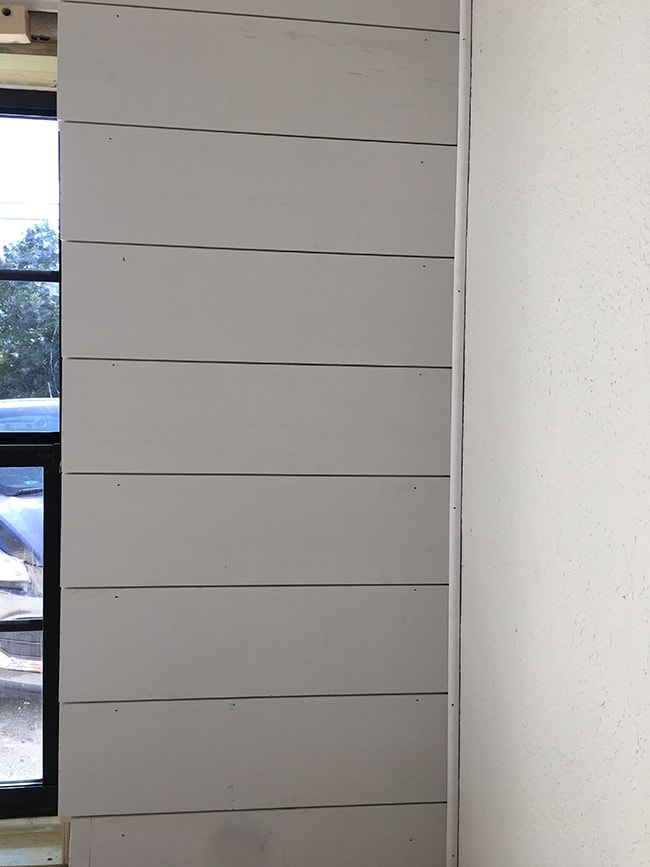
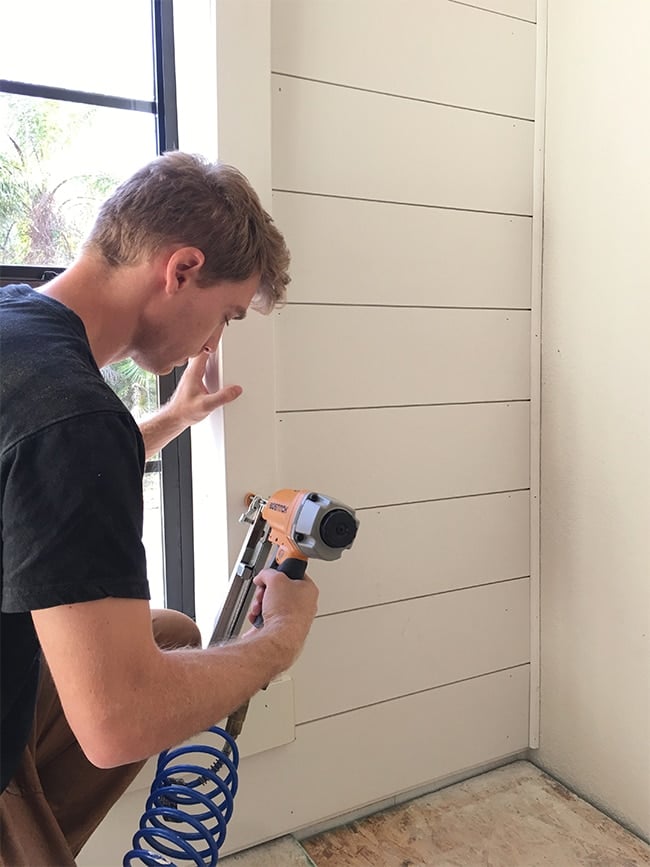
While waiting on the windows to be installed, we got to work on the back wall. I wanted something more interesting than the plaster walls, and wallpaper was not an option since they were textured, so I thought shiplap would be the perfect solution. I’ve installed my fair share of shiplap—or faux shiplap to be accurate, but this time I decided to go for the real deal for easy installation and more professional looking results. Lowe’s carries shiplap in varying sizes/lengths, and I opted for the widest width (7″) and longest length (12′) to avoid seams.
Before installing, we had to attach furring strips to the wall since it’s made out of concrete which means you can’t nail into it. We also took this opportunity to install thin insulation to help with energy efficiency, since it’s an exterior wall.
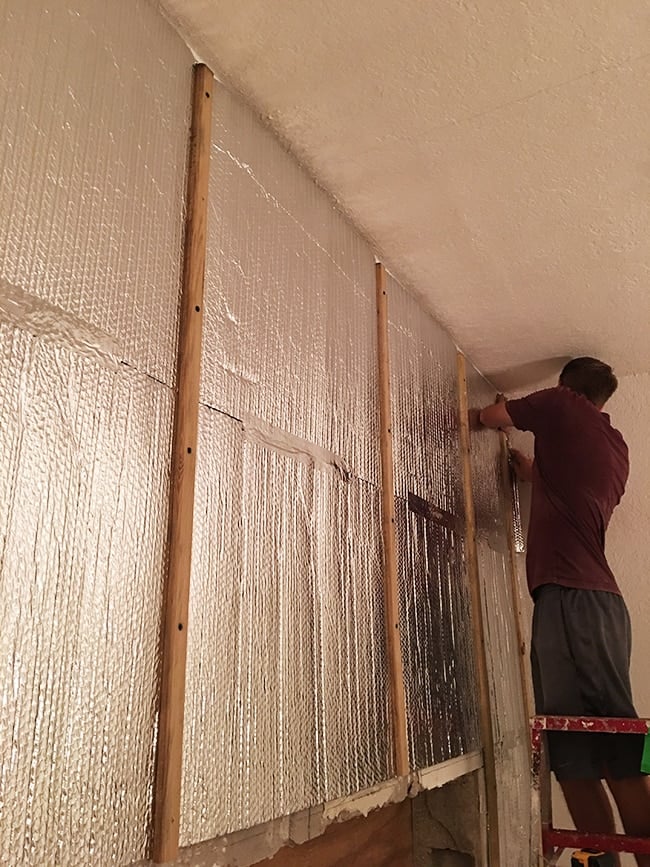
This step was a couple extra days of work, but absolutely worth the effort and added cost to do it right.
With our wall freshly insulated and furred out, it was time to install our shiplap! This process is very straight forward and one of the easier parts of this whole project. We spent a couple evenings and knocked it out, along with installation of our new window, with less than an hour to go before Thanksgiving day.
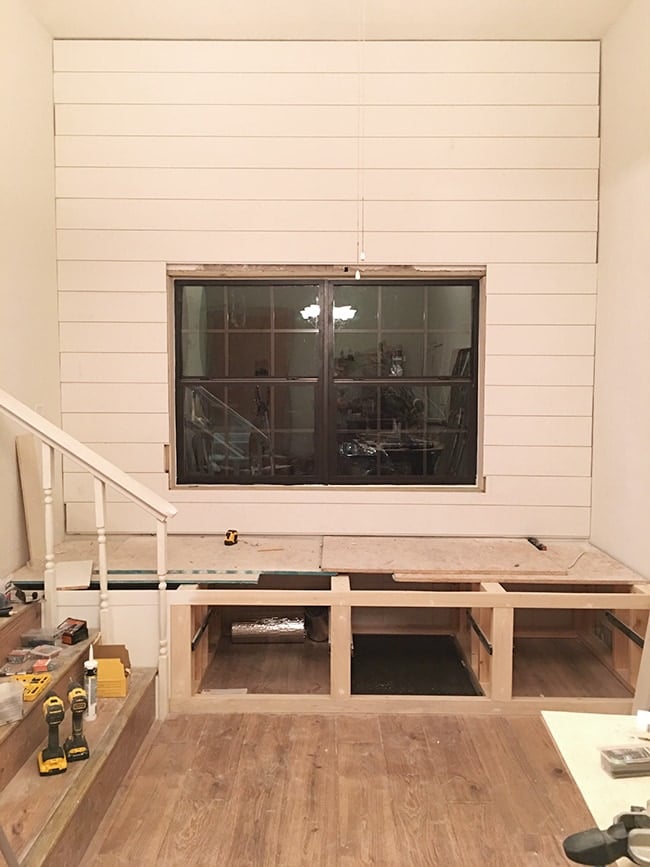
And with that, the hardest parts were over! The next three days were spent on all the little details—like quarter round along the edges of the wall:
Window trim ripped down from scrap plywood:
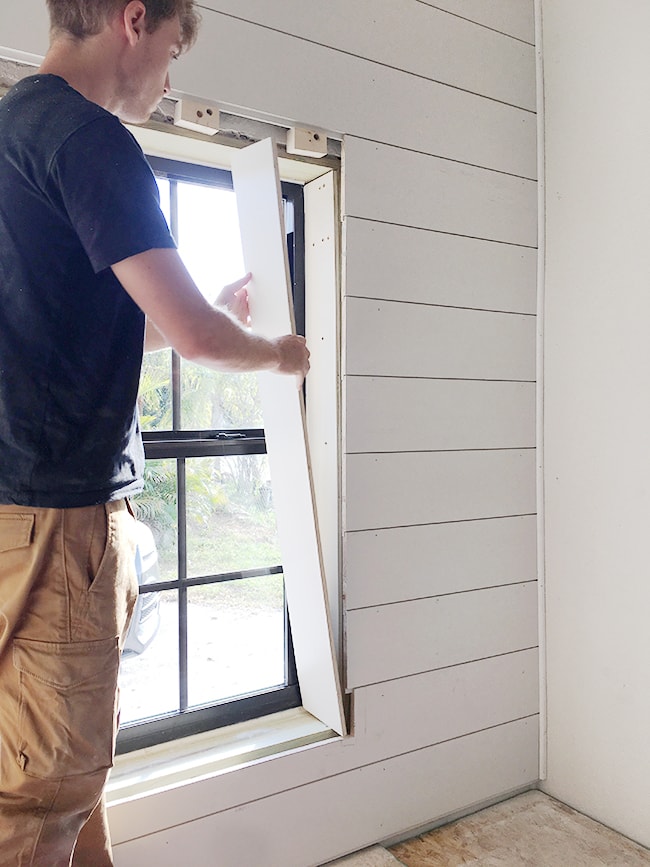
Window sills and more window trim:
The drawer fronts were looking pretty plain, so Lucas ripped down 3″ strips of wood to give them a shaker style:
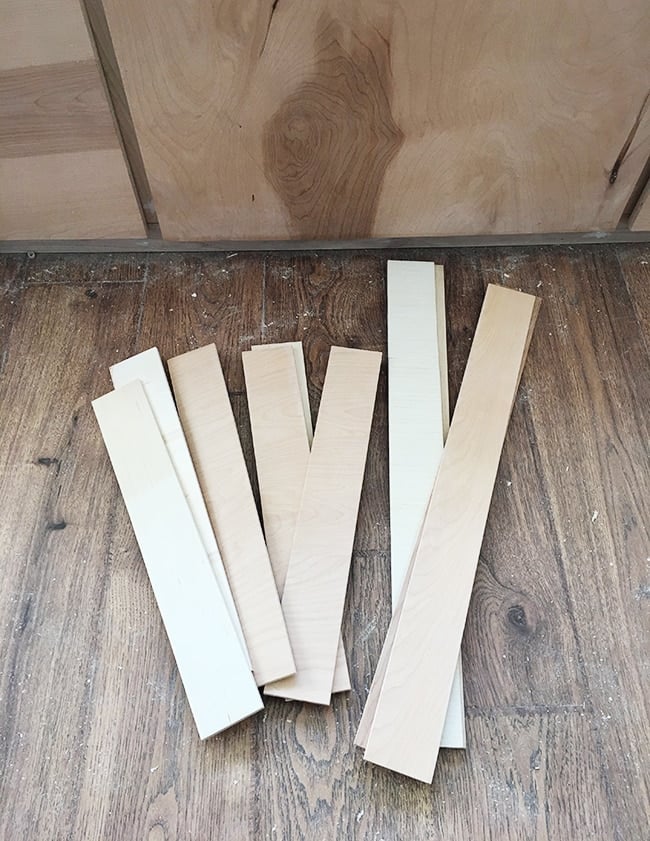
The edges were mitered, and we used wood glue and nailed them in by hand (we didn’t have small enough nails for our gun, but a hammer worked perfectly!)
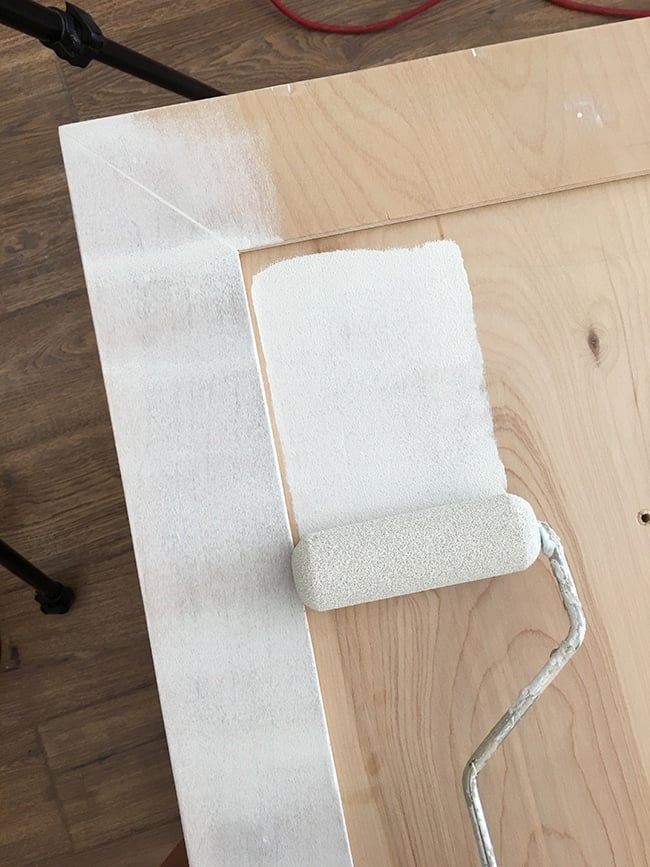
Then a full day of patching, caulking, sanding and painting…
Tip: for a smooth painted finish, you need smooth wood (of course), a foam roller, several light coats and and sanding between each coat with 220 grit paper. We painted everything in HGTV Home by Sherwin Williams Pure White.
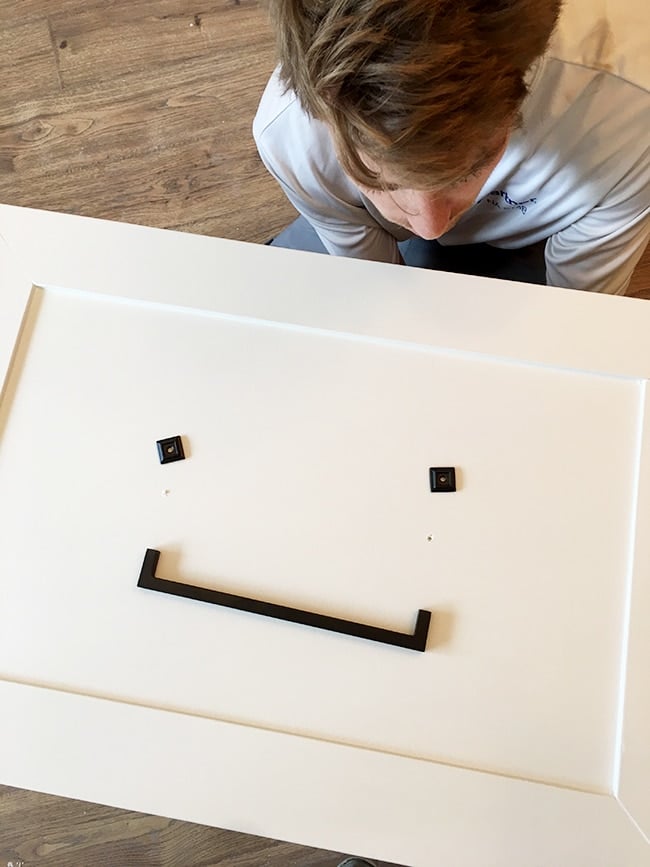
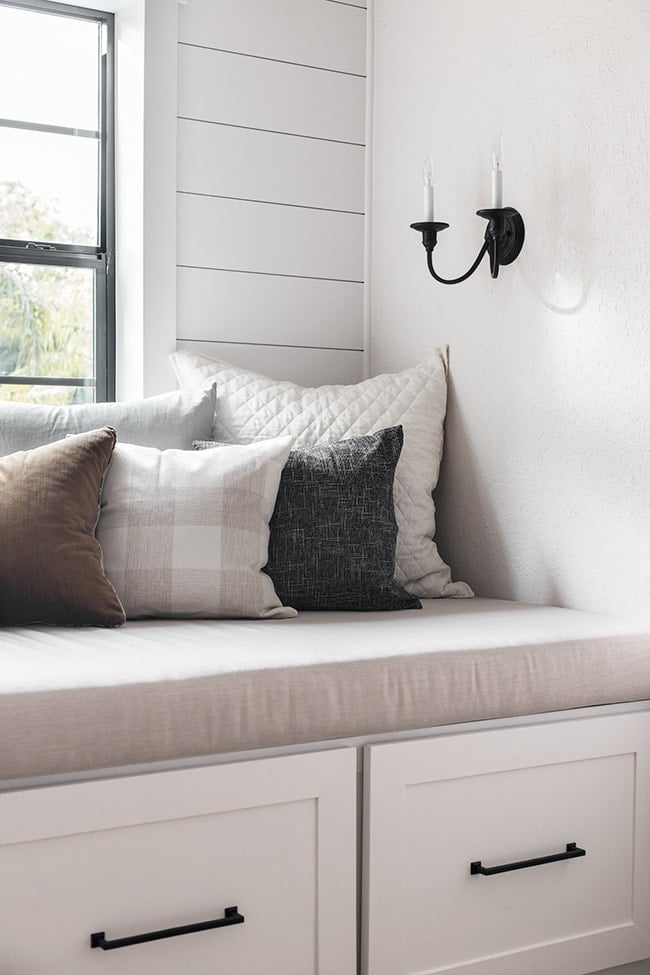
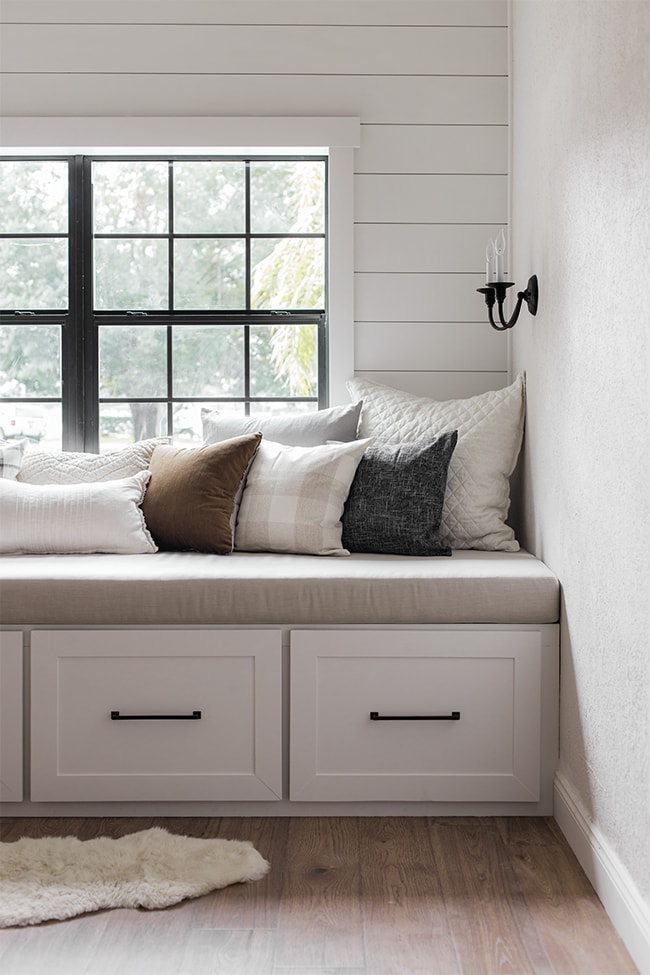
The drawers were super happy about getting new hardware.
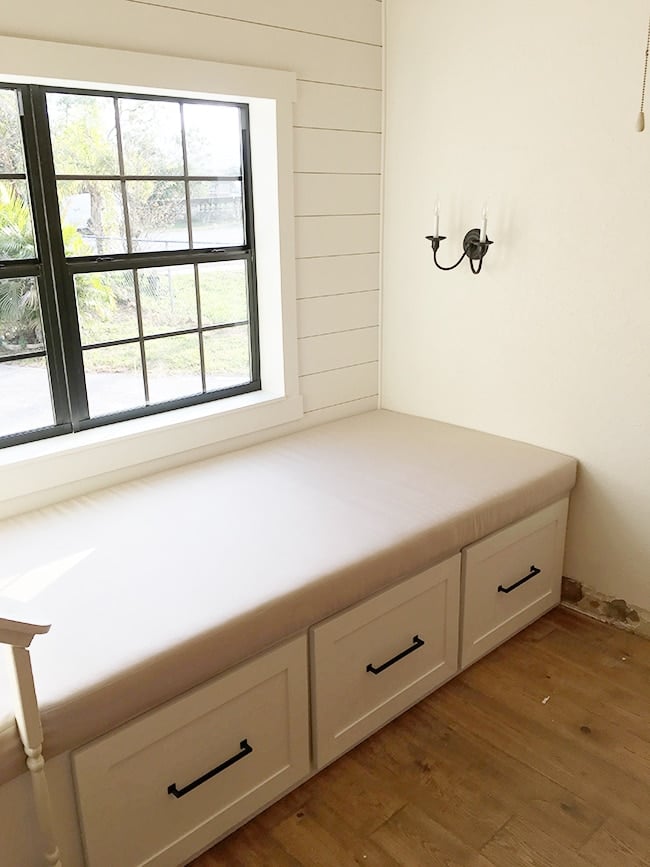
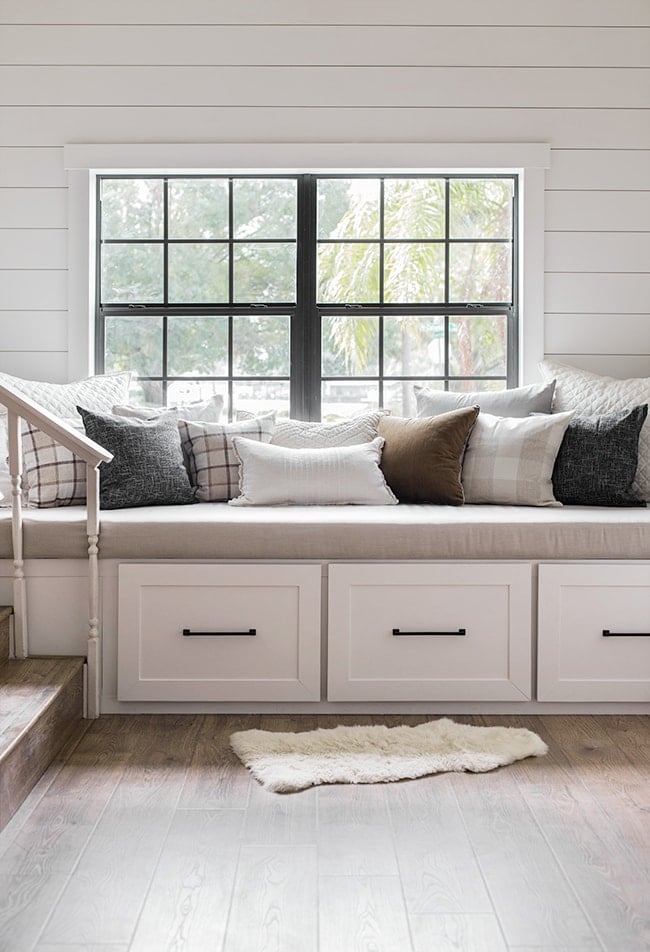
For the top of the bench, we cut down two 3/4″ sheets of plywood to fit.

I had a custom 5″ cushion made by a local cushion shop (using Sunbrella fabric) and we added two matching sconces. We ran out of time to wire them, but that will be done soon!
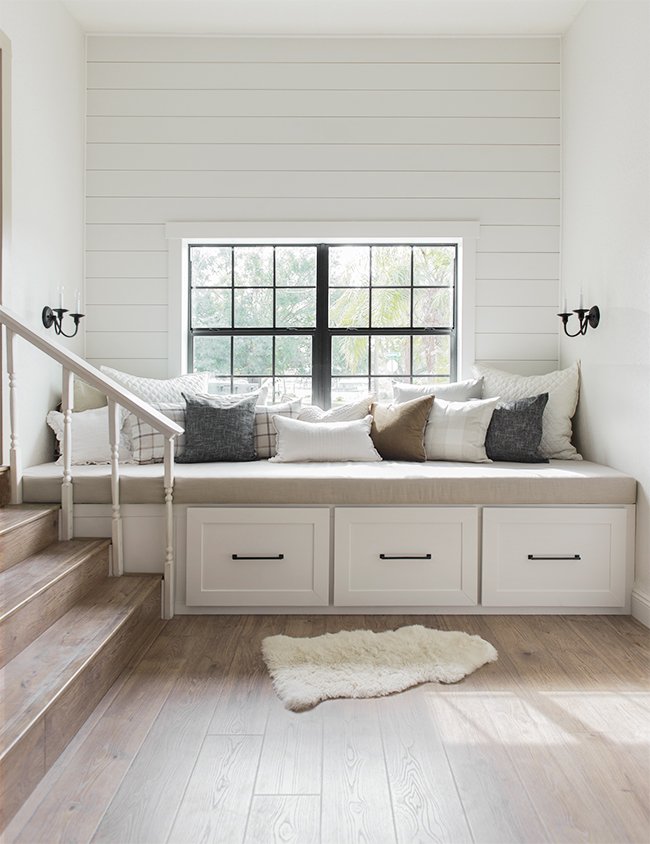
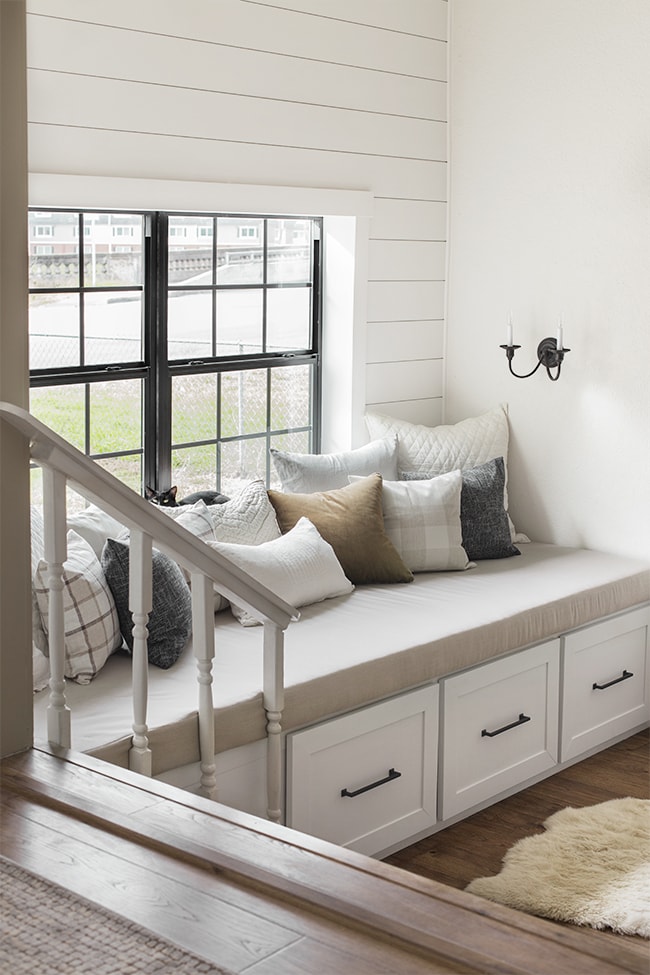
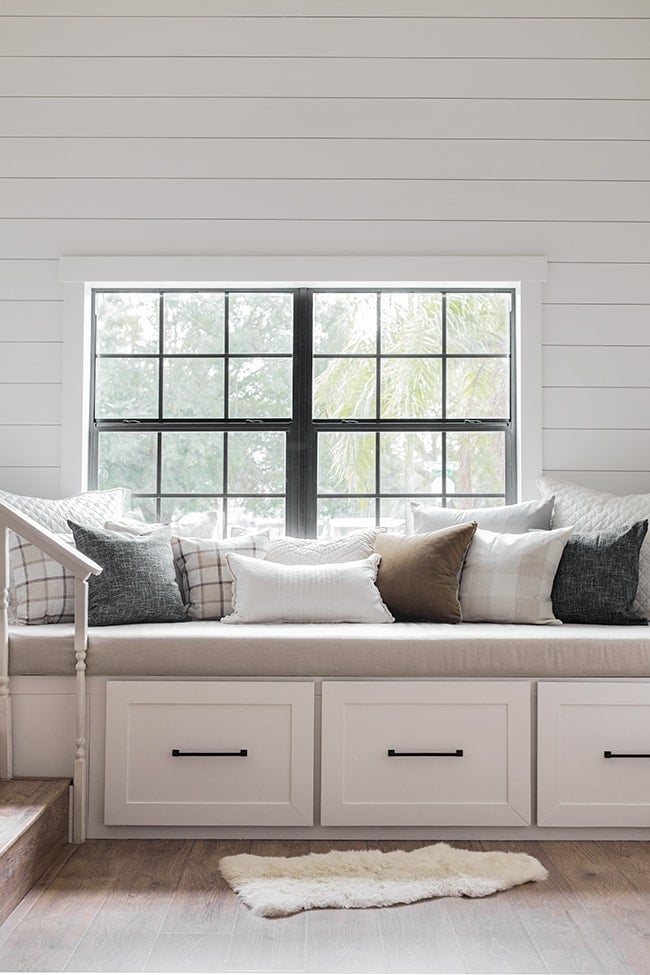
You guys. Look at what we made! (hover over or tap the photo to pull up sources):
I am just beside myself.
This blog post and video are a simplified, condensed version of this journey that stretched across weeks.
As you can imagine, there were a lot of challenging moments and frustrations along the way. The struggles have made this finish line that much richer.
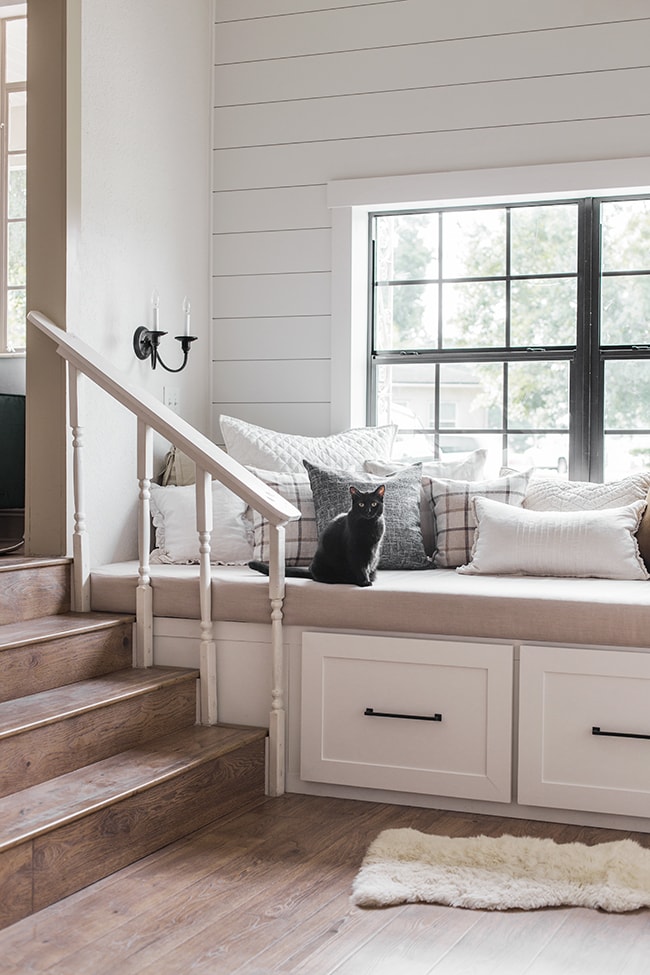
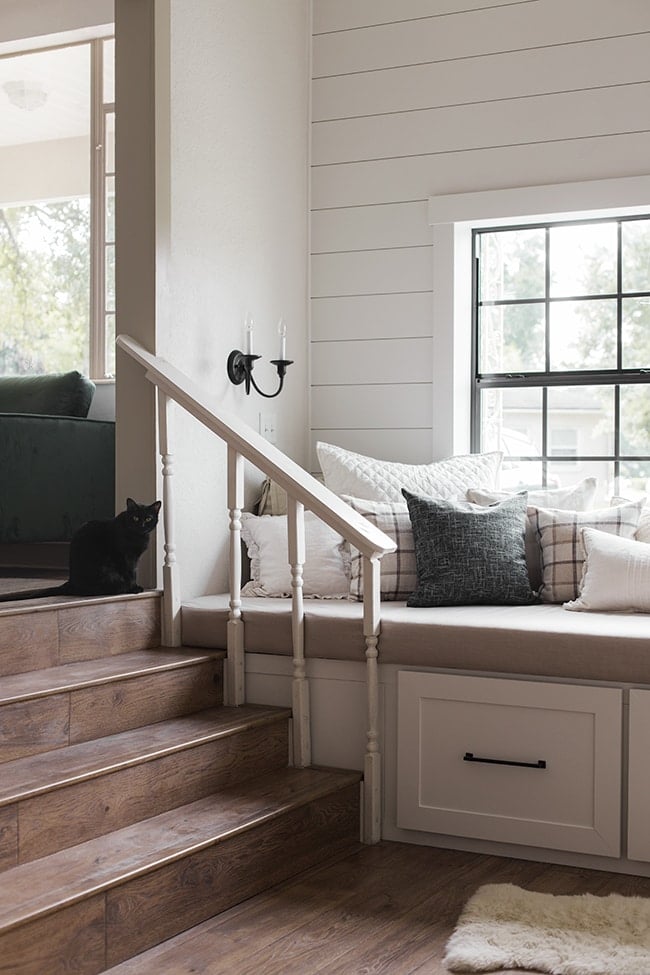
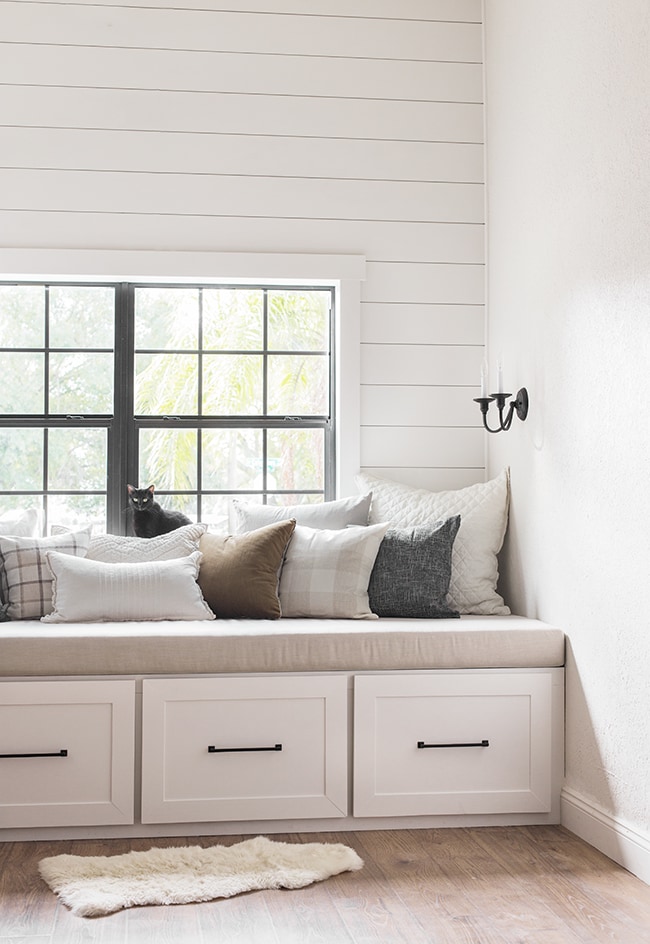
I’m a little surprised at how different the entire house feels. You can see down to this room when you walk in the front door, and the coziness draws you right in and makes you want to curl up with a book.
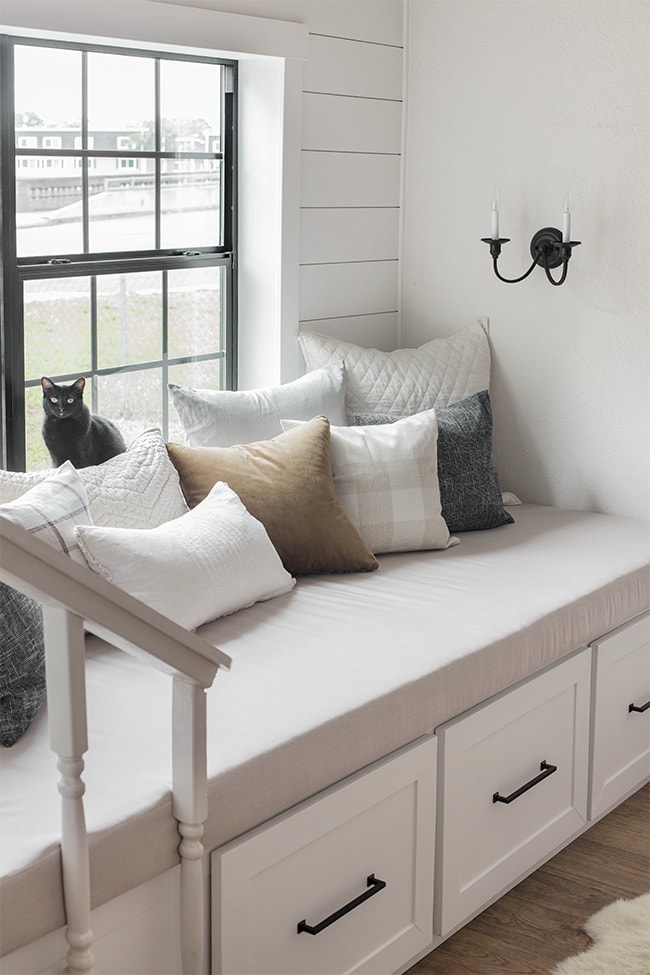
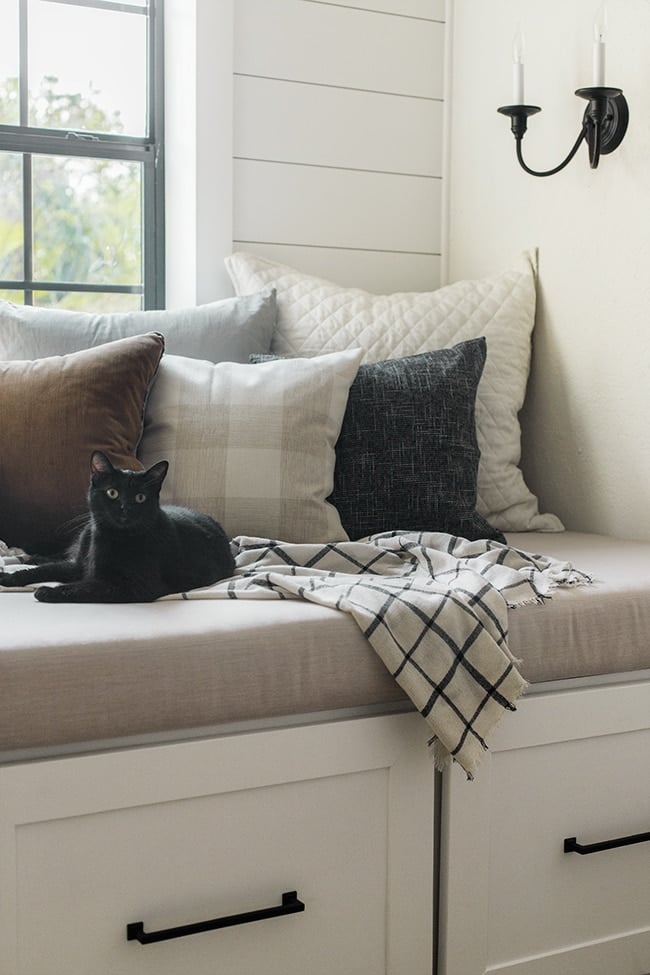
Susie agrees—she hasn’t left that window ledge in days.
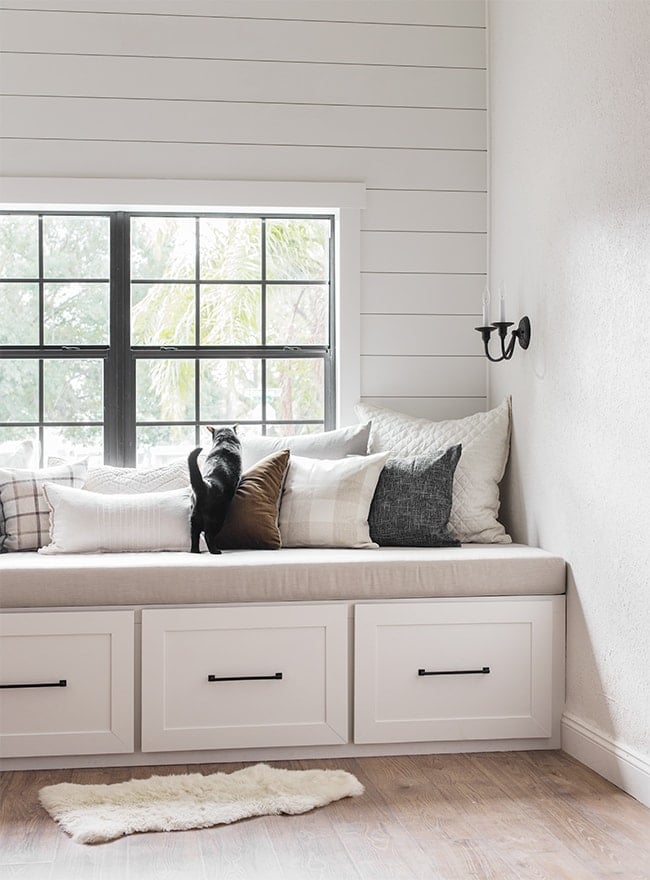
Can we talk about these huge drawers for a minute?
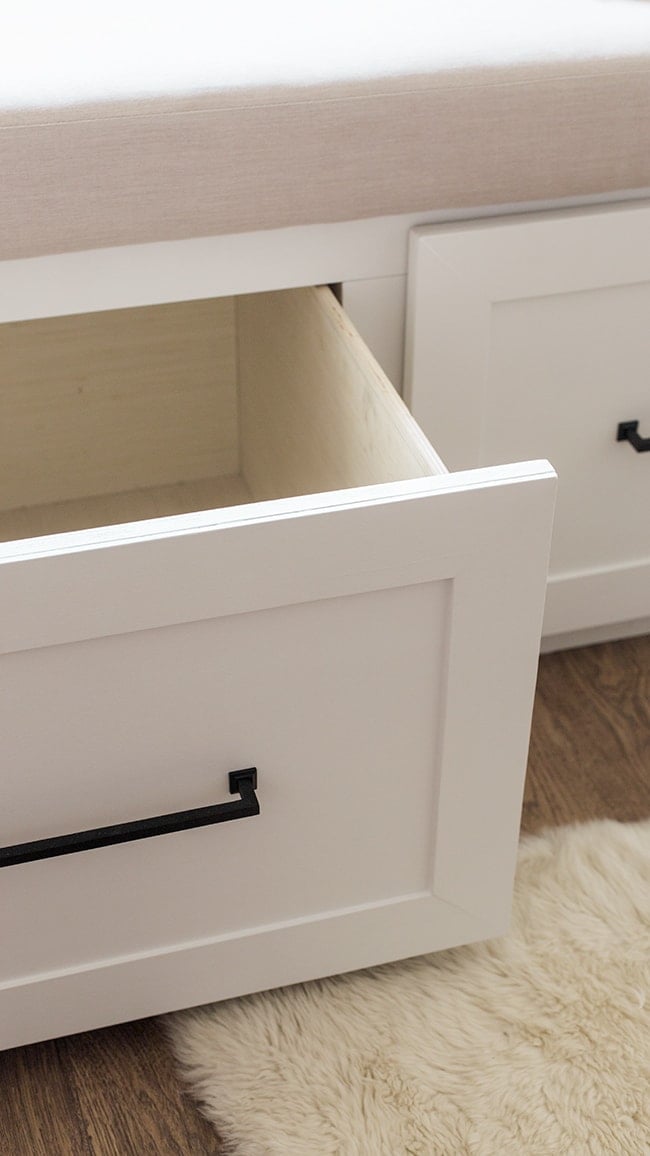
I finally have a place to put all my pillows!
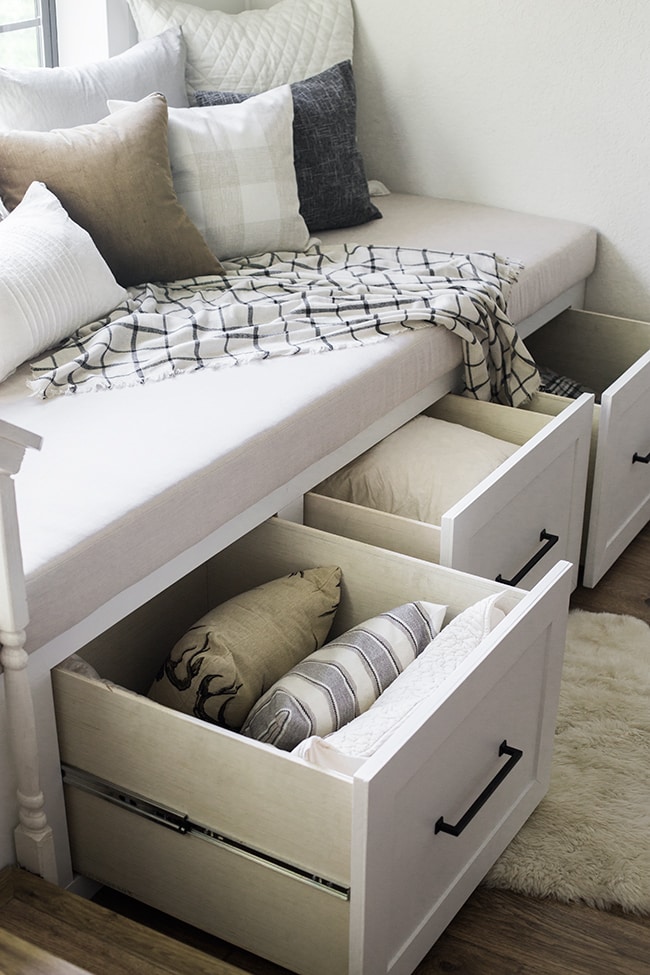
Ok let’s be honest, 1/4th of my pillows… but better than nothing!
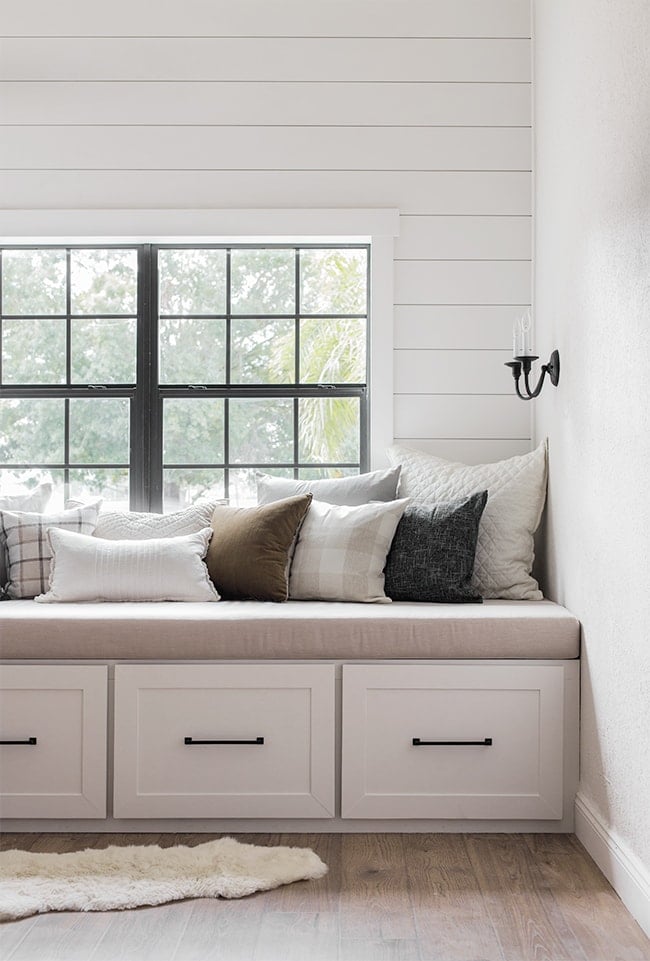
This bench is deceivingly large. It’s the width of a twin size bed, and 12′ long. Two people could sleep on it if they wanted.
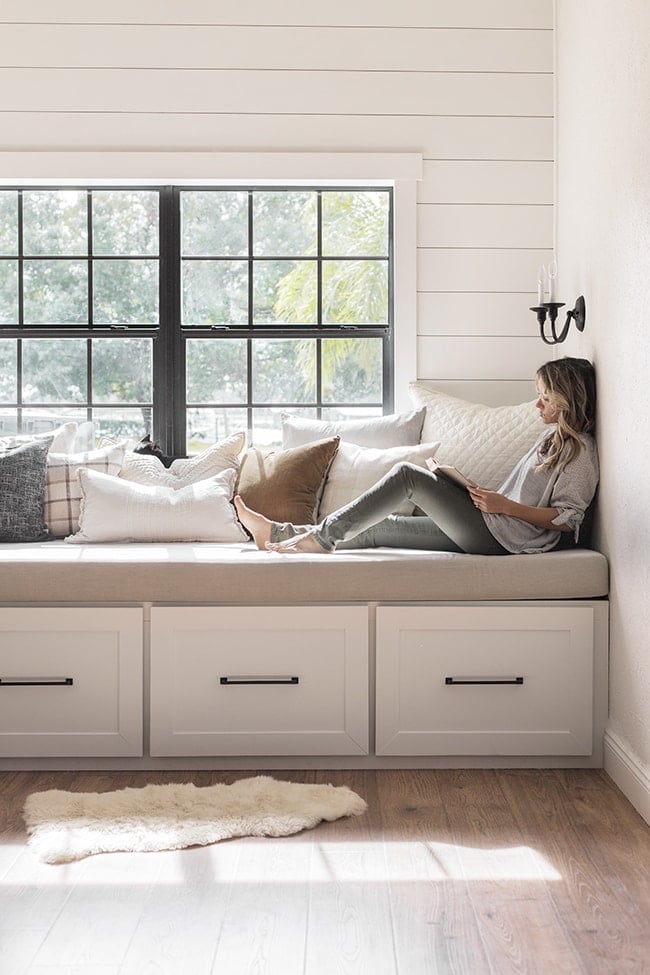
I love the touch these simple sconces add! They make such a difference.
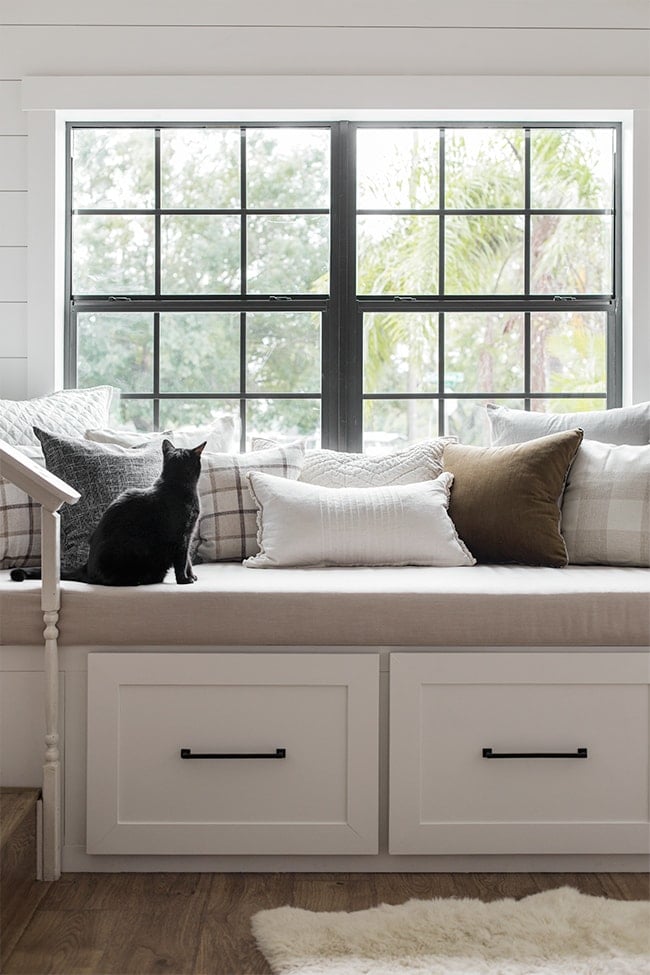
We didn’t get around to replacing the railing, but I’m thinking we should just remove that side altogether. Not sure if that would be a safety hazard… what do you think?
Yes, I’m aware this room needs a deep cleaning (the whole house does). The paint was barely dry before I threw on the pillows to snap a few finished photos.
Speaking of pillows—if you’re wondering about the sources, I’ll be sharing all about those in a blog post soon! I’ve linked to a handful already in my IG stories (they’re crazy good prices!)
As soon as this post goes live, I’m busting out the Christmas pillows & blankets and making this bench festive. There will be a holiday decorating blitz over the next few days here and next week I’ll share my last minute/simple decor ideas on the blog.
Okay—I think that’s enough content for one blog post! Are you overwhelmed? Or ready to tackle your own window seat/daybed/reading nook? All you need are the right tools and lots of patience 🙂
Happy holiday season my friends—see you again next week!


Kinga says
Wow, what an amazing project! Thank you for the detailed instructions, I’ve been thinking of building a bench like that but it seemed overwhelming.
I’d remove the railing, what’s the worse that can happen, you fall on that bed and stay there for the rest of the day 😉
Jenna Sue says
Thanks Kinga! It can be overwhelming at times but it’s certainly manageable if you’re diligent and patient. Go for it! 😉
Beth says
Wow! The before and after on this one blew me away. So impressed with your skills and your ability to see potential in the space. I felt like the hand rail stood out and wondered why you hadn’t removed it, but I get what someone else said about a rental property and liability. Wonder how it would look black to match the window?
Really great job.
Jenna Sue says
Thanks Beth! We’re torn between visuals and functionality as well… it doesn’t seem dangerous to me given there’s a soft cushion there! We’ll see what happens 🙂
Arli says
Wow, it looks amazing and soooo comfortable (and functional)! I can see myself napping there.
Your city code may require the handrail. I would change it out to something more straight-lined in keeping with the drawer style.
Great job Lucas!
Jenna Sue says
Thanks Arli, I’m sure there’s a good chance it has to stay for code! We’ll look into it 🙂
Jen Chu says
That poorly-sized 2×3 DIY handrail is kind of a bummer considering your finish work is so much better. I have a feeling if it bothers you a little now, it will bother you even more later as the house gets more and more finished.
Jenna Sue says
Yep, there’s a good chance we’ll be redoing it at some point!
Kathryn says
Omigosh Lucas!!!! What a man! I’m glad he had the confidence to do this project. He’s just getting better and better. There’s no stopping you dynamic duo now!!!! Kudos for a beautiful job and thanks for the amazing tutorial.
Kathleen says
You two make quite the team, another amazing transformation! I think Susie agrees and I’m pretty sure she thinks you two built it just for her. Looks like she really appreciates the beautiful new window.
Anupama Wenzel says
Well done! I’m always impressed with your DIY skills.
Keep the hand rails. The home will be a rental, the hand rails (both) offer safety, and decrease your liability.
Have you thought about a Favorite Tools or Favorite Decor Items post? I could really use something like that.
Jenna Sue says
Thanks for the feedback, Anupama! I did a holiday gift guide post years ago but I should do an updated one! For now I have all of my favorite tools saved here: https://www.amazon.com/shop/influencer-c06b9920?listId=2ZTTT6HOQOZMP&ref=idea_share_inf
Favorite decor items — there’s so many to list! There’s links to the sources for every room on the House Tour pages of my blog, but I’ll see if I can round up a handful that stand out and share them in an upcoming post 🙂
Anupama Wenzel says
The Amazon link is great, thanks! And you even have a tab for items in your home.
I remember you purchased bathroom faucets from Ebay years ago, and I was so surprised that you can get great quality products from Ebay. I have only purchased refurbished Dyson products from Ebay (which has been a great experience BTW).
Thank you!
Jenna Sue says
No problem! They actually sell those same faucets on Amazon, which I’ve linked to in that list since they disappear from Ebay a lot. Ebay has everything though, just like Amazon!
Stephanie says
It looks amazing! I’m glad you shared a picture with you in it because I didn’t realize the scale of this until I saw a person in there for measure- wow!
KristenEff says
I totally agree. Jenna looks so tiny compared to what I imagined the scale is. What an amazing bonus space! The outcome was totally worth it, but man… what an involved process. My 5 hour time limit would be waaay up!
It would be fun to sit on the bench and rest feet on the stairs to join living room conversation, but the handrail looks like it belongs there and the whole rental liability thing that other people have mentioned. With it intact, it kind of makes it even more cozy in a way. I’d love to know what you paid for a custom bench seat that size, or what the approximate $$$ range is.
Jenna Sue says
Thank you Kristen! It’s a good thing Lucas was in charge of this one, because I probably would’ve given up in the middle of it 😉
We used a local upholstery shop and paid $535 for a 123″ x 44″ cushion. It wasn’t cheap, but less than quotes I found for custom cushions online. And the results are very professional — something I wouldn’t be able to recreate (or have the time/desire to do) on my own!
Jan says
Beautiful job! Like you said, it really changes the look and feel of the entire house. You guys are really updating a basic into a home with a lot of charm and detail.
Love it!
Robin says
This is amazing. I personally like the handrail; it sort of balances out the asymmetry of the 3 drawers, but you could probably get away with removing it as well. Is there another handrail on the other side of the stair?
I am so impressed that you guys built drawers from scratch. It all looks amazing.
Jenna Sue says
Thank you Robin, and for your feedback! There is another rail on the other side of the stairs. I can’t decide if it’s worth the effort to redo them. And no one is more surprised than me that these drawers work properly ?
Marty says
What a fabulous use of space and it looks amazing too.
Jenna Sue says
Thanks so much, Marty!
Terri says
wow, wow, wow!!! Always amazed and admire your vision, Jenna! Lucas knocked this one out of the park! As always, thank you for sharing.
Jenna Sue says
Thank you Terri! 10000 million points to Lucas for making this happen!
Brenda says
Great job….always look forward to your posts full of creative surprises.
Try vacuum storage bags for the pillows you can triple your storage and buy more..;)..
Until next week happy diying
Brenda
Jenna Sue says
Thanks Brenda, that’s a great tip! Pillows are the hardest to store away!
Kelsey G says
Incredible. Just like everything you do. You’re such an inspiration!
12/10
Jenna Sue says
Thank you so much for your support, Kelsey! <3
Linz says
Awesome job, Lucas!!?? When I first saw the photo, I couldn’t figure out where it was taken. Then I realized it was the bonus room, how do you guys do this?!? You guys completely changed the look and function of the space. I love how large it is and how perfect the drawers look. So cozy??? So…. Is it 1/4 of your pillows in the drawers and on the seat? Or 1/4 of them fit into the drawers? ? Can’t wait to read your updates every Wednesday!
Jenna Sue says
Thanks Linz, this project turned out better than we could have imagined too! 1/4 of my throw pillow collection could fit in the drawers — but bed pillows are a whole other issue now! ?
Barb Ward says
Great job on design and implementation, as usual
Mr .& Mrs. ♥️
I definitely would leave hand rail. It does enclose space somewhat,
And you do have to remember that ALL types of people might be renting
This space.
Keep up the grrreat work you two❣️
Jenna Sue says
Thanks Barb, and appreciate the feedback!