Can you believe it has been nearly six months in the making? Today our playroom is officially DONE! Technically this space is an office, TV and play room, but I think the primary use will be family fun & games at this stage of life, so let’s just call it the playroom. Come on in…
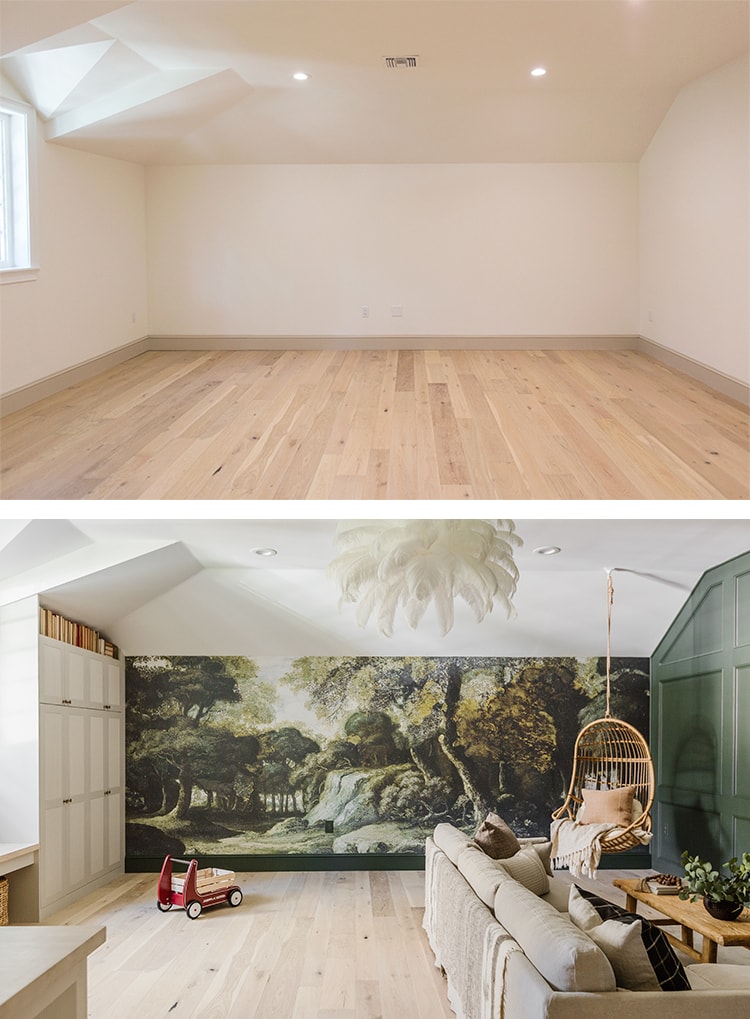
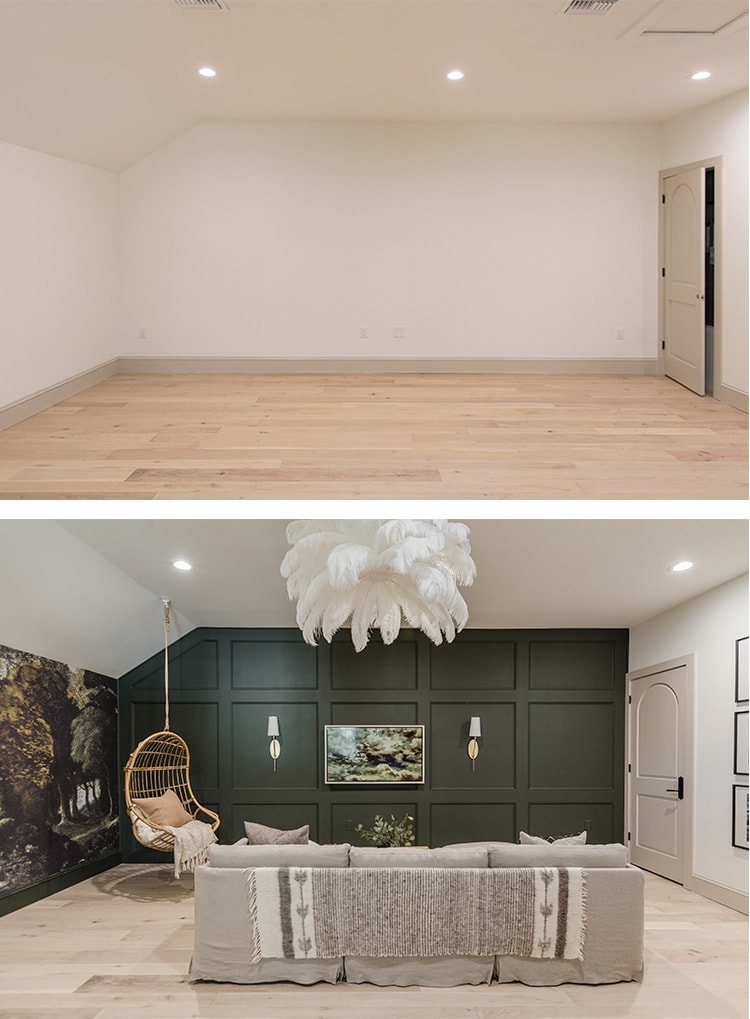
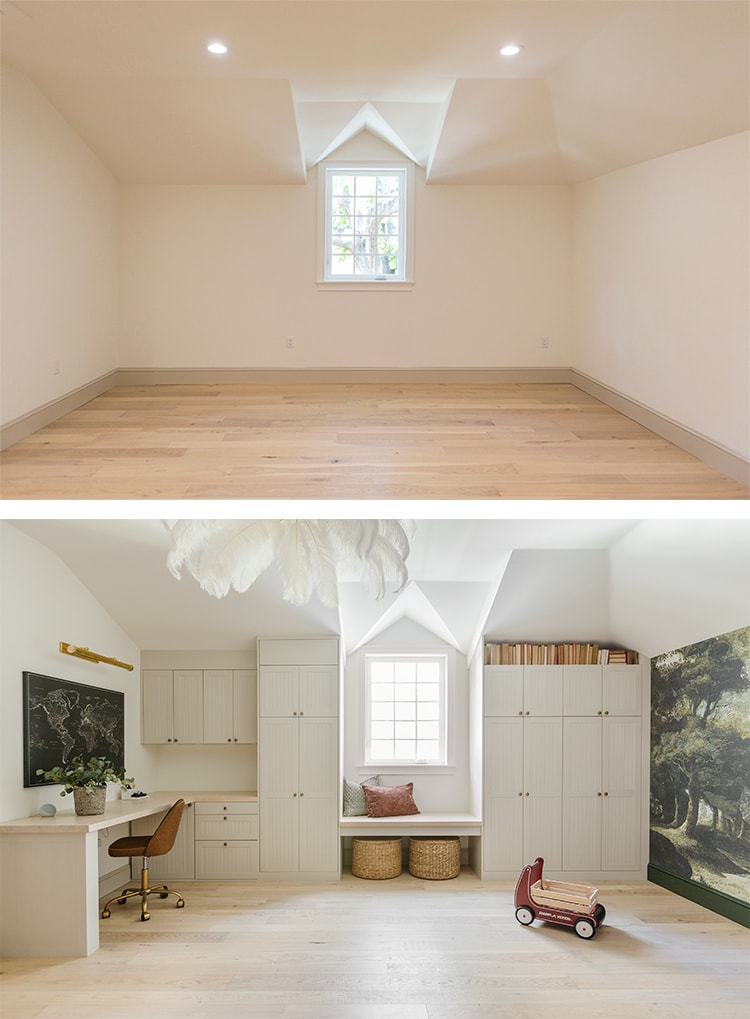
Originally we planned to leave this as an unfinished attic space (to keep building costs down) but thankfully, we ended up finishing it out as a “bonus room”, gaining us an extra ~380 square feet of living space.
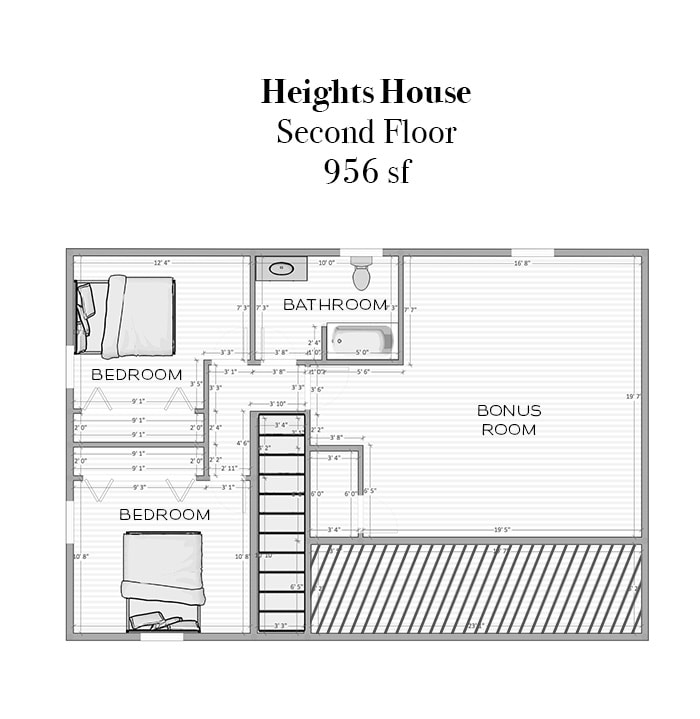
Now this once afterthought has become our new favorite room in the house—a space for our family to play, work, watch movies, and store all of my home décor and craft supplies.
Let’s see the side by side before + after transformation!
If anyone needs us, we’ll be hibernating here all winter! Can you blame us? I really couldn’t be happier with how this turned out, even though the timeline dragged on foreverrrr.
In case you missed anything, here’s a breakdown of every project:
- July: Design plans
- August: DIY recessed panel wainscoting
- September: DIY mural install
- October: DIY Ikea cabinet built-ins
- October: DIY desk & bench install
- November: DIY fluted cabinet doors
PS: Semihandmade also shared a great writeup on our cabinet painting process!
In the next two weeks I’ll be sharing our DIY TV frame and feather chandelier tutorials, so stay tuned for those!
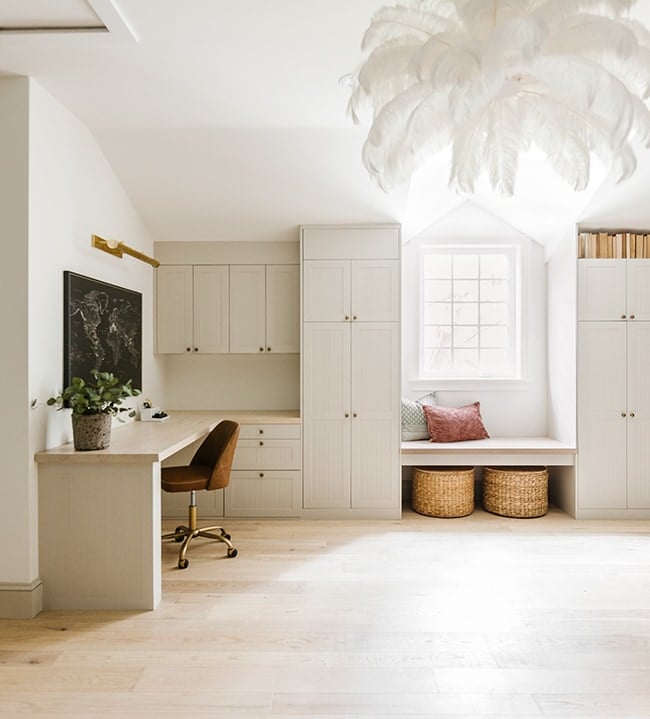
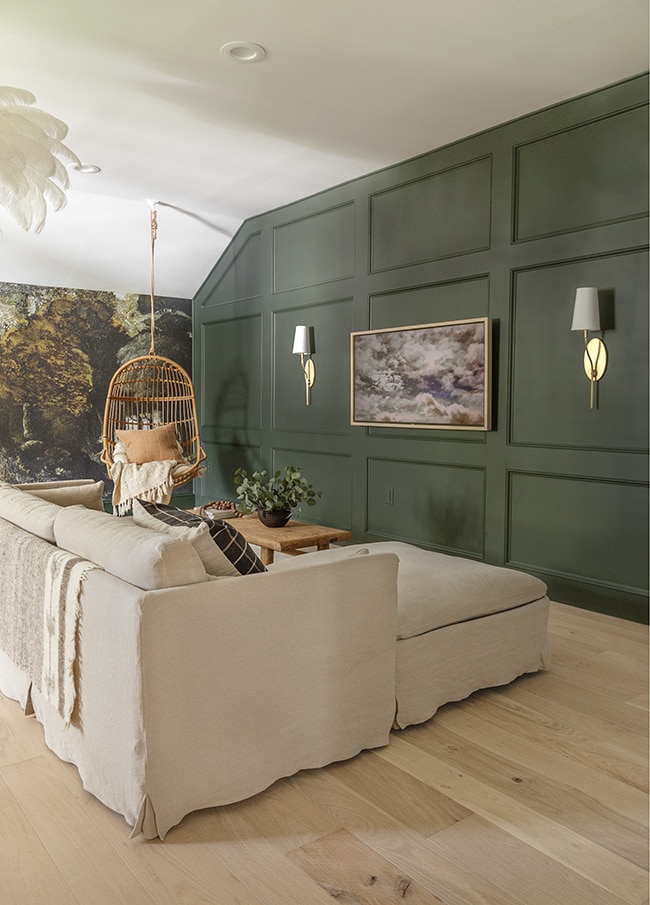
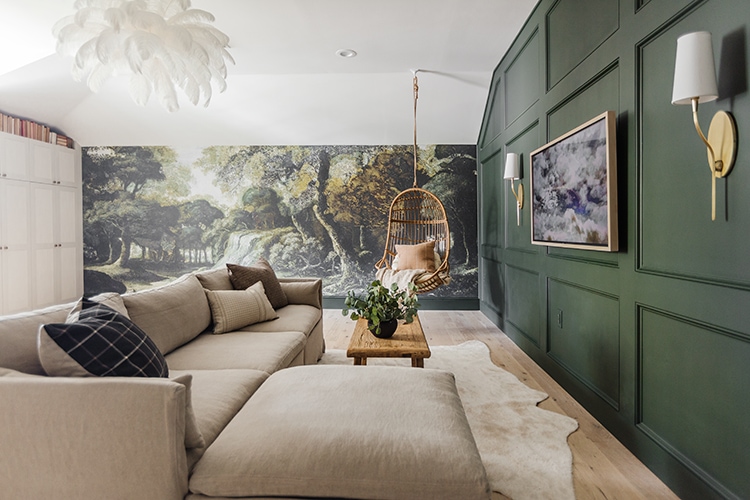
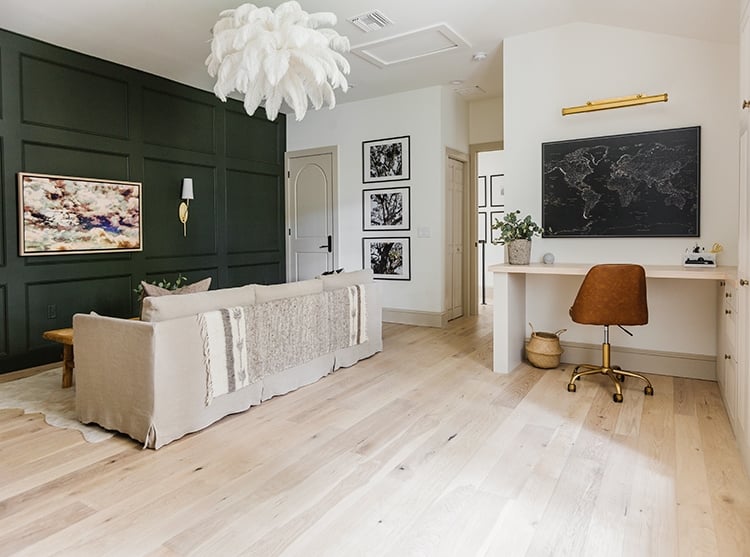
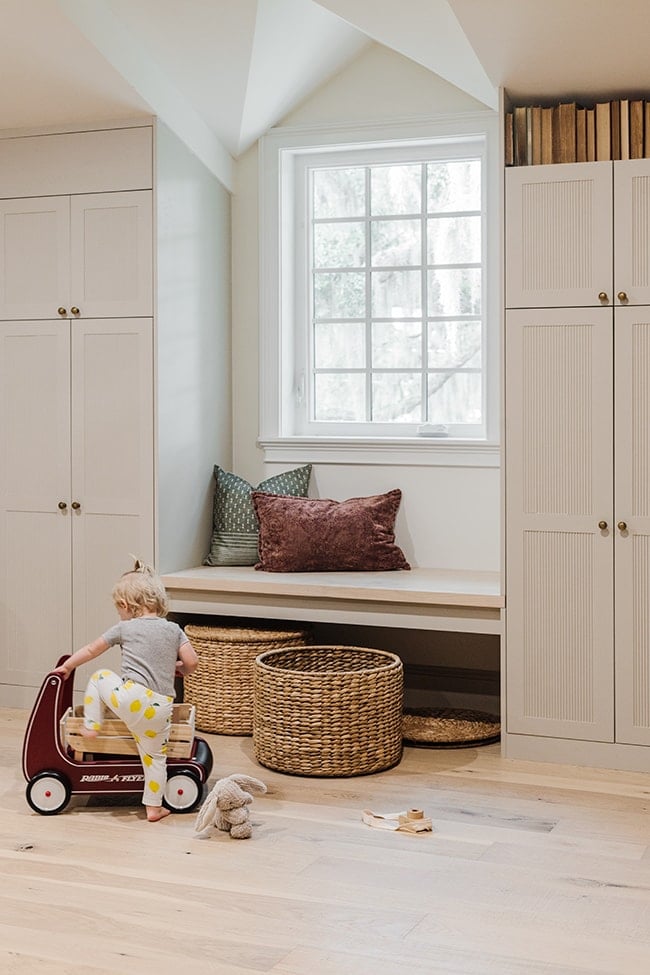
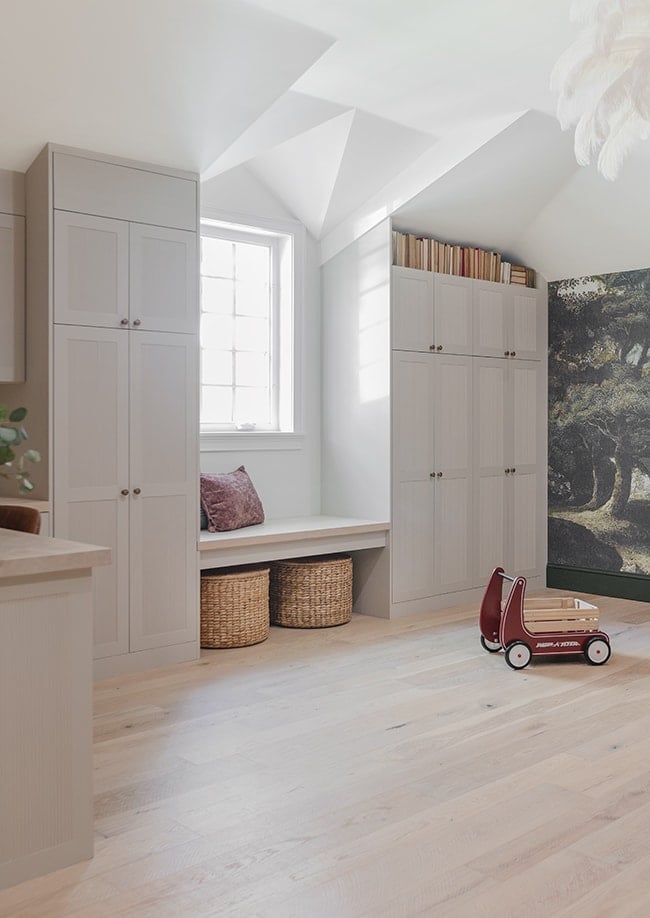
Here’s the view when you walk in…
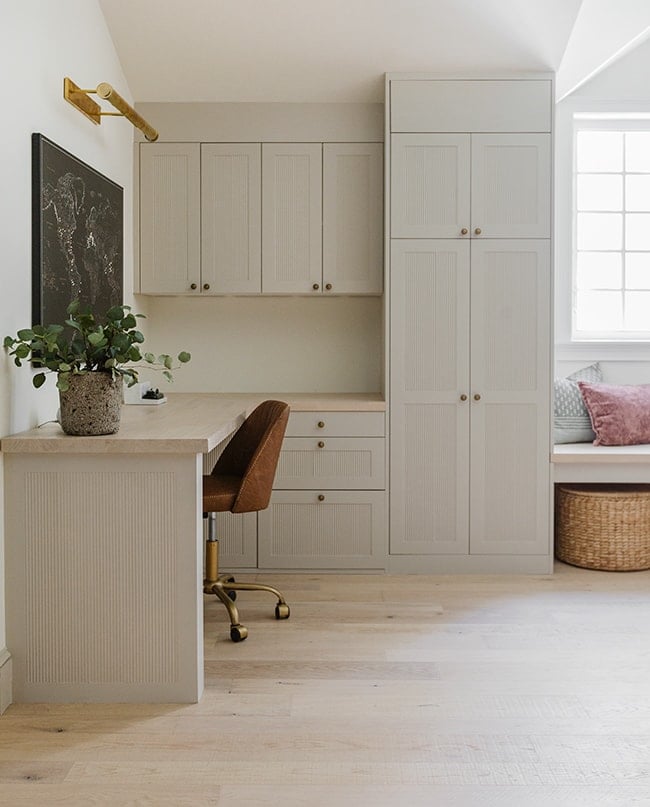
On the left wall, we added built-ins using Ikea Sektion cabinets and Semihandmade doors (with custom fluting detail).

We also built a bench seat and desk using butcher block, stained to match our French oak floors.
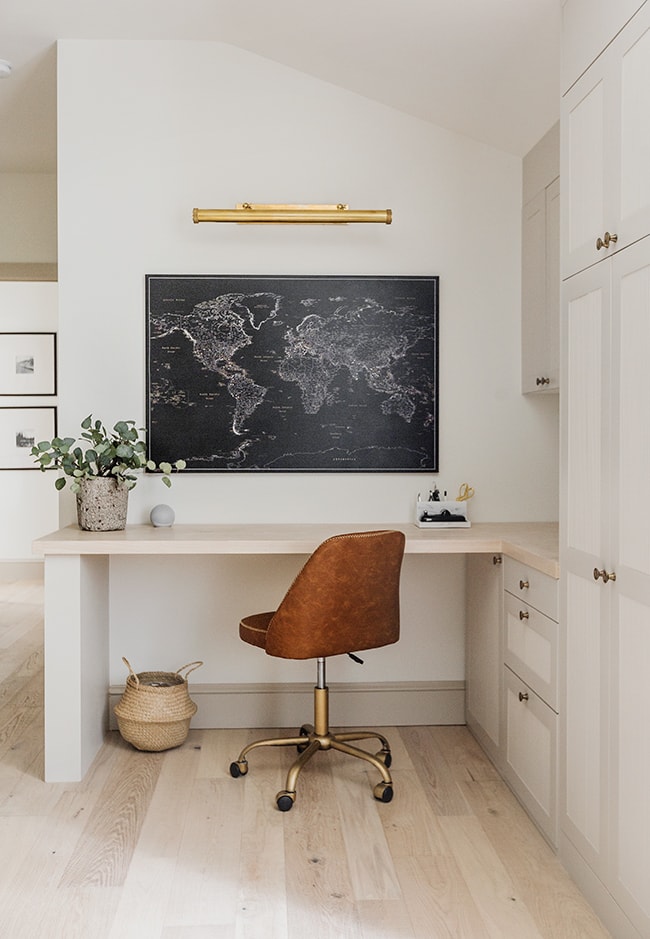
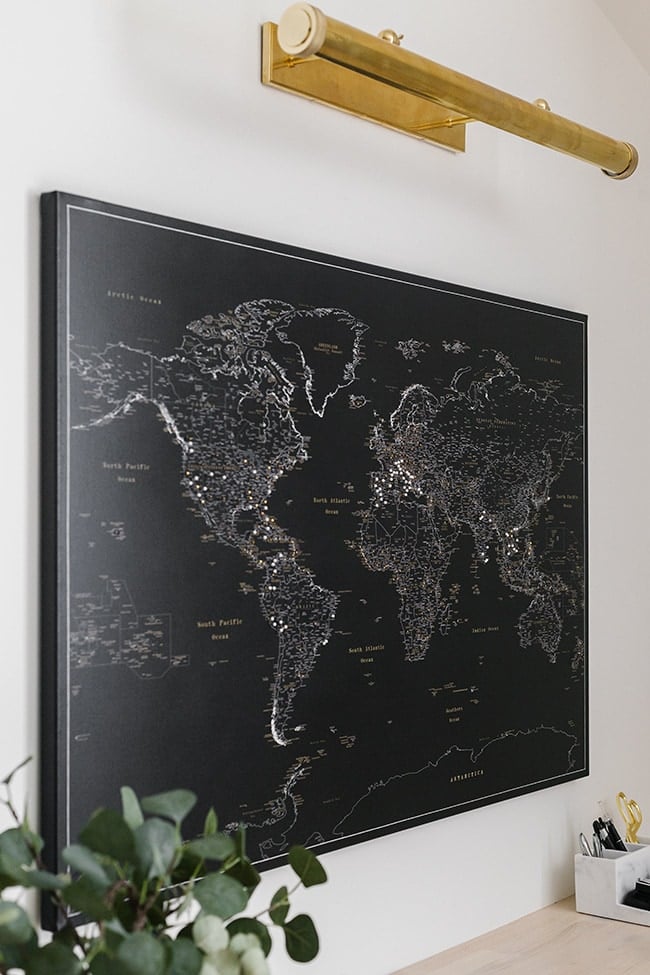
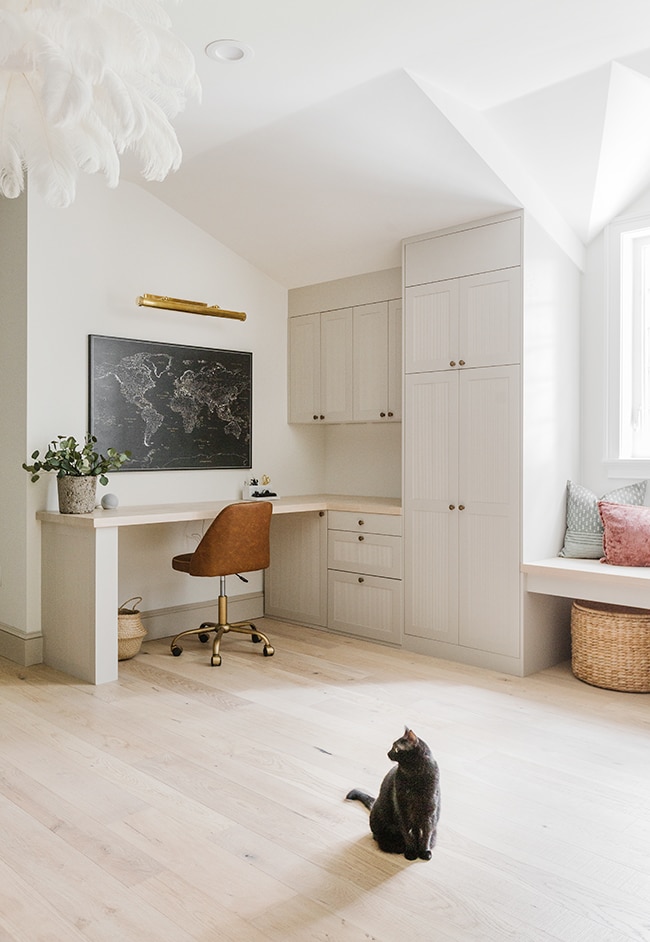
This canvas push-pin world map is one of my favorite details in the room, and a fun way to keep track of our travels. We installed an extra large aged brass picture light to illuminate the desk area.
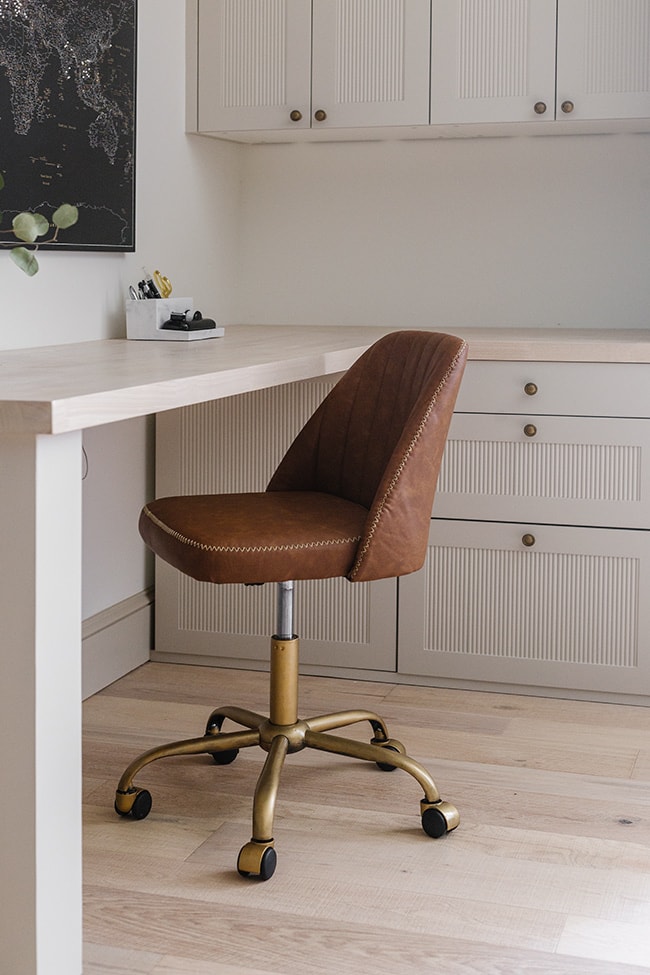
I offset the cost of splurge items with this budget leather desk chair, and turned the black plastic into antique gold using my Rub n Buff technique (plus a good spray primer and clear lacquer—fingers crossed the finish lasts!) The cabinet knobs are also inexpensive metal with a Rub n buff + lacquer finish.
I’m actually still waiting on a roman shade for the window (expected to arrive any day now) so I’ll update on Instagram once that is installed. The window seat will eventually be double duty as a kids desk, once Esmé is a bit older.
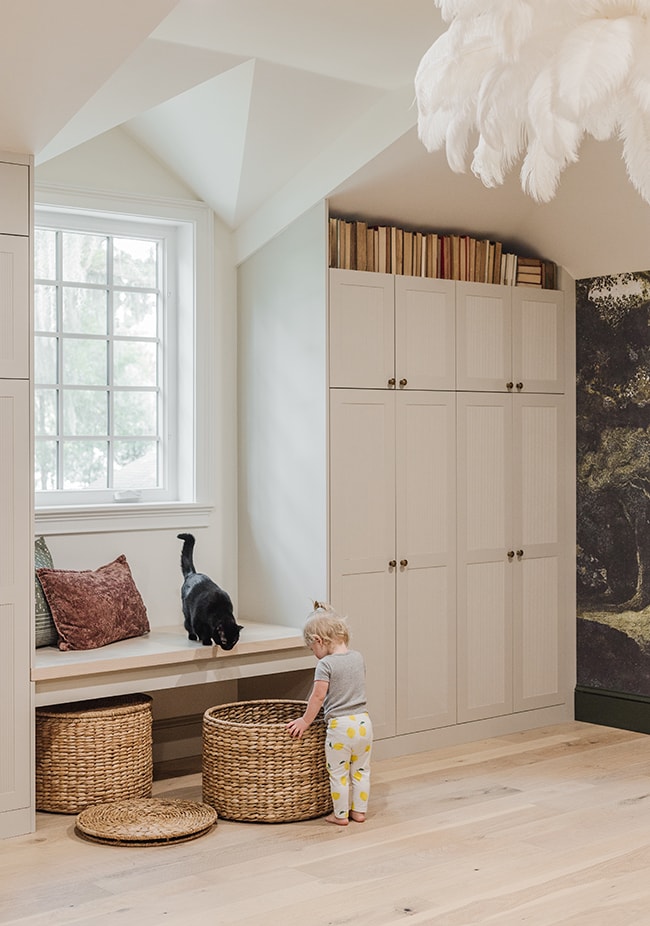
I found these two great woven ottomans from Target, which fit nicely tucked underneath the bench as toy storage.
We’ve just started organizing these cabinets so the desk area will most likely evolve over time. To be honest I’m not sure how much either of us will use this for work in the near future (I’m not ready to give up working from my bed!) but I am looking forward to having a permanent home for all of our files and office supplies.
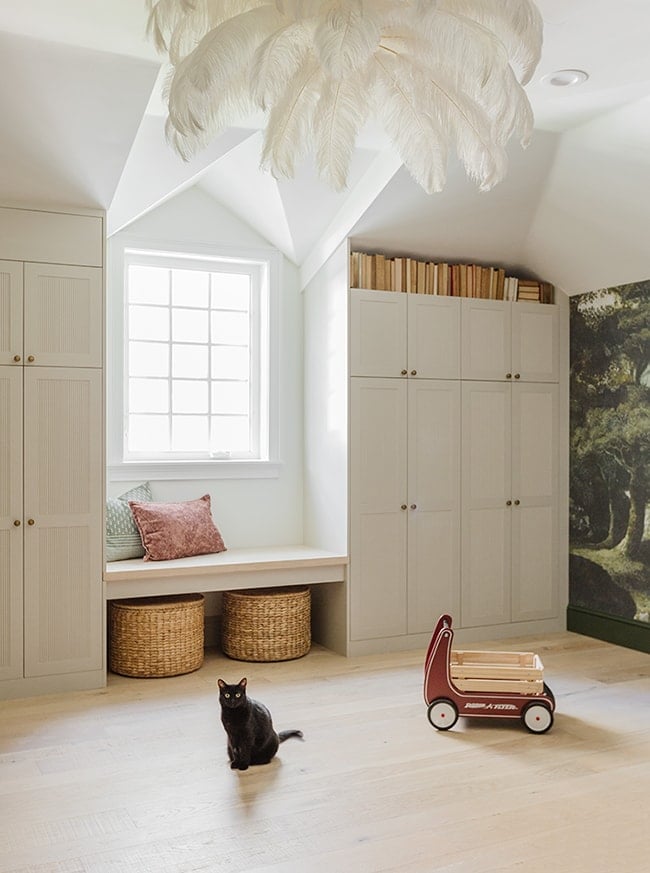
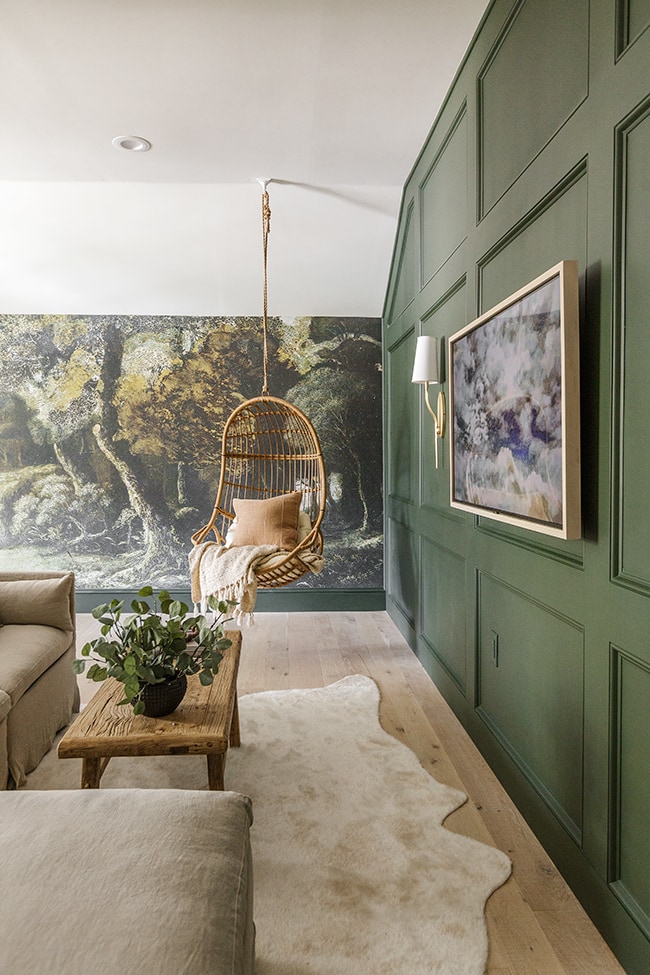
There was a big debate about leaving this space above the cabinets open, and I’m so glad we did! It’s the perfect space to display my vintage book collection and gives the room an old library feel, don’t you think?
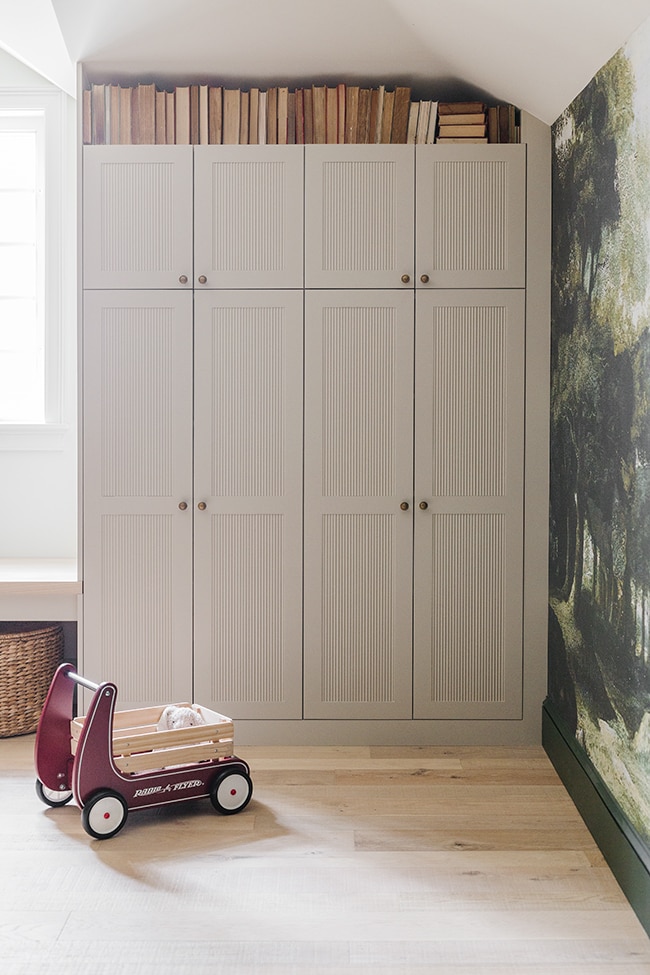
I think it goes quite well with the whimsical, storybook theme of the room…
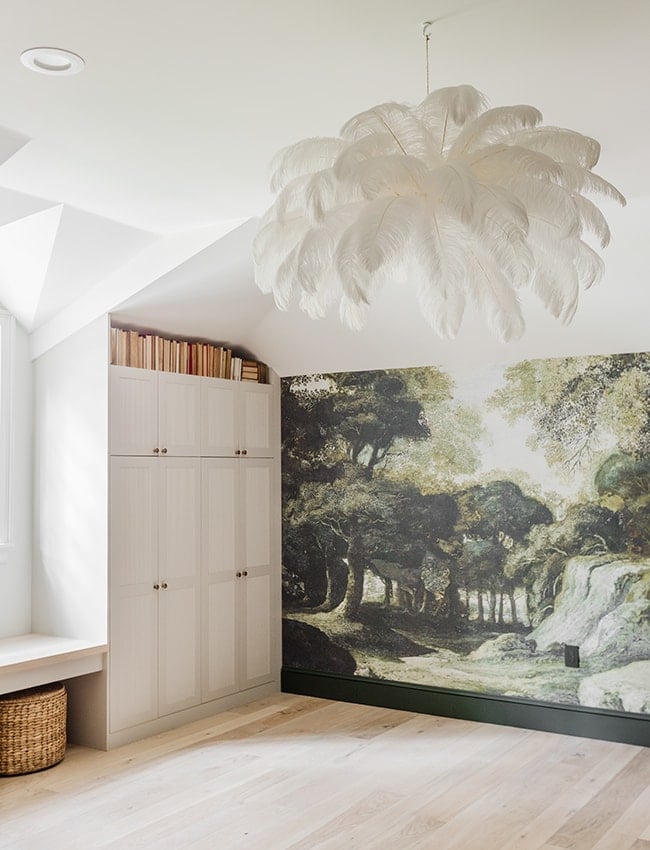
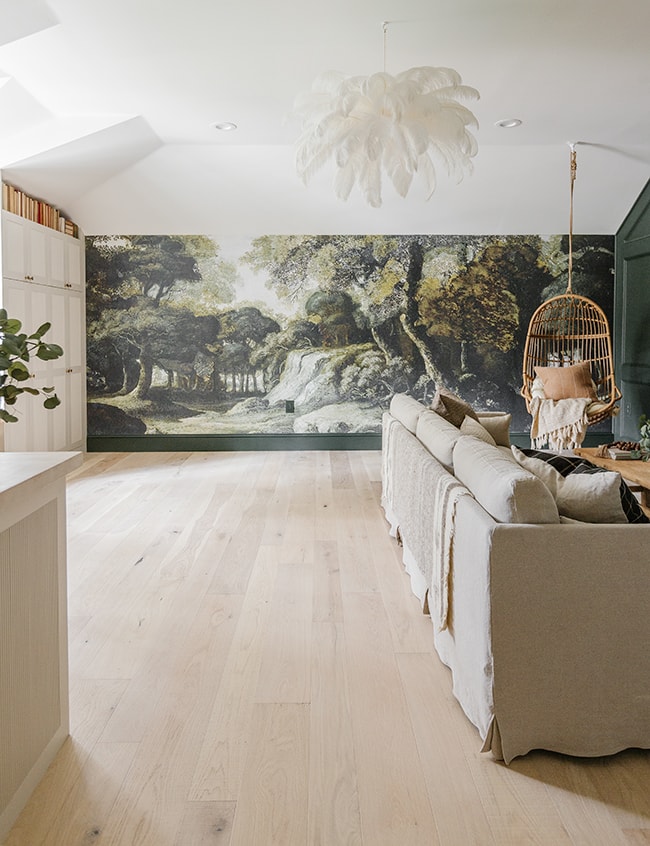
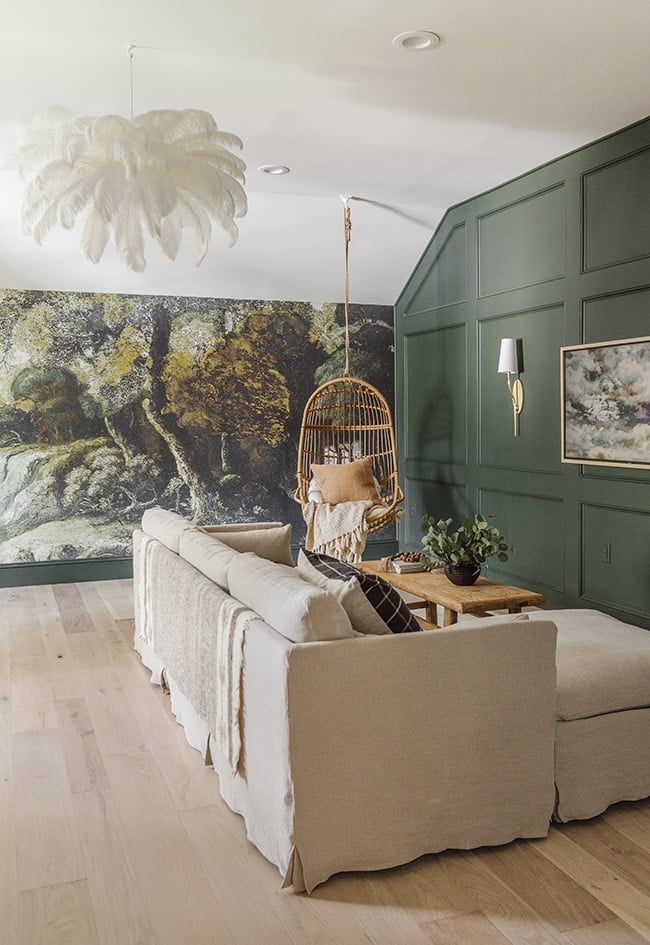
I still can’t get over this mural. It was the inspiration for the design and my favorite part of this room.
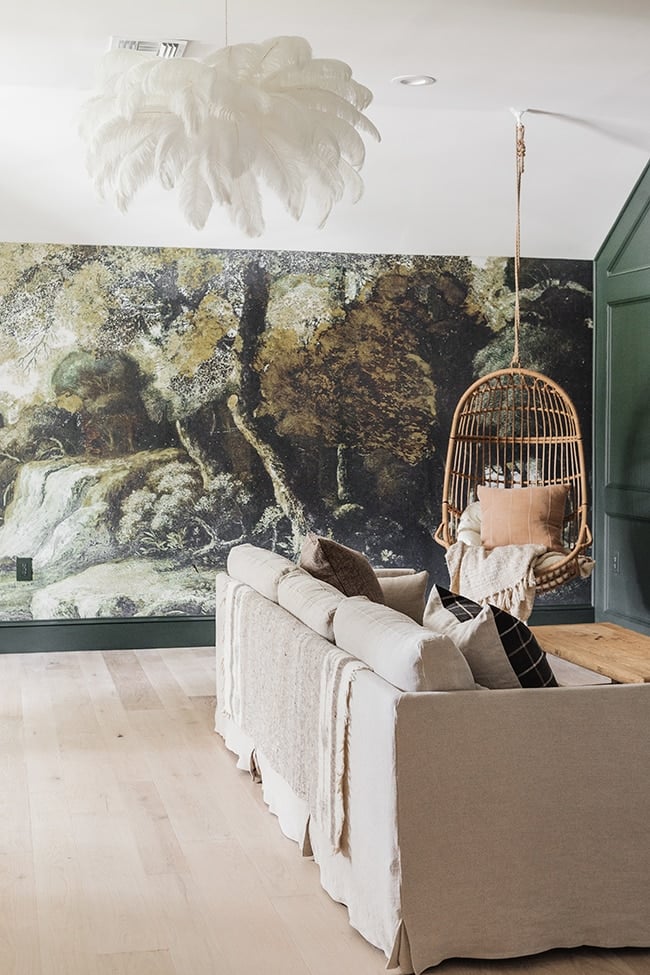
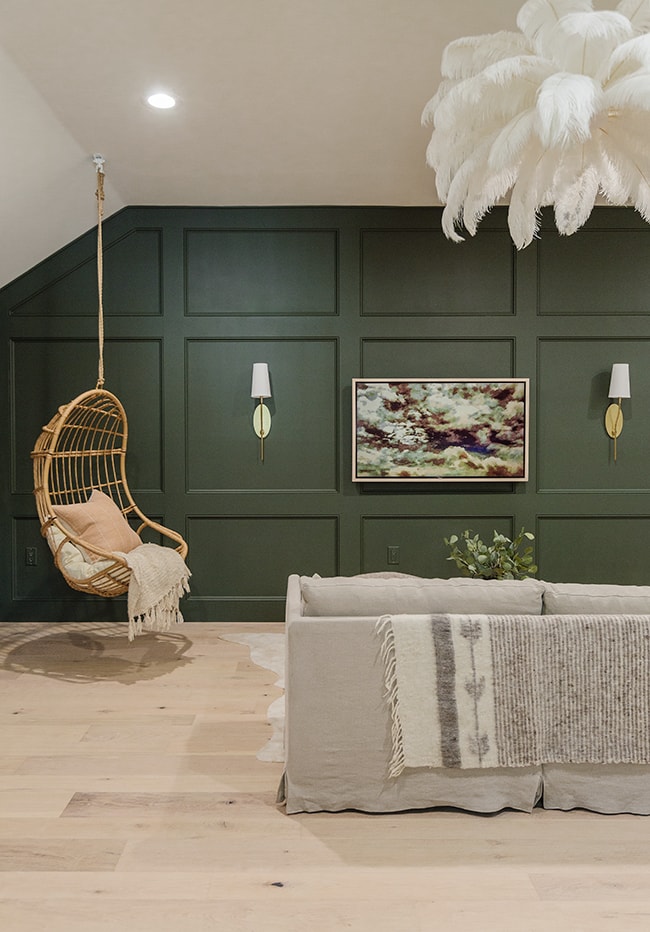
And of course, you can’t design an enchanted forest playroom without a hanging chair...
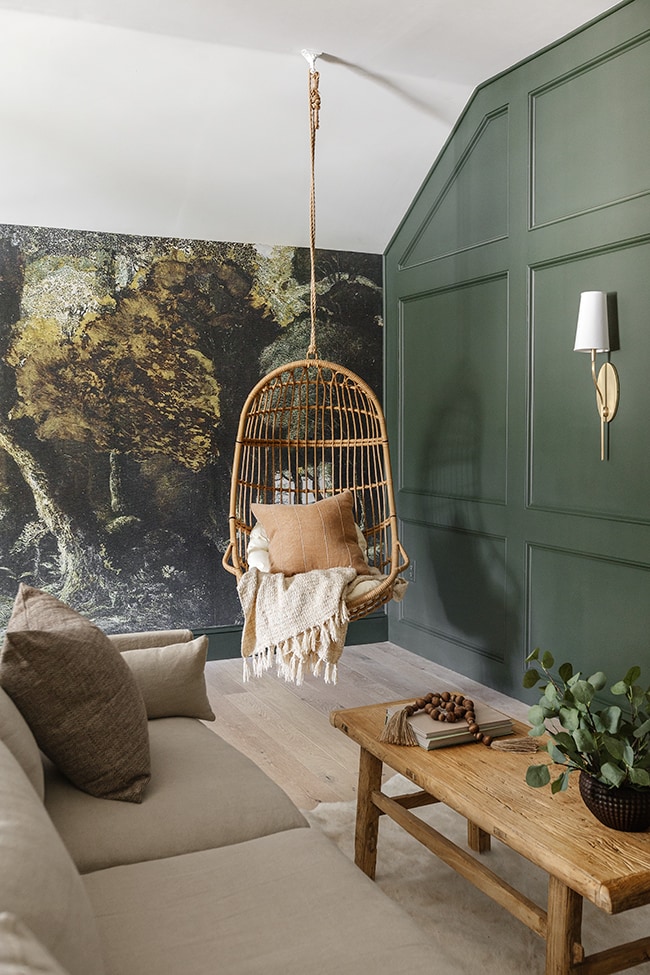
For those asking how we hung it—we used this heavy duty swivel hook (painted white) screwed into a stud in the ceiling, along with this 1/2″ manila rope.
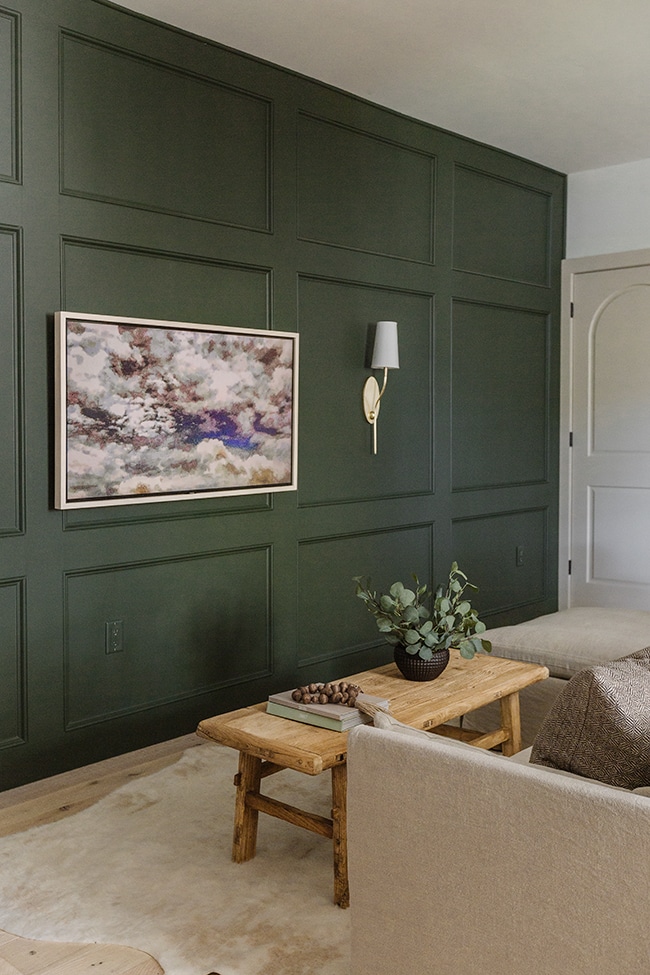
The TV is another area we kept costs down, by snagging a new 50″ 4K Samsung during Black Friday and building our own wood frame for under $15. The reviews are better than the Frame TV and it has an ambient setting built-in to look like artwork.
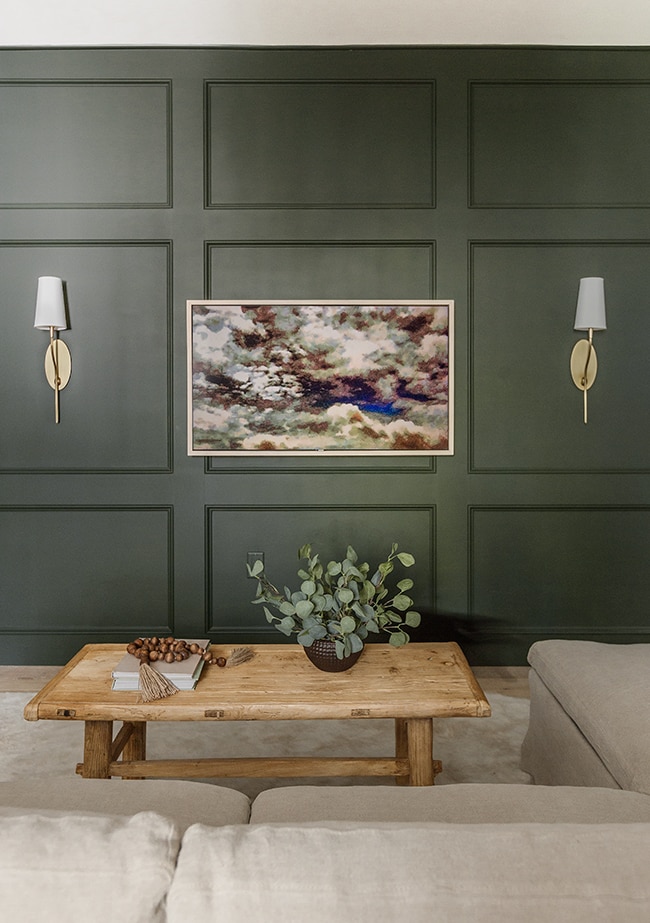
Watch for the tutorial soon to see how we did it in an afternoon (and saved $900!)
You might recognize this coffee table I used for a few fall living room photos last year, but I actually ordered it for this room. The compact size was perfect for our small TV area, and the rustic handmade wood is stunning. Hopefully it comes back in stock soon!
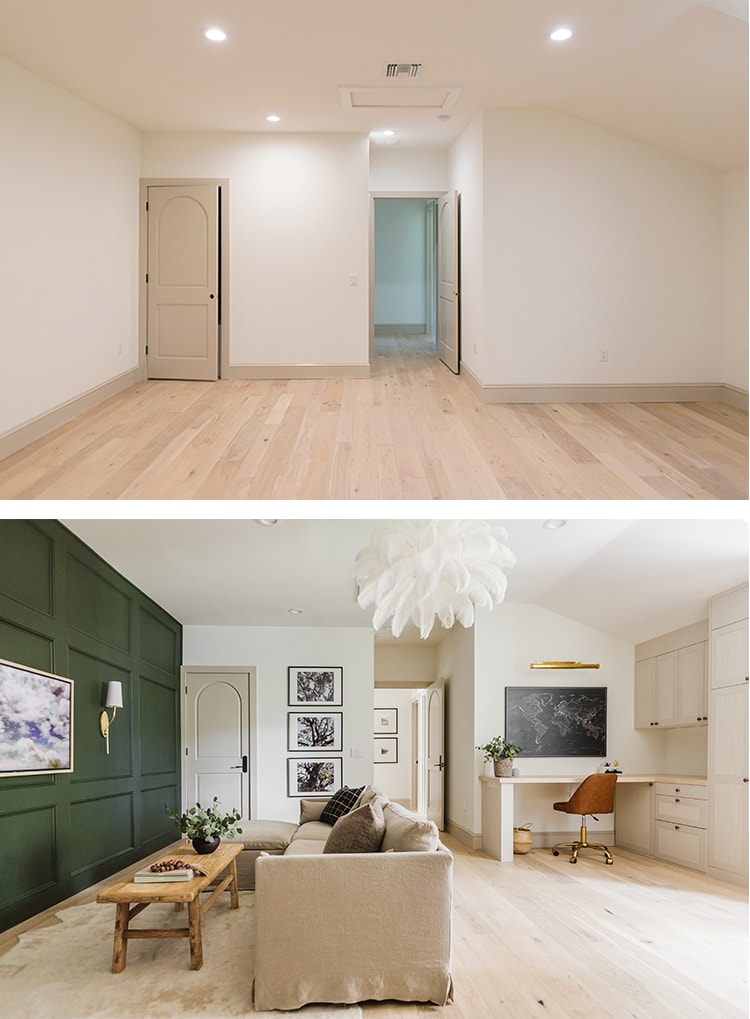
Speaking of the sofa—this is the main piece of furniture in this room so it had to be perfect! After a long search, I ended up choosing the Gabriel 4-pc chaise sectional from Six Penny, in the oat flour fabric.
I also chose the feather down filling which you can sink right into for a movie or long nap. It’s lower profile than most sofas, which works since it’s in a tighter space and I didn’t want it to take up too much room visually.
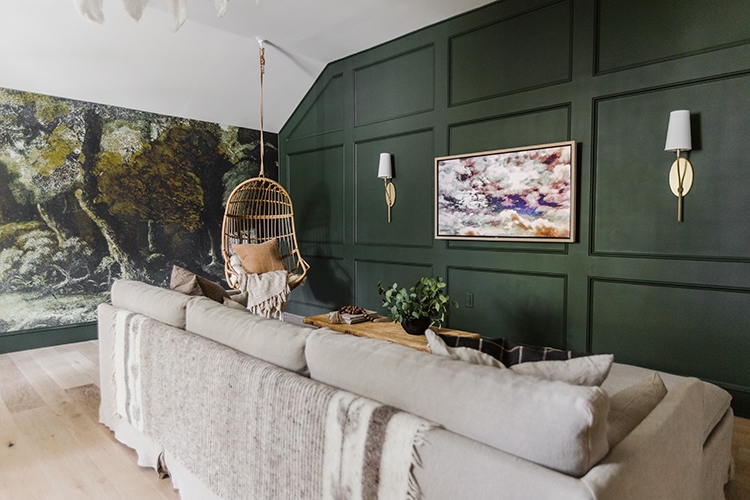
Since the back of the sofa faces the room, I layered this handmade wool blanket behind the cushions. Staring at the back of a large piece of furniture can feel closed off and uninviting, so this trick is a great way to add interest to a plain surface through texture and pattern.
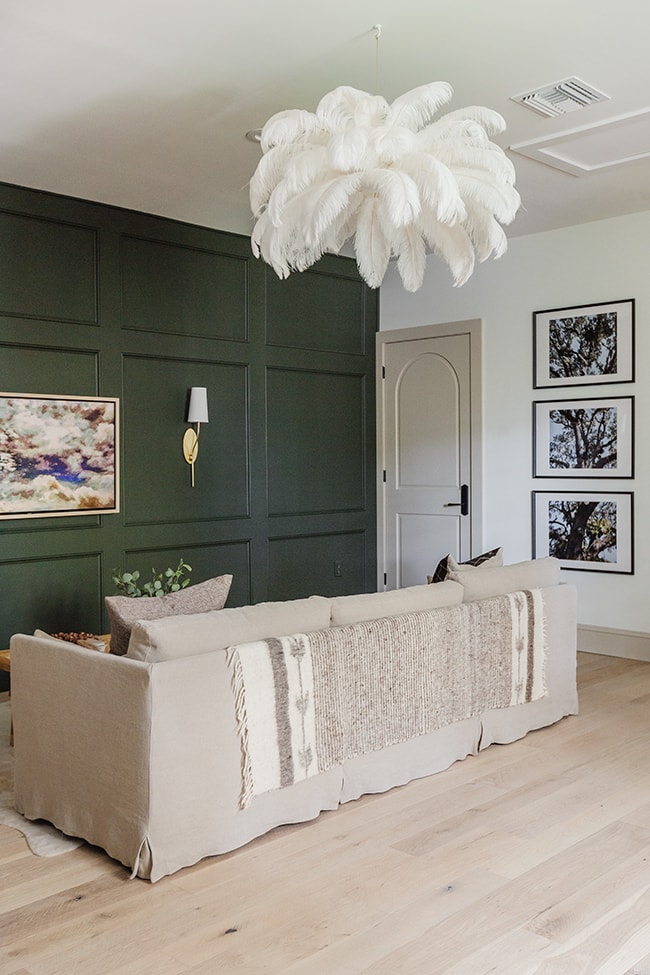
An ivory faux cowhide rug adds warmth and softness underneath the sofa, and I love how the organic shape feels natural in this space.
To the right of the sofa is a utility closet (also where I store my oversized art) and on the wall I hung a photo I took of our tree in the backyard, split into three Ikea frames.
And above you can see there’s another small closet just to the left of the entrance, which we haven’t organized yet but it will be great overflow storage someday.
Whew, I think that covers everything! This was one of our longest, tiring and most rewarding room makeovers to date. And hopefully, it will be the backdrop to many family memories in the future. That’s really what these renovations are all about in the end, aren’t they?
What’s your favorite part? Did you follow along through the entire process? Hopefully you learned a few DIY tricks or gained some inspiration for your own home. Don’t forget, there’s still more tutorials to come!
Feel free to leave a comment with any questions, and click on the image below for paint colors and links to every source (these can be found on the Playroom Sources page):
Coming next week: All the details on the DIY feather chandelier!


Jaki says
I love this place especially the fluting and the mural???
I apologize if you mentioned and I missed it, but could you tell me wall and trim color? Such a lovely combo?
Jenna Sue says
Thank you so much Jaki! You can find everything listed on the sources page: https://www.jennasuedesign.com/shop/heights-house/playroom/
Gale says
Everything you two do is beautiful!! You both are so talented and your daughter is precious!!
Jenna Sue says
I appreciate the kind words, thank you Gale! <3 <3
Pat says
Stunning playroom! Yes, I have watched from the beginning. I really like how you can see your collection of books nestled up there. And as always your attention to details make your rooms!!! The two of you are quite the team!
Jenna Sue says
I’m so glad you like it Pat, thank you!
Linda says
This turned out so great! I’m proud of both of you! Job well done!
Jenna Sue says
Aw thank you so much Linda! Means a lot 🙂
Karen says
Jenna sue
It’s a Lifetime of fun.
Jenna Sue says
? ❤️
Michele M. says
So fabulous. It is such an amazing WOW space. You guys did an incredible job. I absolutely love that multi-purpose wonderful beautiful space. Well done, very very well done.
Jenna Sue says
I’m so glad you like it Michele! Thank you for taking the time to comment ❤️
Sherry says
I would love to see a tutorial on the finish that you put on the desk chair. Your room is lovely.
Jenna Sue says
Thanks Sherry! You can follow my Rub n buff tutorial here: https://www.jennasuedesign.com/2020/01/rub-n-buff-gold-test-diy-tutorial/
Tam says
You inspire me to tackle diy in my own home. Done a wall in my living room and both sides of my hallway. Love your easy explanation of how to and what to use tools. You make it look easy yet show us what problems you had and how you fixed them. Love your blog. LOVE the Wall Mural that’s my favorite part.
Jenna Sue says
I’m so glad you are finding the posts helpful, Tam! I hope I can continue inspiring you to DIY! ❤️
Abby says
As always, I am amazed and so impressed by your talents and creativity! It’s simply stunning!
Jenna Sue says
Thank you so much Abby! ?
Nancy says
What color is the green you used on your wall?
Jenna Sue says
Hi Nancy, it’s SW Ripe Olive. You can find all the details on the sources page: https://www.jennasuedesign.com/shop/heights-house/playroom/
Cheryl says
Love it, love it, love it! Wish it was in my house! 🙂
Jenna Sue says
Thank you Cheryl! You should make your own! 😉
Teddee Grace says
What a fun space! I was anxious to see it. I love the feather chandelier and will be looking forward to the tutorial.
Jenna Sue says
Thanks Teddee! Excited to share that one next week 🙂
Lilly T says
Loved the finish products. Absolutely Stunning!! Can you share the size of your map? I love that so much! You guys rock! Love your ideas and design. I truly enjoy following your blog and your family. Thanks for sharing it with us <3
Jenna Sue says
Thank you so much Lilly! Our map is the Large, 120x80cm ❤️
Amélie says
This is such an unbelievable space! Your style truly inspires and I love watching all the projects you guys tacle. What a great addition to an already beautiful home!!!
Jenna Sue says
Thank you so much Amélie, that means a lot! Also… I’m obsessed with your name ❤️
Dawn says
That chandelier has stolen my heart. Can not wait for the tutorial. I’ll need to make it way way smaller for my tiny townhouse but imma make that beauty work lol.
This room is incredible. You 2 never cease to amaze and impress.
Jenna Sue says
Thank you Dawn! It’s so simple to make too — you’ll love it!
Mara says
What size is your cowhide?
Jenna Sue says
Hi Mara, it’s the 6’2×8′