This post is a paid collaboration with Lowe’s Home Improvement. All opinions are my own.
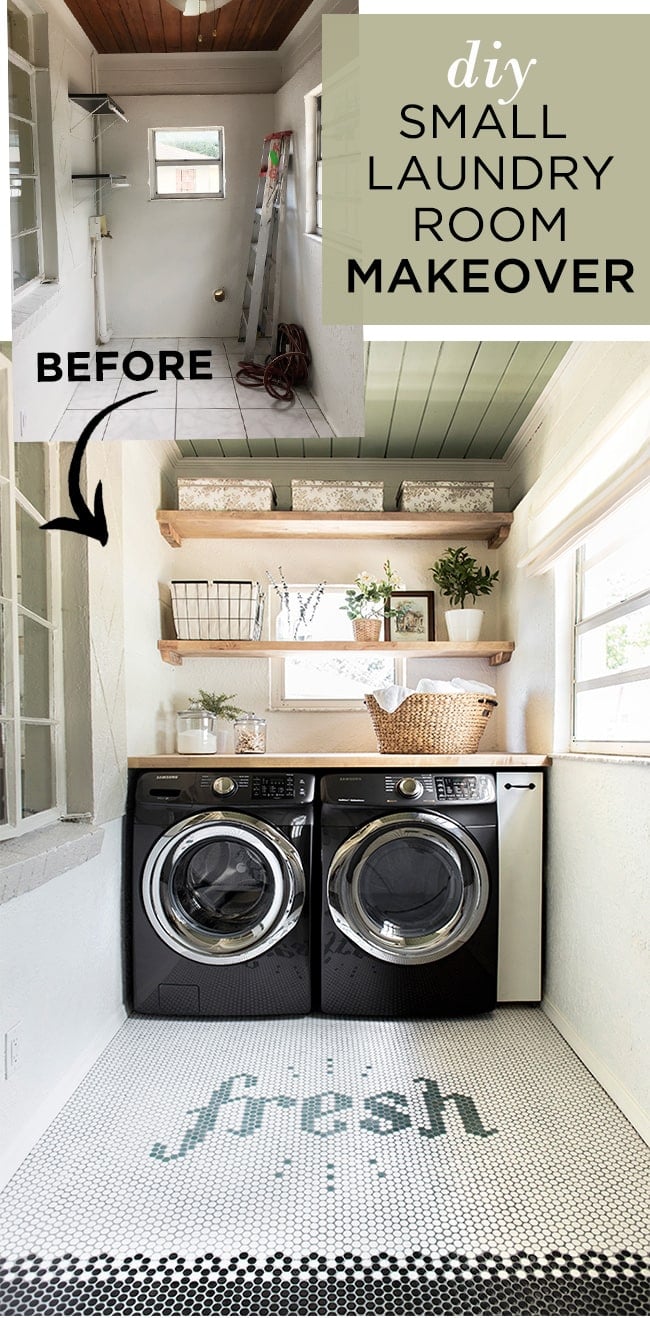
The dust on our new floors hadn’t even settled yet before we were moving onto our next project in the Riverside Retreat…
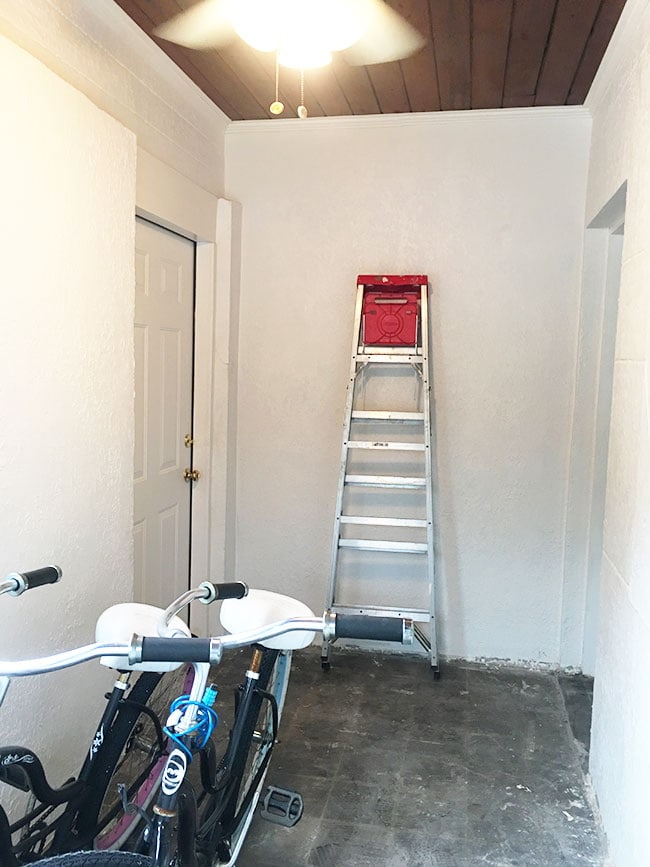
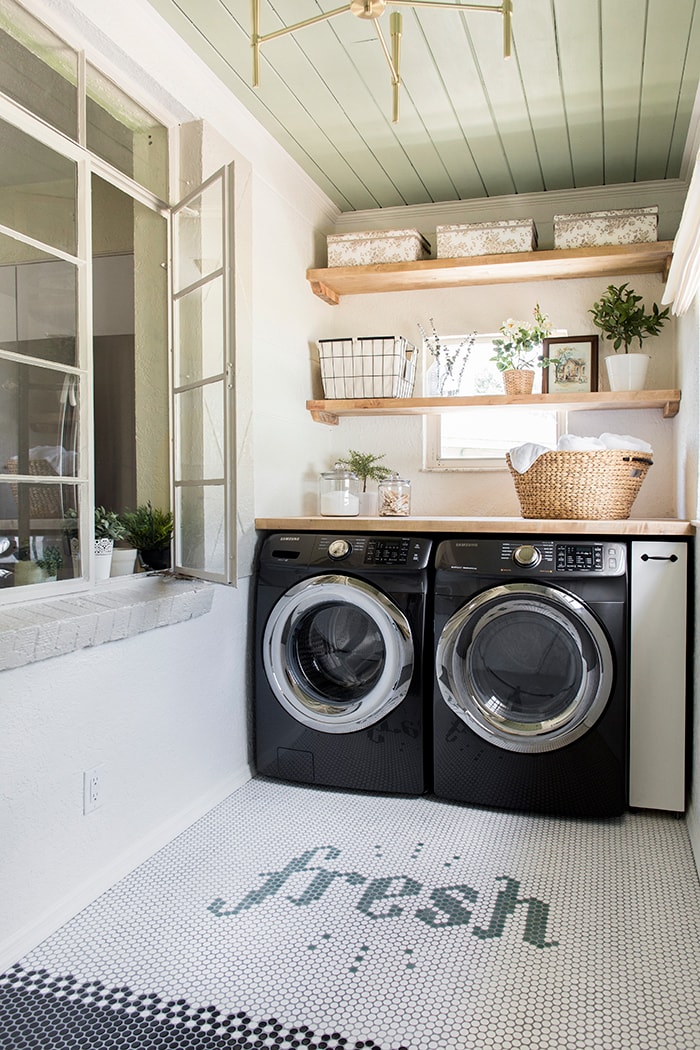
With so much to do in this house in so little time, we decided to start with the smallest room first: our laundry room:

When I say small, I mean just enough room for a washer, dryer, and one person to comfortably stand in while doing laundry. The size and configuration certainly limits the potential in here, but I was determined to make the most of it on a small budget and timeframe.
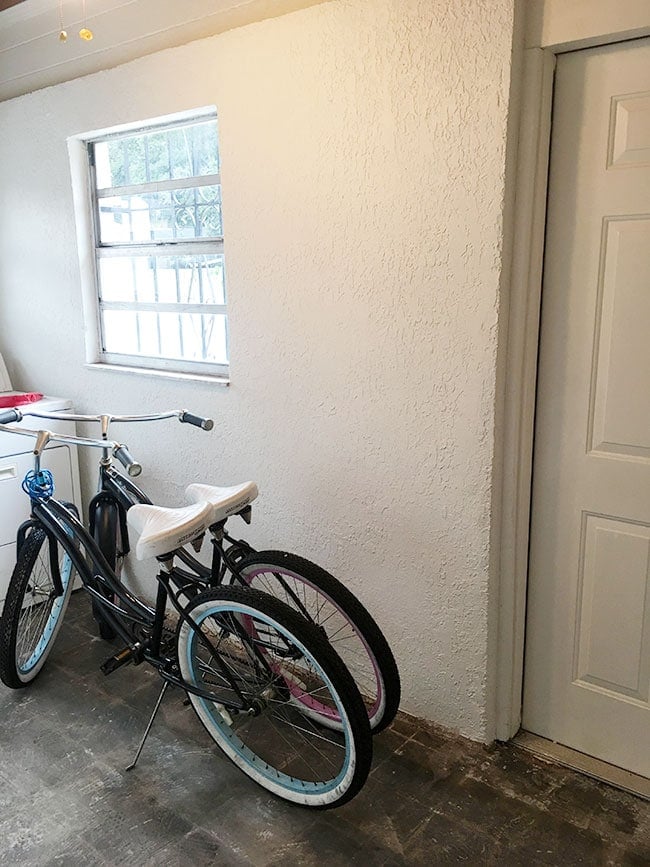
This room was originally an exterior porch, later converted into a utility room. This means the walls are thick, textured stucco (the worst kind of wall) with exterior shutters and a window to the kitchen. I’m all about those unique features so that part I don’t mind.
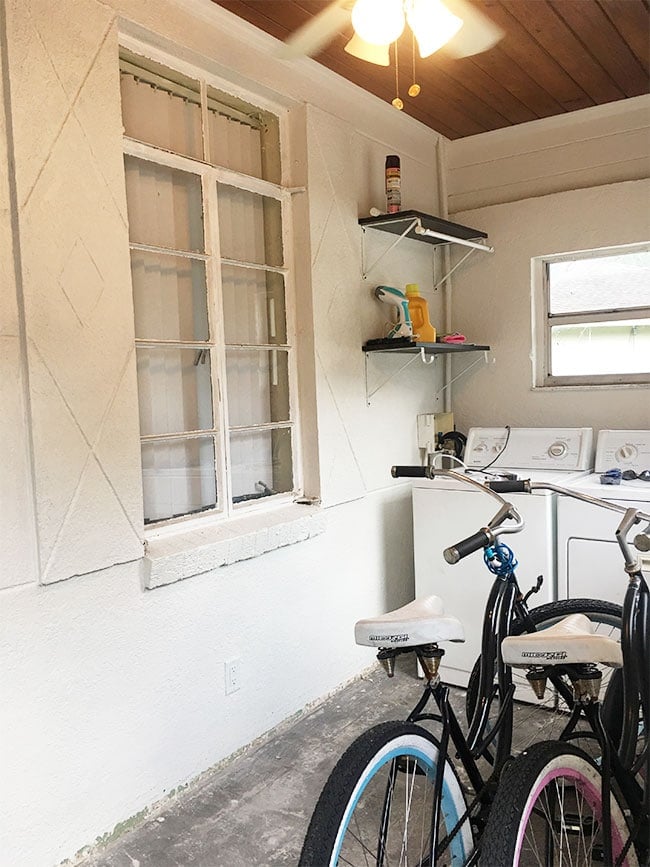
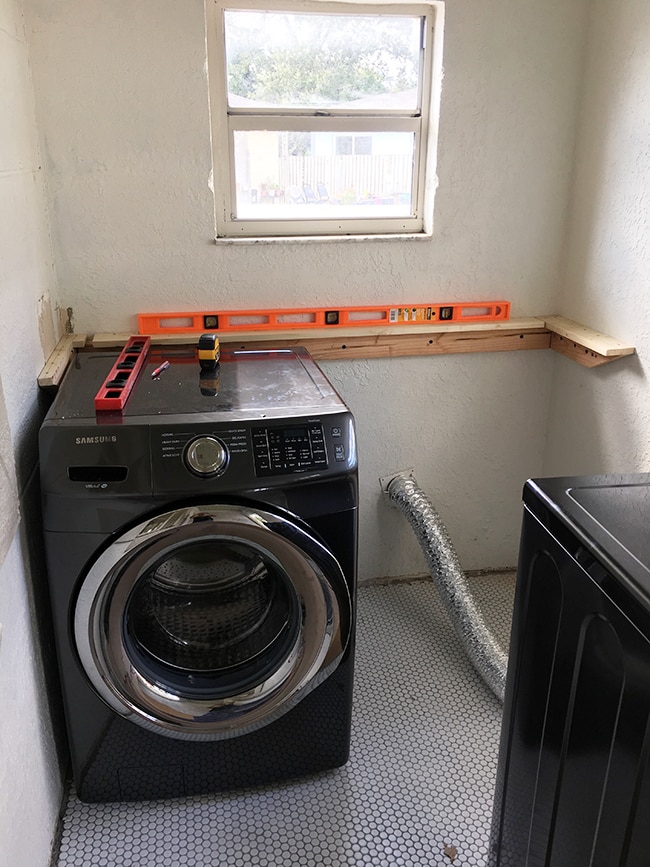
The only functional part of this room were two small shelves, which weren’t the best use of the space. The problem was, the washer/dryer wall is essentially the only usable wall space since the room is too narrow to mount shelves/cabinets on the side walls.
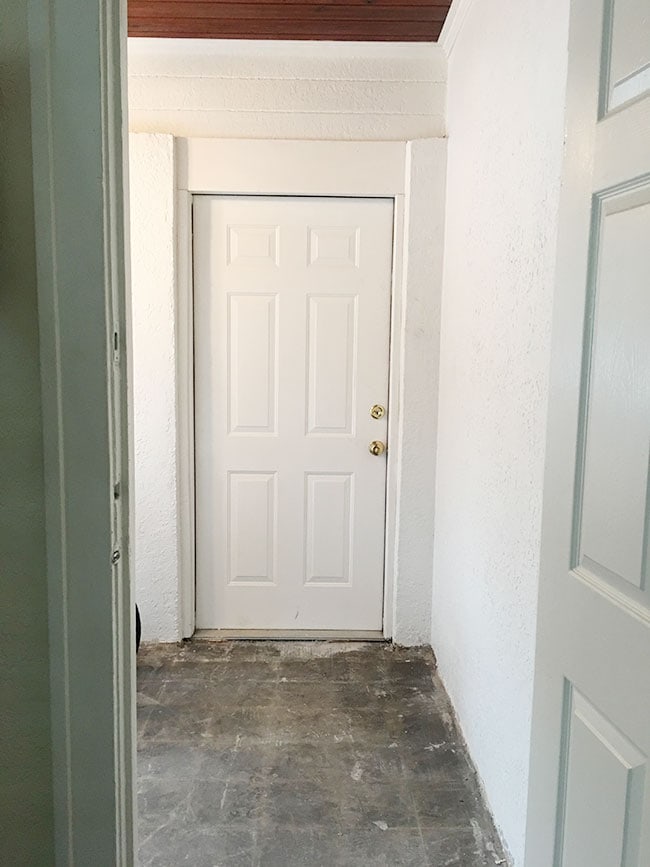
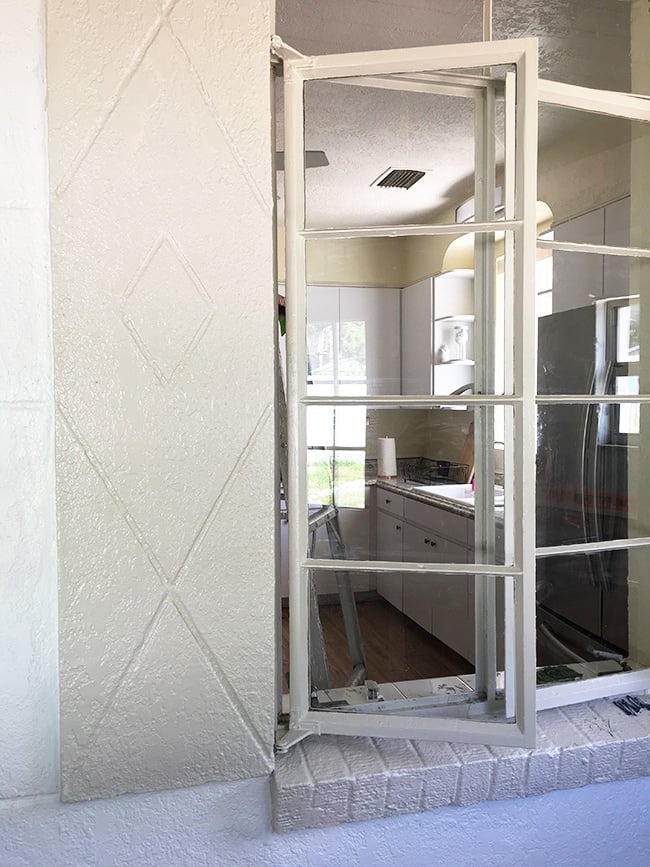
The wall opposite the washer/dryer is a passageway between the kitchen and back door, so we couldn’t do much there either. There was a window in the center of the back wall which also limited our options (removing it was not in the budget).
I had to put my thinking cap on and come up with a plan to maximize storage, functionality, design and budget—I shared my design inspiration and plans in the ‘Before’ post last month:
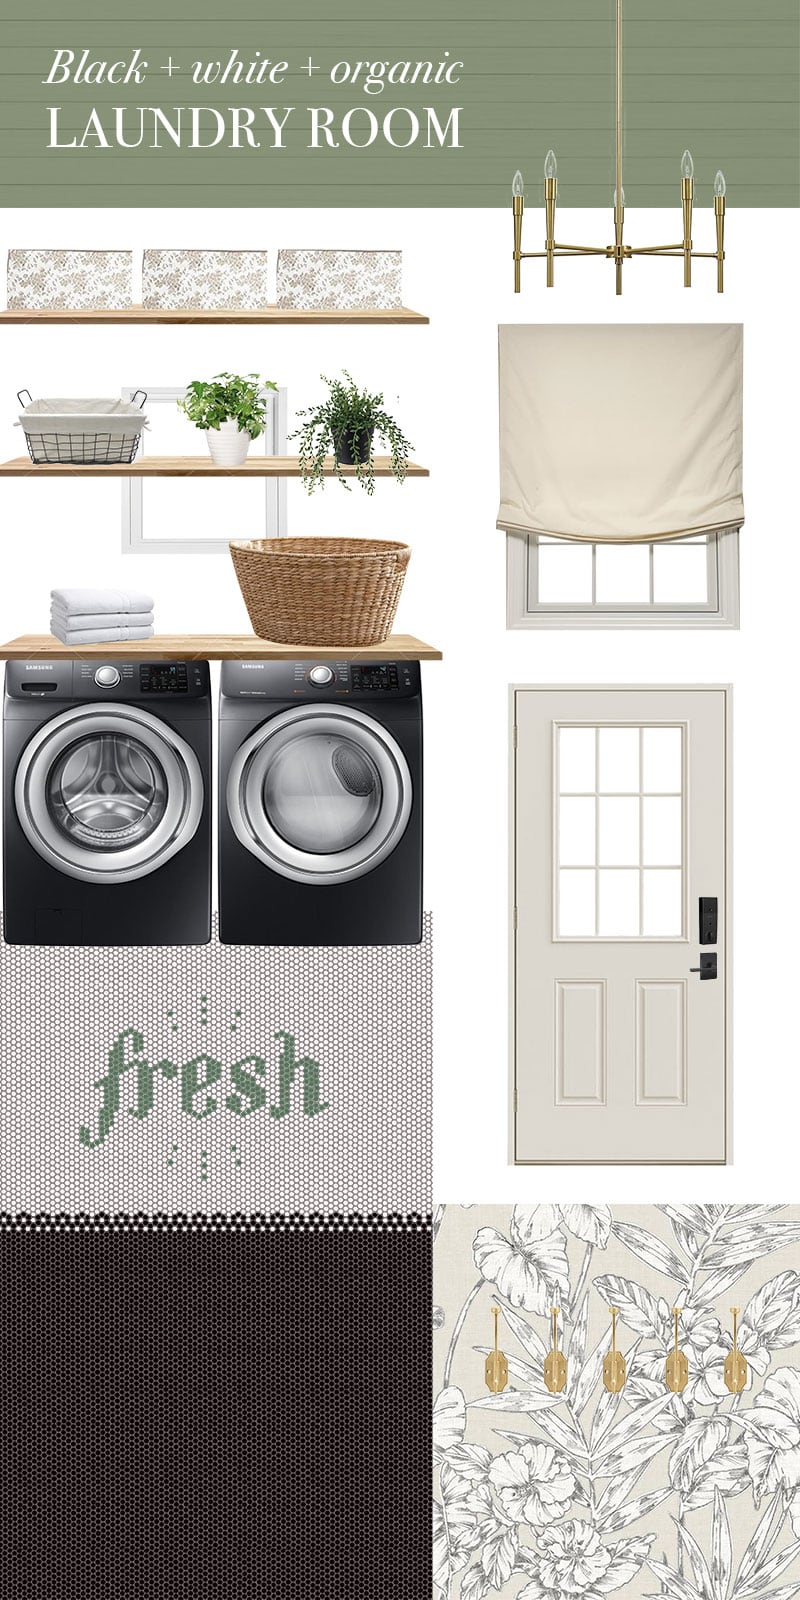
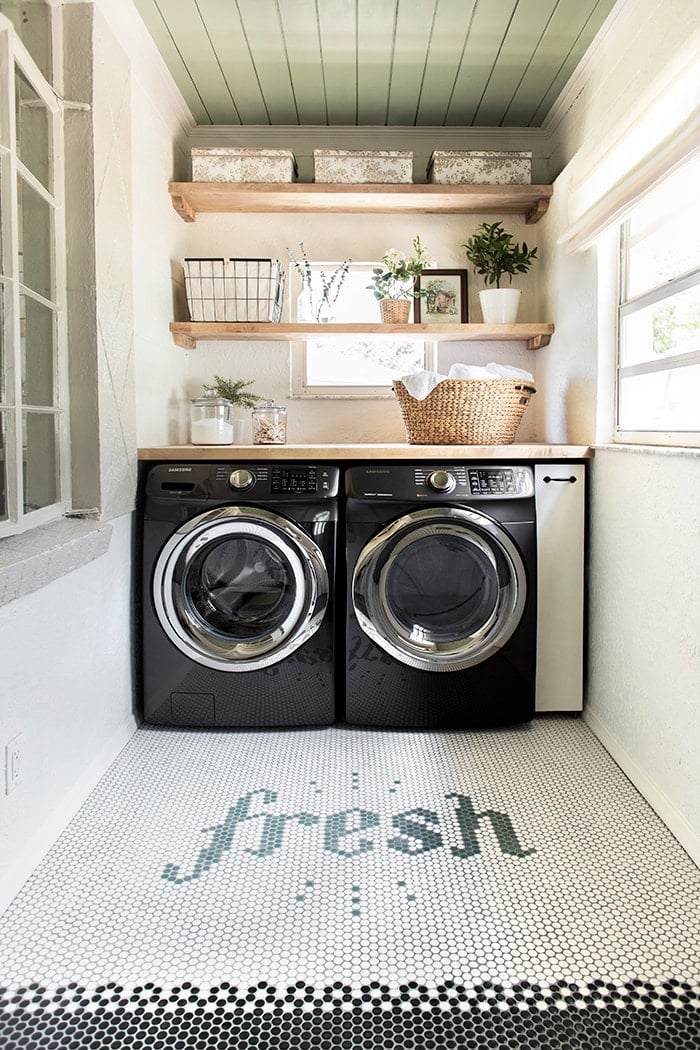
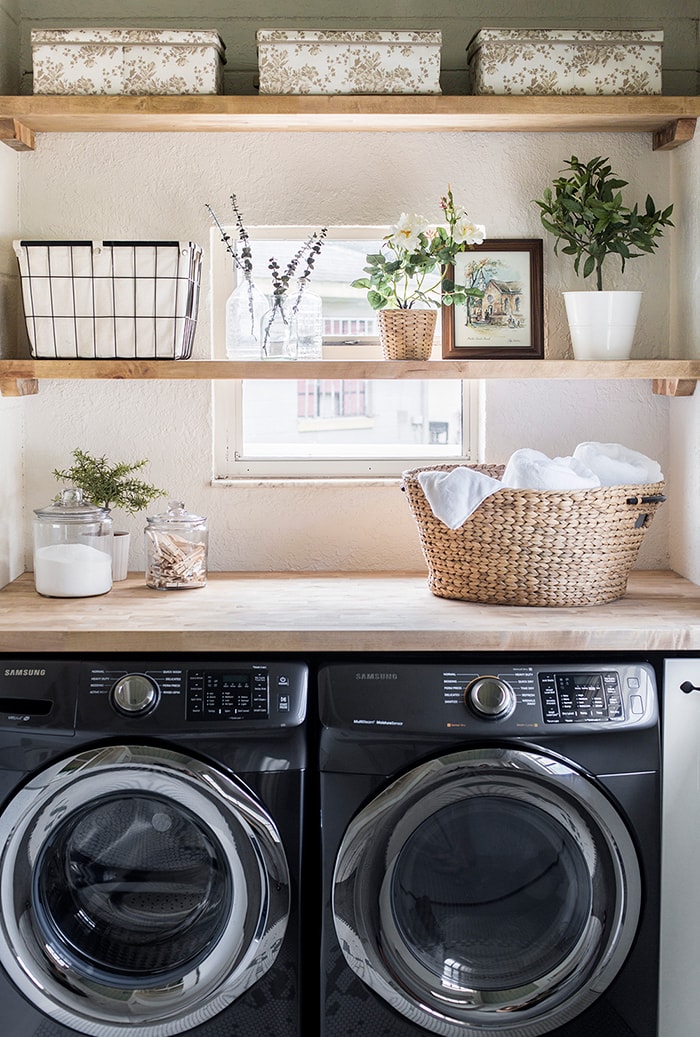
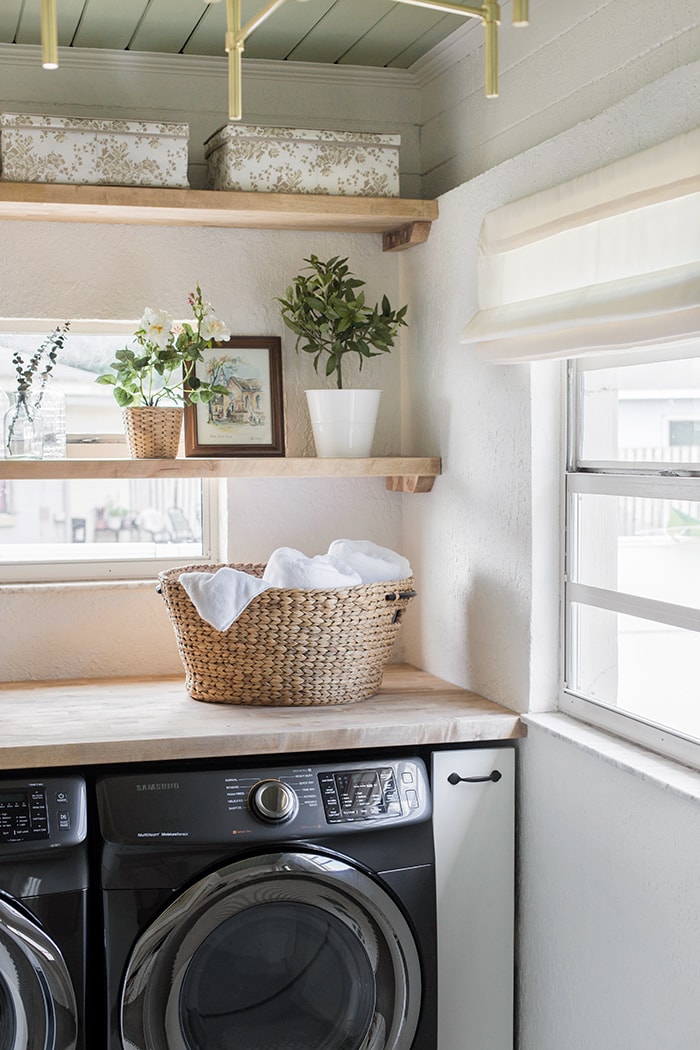
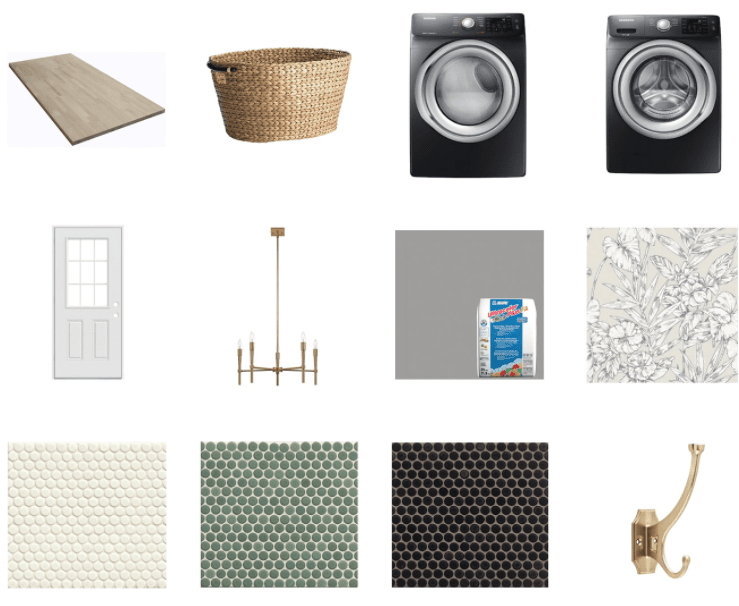
The floors would become the focal point with a fun custom penny tile design, I’d keep the room light and airy with soft earthy colors, introduce organic elements like wood shelves/counter and botanical wallpaper, warm it up with gold accents, upgrade our barely-working Craigslist washer/dryer with the highest rated large capacity Samsung models, and make the space more functional with a mix of open and closed storage.
Mission accomplished.
Here’s how we pulled it all together in 3 weeks (I’m not counting the week we were off getting married ;).
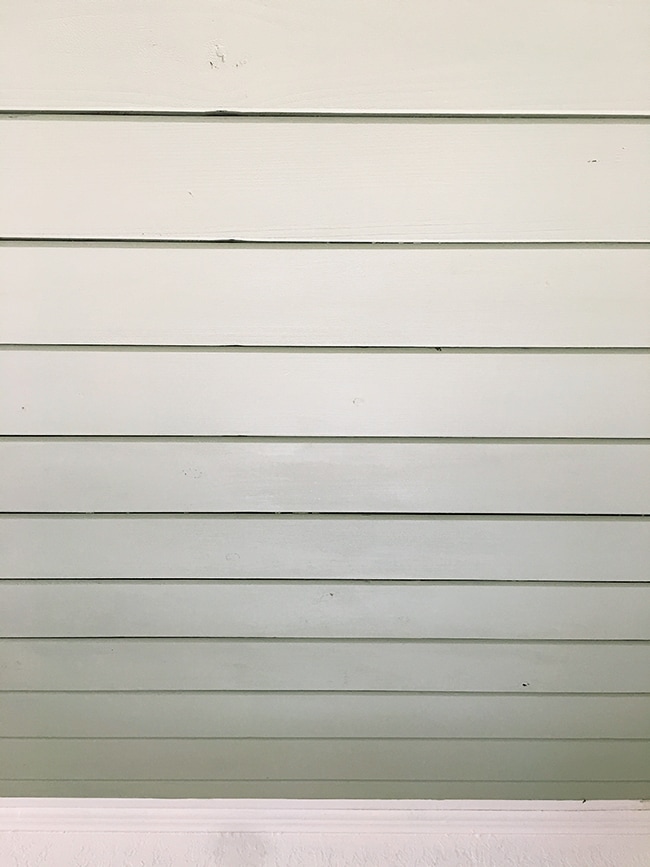
First, I lightened up the dark wood ceiling with HGTV Home by Sherwin Williams Softened Green—a gorgeous neutral sage green.
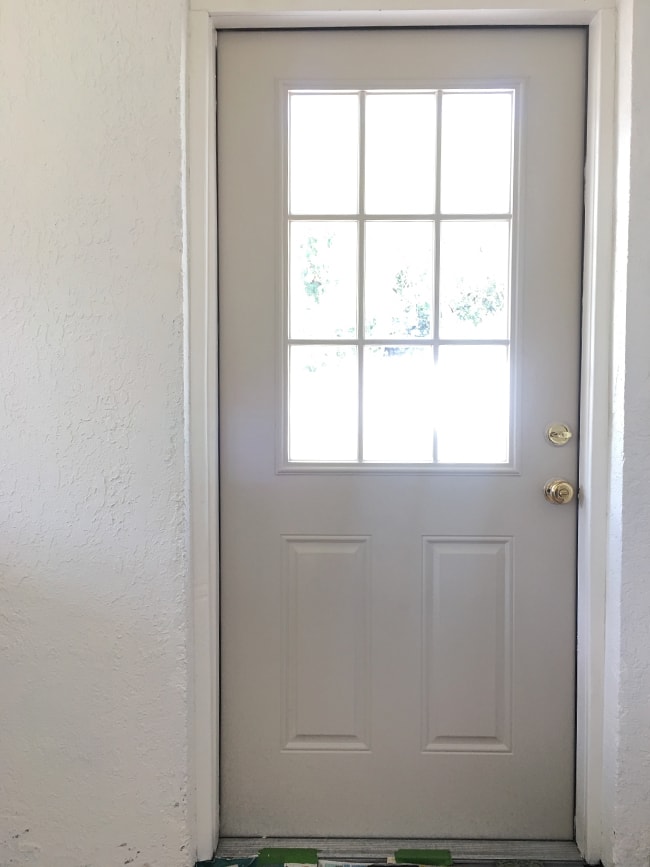
Next, we swapped out the old back door with a Jeld-Wen glass patio door. You can never have too much light in a tiny space!

The old windows had layers of thick, baked on paint (one window was painted shut) that we meticulously scraped clean with razorblades (it took us about a week) and we gave them a fresh coat of Accessible Beige—also in the SW HGTV Home line, and a new favorite color!
The new door and shutters were painted to match (everything in a satin finish).
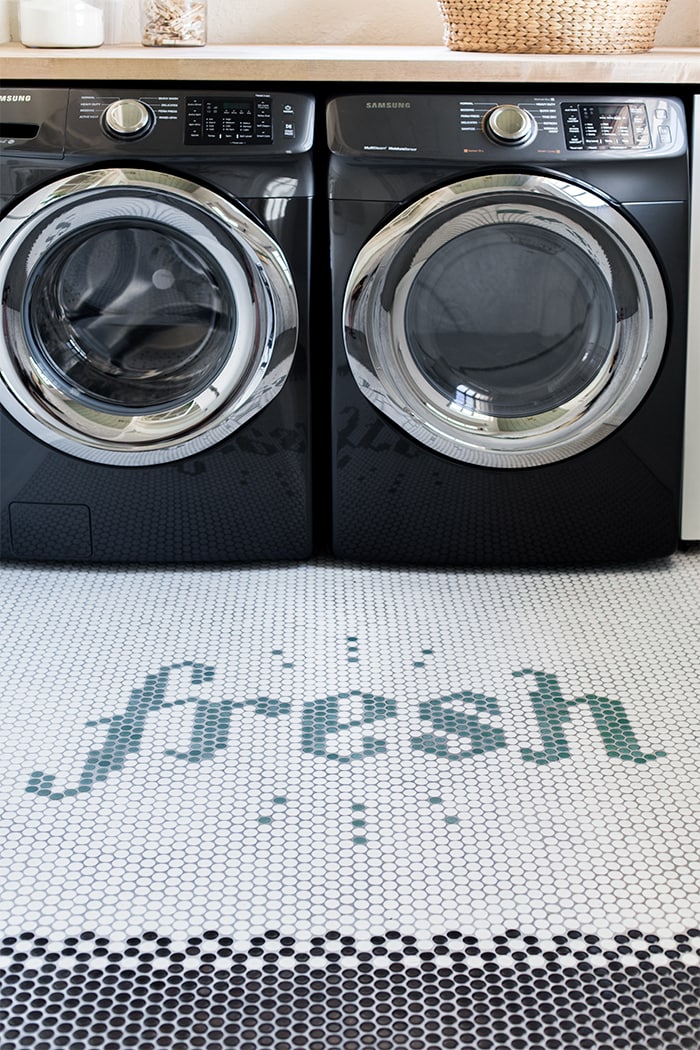
Now for the main event: tile! I haven’t tiled in years — since the 2015 One Room Challenge, so my skills and memory were a bit rusty. Luckily, we were able to follow in the footsteps of the great penny tile pioneers who have come before us.
We followed this blog tutorial from YHL (they’re always so thorough, I love it) and took our time, working on the project over the course of a few days.
I picked up this Skil wet tile saw before starting, thanks to the great reviews (and it’s only $69!) and then realized that this project doesn’t require a saw at all… oops. The penny tiles simply peel right off the mesh backing, and any cuts that need to be made are done by hand with tile nippers.

Fortunately(?) we have lots of DIY tile projects in our future, so this saw will get put to good use soon.
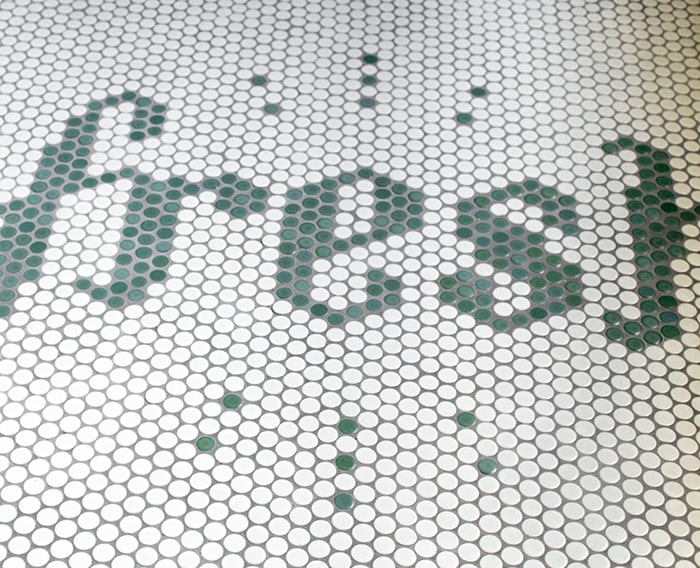
Penny (or hex) tile is one of those risk/reward scenarios—it can take more effort and attention to detail than other types of tile, but the payoff can be great if done right. You have to be super precise with this type of tile as every small imperfection will be obvious, but the reward can be something completely unique since you have creative freedom to do any design you wish.

I’ve been dying to experiment with this and try out my own design, and I spent weeks working on a plan and making adjustments in Photoshop, until settling on the winner:
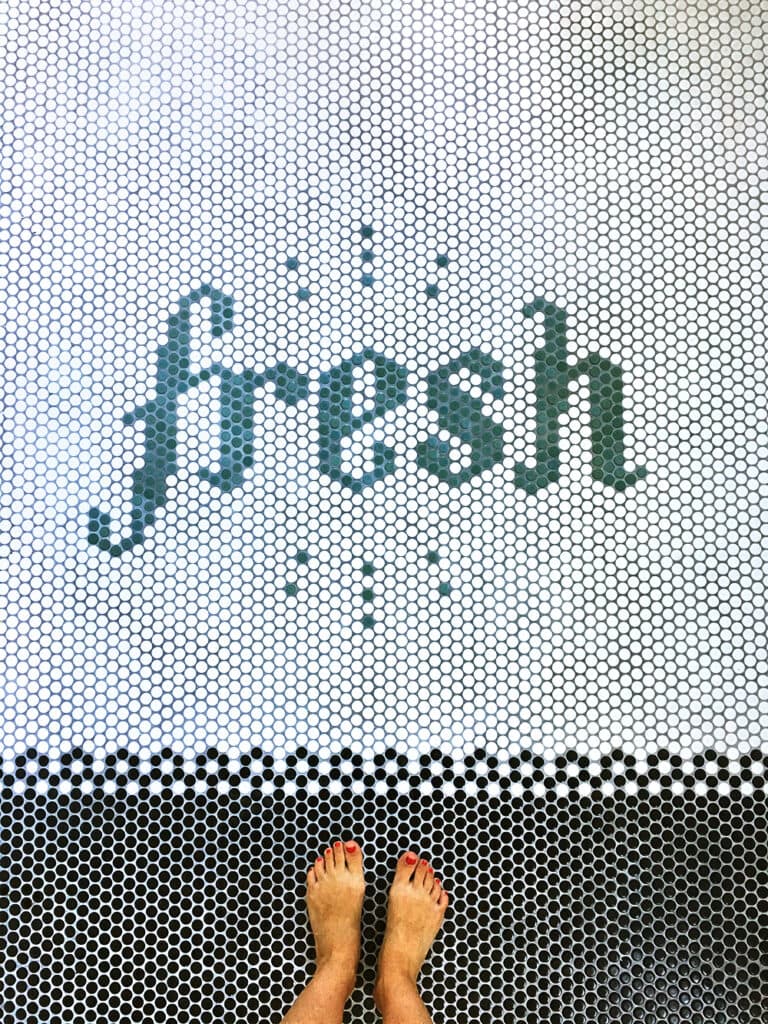
Isn’t it cheerful? That’s what laundry rooms should be all about. Let’s not make chore time any more depressing, right?
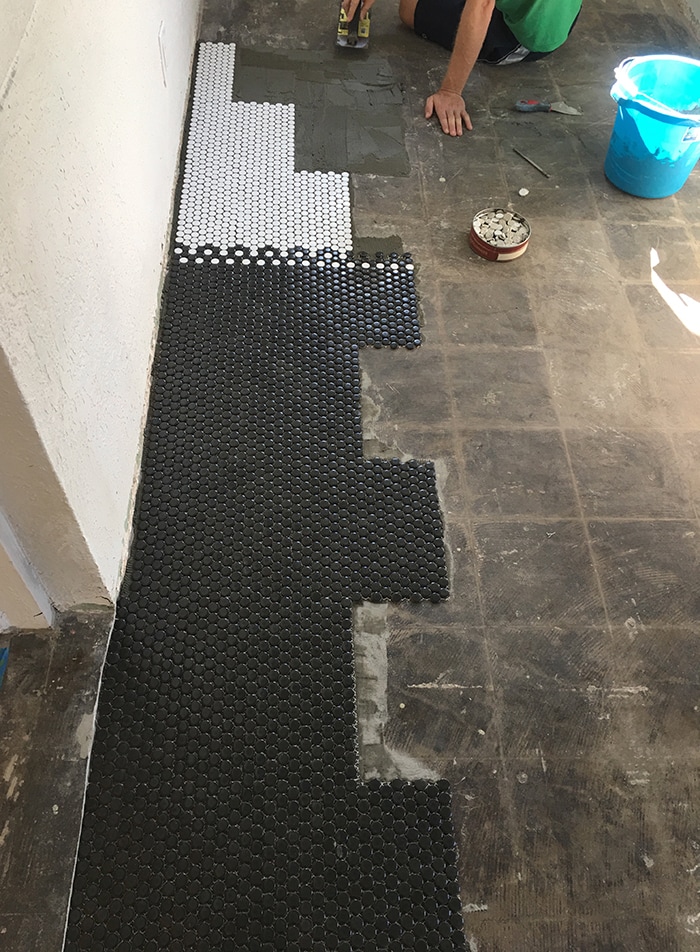
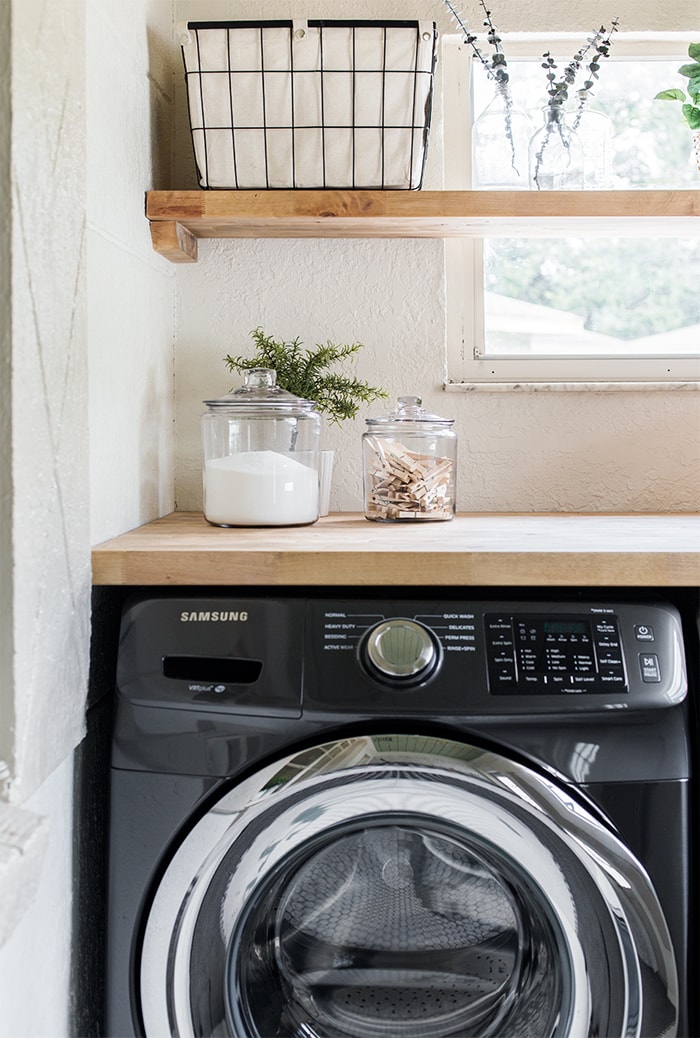
I used Bedrosians penny tile from Lowe’s, in white, charcoal and silver sage (which is a little more teal in person). For the grout, I decided on Mapei’s UltracolorPlus in Timberwolf (which eliminates the need for a sealer). Tip: if you’re worried about imperfections, use a grout color that’s similar to your tile color. I actually prefer the look of dark grout with black tile and light grout with white tile, but since I was using both black and white tile, I figured that a medium gray would be the best compromise.
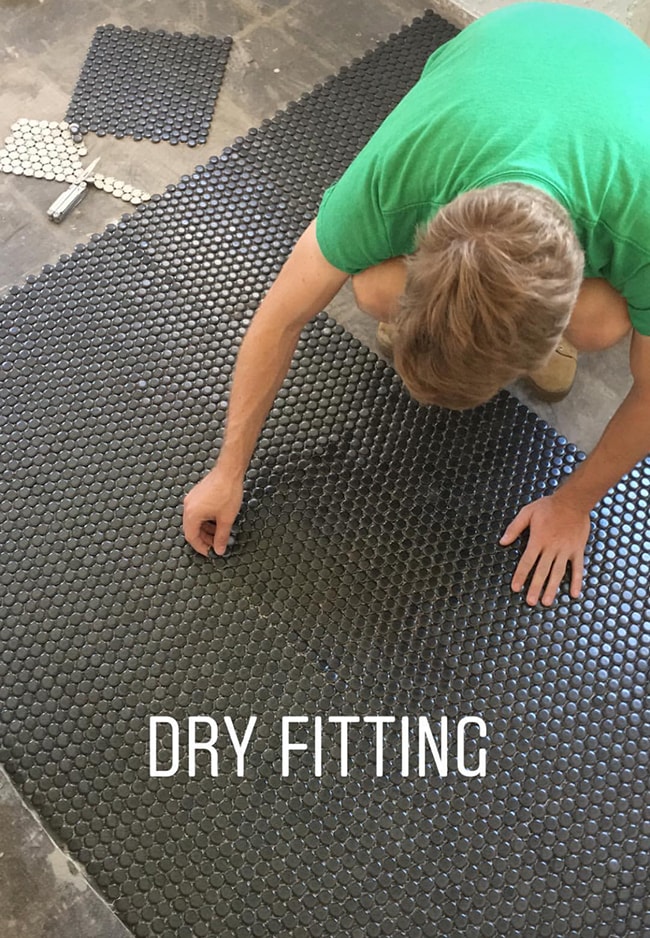
Once the concrete floors were prepped and cleared of debris, we spent a few hours dry fitting the tile and cutting out the individual pieces for our design. It was very much a ‘figure it out as we went’ scenario, involving a lot of adjusting and readjusting until everything look centered and matched our mockup.
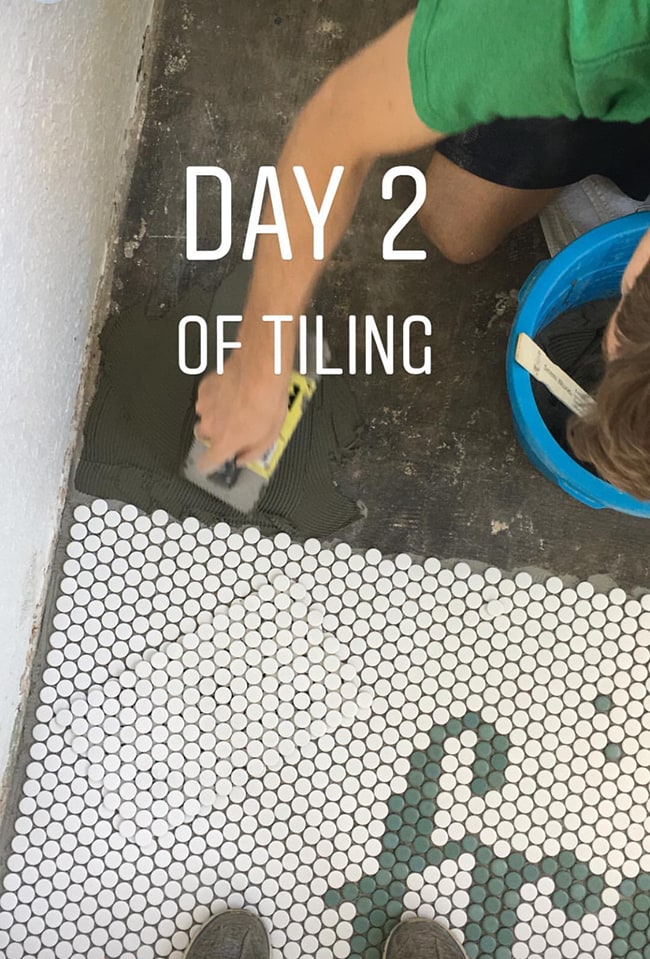
Setting our pre-arranged sheets of tile was pretty straightforward. It went by surprisingly fast, starting in one corner and weaving our way across the room as we raced the clock to get our sheets in place before the mortar dried. Once you get the hang of the proper mortar thickness, you’re off to the races. We finished half the room in one evening and the other half the next day.
If you follow me on Instagram, you may have seen the updates in real time on my stories. The full recap is still saved there on my Laundry Room story highlights if you missed any of the action.
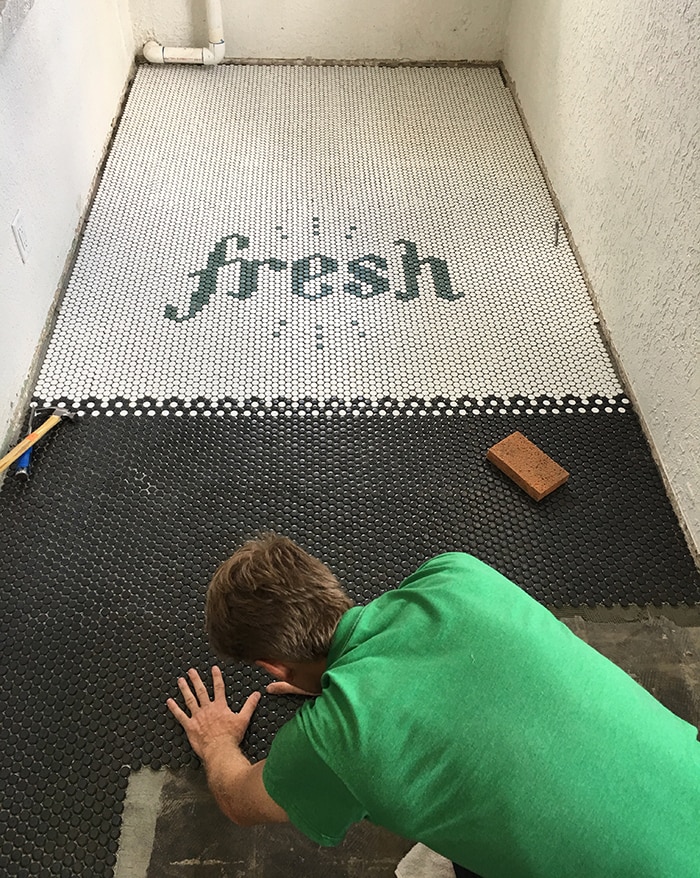
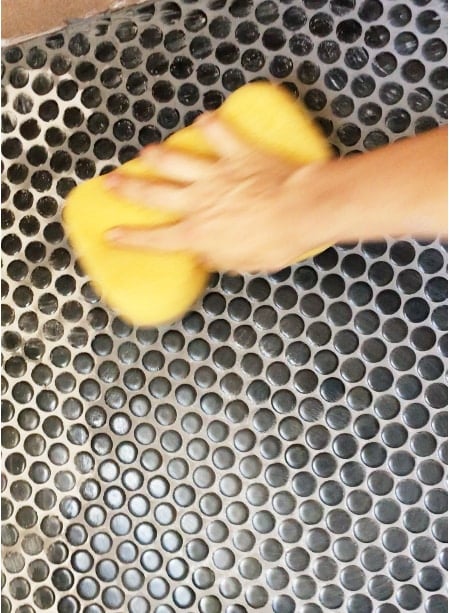
Grouting was a piece of cake—or perhaps frosting is a better word to use here? Pretending the grout is frosting makes it more enjoyable 🙂 It took just a few hours to do the whole room (and a loooot of wiping down/buffing the haze with a clean sponge over several days).
These ‘permanent’ DIY projects are always nerve wracking, even for me after all these years, but even the most difficult ones are truly always worth it in the end (as long as you’re safe and don’t lose a finger, of course). I encourage you all to get out there and JUST DO IT 😉

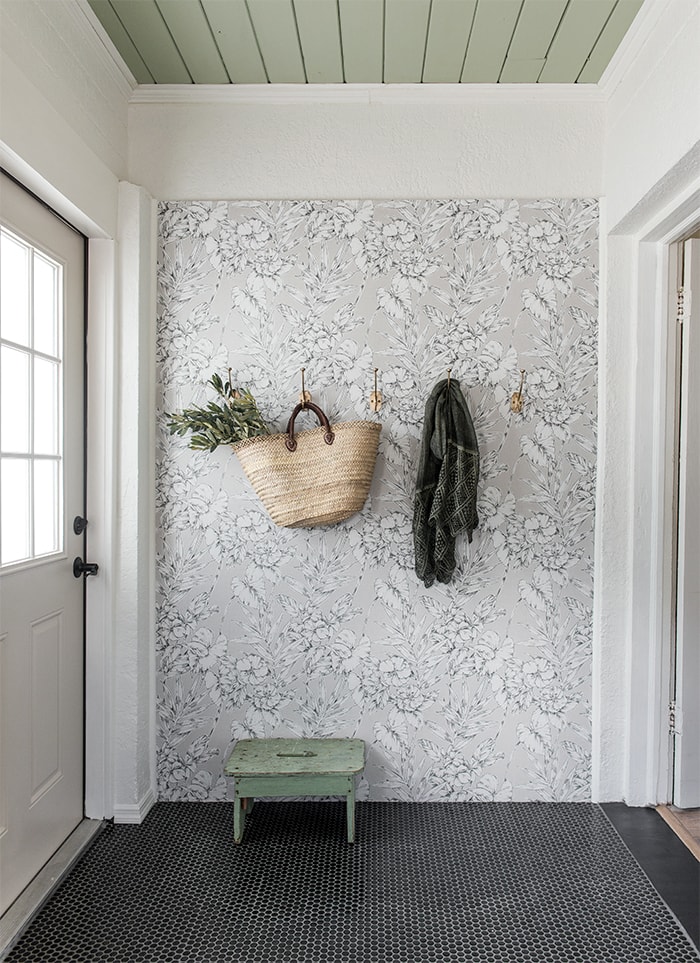
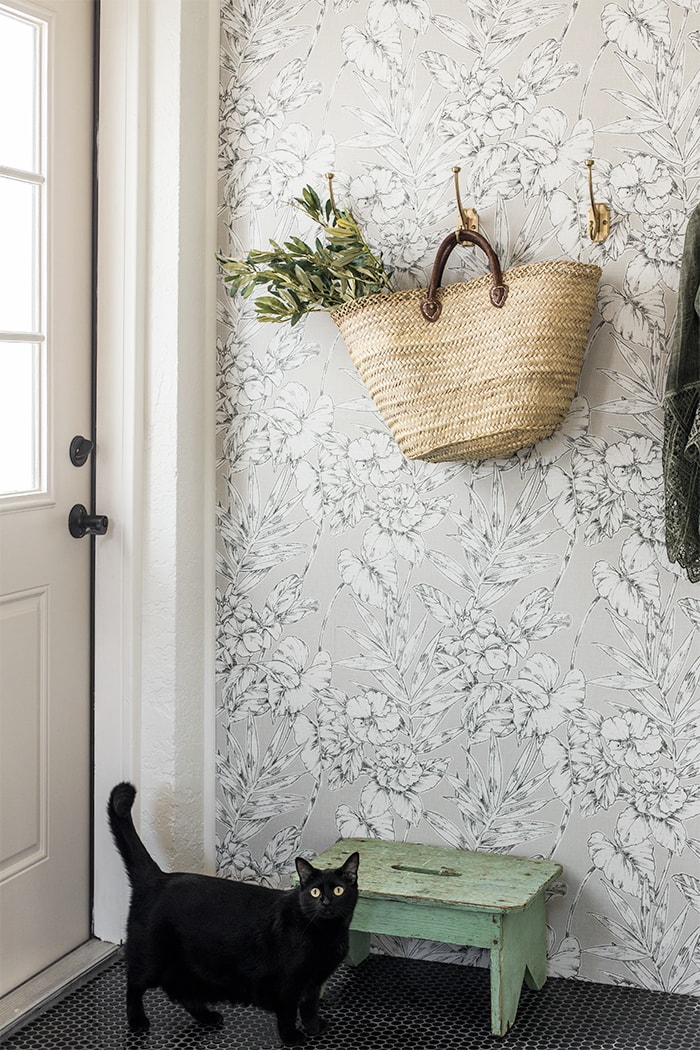
With the floor tile and paint out of the way, we moved onto one of my favorite parts—wallpaper! Originally this was out of the question given that you can’t wallpaper over textured drywall let alone stucco, but I was determined to sneak wallpaper into this room somehow… enter, MDF:
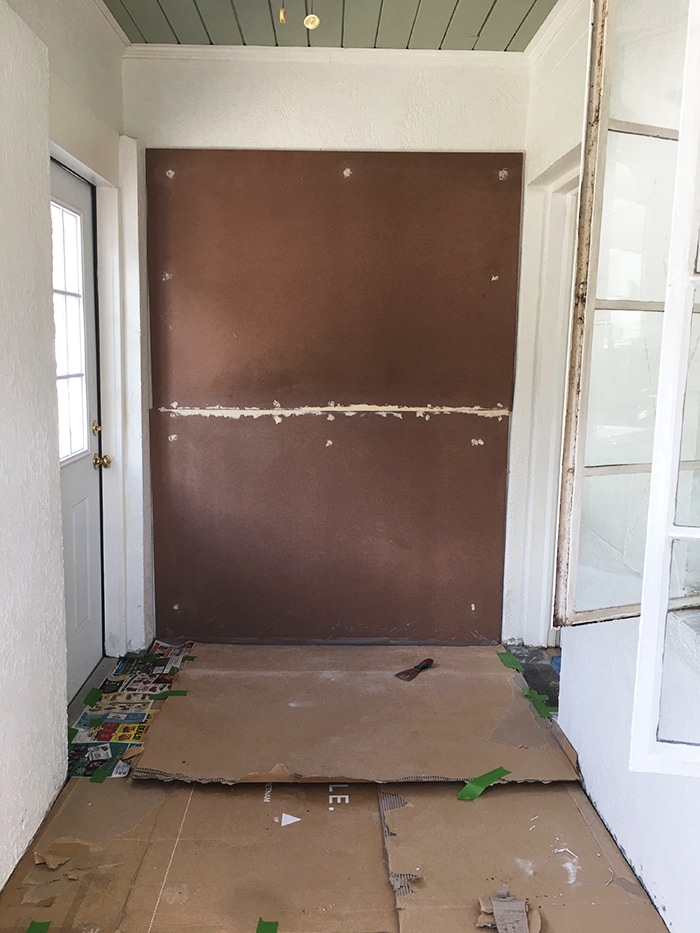
You can use any smooth/flat surface for this, and drywall probably would have been a better option but 1/2” MDF is what popped into my head first so we went with it. We had to use special concrete anchors (Tapcon) with a masonry bit and hammer drill to attach them to the wall (I’m telling you, stucco is the worst) and our walls are wavy and crooked on the sides so the boards were far from a perfect fit. But all we needed was a smooth foundation for the wallpaper.
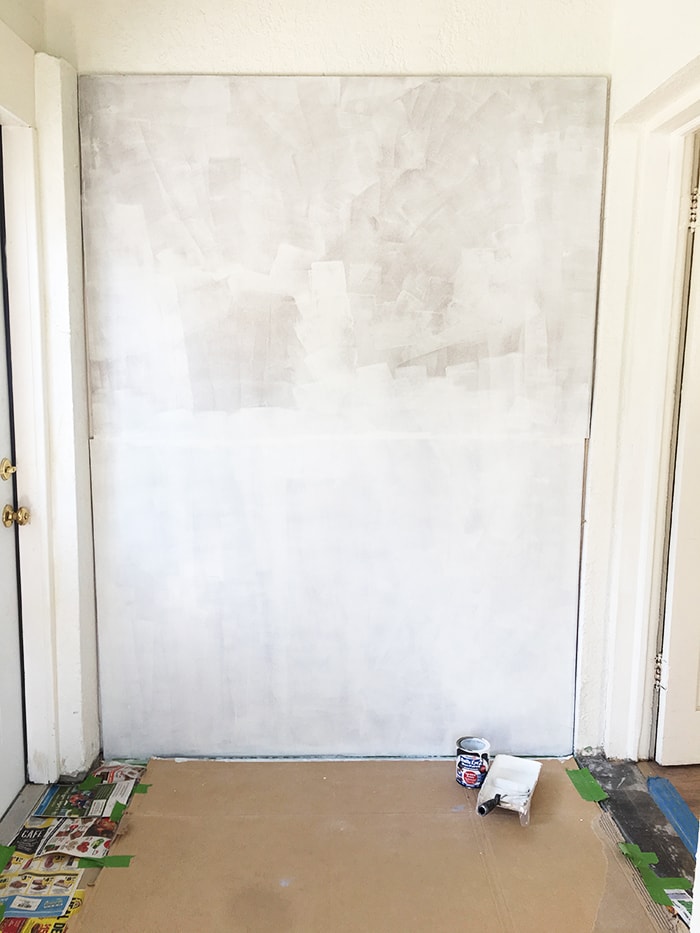
The MDF was given a few coats of Zinsser water-based primer/sealer as a base for the wallpaper, and then it was off to the races!
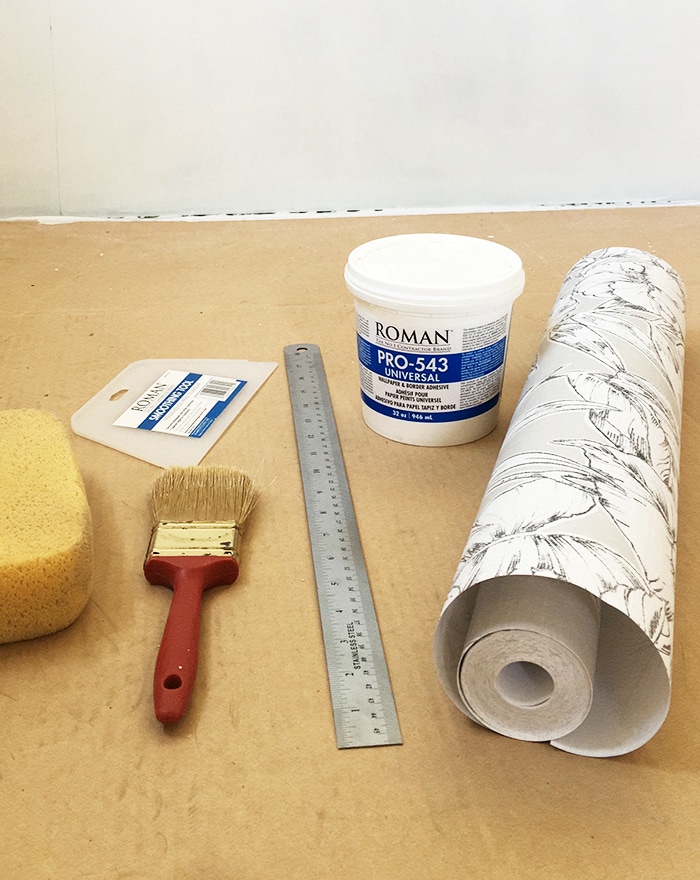
I found this super cute botanical wallpaper by Brewster and picked up a container of Roman adhesive, since the wallpaper is not pre-pasted. This was my first time using non-pasted wallpaper and I thought it’d be extra work, but it really wasn’t!
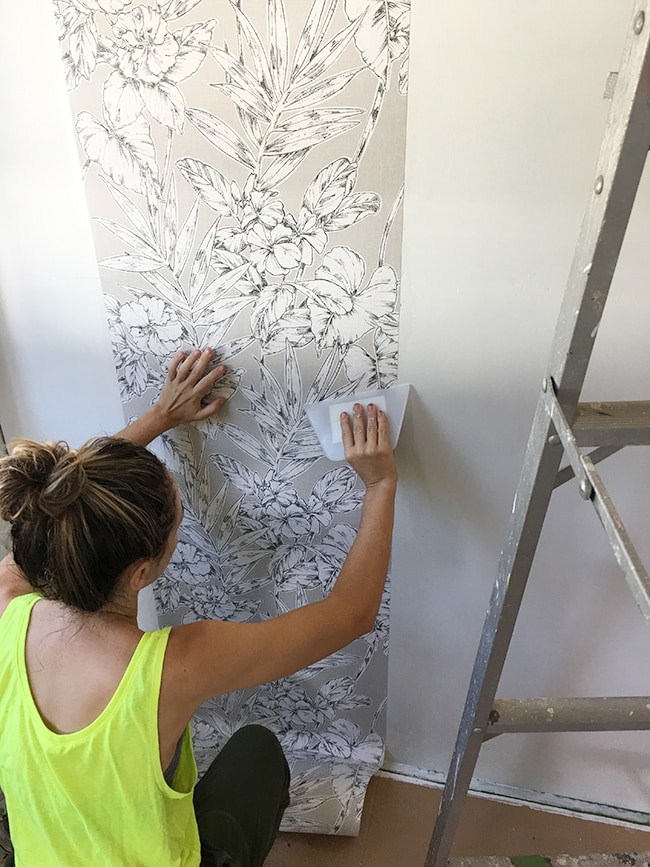
This paper is relatively thin so it’s easy to cut with a razor blade, and we ended up using the entire roll.
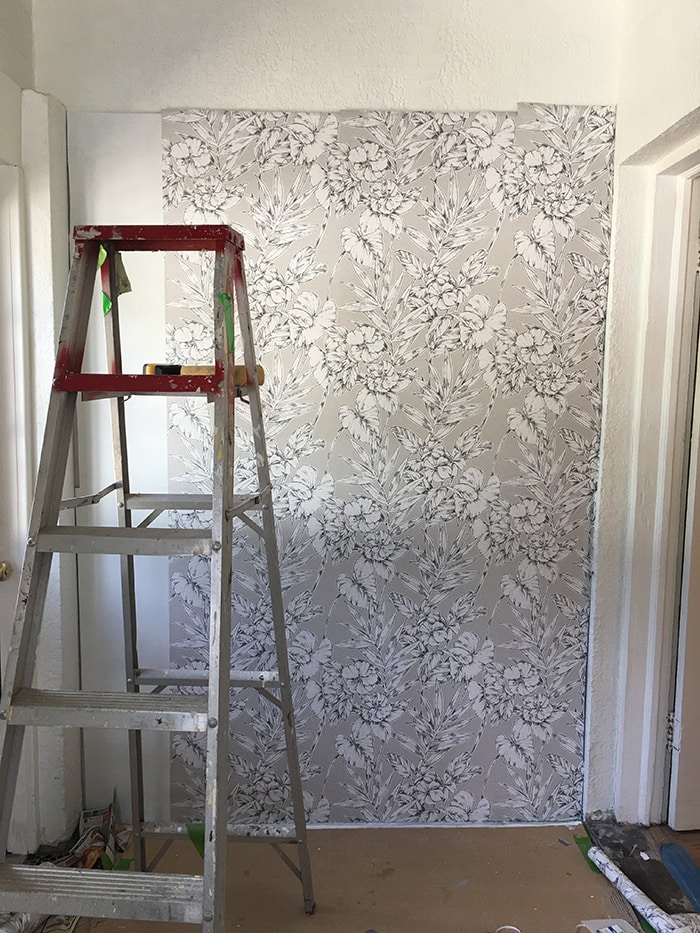
There’s a ledge that goes around the room about a foot from the ceiling, so we decided to align our wallpaper wall with that instead of the ceiling, mostly to avoid having to remove the crown molding and reinstall it—which would have opened up a whole can of worms that we had zero desire/time to do right before our wedding. DIY Sanity 101: Pick and choose your battles, folks.
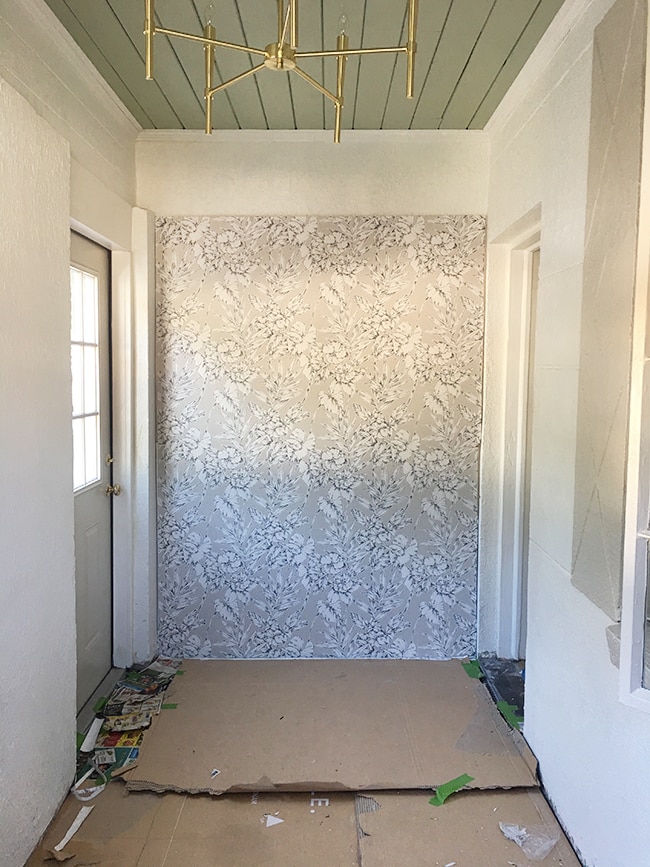
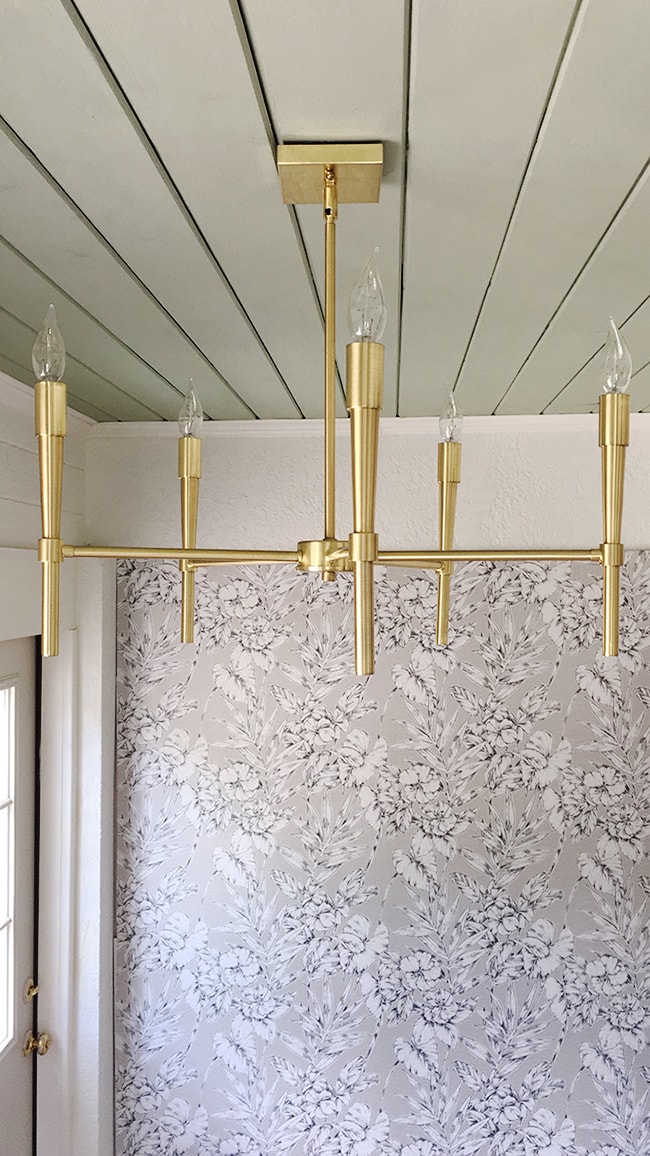
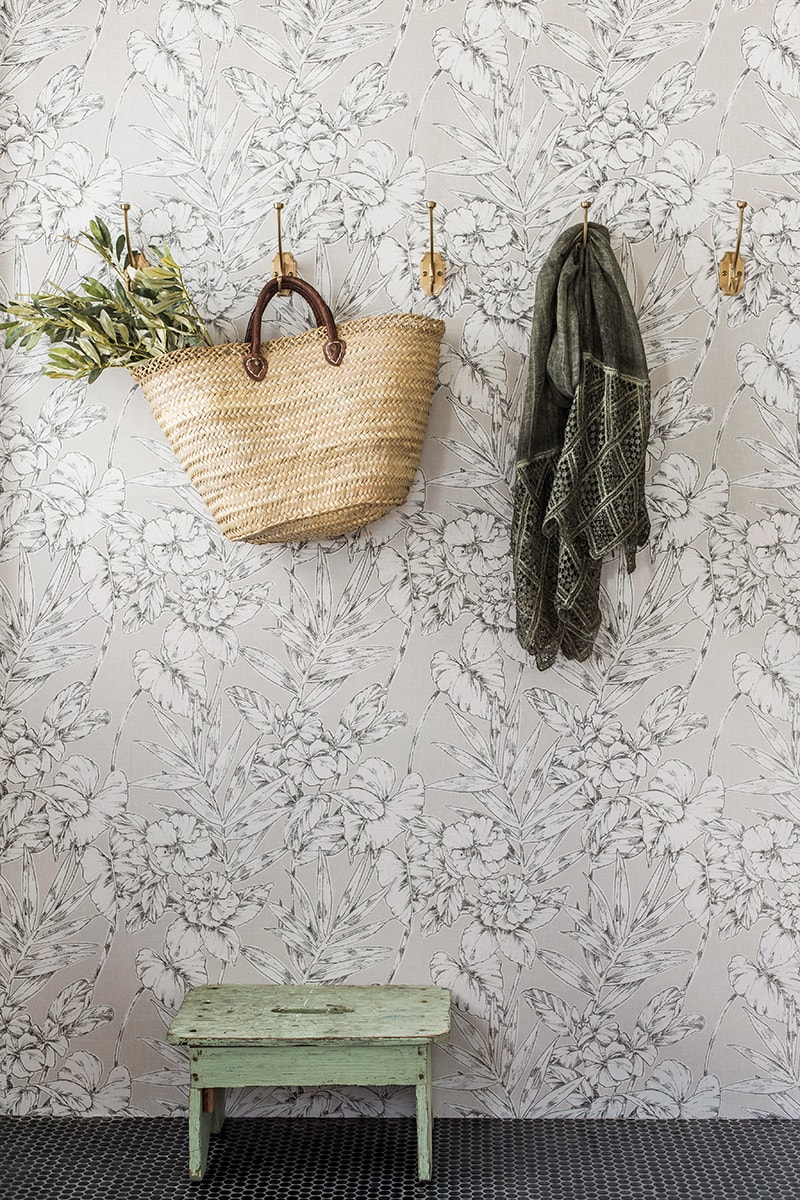
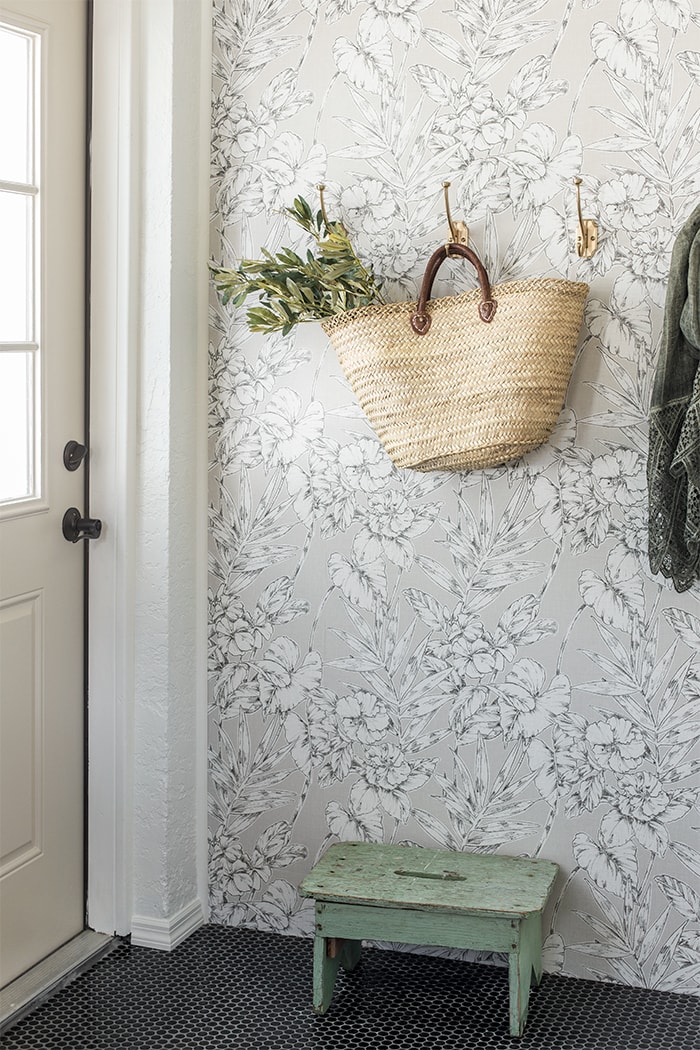
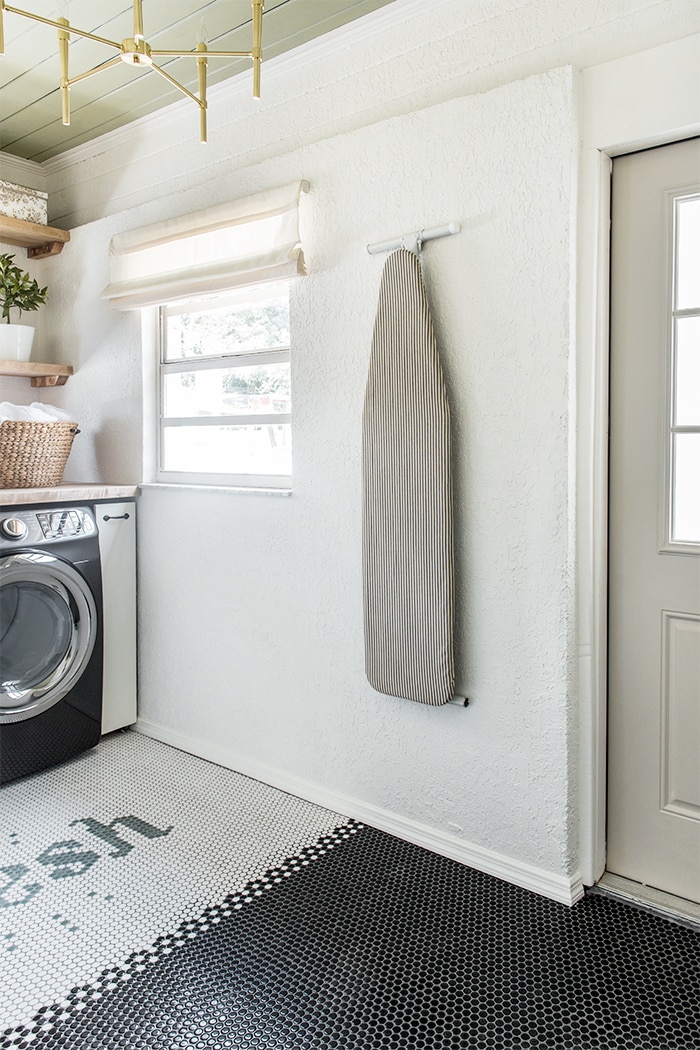
Notice that pretty little gold thing up there? That’s our new chandelier, and I’m in love.

In such a utilitarian space, you’ve gotta add a dose of glamour to balance things out. Design is all about opposites and contrast. This delicate beauty brings a subtle elegance to the space, and the best part is, it’s under $100!
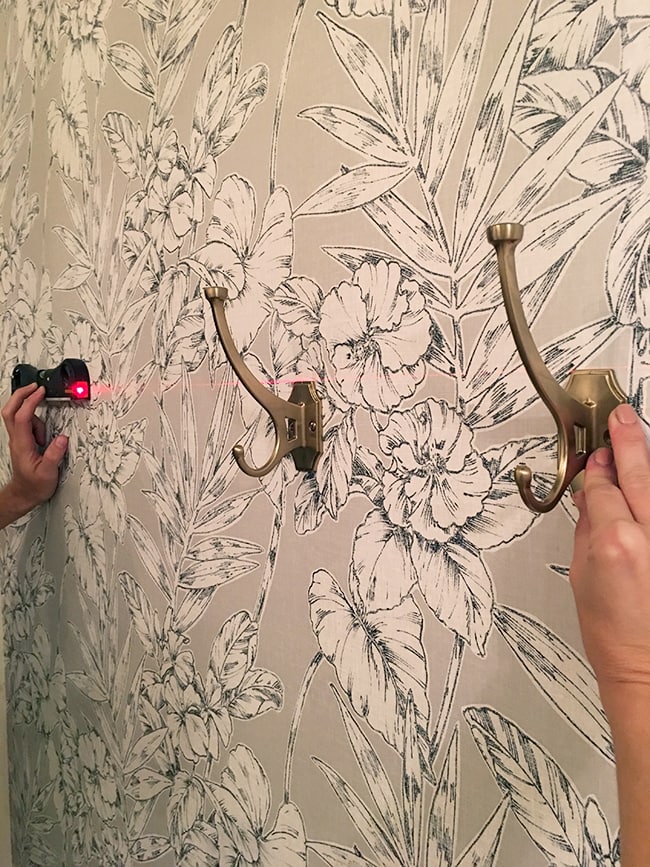
Speaking of gold, I found these awesome hooks for just $6 a piece, and we installed five of them using a laser level:
Now that formerly plain stucco wall is functional and pretty—my favorite combination!
The day before we left for our wedding, the Samsung washer and dryer were delivered—whew!
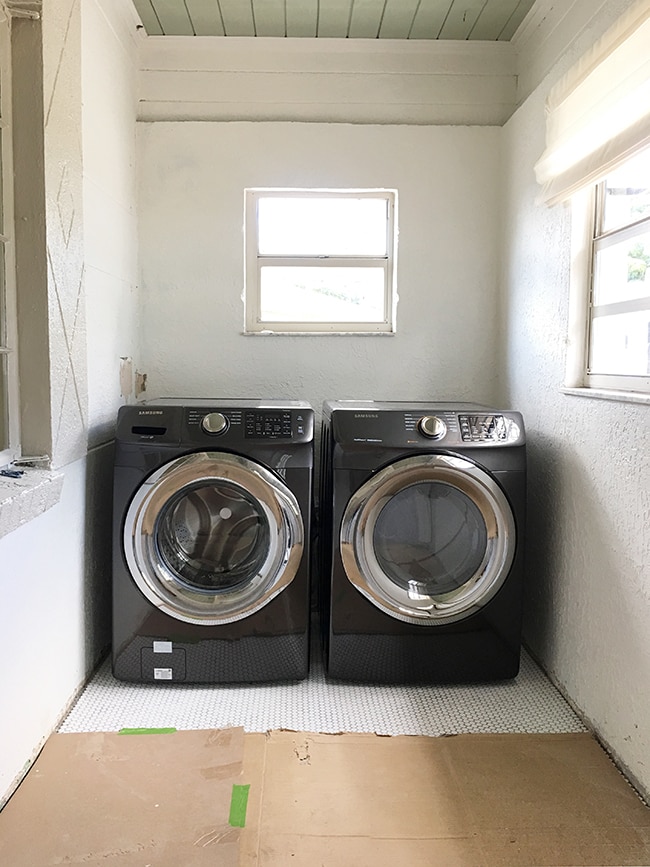
We’ve done a handful of loads already, and can I just say that I feel like I’ve upgraded to a Maserati after being stuck with Ford Pintos for the last few months. What a difference!
Apart from the much larger capacity and no longer having to worry about the washer spinning violently out of control, my favorite part is the simplicity of the controls and the preset cycles. The countdown timer is also a necessity, and I’m so glad to have that back!
I chose these models because they had the highest ratings and thousands of reviews just on Lowe’s, and I didn’t need the extra features of the fancier models. Keep in mind, this house will be a rental soon, which means everything needs to be simple and easy to operate.
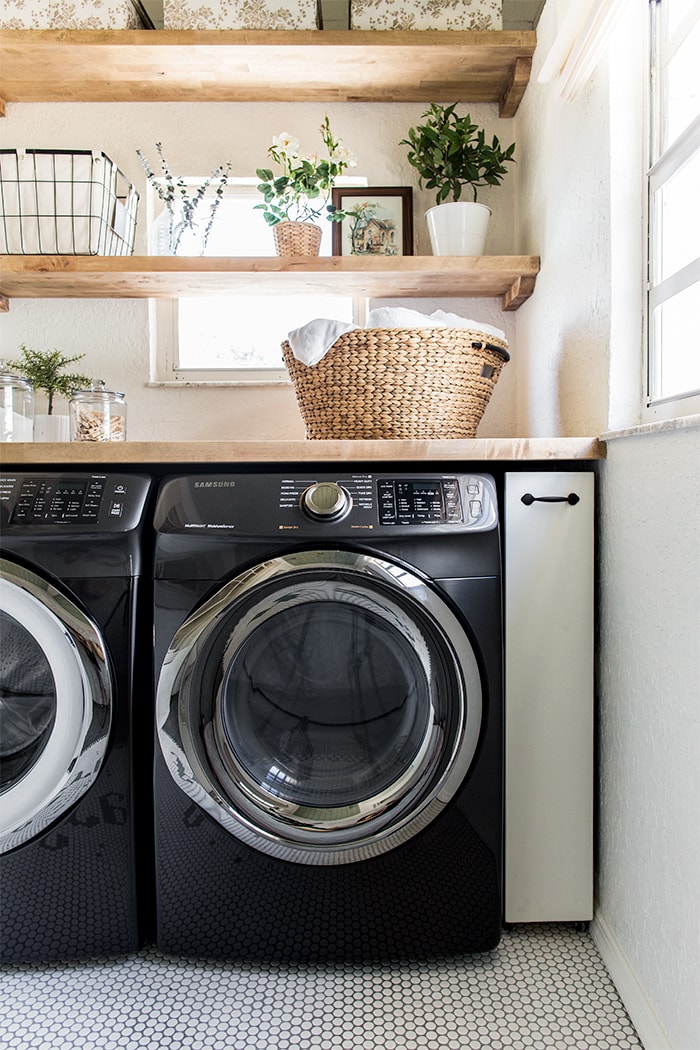
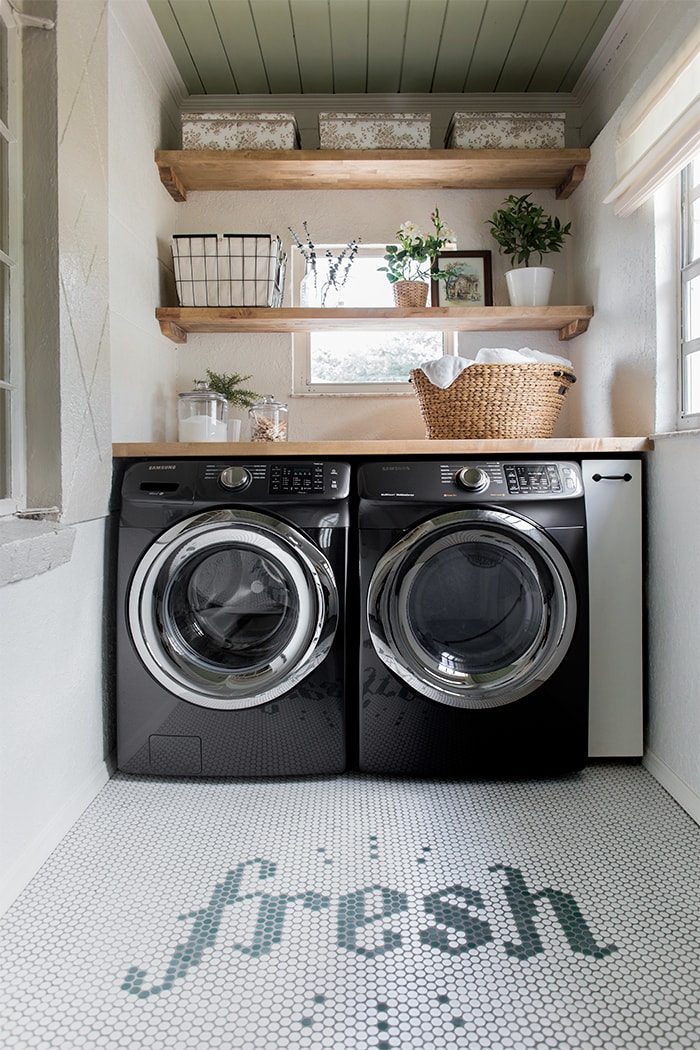
The day after we returned home from our wedding, we were installing our butcher block countertops.

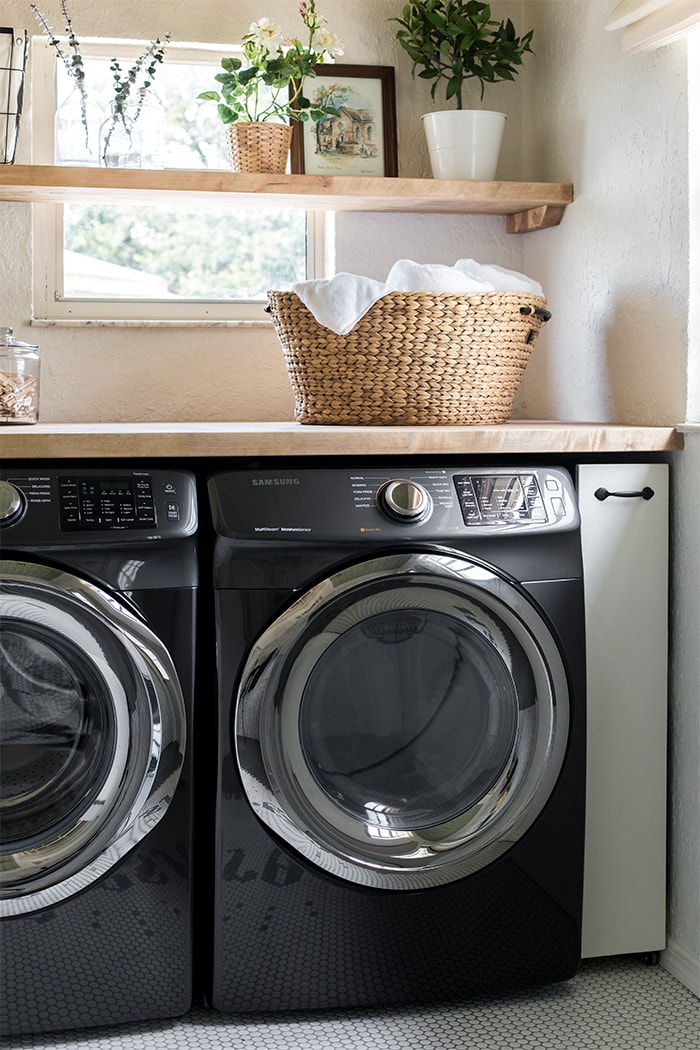
I used this same product back in the Cottage Flip Kitchen and they’re my favorite wood countertop material. I love that they’re thick, solid and stainable, and at 39” they’re plenty deep enough to use one piece as counters (we actually had to rip ours down 5.5” to fit).
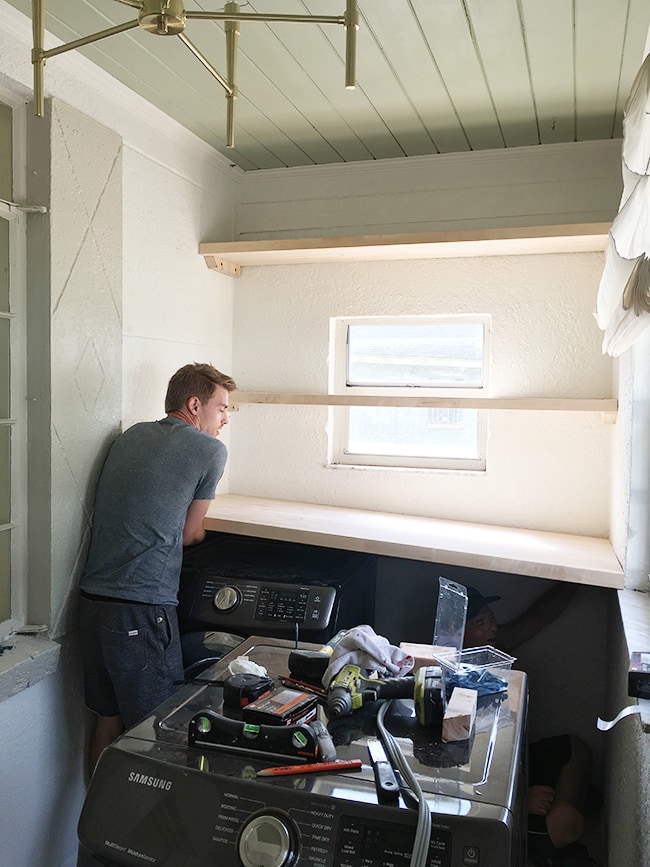
I bought two 6’ pieces—one for the countertop, and another to cut into two matching shelves. For the counter, we secured 2×4’s into the concrete walls with heavy duty Tapcon anchors, screwed a 1×4” ledge on top of that, and screwed the ledge into the butcher block from underneath (FYI—prior to this we relocated the electric & plumbing which is hidden by the washer).
For the shelves, we ripped 4 small pieces of the butcher block to use as ledges (with Tapcon screws and I patched, filled and sanded the holes).
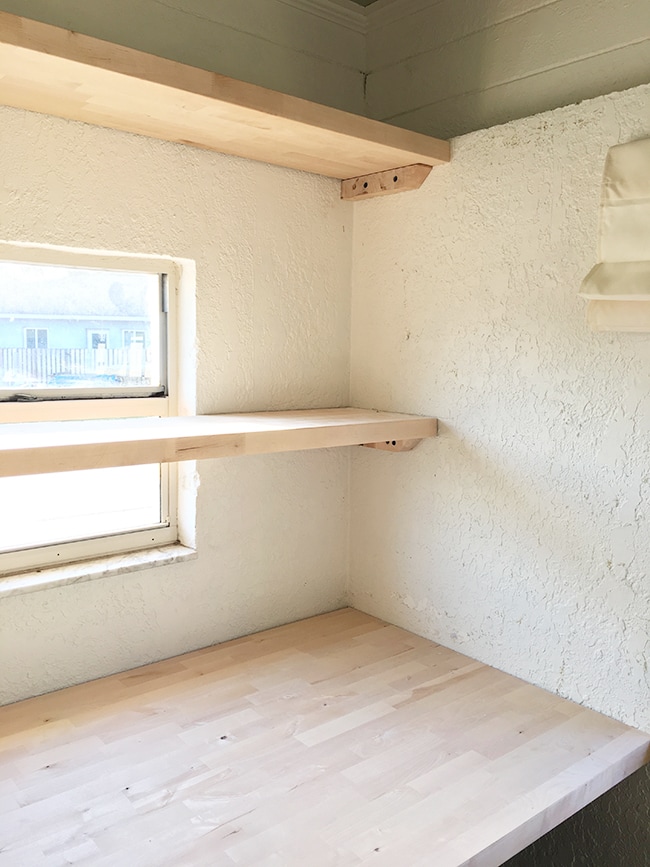
After everything was installed, I finished them off with Minwax’s Weathered Oak stain.
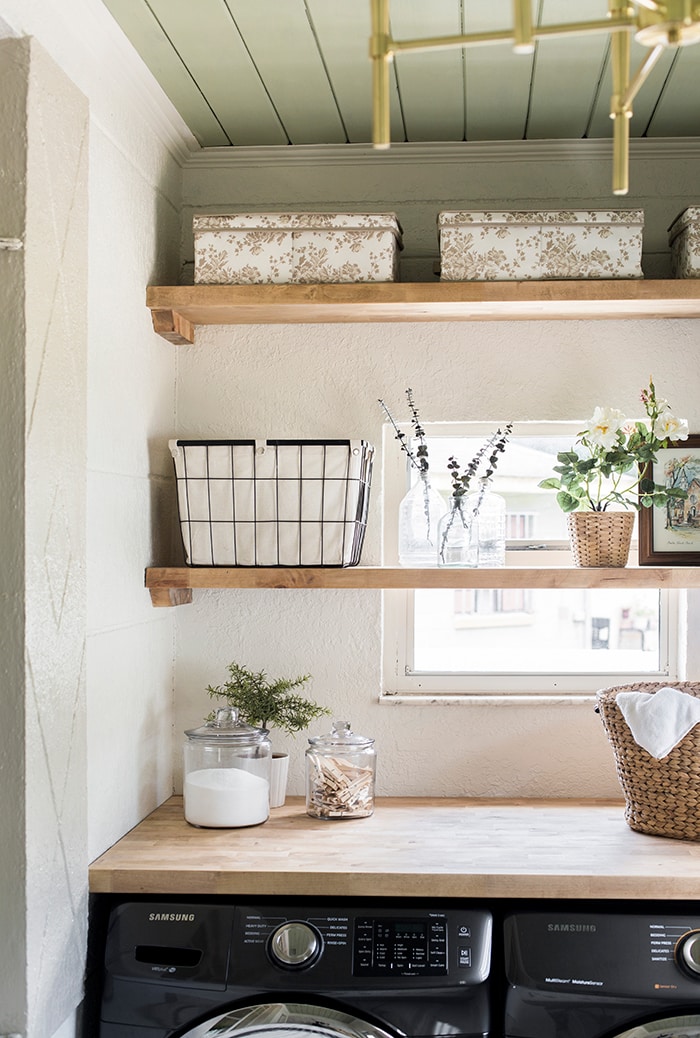
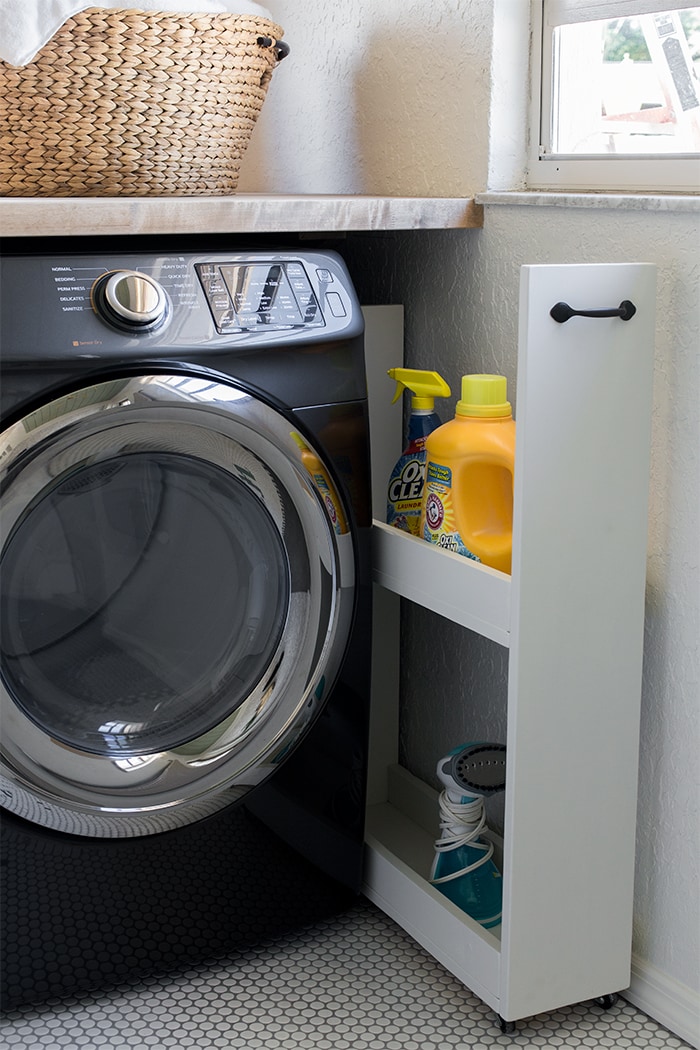
The open shelving looks great and keeps the small space from feeling crowded, but hidden storage is important, so I came up with a quick solution utilizing the small gap between the washer and dryer.
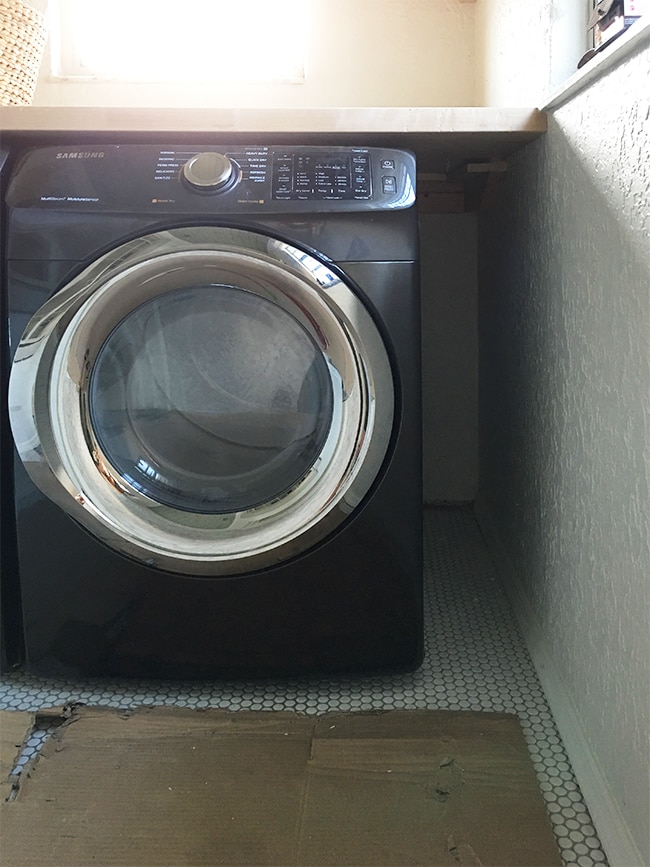
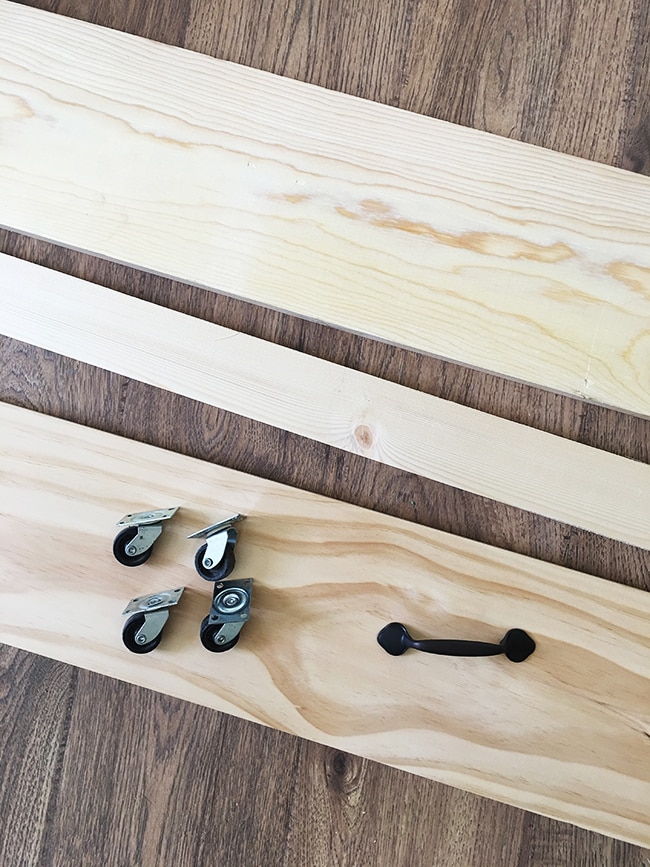
There was around 8” of empty space between the appliances, so I decided to push them to one side and fill the gap with a DIY rolling cart (I prefer it to one side/out of the way vs in the middle of the appliances, but it can go anywhere).
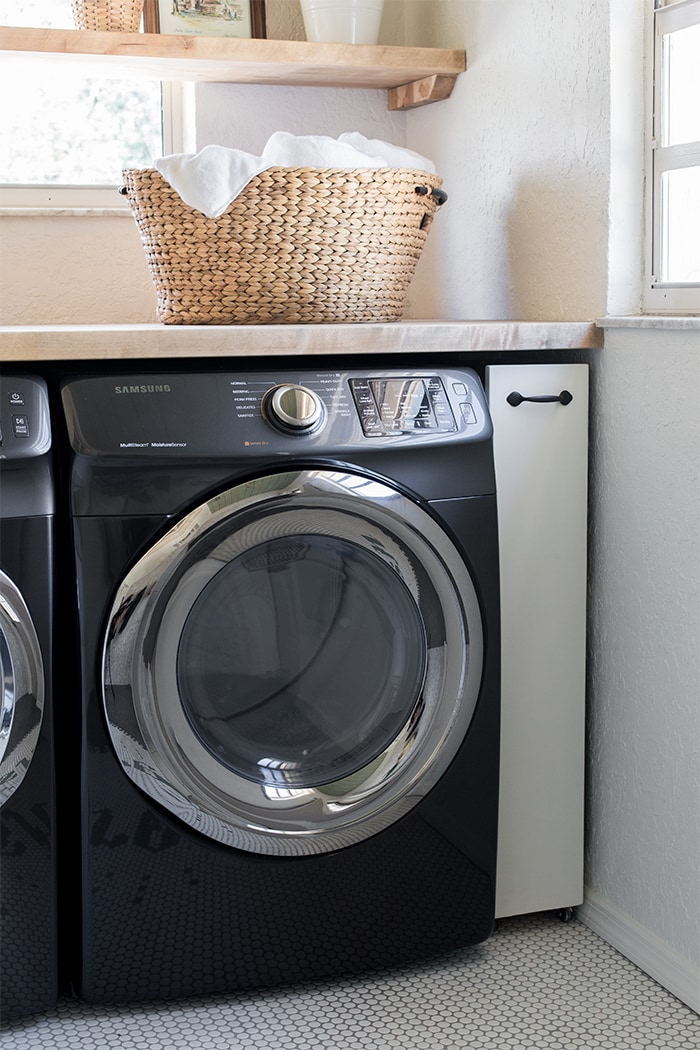
Pinterest came to my rescue with this DIY tutorial, and we picked up the supplies at Lowe’s for under $50. All you need is wood, glue, screws, a nail gun, drawer pull and some casters (we used 1×8’s and 1×4’s, skipped the Kreg Jig and made our own pocket holes with a paddle bit).
It was a quick and easy evening project, and look how functional!
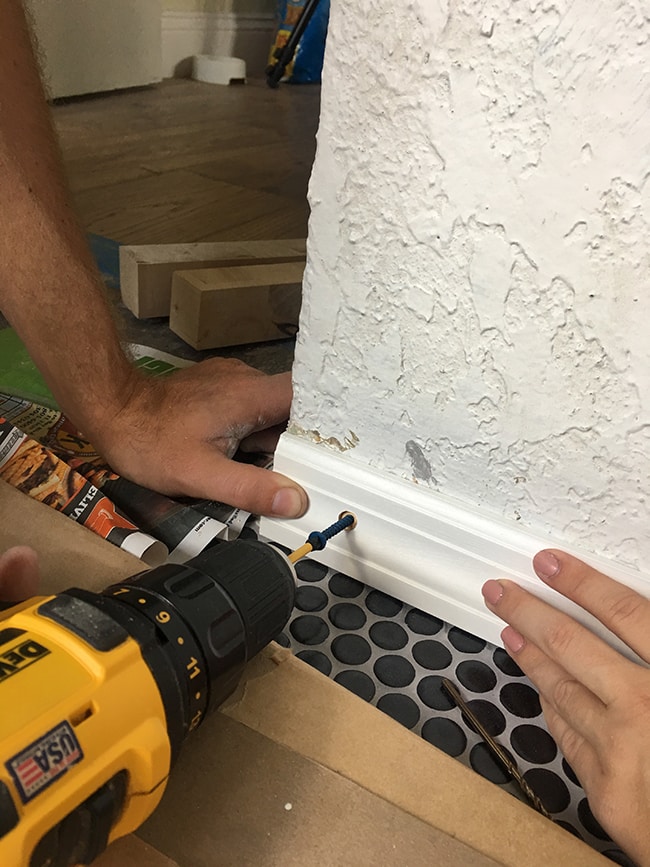
The day before the reveal shoot was spent installing quarter round along the vertical sides of the wallpaper wall and new baseboard—a five step process that involves 2 drills and 3 drill bits, PER SCREW (have I mentioned how much I despise stucco?)
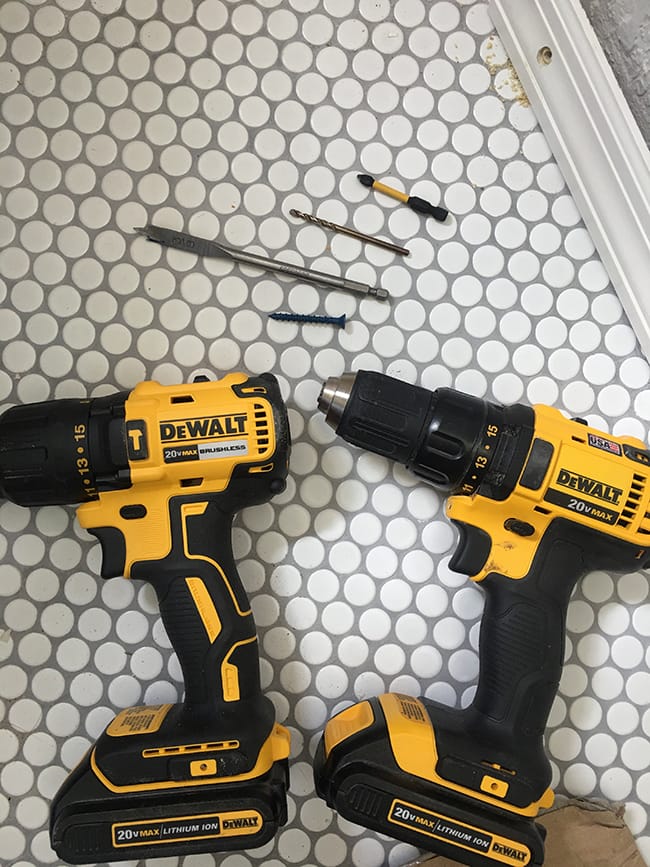
By the way, I’ve owned a wide range of power tools in my day and DeWalt wins them all. I got this cordless drill a few months ago and we just bought the hammer drill for this project, but they’re quickly becoming our most used and loved tools. It has taken me years of headaches to learn that high quality tools make all the difference!
If you have a room with stucco walls, or even highly textured plaster or drywall, I hope that this transformation can give you some encouragement that all is not lost. You can still have a beautiful room with unfortunate walls!
And your tiny room can be a shower stopper! Our laundry room is certainly the crown jewel of this home.

At least, for now… we’ve got a guest bedroom makeover, coming up next! As soon as I hit publish on this post I’ll be in there cutting crown molding.
But first, I’ll take in that “fresh new laundry room” smell for another moment…
Ahhhh… smells delicious.
All of the materials, supplies, tools etc for this project were from Lowe’s and totaled under $5k, which I think is great for such a drastic transformation. I also think it’s pretty convenient to be able to get everything you need online in one order, or in my case, over a handful of trips to my Lowe’s 10 minutes away.
It feels so nice to have our first finished room, and now we’re in the habit of scheduling daily DIY time to stay on track for the rest of the house. These reveals are fun but we must remember that this is a marathon even though it’s felt like a sprint lately, and we have to enjoy the journey! Trying to stay in that mindset as we go on to the next project.
You can find all of the Sources linked by clicking below:
Happy October!


Nicole says
I’ve been on a never-ending hunt for hooks for my entryway and I LOVE the ones you’ve used here, but I’m worried they’re too large. Could you tell me their dimensions and how far they stick out from the wall? Lowe’s website doesn’t have that information…
Thank you!
Jenna Sue says
Hi Nicole, the size is 5 3/4″ tall, 1 3/8″ wide, 3 3/8″ projection. I just added this in my review to the website so hopefully that will help others 🙂
MC says
That is beautiful and classy! You two are freaking amazing!
Jenna Sue says
Aw thank you, MC!
Suzette Fox says
Love the wicker laundry basket! Where did you get it from?
Congrats to you and Lucas!
jennasuedesign says
Thanks Suzette! It’s from Pier 1, the Carson wicker basket I believe it’s called 🙂
cammie says
Such an amazing transformation! That penny tile is to die for! You mentioned you created the pattern in Photoshop – was it difficult? Do you think it’d be possible to do that just messing around with the tiles and a marker? I have no idea how the two of you are able to consistently accomplish so many projects – with a wedding thrown in there too! Great work as always, and thanks so much for sharing with us!
jennasuedesign says
Thanks Cammie! Not gonna lie, I worked on it over the course of several days and lots of hours. I started by manipulating a font and adjusted by hand from there, but there are much simpler designs you can do or lettering with straight edges, and you wouldn’t necessarily need a computer. It really depends on the look you are going for!
Rebecca Drohan says
Would you mind sharing the font you used as a starting point?
Jenny B. says
It looks amazing! I love how you put your graphic design skills to work on the penny tile! I also love the butcher block shelves, and the wallpaper, and the hooks… Terrific job!
jennasuedesign says
Thank you so much for the compliment, Jenny!
Kara says
Looks phenominal!! I have heavily plastered walls so I feel your pain! Keep up the awesome posts!
jennasuedesign says
Thank you Kara! There is hope for us! 😀
Linda Grubbs says
Black, green and white are one of my favorite combos!! LOVE, LOVE, this project! That floor……:) Gorgeous!
As always , I LOVE how you can make something that is kinda ugly into something that is SO lovely!!!! Well done sweetie!!
OH, oh, oh….and congratulations on your marriage!! Hugs to you!
jennasuedesign says
Thank you for your support as always, Linda! <3
KImberly says
First off, Congratulations on your marriage. I hope that you share a few photos.
Secondly, the laundry room looks incredible. I never would have thought that it would be possible to take the before space and turn it into something so beautiful. You have packed a ton of inspiration- tiles, shelving, lighting, wallpaper- into a tiny space. I love that you made a utilitarian room into something glamorous.
jennasuedesign says
Thank you so much, Kimberly! And I’ll do a blog update next week with a few wedding photos and other updates 😉
Michelle says
I love how this room came together! The penny tile floor and “fresh” design are STUNNING but I also just love the cottagey charm of the open shelves in front of the windows!
jennasuedesign says
Thanks Michelle! I think the window shelf is pretty neat too 🙂
Rose says
Just gorgeous! Love it all but the penny tile is really amazing. Looking forward to more rooms to come. Congratulations to the newlyweds. You guys make such a great team!
jennasuedesign says
Thank you, Rose! I couldn’t do it without him 😉
Julie says
So good! Love everything! Does the $5k include the appliances?
jennasuedesign says
Thanks Julie, and yes it does! These models have actually been on sale for 30% off for several weeks.
Sandra P says
So so so GOOD!
jennasuedesign says
Thanks Sandra!
Karen says
Love it! Super cute. One question though…what would you think of painting the space above the wallpaper all around the room a different color? Just some contrast, maybe pulling from the wallpaper? It just looks like a little something is missing. Sweet little space!
jennasuedesign says
Thanks Karen! I prefer to keep it matching the other walls so it doesn’t draw more attention 🙂
Kristen Eff says
What a labor of love! Stucco is an A-hole, for sure. Amazing job on this room! So many steps… Hey I was thinking, would it be an option to install a matching (or other) shelf on the upper wall where the wallpaper stops? It looks like there’s one in about the same spot on the washer/dryer side. I completely understand why you stopped there, but maybe a small shelf would make it look purposeful? Or maybe too closed in if something’s over your head as you walk through…
jennasuedesign says
Thanks Kristen! That would certainly be an option if we really needed the extra storage, but we have plenty now! And you’re right, it would feel closed in as you walked under it
Shelly Smith says
As always, I love it all. I even like the gold light and I don’t normally go for gold. You are magic!
jennasuedesign says
Thank you Shelly!