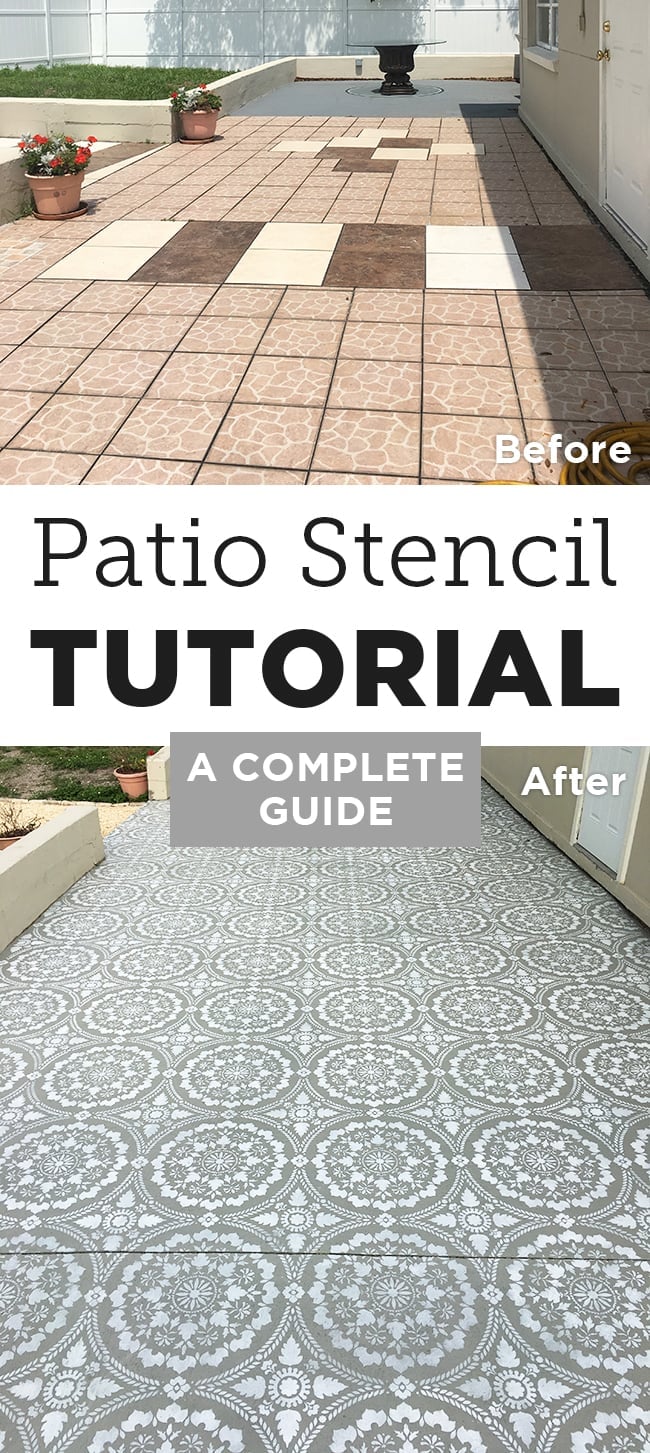
If you’ve been following my weeks-long stenciling saga on my Instagram stories, the day we’ve all been waiting for is FINALLY here! It’s the most thorough patio stenciling tutorial I could possibly deliver, so enjoy…
Jump to:
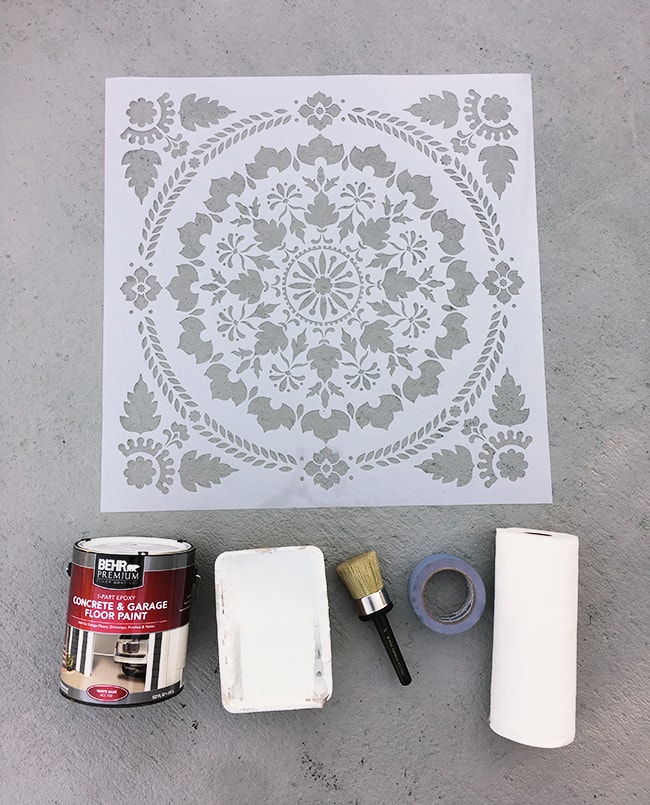
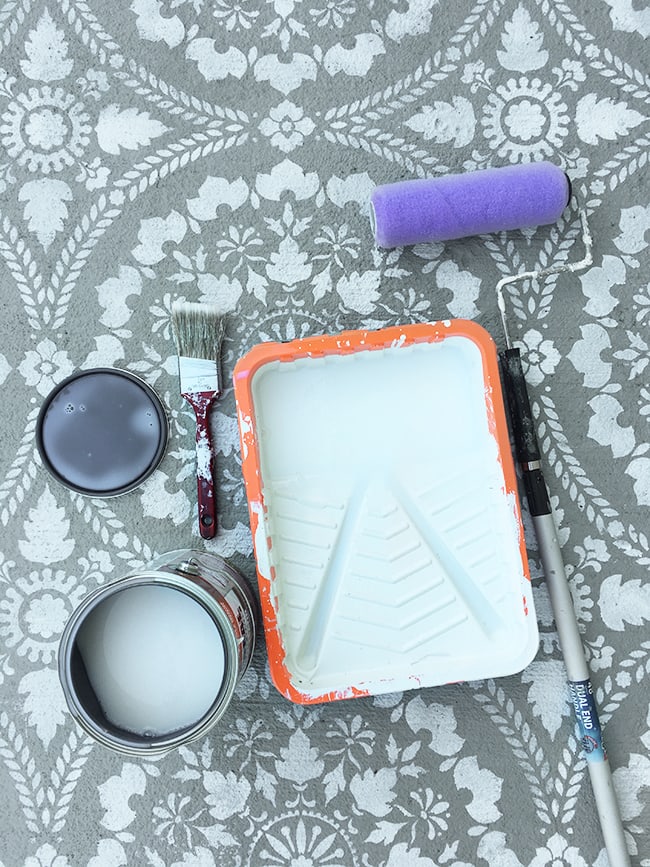
Here’s what you’ll need:
- Large stencil
- Outdoor concrete paint (I used 3 gallons of Battleship Gray for the base coat + 1 gallon of white for the stencil)
- Concrete sealer
- Textured nap roller (if painting a base coat)
- A good stencil brush
- Latex paint remover
- Tape (I found duct tape worked best on textured concrete)
- Hydration, sunscreen, bluetooth speaker, bug spray (specifically if you live in the south)
- Optional but very helpful: leaf blower
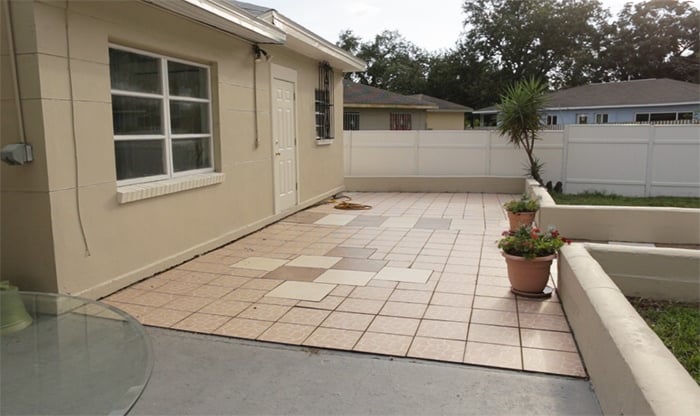
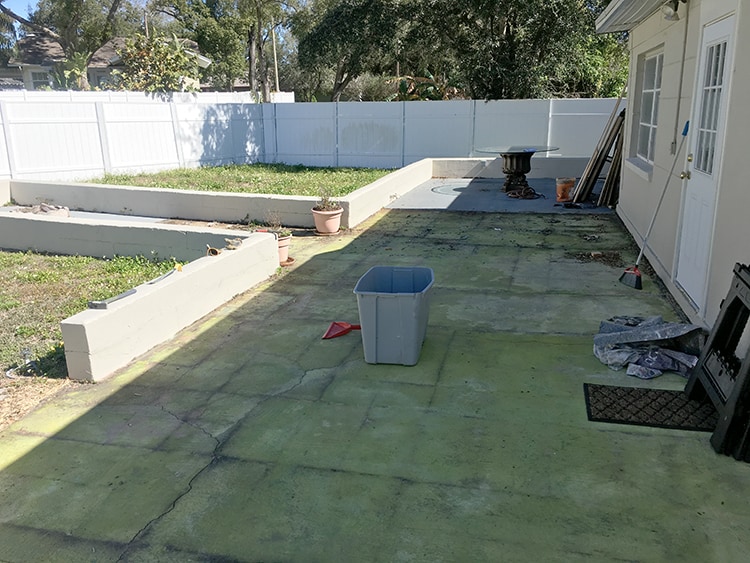
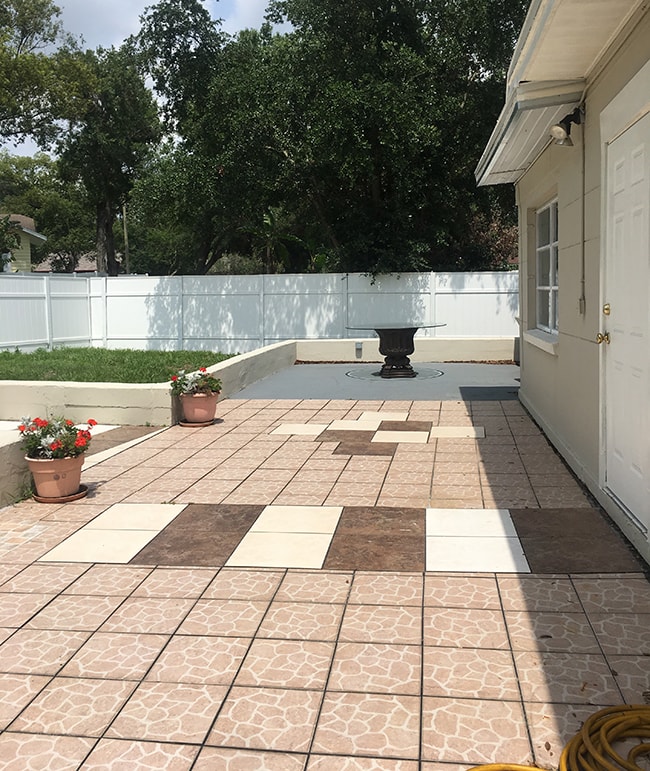
Our story goes deeper than just stenciling, though. It begins in a world of a patio partially covered in mismatched brown and white giraffe tile.

We’ll never know what was going through the minds of the people who thought this was a great idea.
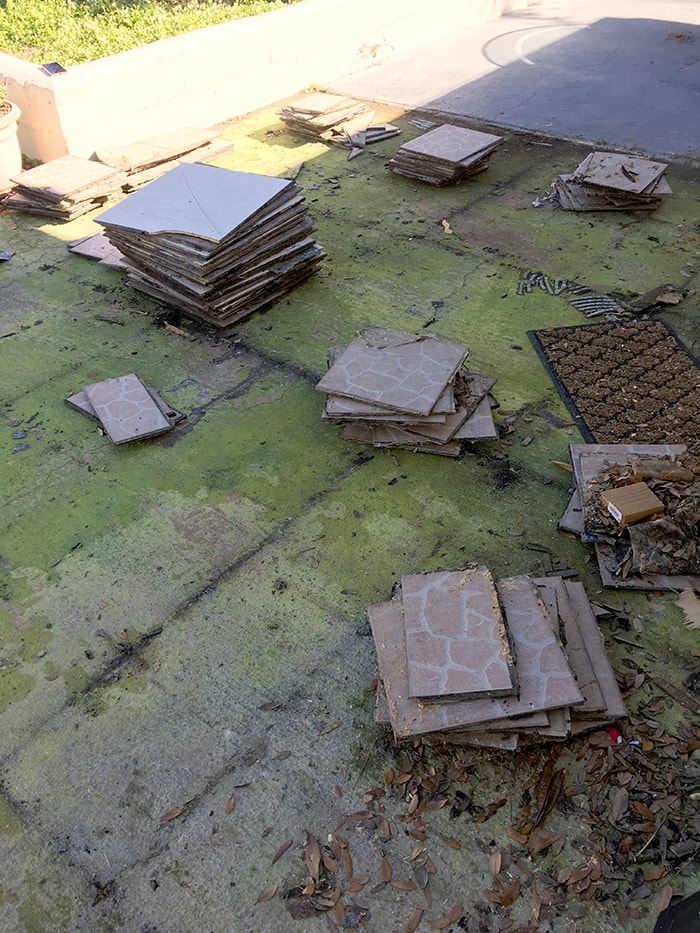
In February we began the process of removing the offending tiles, and luckily since they weren’t installed properly, they came up without a fight.
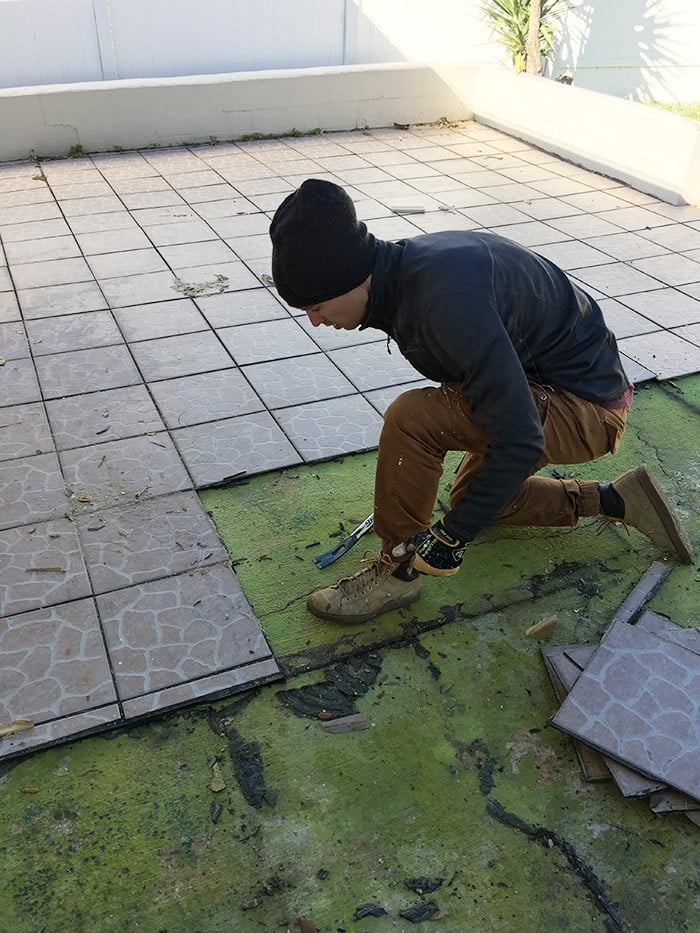
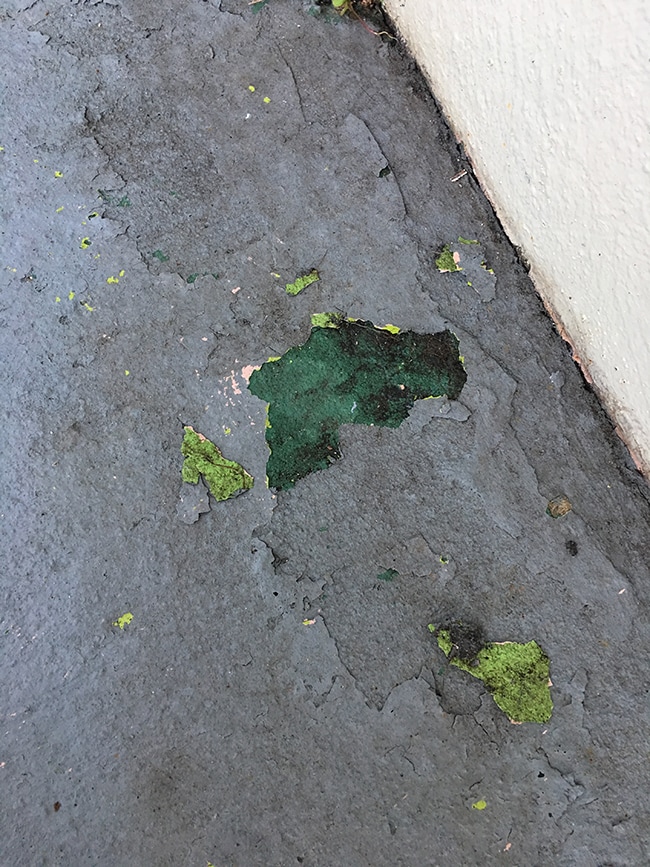
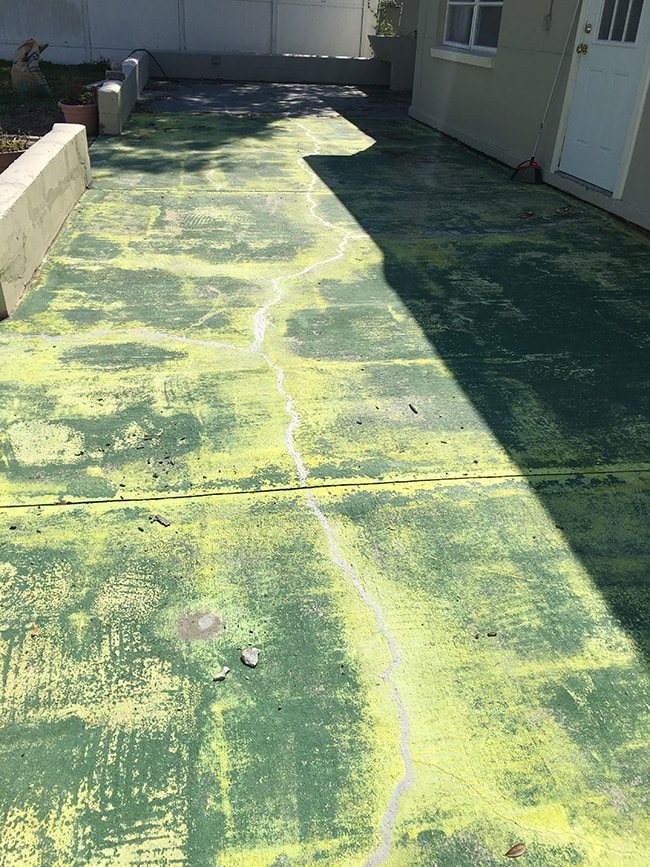
Underneath the surface was what I assumed to be mold and mildew after who knows how many Florida summers.
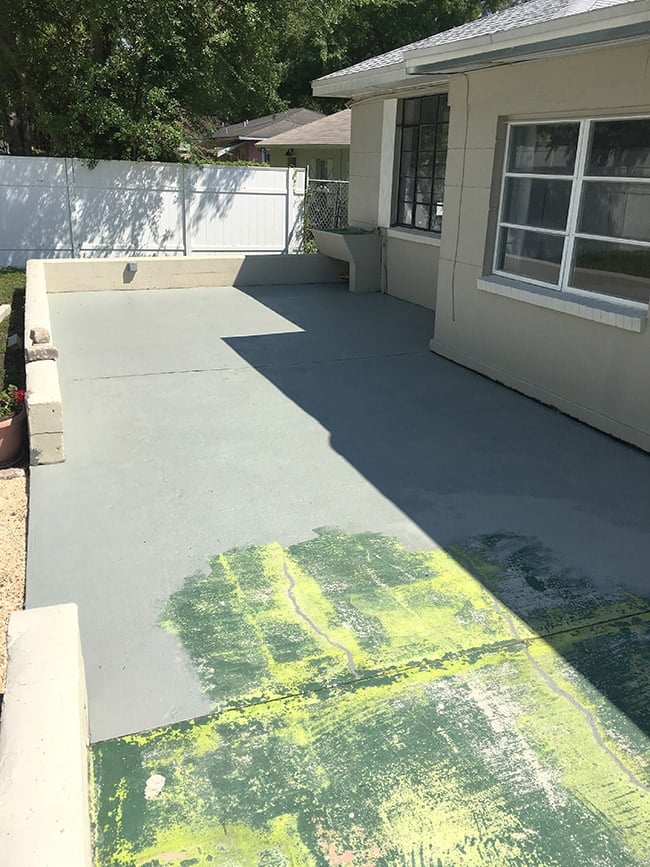
But then, upon closer inspection, we realized that nope, this was in fact, green paint.
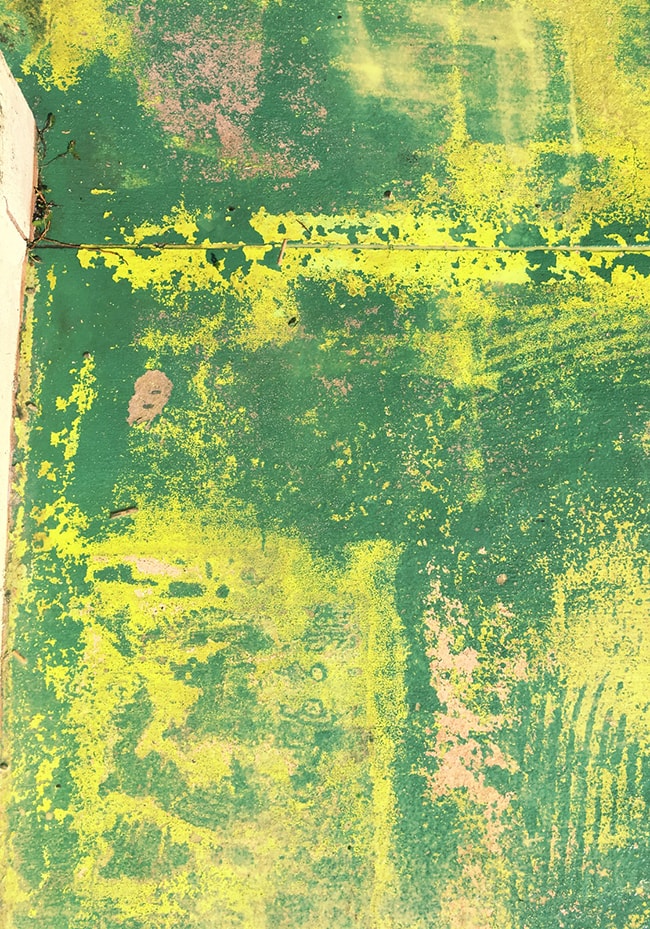
Power washing quickly commenced, revealing not just one layer of paint, but two… the always in-style, neon and emerald green.
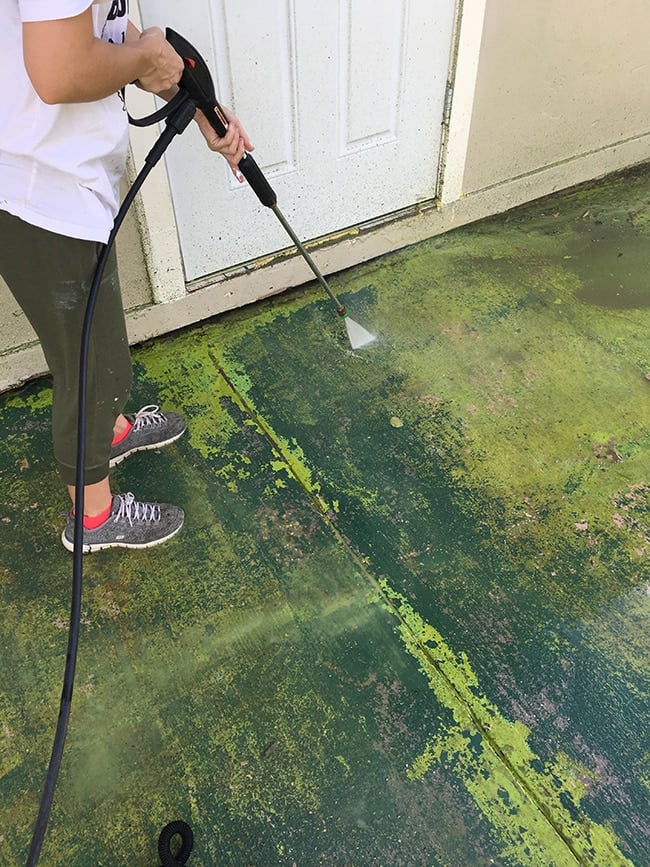
More hues of pink and purple were slowly uncovered, revealing a colorful and curious past life. Oh, if this patio could talk.
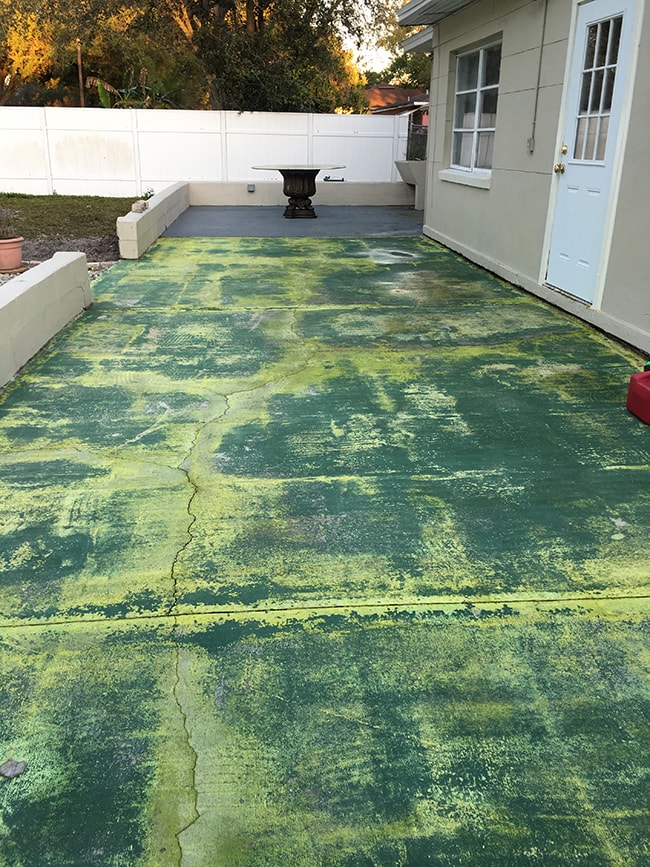
A full afternoon of pressure washing was as good as it was going to get, and we called it a night.
Step 1: Prep the surface
I can’t stress enough how important this first step is. If your concrete is not properly prepped, any painted finish will not last. If you’re stenciling directly on unpainted concrete, you’ll have much better luck in the long run!
Unfortunately for us, we had to address the multiple layers of cracked and flaking paint that were no match for the pressure washer.
I used a putty knife and did my best to scrape it all up…
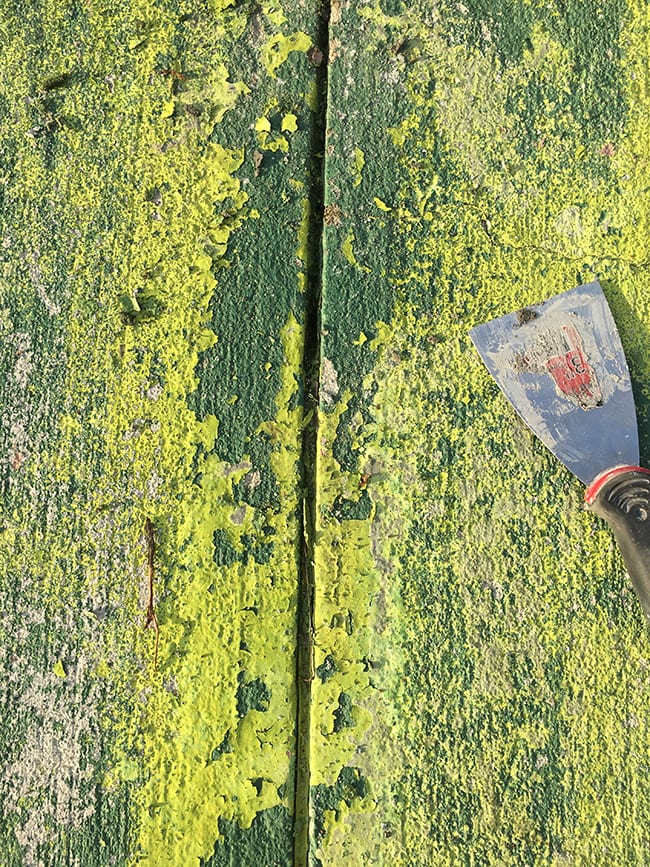
But the loose paint was everywhere, very stubborn and I could only do so much by hand on a 650+ sq ft patio. I knew the concrete paint would also be thick enough to cover up and eliminate most of the smaller flakes. Fortunately, this isn’t an interior surface that has to be 100% perfect!
There were also multiple cracks that needed to be filled, and I picked up this concrete crack seal to do the job.
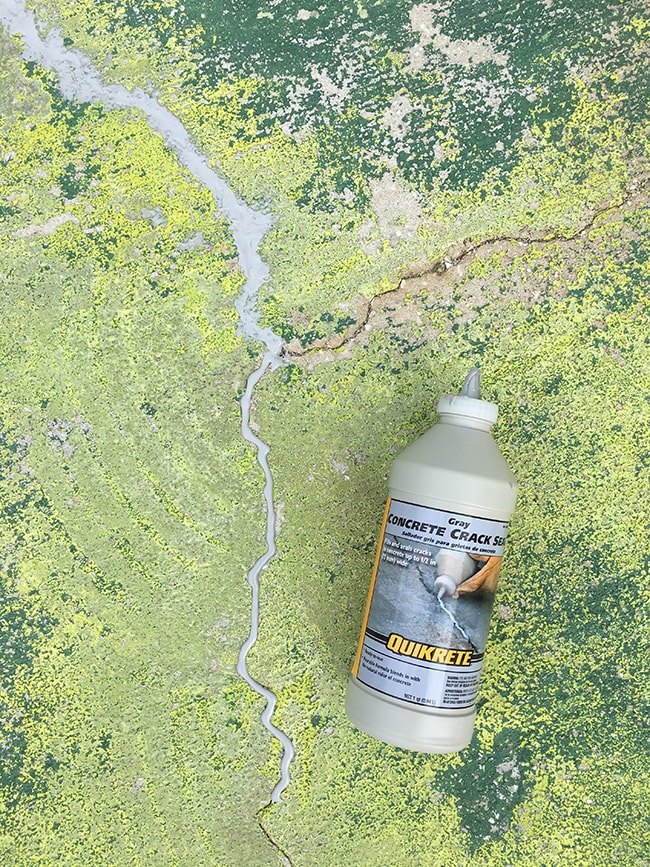
It worked beautifully and was instant gratification! I love this stuff.
With the cracks sealed and old paint scraped off as much as possible, it was time to paint the surface.
Step 2: Paint the base layer (optional)
If you’re stenciling directly over the existing surface, you can skip this step.
I did a TON of research on this (and I mean hours) trying to find the best option. It had to be durable, long lasting, affordable, easy to use/apply, and the right color. I scoured Amazon and the big box stores, reading every word and photo of every customer review. I was leaning toward a couple options on Amazon, but the color options were very limited and the gray read as a blue-gray (not a fan).
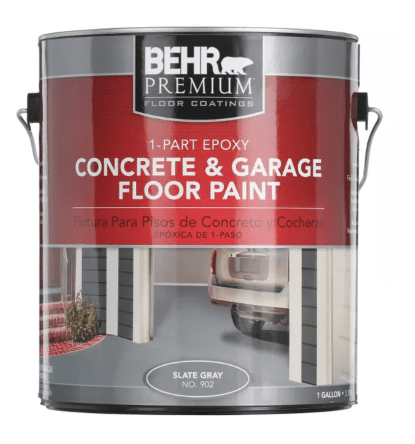
Eventually I landed on this Behr Concrete & Garage floor paint, after finding that it was available in a ton of Behr colors (other manufacturers take note!)
I ordered two gallons in Battleship Gray, which is a very neutral light/medium gray without those pesky blue undertones (go custom and don’t get their off the shelf Slate Gray unless you like the blue-gray).
I started by cutting in around the edges with a good short angled brush (you’ll have to excuse the lighting in some of these photos)…

Then rolled out the center with a nap roller made for textured surfaces.
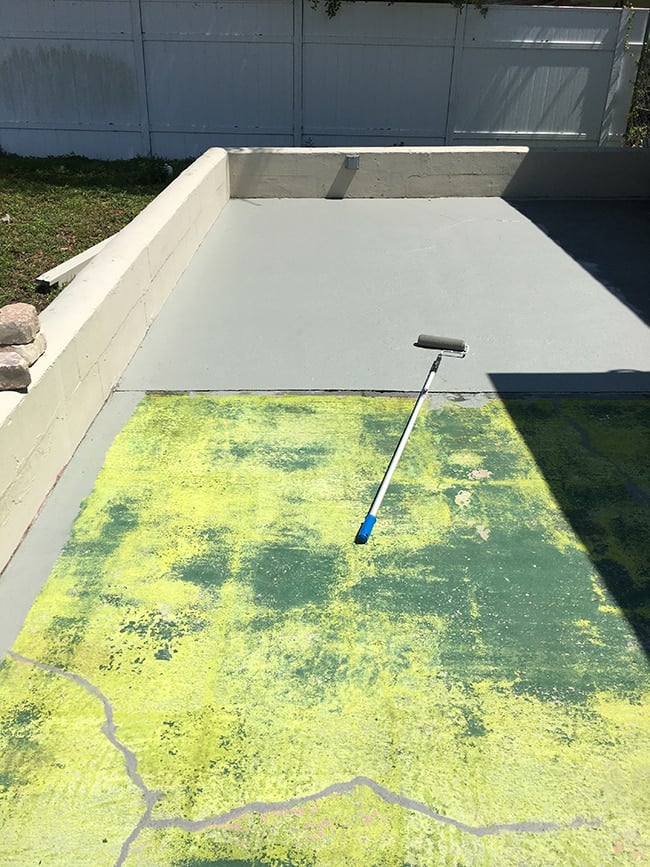
After snapping the first roller handle in half, I realized that this job wasn’t going to be quite as easy as I thought due to the uneven surface. In order to fully cover, I had to completely soak the roller in paint and reapply every few feet.
Worried that I’d run out of paint, I used as little as possible, rolling over the surface multiple times with more pressure. It was a tiring job that took up most of the day (the sun out in full force didn’t help either.). Here’s how far one gallon went:
By the end I realized I wouldn’t have enough, and ended up with this much to go on the side of the house:
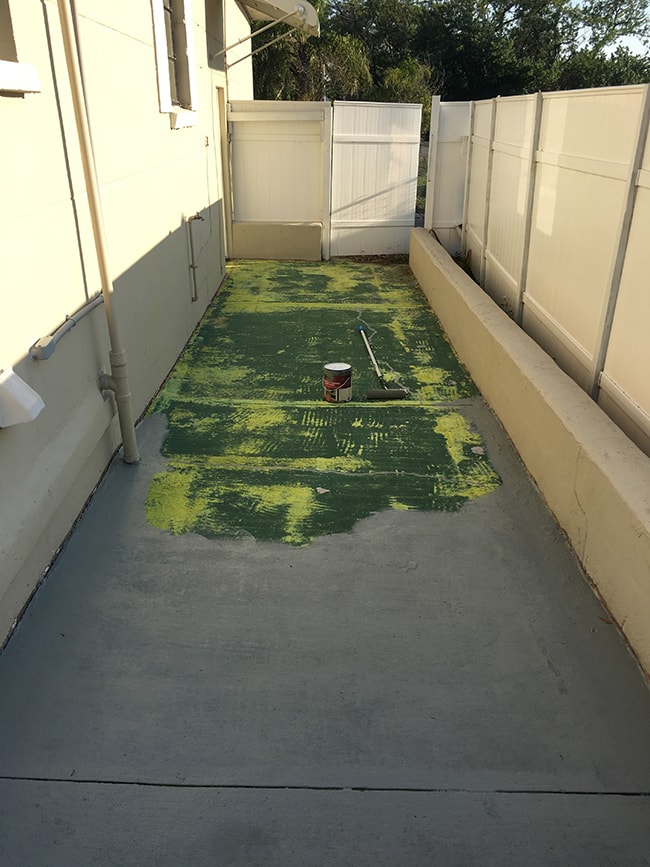
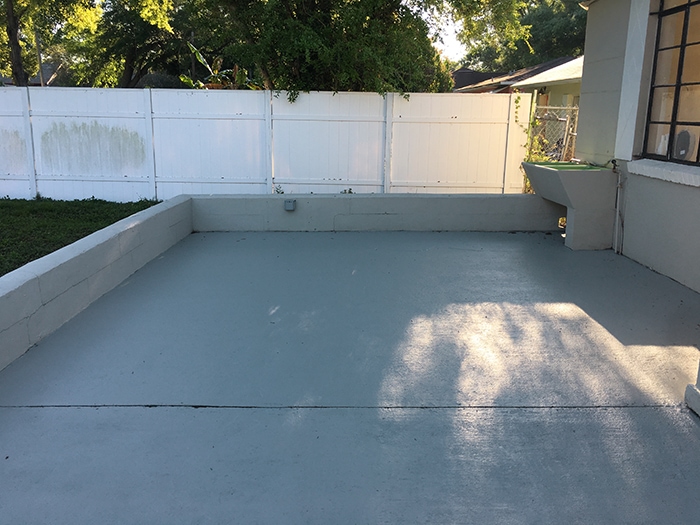
I’m definitely a fan of this paint though. It easily covered in one coat and dried within minutes. The color is nice too, no blue tint at all (don’t let the early morning light and poor iphone 6 white balance sensor fool you):
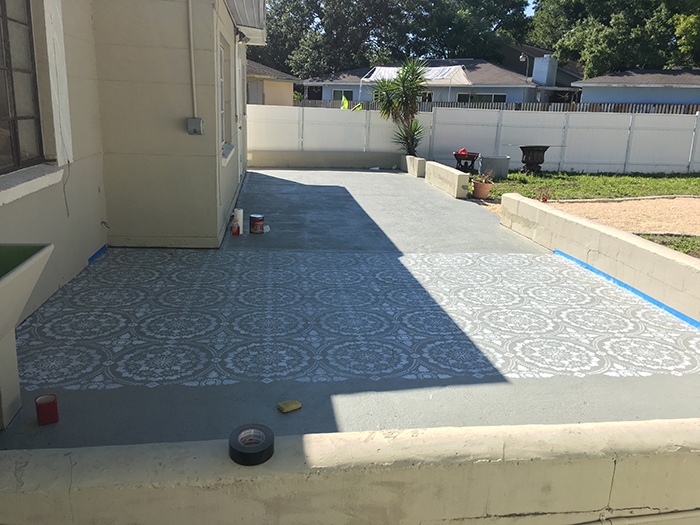
Step 3: Let the stenciling begin
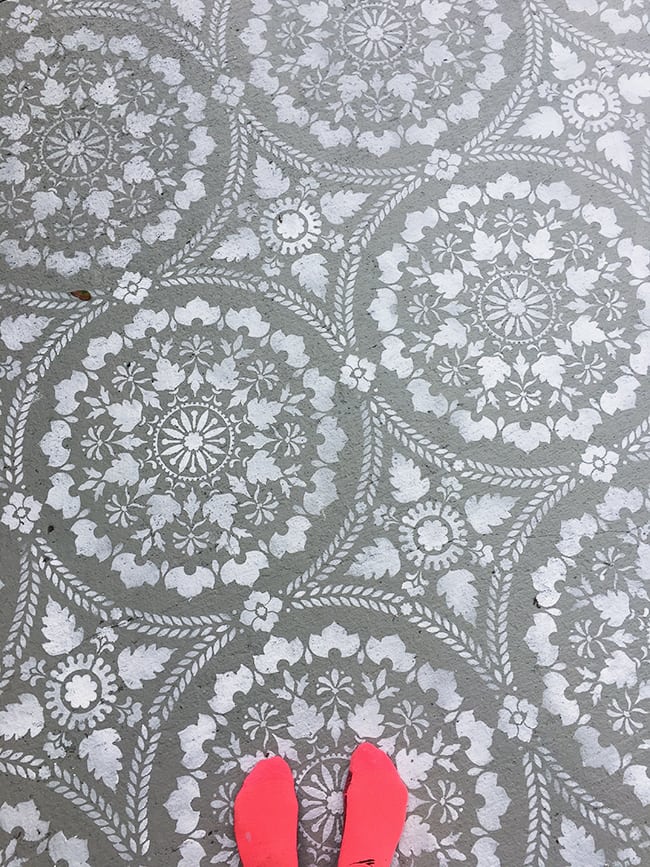
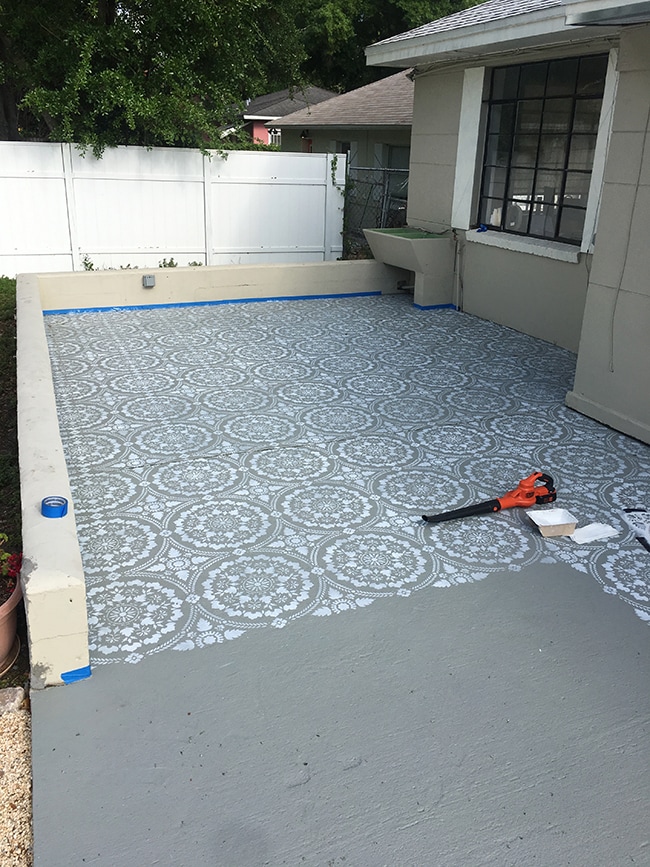
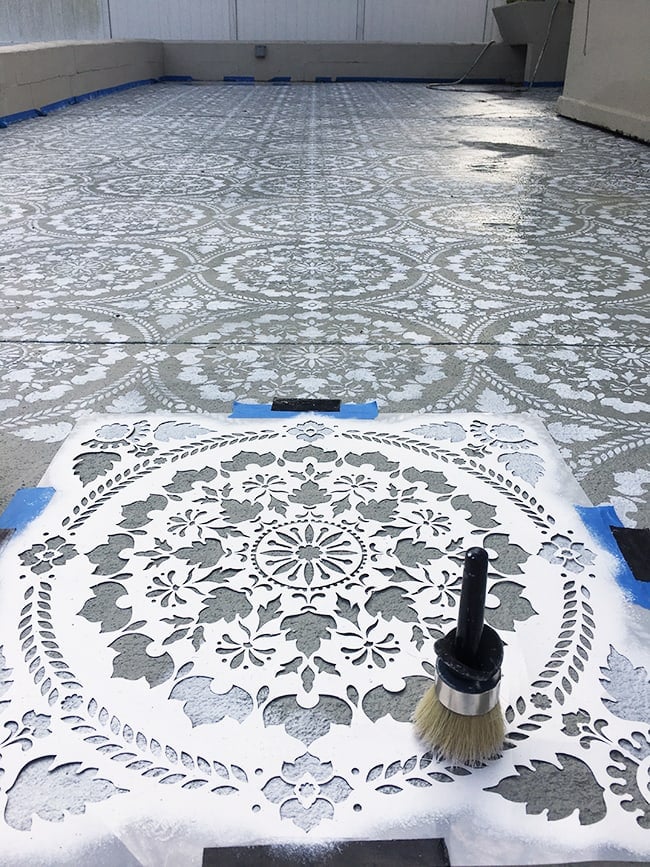
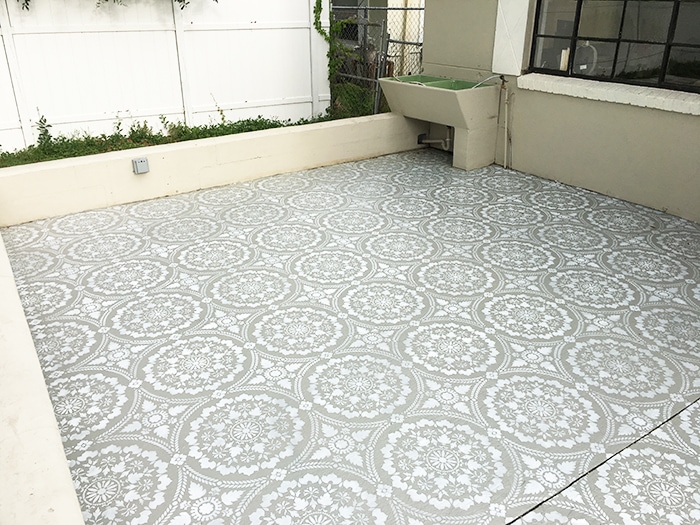
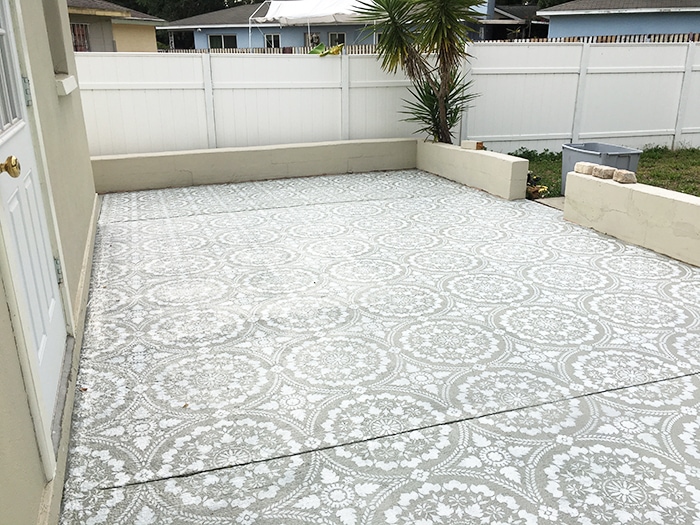
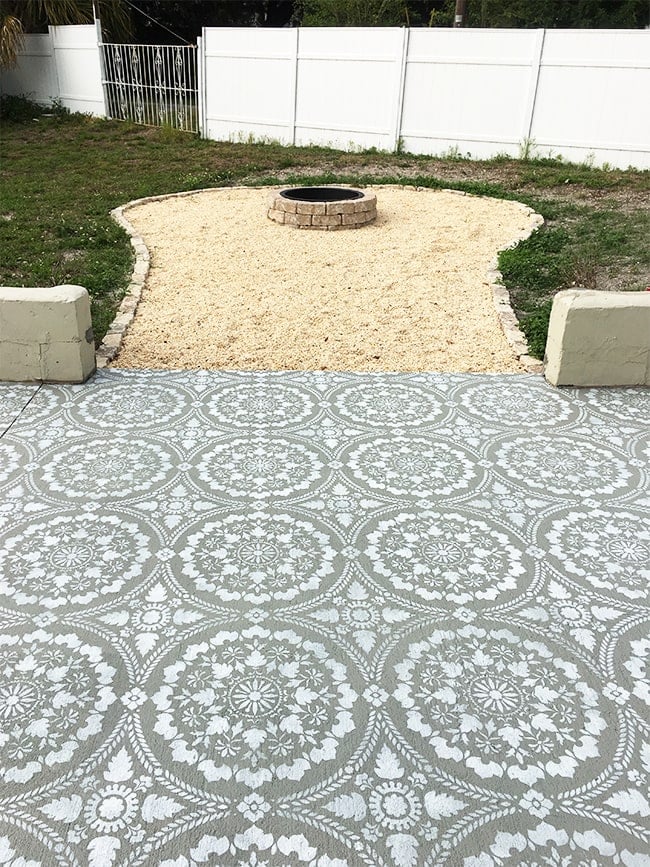
Okay, NOW for the fun part! I ordered my stencil months ago, after spotting it at Royal Stencils… how gorgeous is their Mandala Fusion stencil?
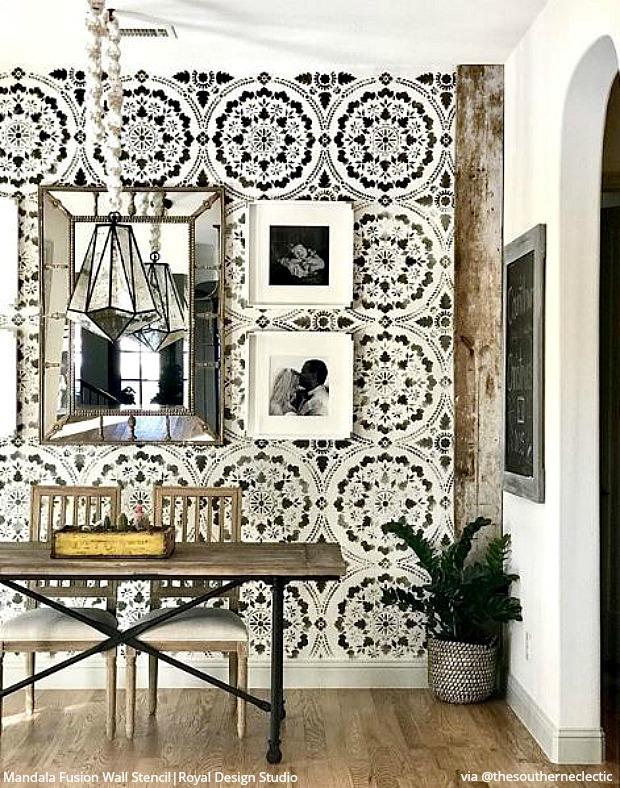
It reminded me of tile, which was the look I wanted, and it’s available in a 26×26″ size, making it perfect for larger spaces like walls and floors. I’ve used Royal Stencils in the past (twice, actually) and even posted a blog and video tutorial if you need a guide for stenciling walls.
Stenciling a concrete patio, however, is a slightly different beast so keep reading to see how I did it:
The good news is that if you’ve ever stenciled a wall before—this is EASIER! For a few reasons:
- On the ground you don’t have gravity working against you
- Textured surfaces hide all the small imperfections
- It’s outdoors, so it’s not held to the same standards of perfection of an interior space!
All of these reasons should take the pressure off and make it a much more enjoyable experience. Even though this took me 27 hours, it was easy breezy compared to my past wall stenciling experiences.
Now that you have your supplies ready to go, the biggest decision you have to make is where to start. On a wall, you just have to make sure it’s level.
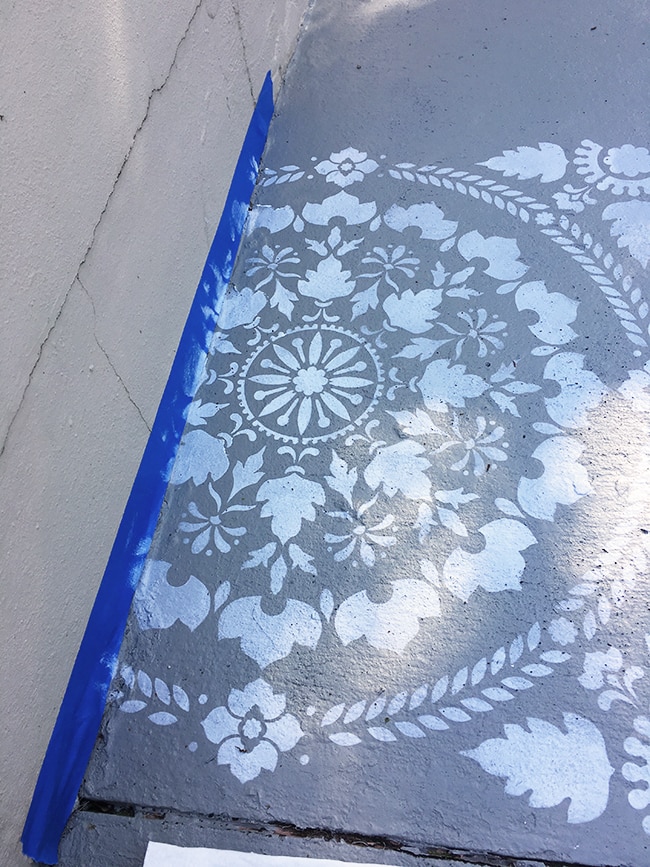
On a floor, it usually means aligning your first row to one edge/wall. The problem with the wall around my patio was that it wasn’t straight or parallel with the house, so the pattern would have ran at a slight angle. I don’t think it would have been too noticeable, but instead I chose to start at one of the concrete expansion joints, which were all nice and straight.
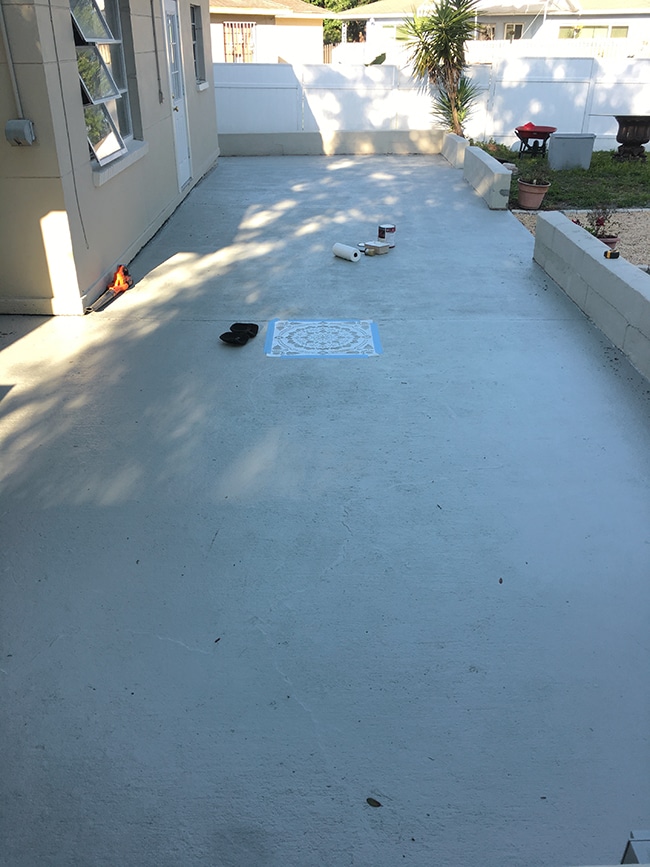
It didn’t really matter where along this line I started, but I roughly measured out to both ends to ensure I wouldn’t be left with a tiny sliver on either side (spoiler alert: you’ll probably still end up with those)
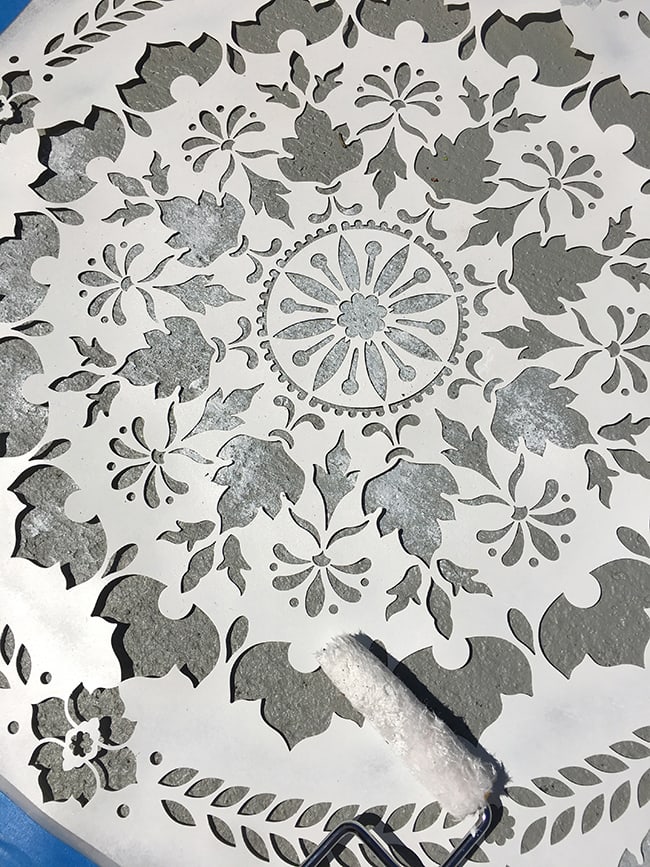
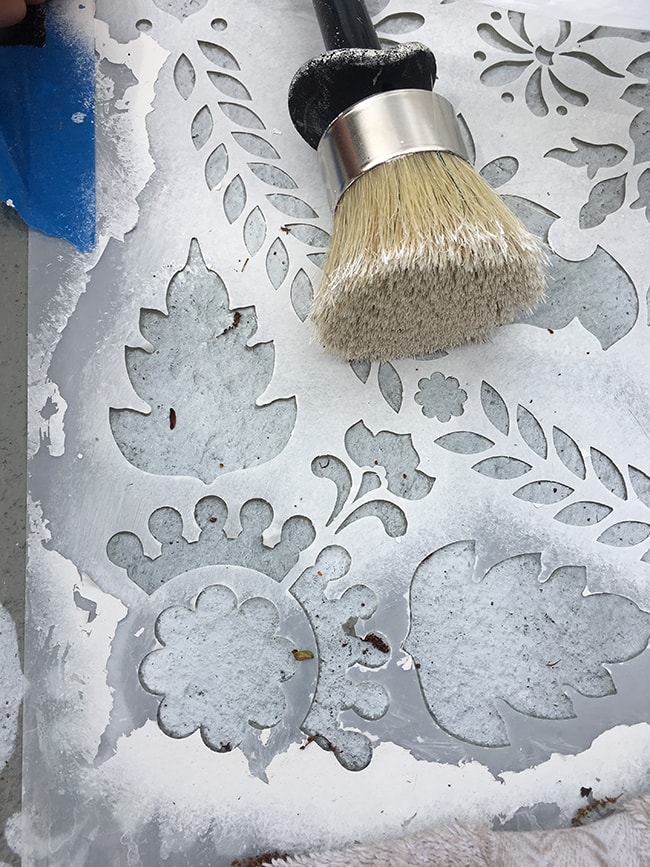
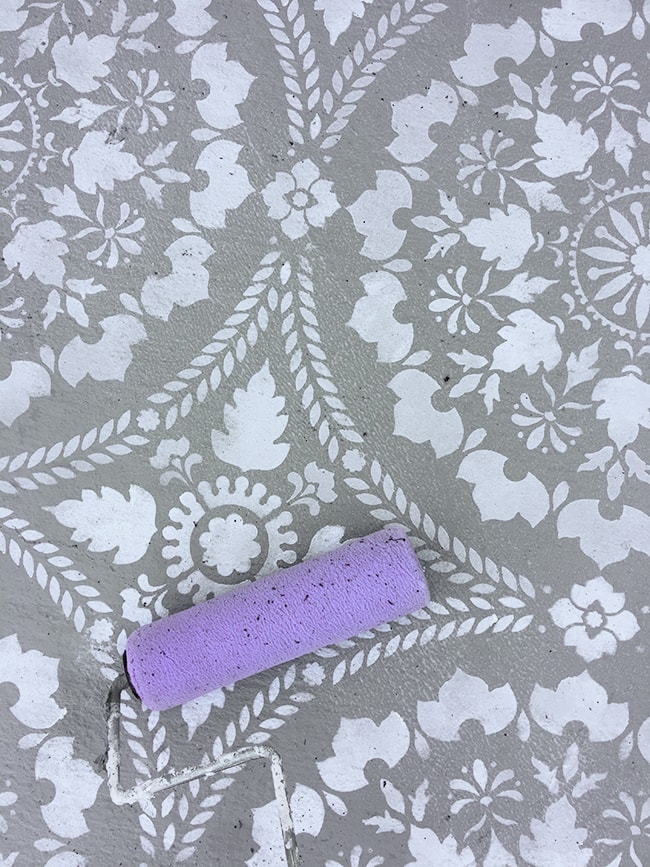
Once I was happy with the positioning, I taped the stencil down with painters tape and dabbed my brush into the paint. I ordered this extra large stencil brush (also from Royal Studios) which gives much more control and better coverage.
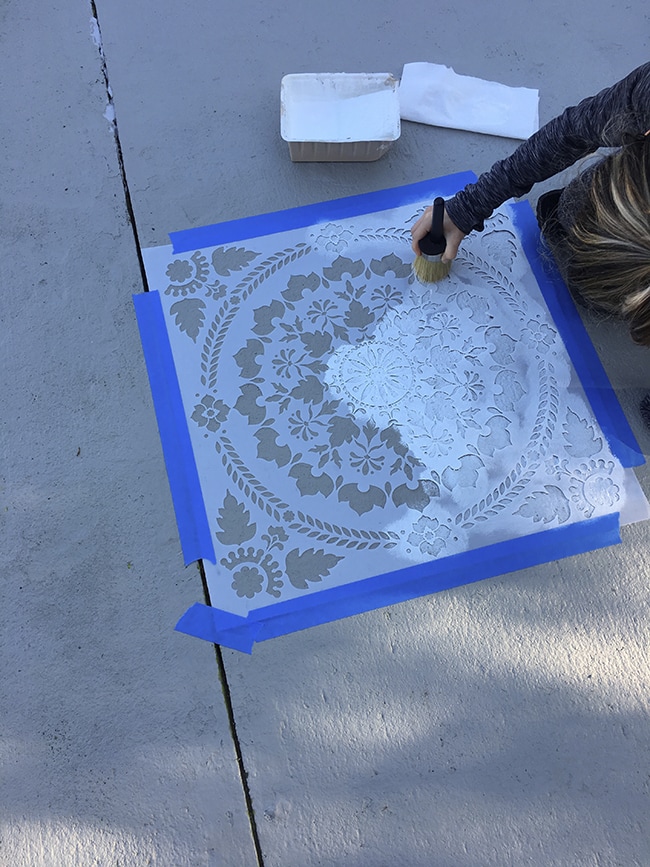
After lightly dipping the edge of the brush, you have to offload it by swirling it onto a paper towel to remove any excess paint. There should be no wet/dripping paint on the bristles, as it can cause bleed through underneath the stencil.
It’s a good idea to do a practice run first before your first stencil to get the hang of the proper technique. Not surprisingly, I had some bleed through on my first stencil and quickly had to clean it up with wet q-tips.
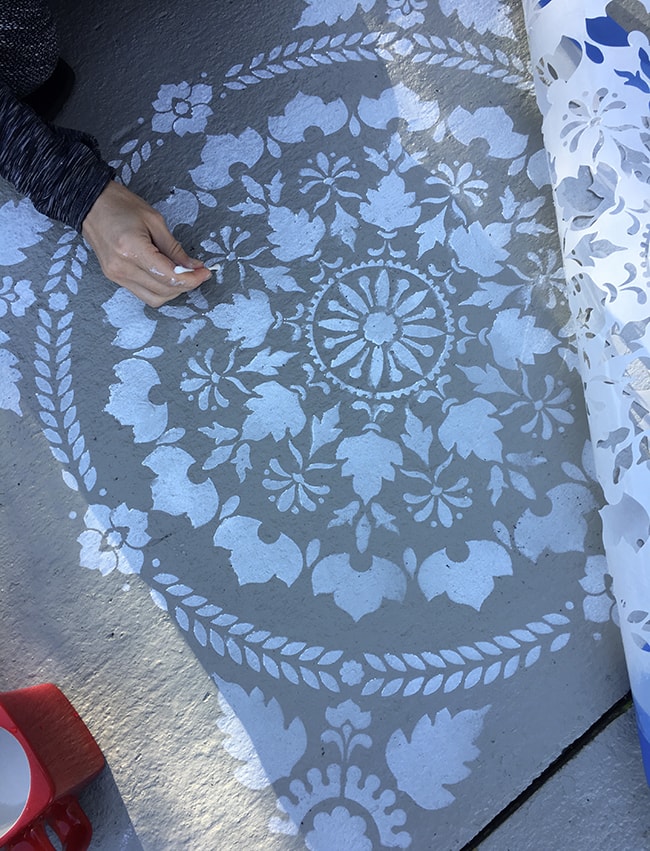
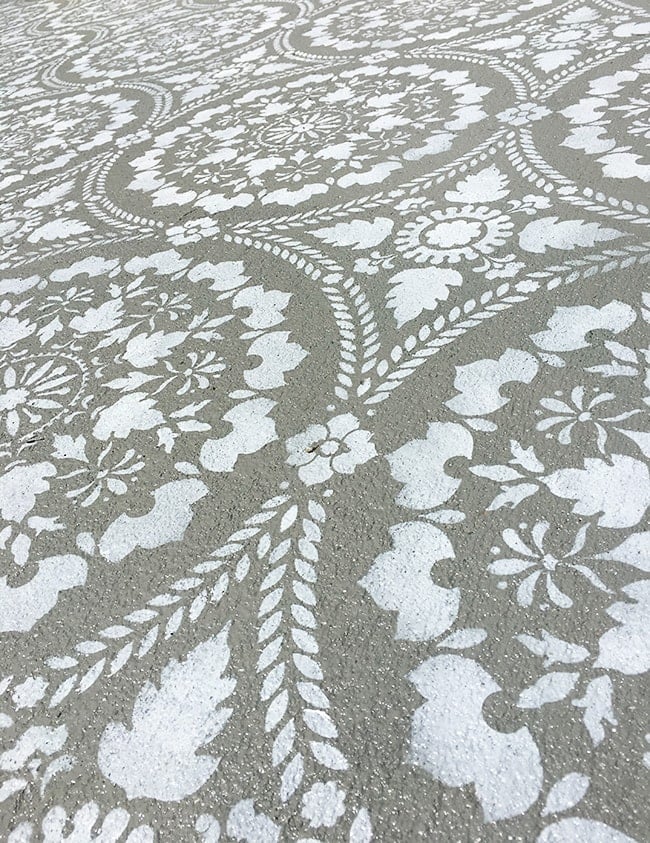
It’s also important to decide the look you want beforehand—do you want fully opaque color with crisp edges? Or more of a subtle sheer pattern with some variation? If you add too much paint to any part of the stencil, you’re pretty much stuck with that level of coverage because it will be very noticeable next to all the lighter stencils. Decide what you want first, and then stay consistent (you can always go back and add more paint!)
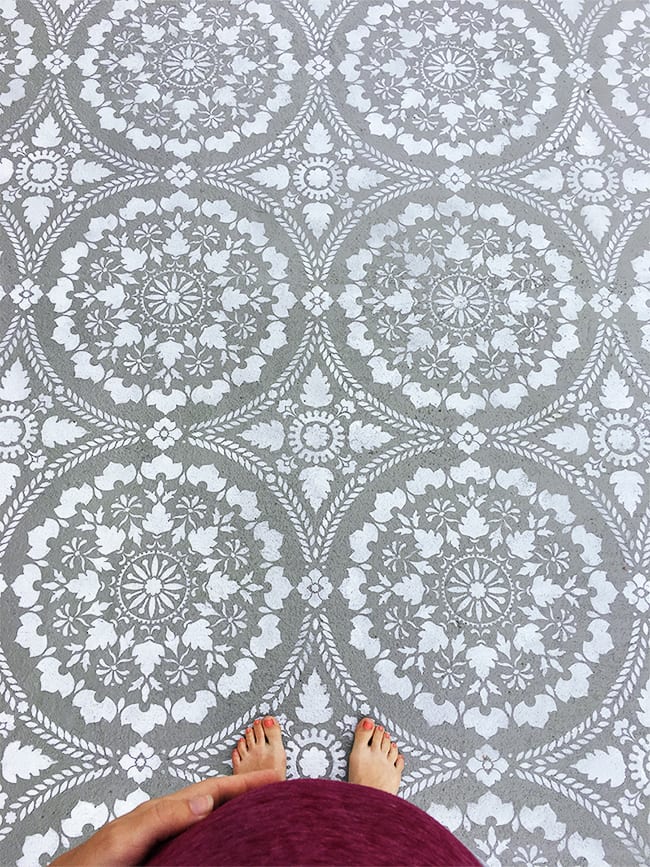
I started out on the cautious side, using very light coats to avoid bleed through, resulting in a semi-opaque finish. I noticed that the paint tends to dry lighter, so I began using a bit more coverage to help combat the inevitable fading from the sun.
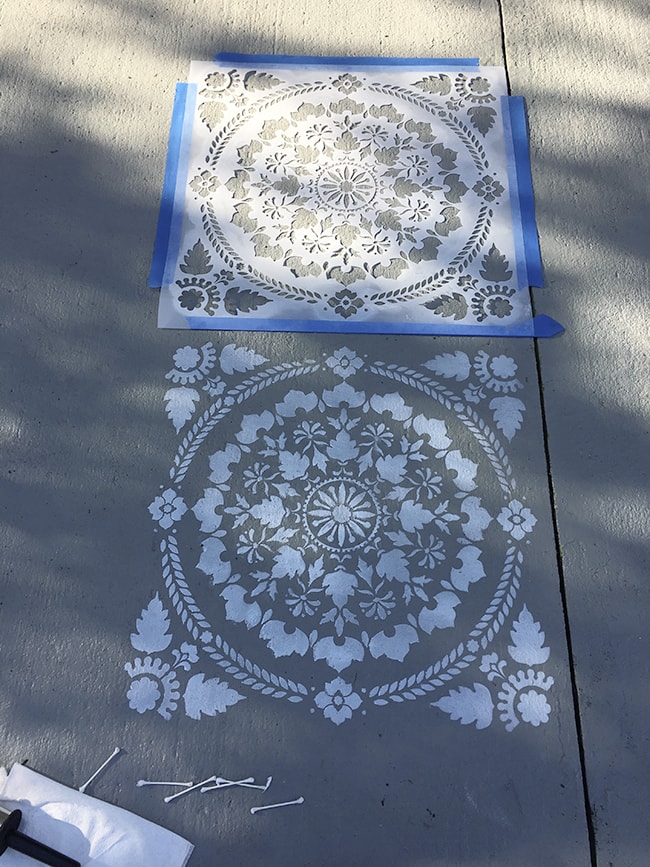
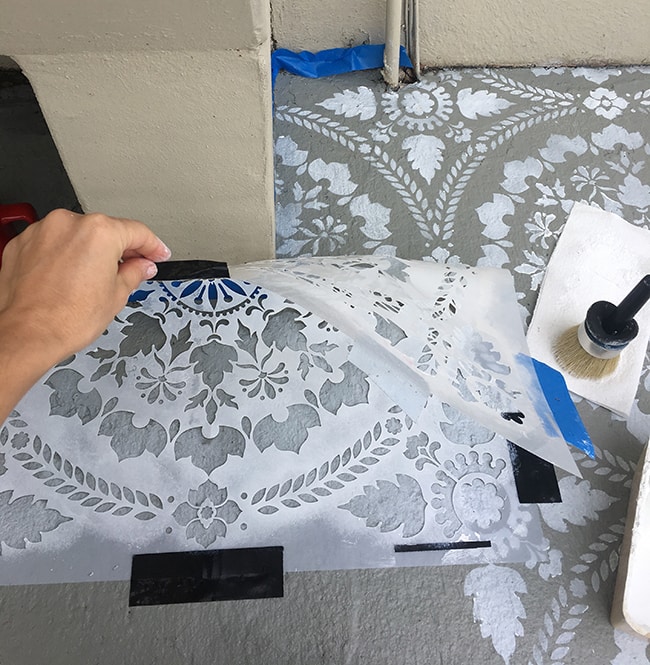
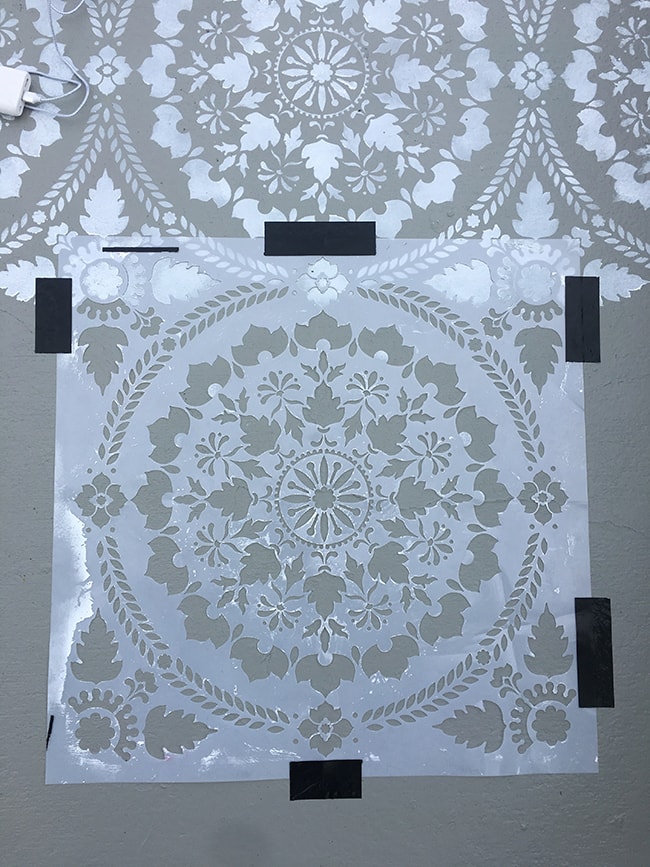
Once you’re happy with the first stencil, simply peel it off and reposition it so the pattern overlaps on the edge. It’s important to be precise with this as a little deviation can add up over multiple stencils. There was no waiting time in between for me as the paint dried right away.
From there it was simply rinse and repeat. The brush worked very well, but faced with days of work ahead of me, I tried a roller brush just to see if it would be faster.
NOPE. It just doesn’t cover over highly textured surfaces, especially uneven ones with gaping crevices like mine. If you have a super smooth concrete finish give it a shot as it will save you hours, but the brush was my only option.
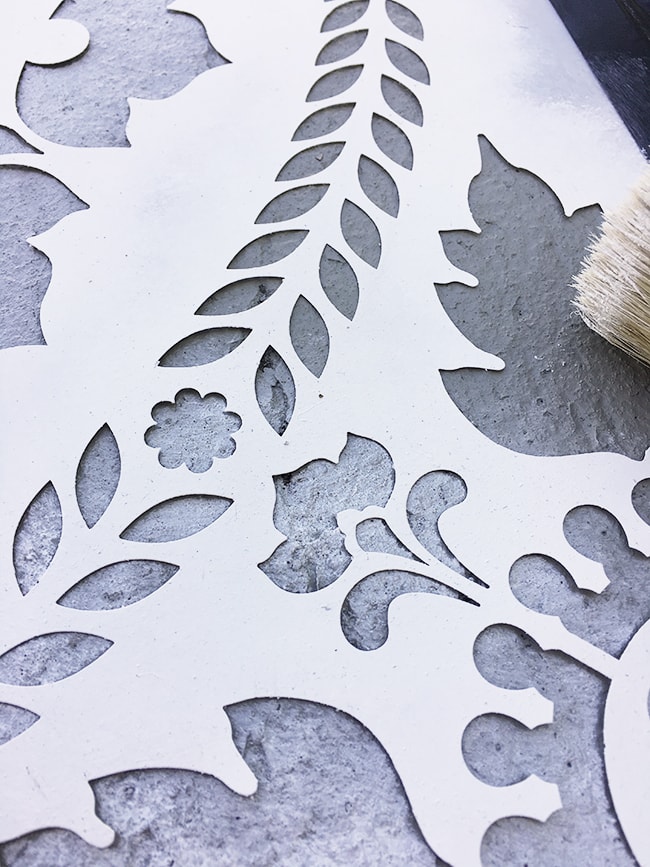
You’d think that with such an uneven surface where the stencil can’t lay flat, there’d be paint going everywhere and the shapes wouldn’t stay intact—but you’d be surprised. These stencils are very forgiving, and pretty much fool proof on a surface like this that hides all the imperfections.
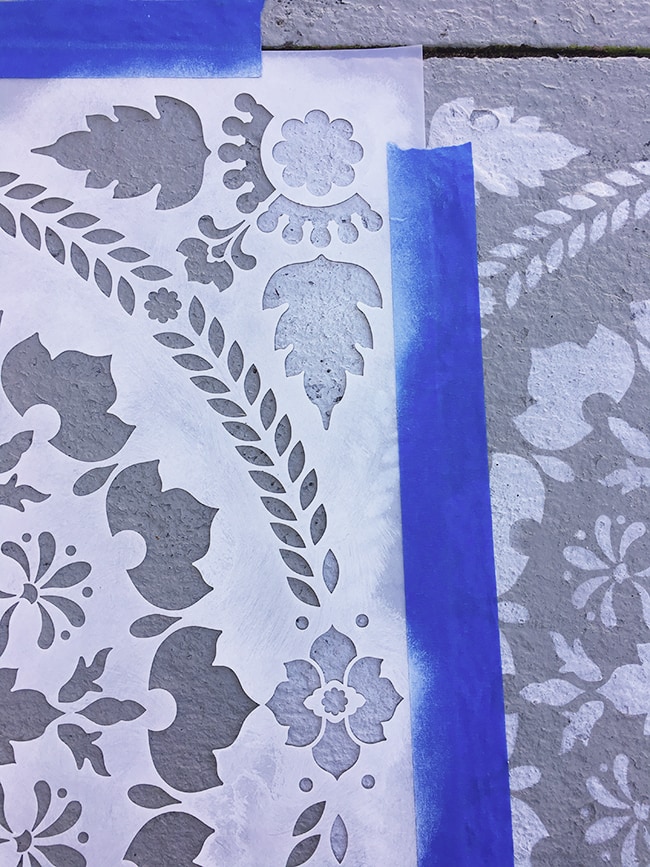
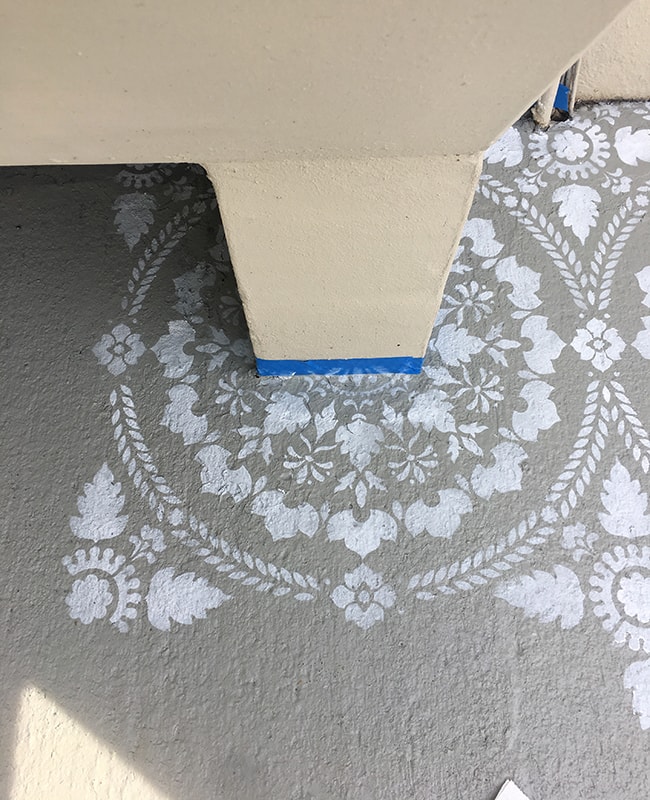
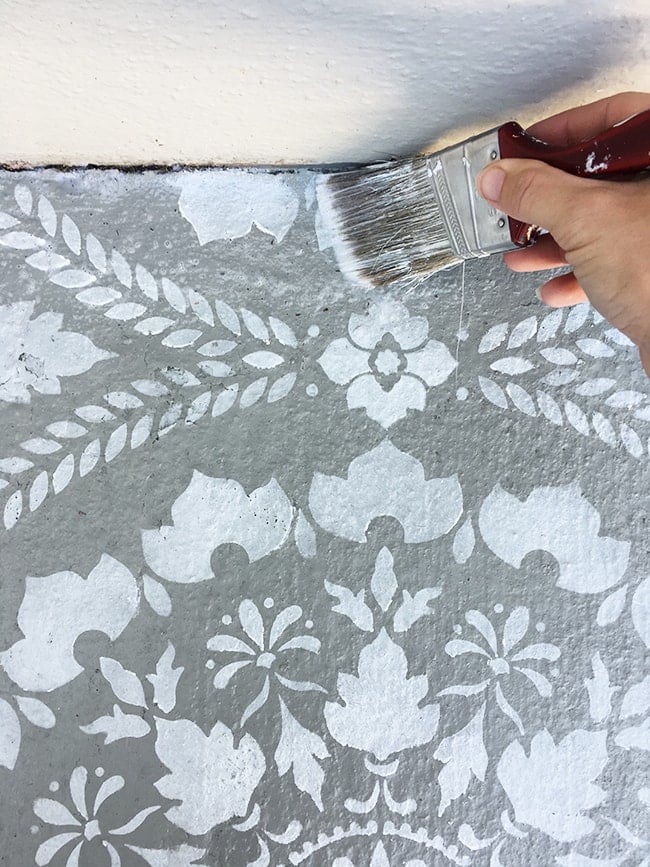
When you reach a wall, the process is quite simple. Cover the edge with painters tape, push the stencil down with one hand, and press the brush into the corner.
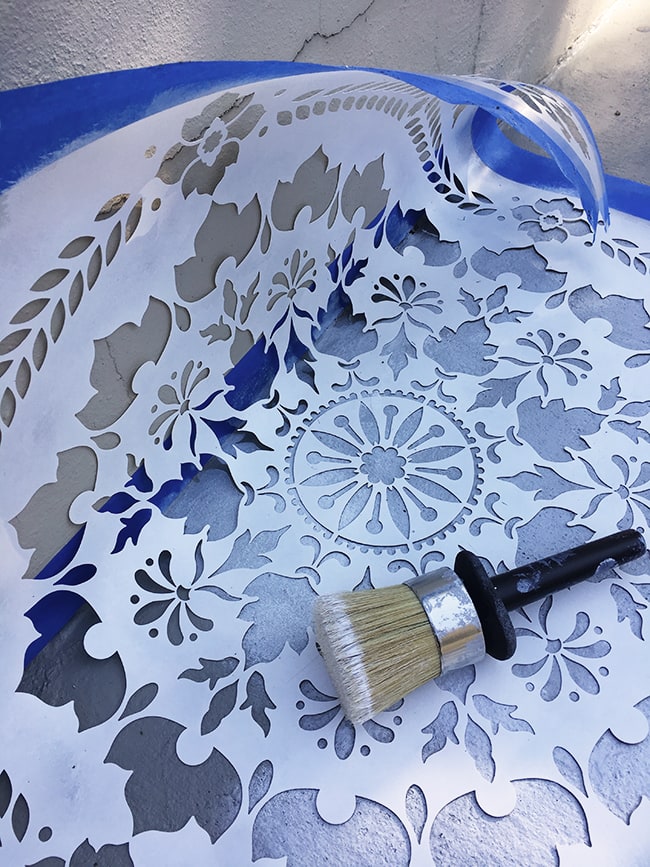
When the stencil needs to wrap around multiple angles, you just do one edge at a time using the same technique.
Looks a bit daunting but it’s really easy. A smaller brush helps (I could only wedge mine into a corner so far) but it doesn’t need to be perfect (again, because this is an outdoor space!)
On Day 1 I put in six hours and was exhausted. The Florida sun and being four months pregnant didn’t help, either.
By the way, I bought these knee pads thinking they’d be necessary but stopped using them after the first day. It’s much easier sitting on a towel closer to the ground than kneeling over!
Step 4: Clean your stencil
At the end of Day 1 was time to clean the stencil, and here’s where things went wrong. I remember this being the most frustrating part of the process years ago when I stenciled last, but this time around it was even worse—perhaps because of the epoxy paint? I tried soaking the stencil in the tub using scalding hot water and dish soap, and scrubbing with every means that I could—repeating this process several times over 24 hours. Some of the paint came off, but a lot of it wouldn’t budge.
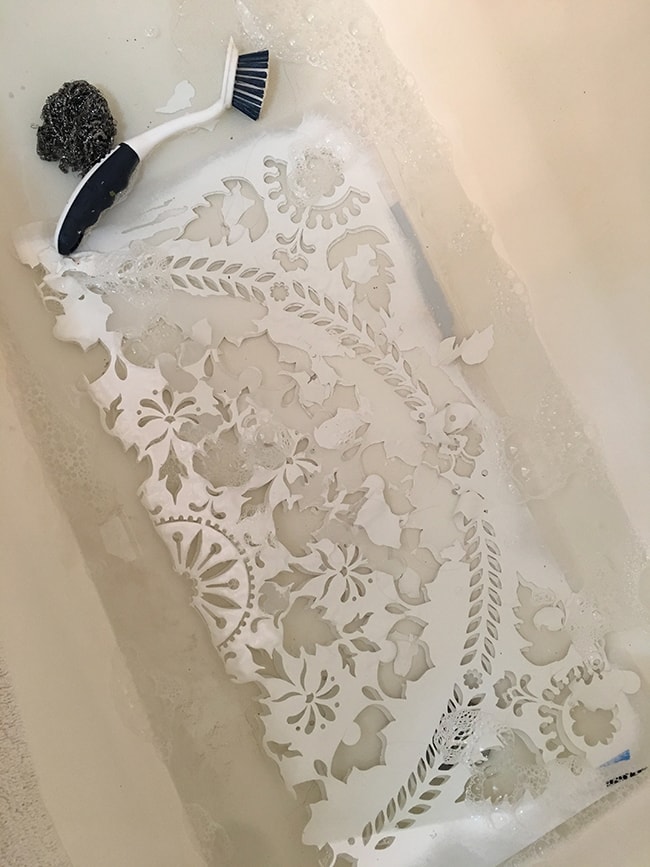
Lucas and I took turns cleaning, and by the next day I was so frustrated that I ended up bending and ripping it in a couple spots. Oops! Fortunately, even with my abuse, and the stencil no longer lying flat, there was no difference in the results.
Step 5: Rinse + Repeat
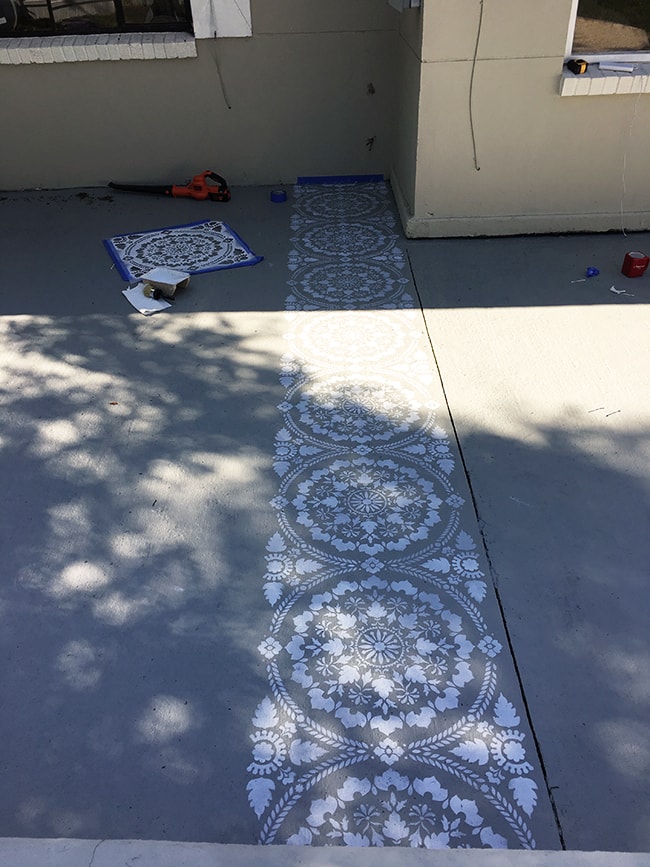
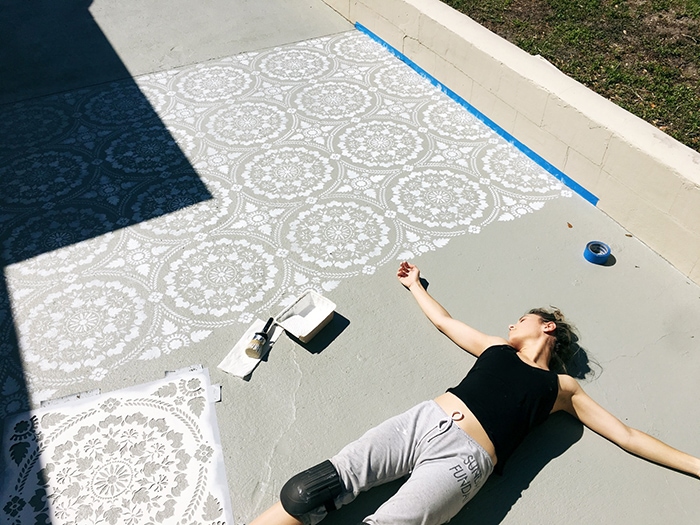
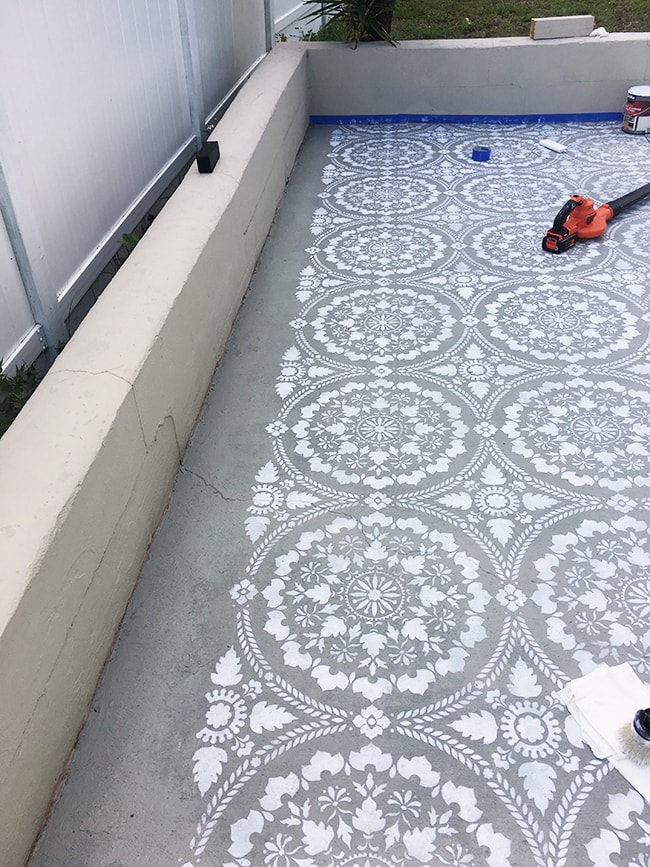
The following day I clocked in another six hours, and made some great progress. By this point it was taking me around 15 minutes per stencil.
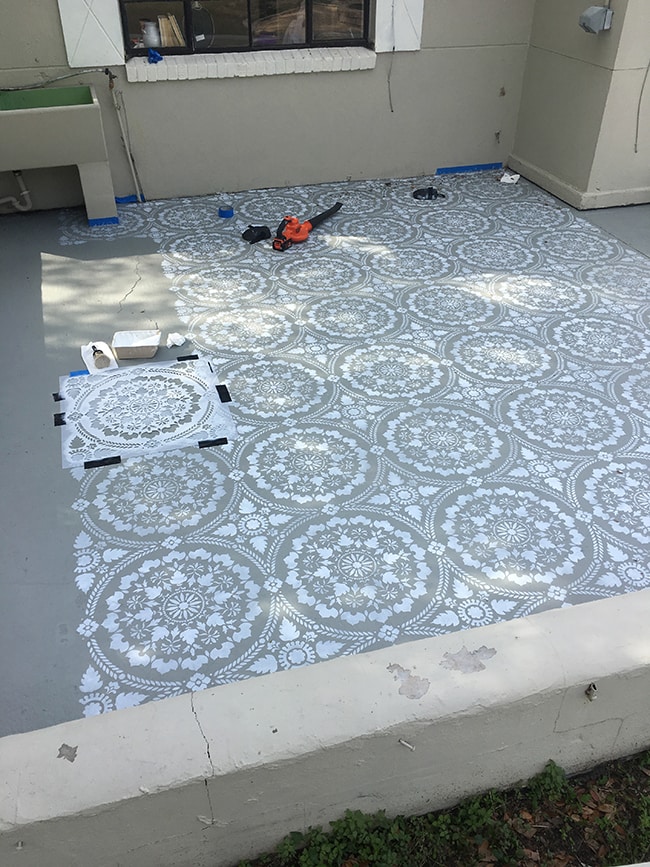
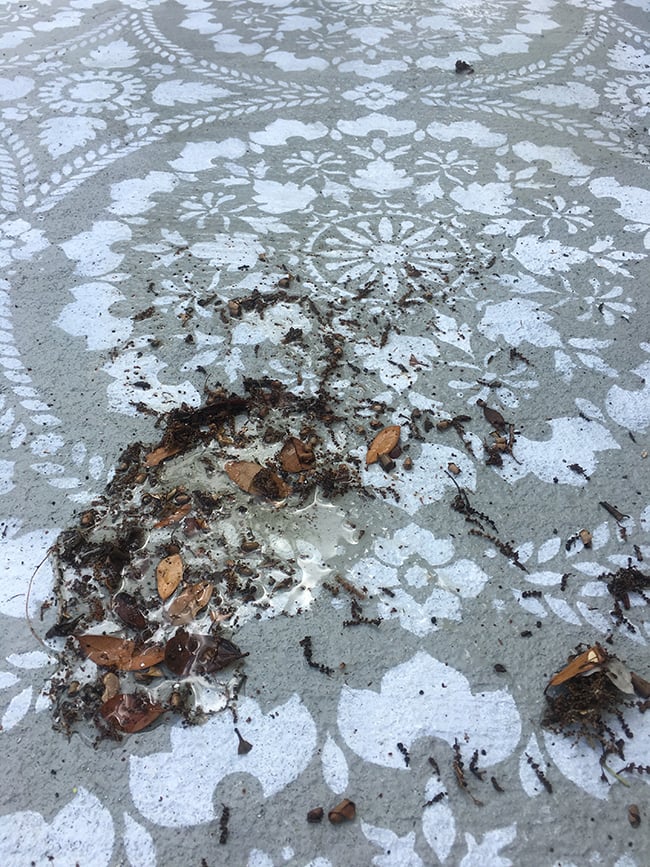
One tool I found incredibly helpful was a leaf blower. Since our patio is exposed to the elements and it’s pollen season here, the trees are constantly dropping gifts and sweeping a patio this large is very energy consuming and inefficient. With the leaf blower, I’d tackle a couple stencils at a time then simply blow off any dirt/tree droppings as I went (I’m a big fan of my Black+Decker, it’s lightweight and easy to use)
With that said, I have to mention again that the wonderful thing about stenciling outdoors is that your surface does not have to be super clean! There’s no way to avoid dirt and bits of nature blowing underneath the stencil at all times, and you would never notice the difference anyway.
I can’t even count how many ants snuck their way into the stencil and were met with the brush of death. A moment of silence, please, for all the insects who perished in the Stencil Massacre of 2019. Their lives were not taken in vain.
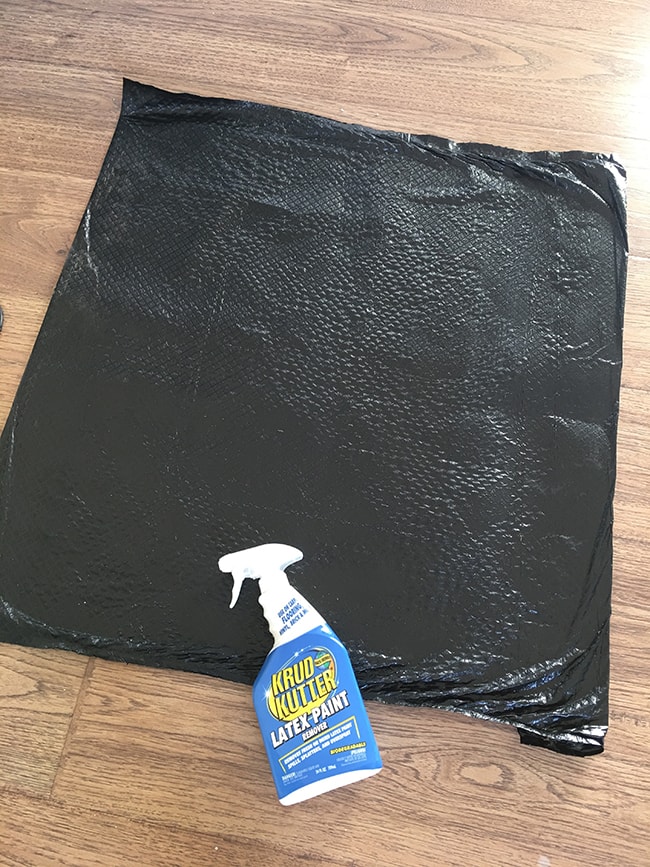
By the end of Day 2 (another 6 hour stretch) it was time to clean the stencil once again, but this time I came prepared after researching my options online. Krud Kutter Latex Paint remover was one of the most recommended products I found, though I was still skeptical based on the traumatic experience of the last cleaning session…
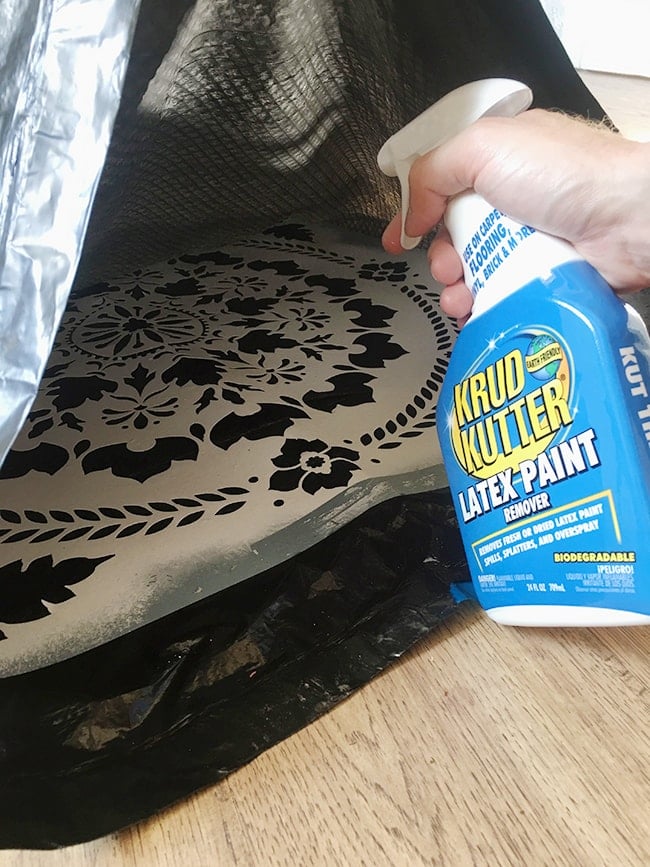
We saturated both sides of the stencil and let it sit in a garbage bag overnight…
And miraculously woke up to this:

Peeling paint everywhere! It easily slid right off the plastic and we were able to take it all up with a brush in minutes. I will NEVER stencil without this stuff again.
Over the next couple weeks, I squeezed in stencil session whenever I could, which was only in the early morning/late evening or periods of intermittent cloudiness, because working in the summer sun in Florida will basically kill a pregnant woman in minutes.
Fortunately, I also had it down to a science by the end, and was clocking in at around 5 minutes per stencil. If there’s a stenciling Olympics, sign me up.

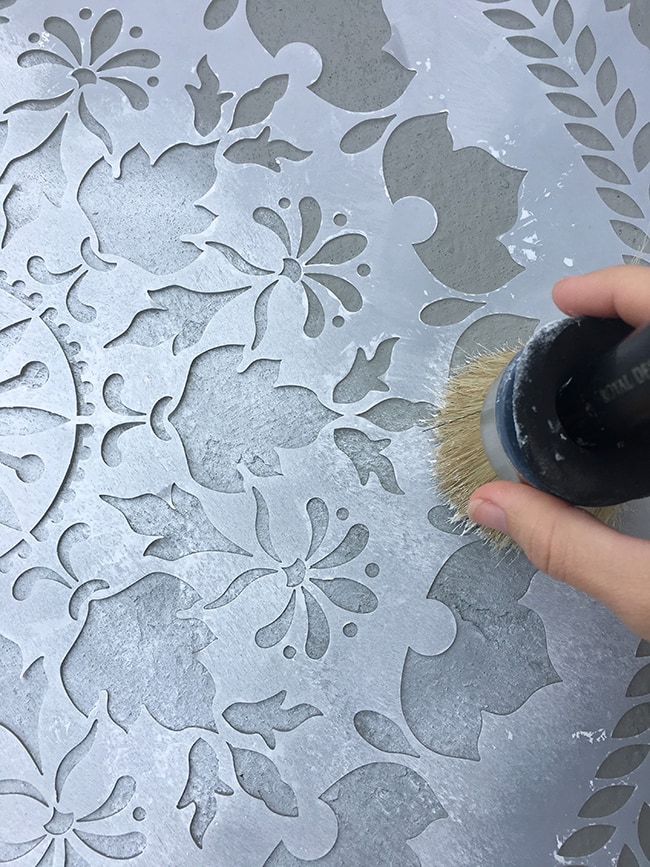
I found that the fastest method is to saturate the brush, very lightly offload (or sometimes not at all), and repeatedly stipple the brush rather than swirl it around. This creates a thicker layer of paint without any bleeding, and you don’t need to go over the same area 2-3 times for decent coverage.
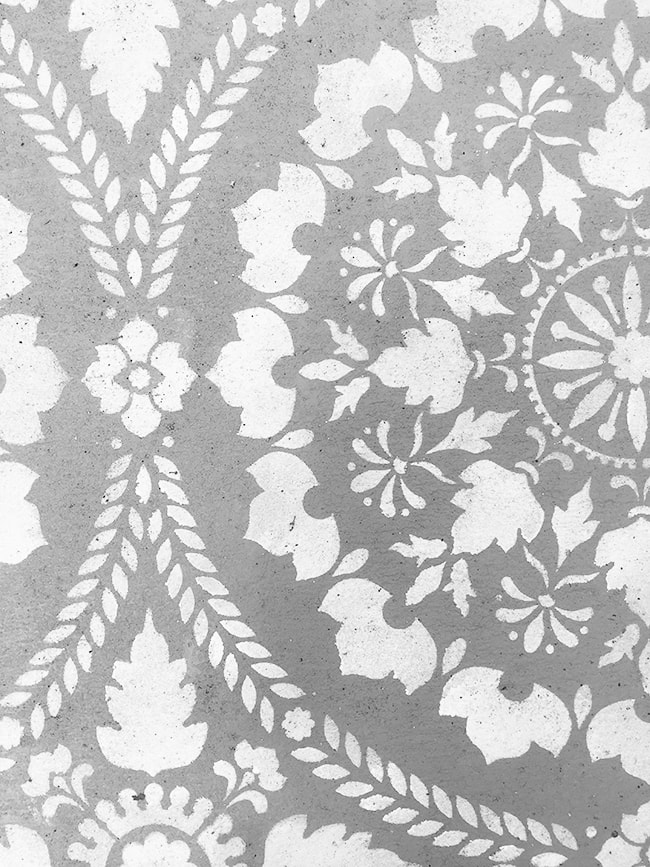
The edges may not be quite as crisp this way, but it’s really not noticeable at all, especially on a rough concrete surface.
Another tip—try not to go over the ‘registration mark’ areas that have already been painted. If your stencil is misaligned with the previous design even a little, you’ll get this ghosting effect which is probably the most noticeable mistake you can make.

I was pretty cautious about this and managed to avoid it for the most part, but again these flaws tend to disappear when you look at the full picture.
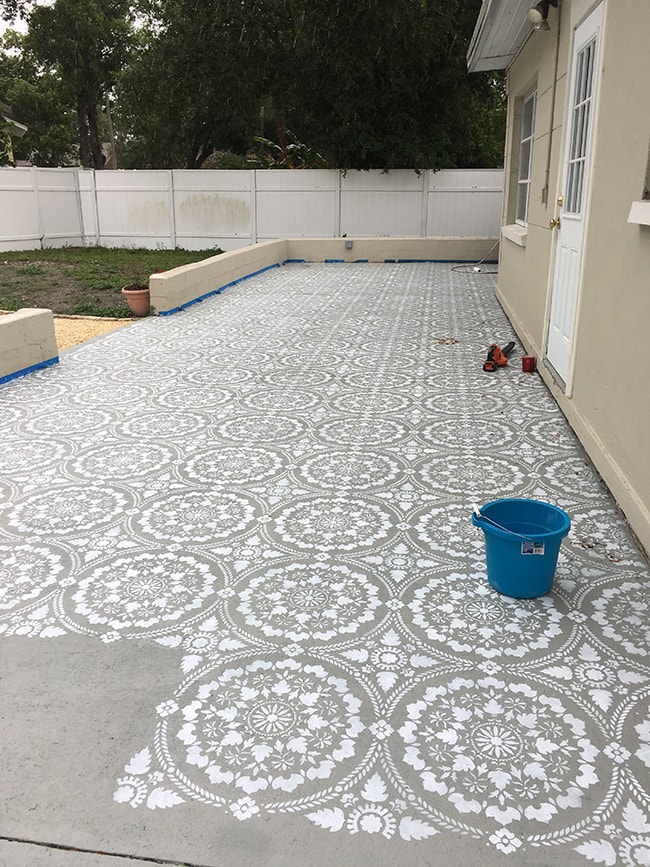
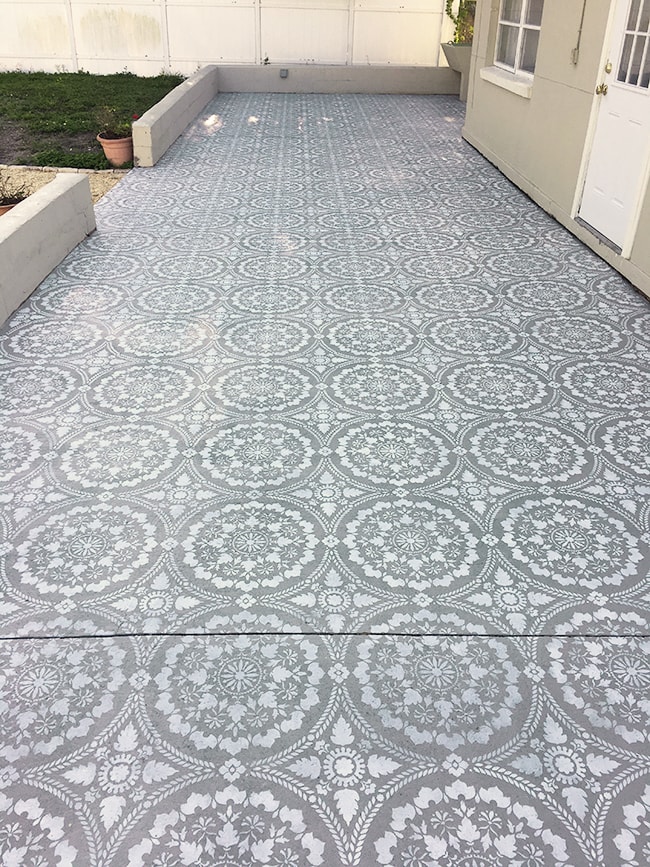
The very last row was a milestone moment. My stenciling obligations had finally come to an end, and I felt like a part of my life had been restored.
But it wasn’t over yet!
Step 6: Seal
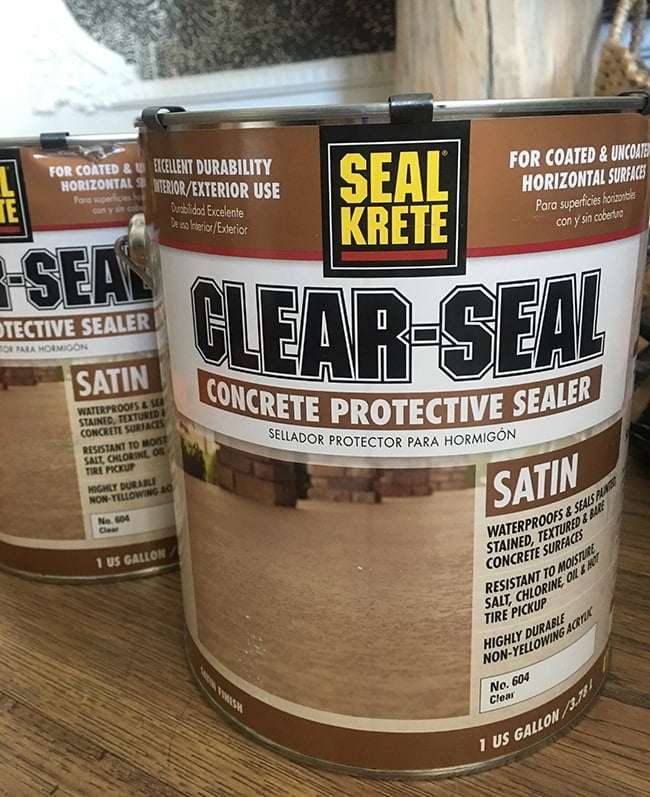
Originally I wasn’t planning on sealing it, thinking that since this was special concrete paint, it would have no problem holding up to what it was designed to do. Several hours into this project and I thought there’s NO way I’m ever redoing this so I set out to find the best sealer out there. After thoroughly reading through all the reviews, I landed on the Seal Krete Clear Seal:
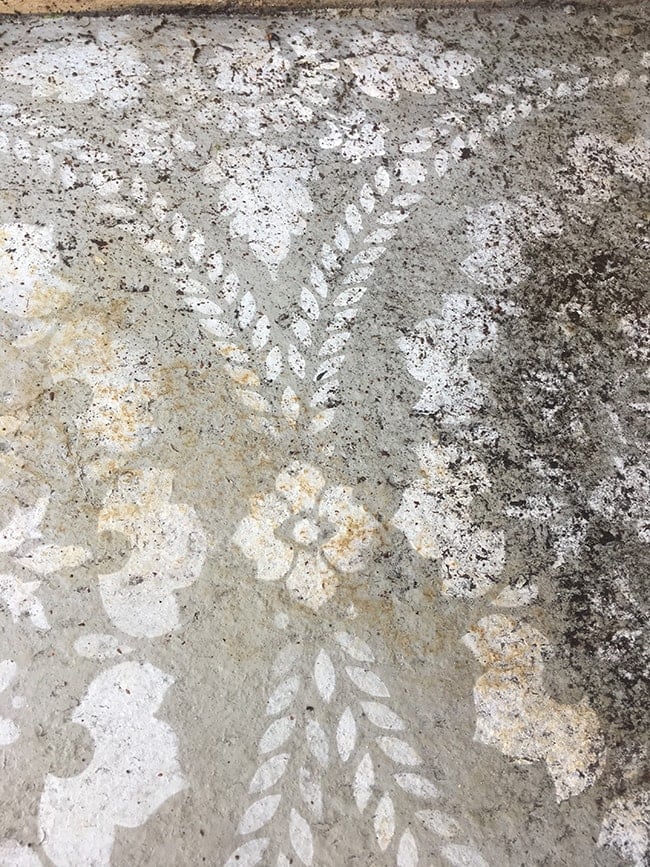
And ater days of rain and tree droppings, I realized how necessary a sealer was…
There are lots of dips and low areas in the patio where water would pool and sit for nearly a day, leaving behind stains from the pollen:
Before sealing, I gently scrubbed the affected areas with dish soap to remove the stains…
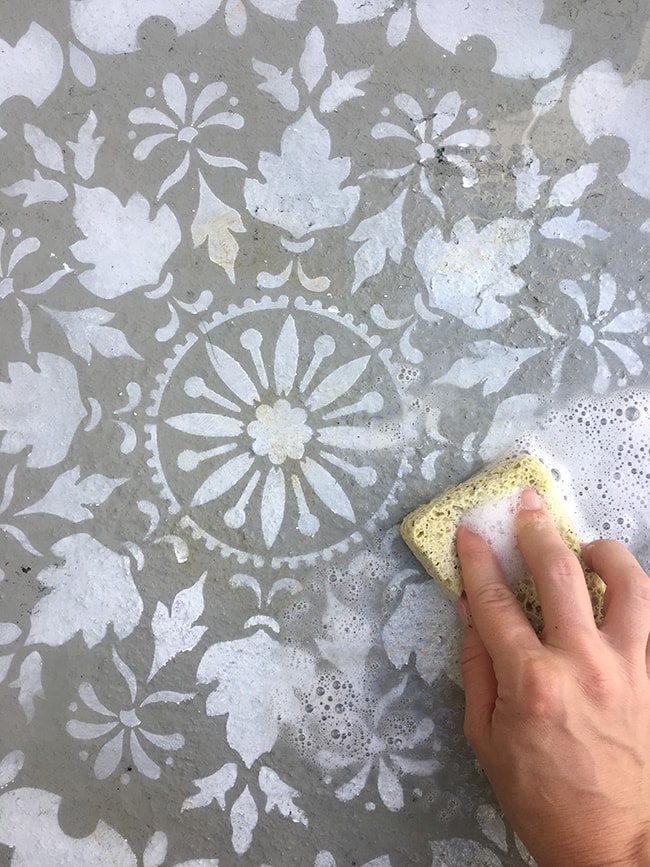
The paint wore off if I scrubbed too hard (yet another reason to seal) but eventually it cleaned up:

After the problem areas were addressed and the entire patio washed clean, it was time to seal.
I was worried this would be as long and arduous of a process as the gray paint application, but it couldn’t have been easier.
The paint glided across the surface like butter, and it was hard to tell the areas I had already covered. I used a super thick coating to ensure full coverage (you can see the brush marks from the roller in the photo above). In the right light, you could tell by a subtle sheen.

I used a brush to cut in around the edges (not necessary, but I wanted to be extra thorough).
The paint claims only 150-300 square feet of coverage per can, but I found it to be MUCH more. I covered the entire surface (over 600 square feet) with a very thick coating with less than 2/3 a can.
Only one coat is needed but few hours later I came back with another coat, even thicker this time because I am taking ZERO chances.
The sealer has a satin finish which is only visible in the sun…
You can see the sheen from this direction:
The sealer has only been on for a few days, but it rained last night and this morning there was no pooling of water and no stains anywhere to be found. So far so good!
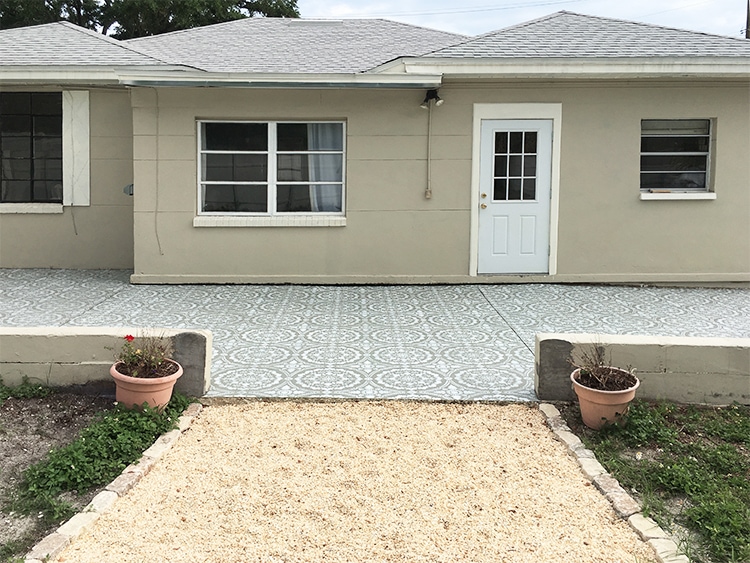
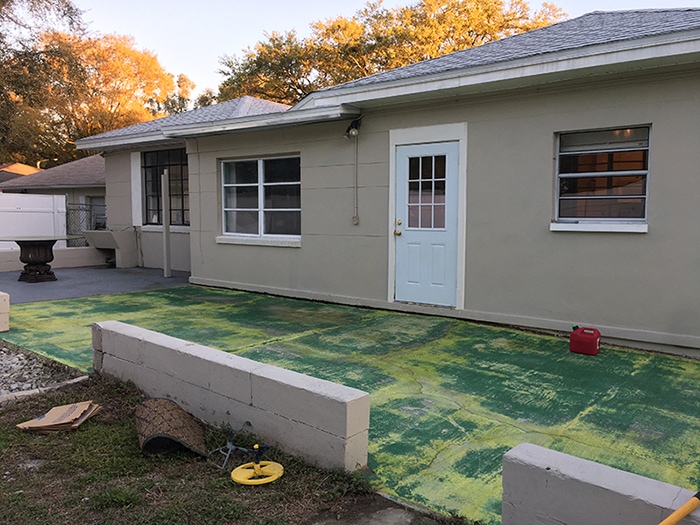
Now that the hardest part is over, it’s time to really transform this backyard with landscaping, lighting and furniture!
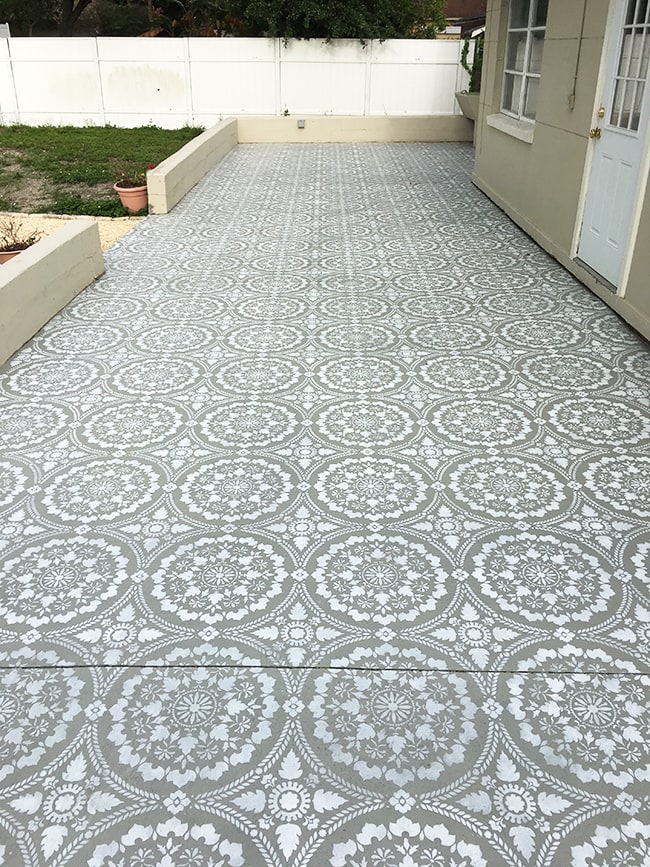
Still a long way to go back here, but I think stenciling was sure worth a couple weeks and approximately $250 to go from this…
to this:
Four months of this belly to go!
Pssst… I posted a vlog this morning with lots of updates on our new build, so make sure to give it a watch to see what else has been keeping us busy over these past few weeks!
This weekend we’ll be focusing on the front porch (once again) and hopefully finishing it once and for all! As always, you can follow all the action over on my Instagram stories 🙂
If you like this project, check out the most popular Outdoor DIYs from my Project Library!


Shari Gann says
Well, I’m impressed. It looks like cement tile. I love it!
Cathy says
Simple Green will remove paint very easily. I purchased a clawfoot tub and the feet had about 50 years of paint on them. I soaked them in a bucket of Simple Green and the paint floated off. I did have to scrub some areas but it was amazing how it worked. Cleans paint brushes too.
Great job on the patio. I can not believe you did that four months pregnant – you are a rock star!
Jeanne says
Amazing and beautiful! Thank you for sharing the detailed DIY!