Today is first room reveal of the beach house! We have been working tirelessly for the past month+ to get this place rent-ready, and last weekend was a huge milestone as we managed to get the house around 90% of the way there (we’re still waiting on a large Ikea delivery before we can call it Done).
While we had to focus our energy on completing the long to-do list on our last trip, I did manage to squeeze in a quick photo/video shoot of one of our Budget Bedrooms to share with you guys. I captured it all in a timelapse—watch below for the Before + After and see how long it took us to transform the room!
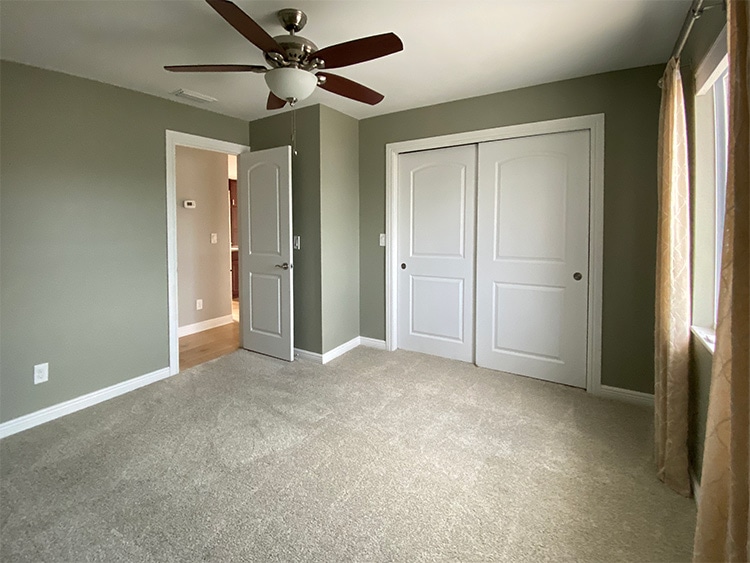
Remember how Bedroom 1 looked before?
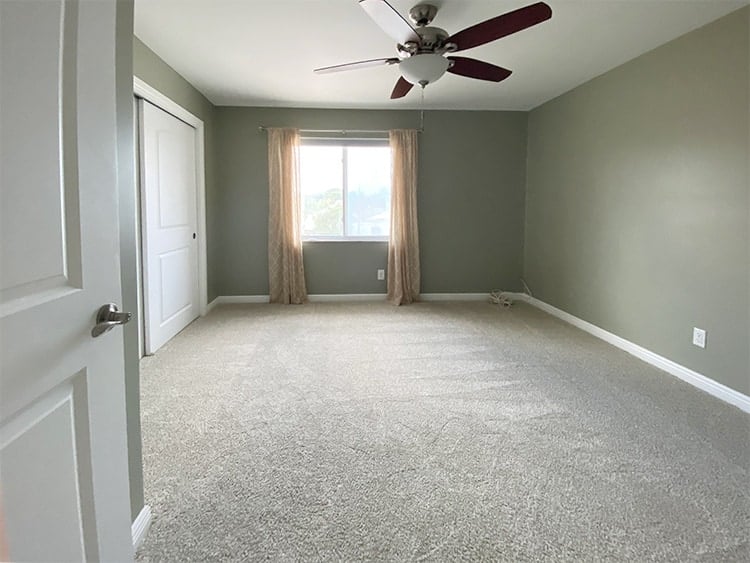
As explained in the design plans post, we don’t have the time nor budget right now to make any major changes like updating the carpet, any electrical work or even painting the walls.
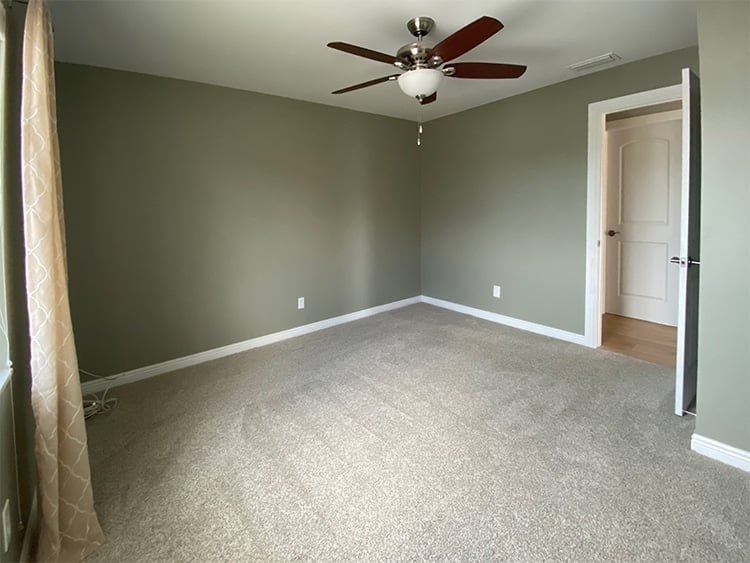
We did swap out the ceiling fan a few weeks ago (we replaced all of the fans in the house with something sleeker and low profile), but everything else was pretty much left untouched.
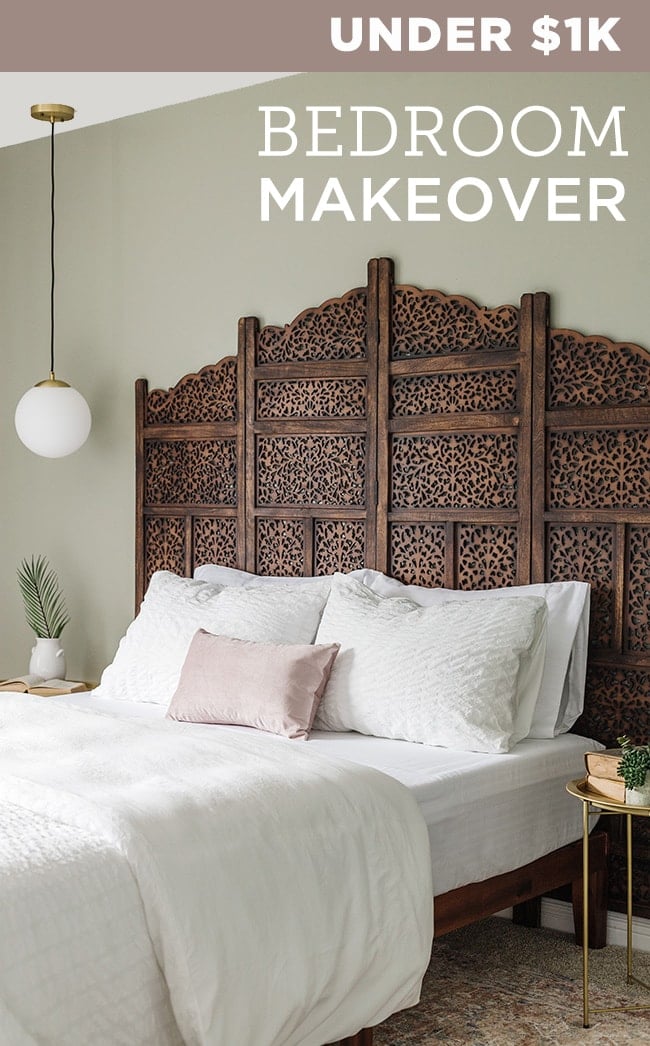
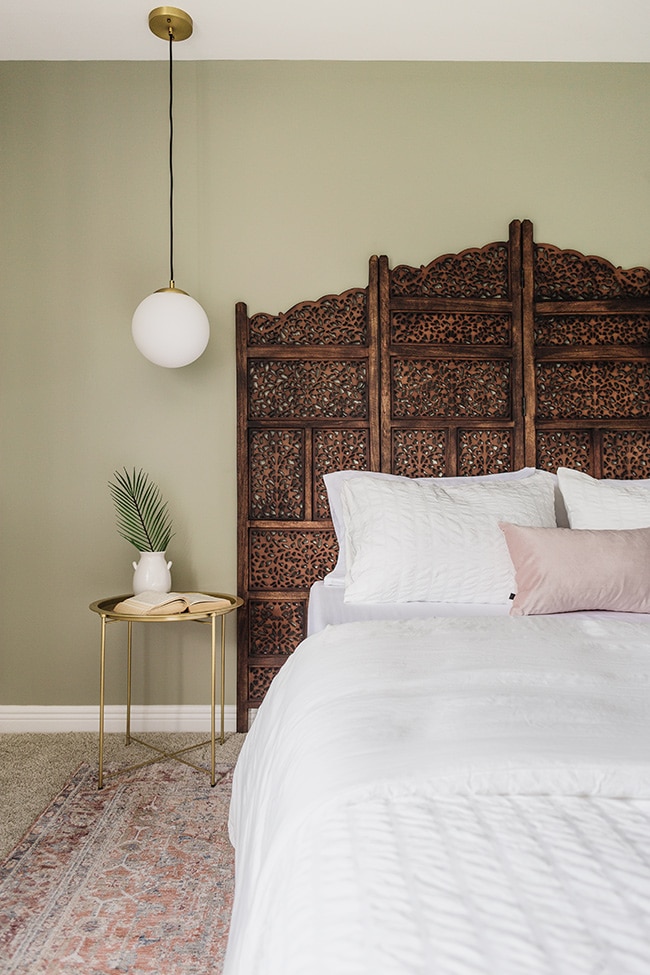
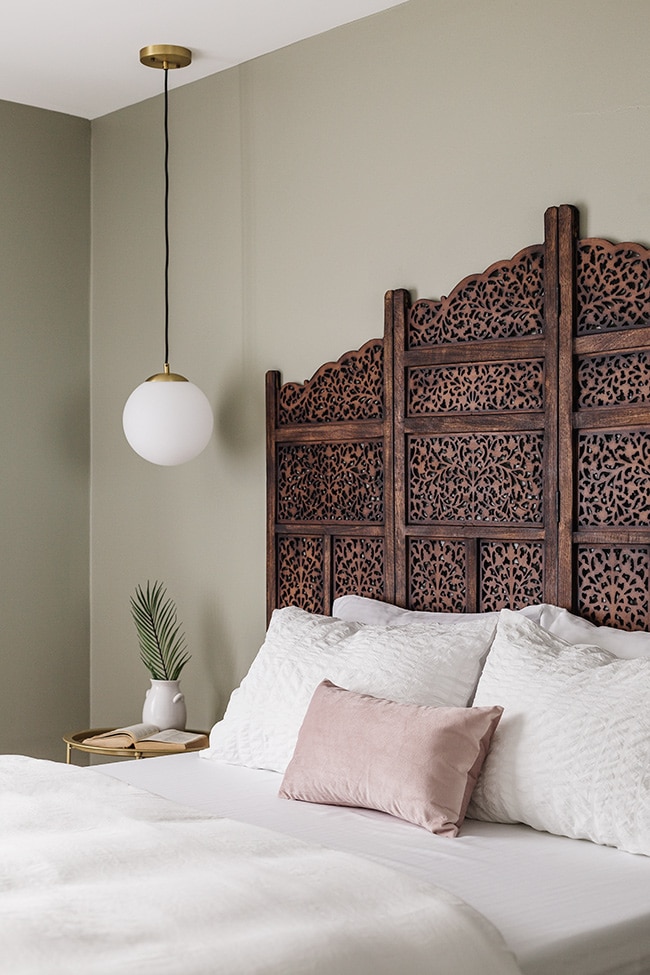
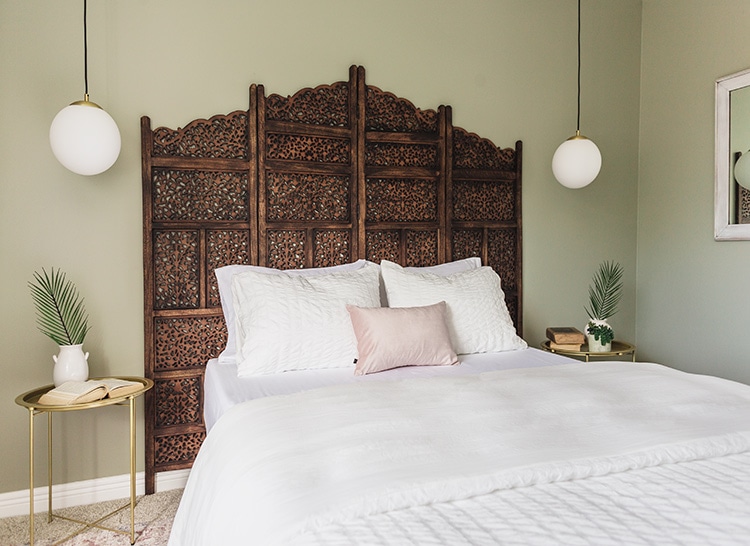
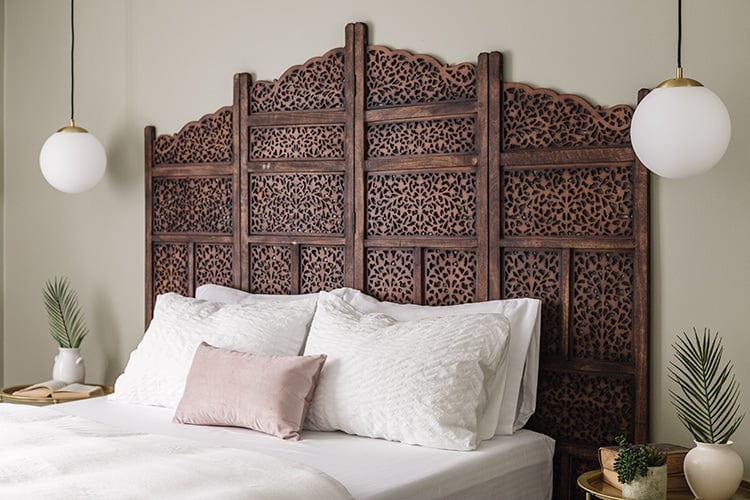
Fortunately the walls were already painted a very lovely color, PPG Smoky Slate at 50% strength (Sherwin Williams Green Earth is a similar shade).
With all our items delivered and waiting in the living room, we started a timer. Less than three hours later, our budget-friendly boho bedroom makeover was complete…
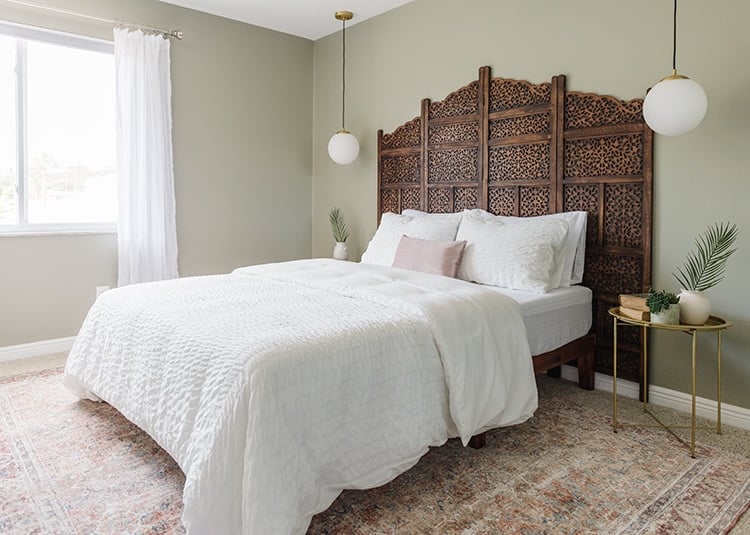
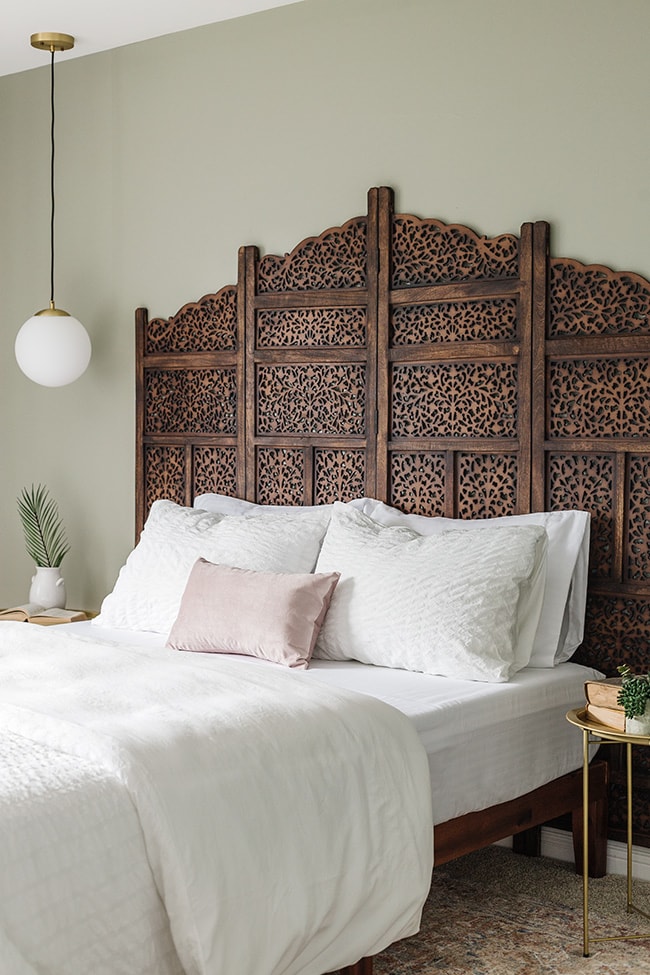
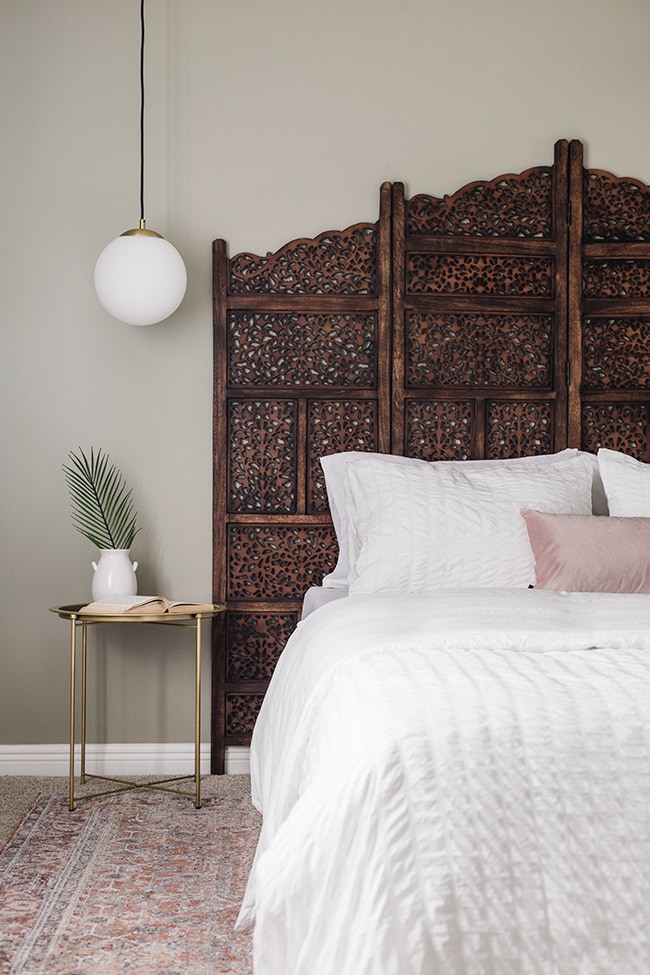
I have a lot of favorites in this room, but clearly the carved wood headboard (a repurposed room divider) steals the show. We attached it to the wall with 4 long dark screws into anchors (two are hidden behind the bed and the other two blend in with the wood).
The terracotta Loloi Revere rug is a pretty close second. It’s SO soft, the color palette is to die for and I’m seriously considering it now for our own master bedroom.

I’m so glad I opted to hang these $52 globe lights from the ceiling instead of using wall sconces. It’s an unexpected feature that draws your eyes up, makes the room feel larger and definitely more high end. The best part is—there’s no wiring involved! I found the genius “magic light trick” from Nesting With Grace which uses battery operated, remote controlled puck lights hidden inside the globe (we tested our puck lights but didn’t have the right fitting to secure them inside the globe—we’ll do that on our next visit!)
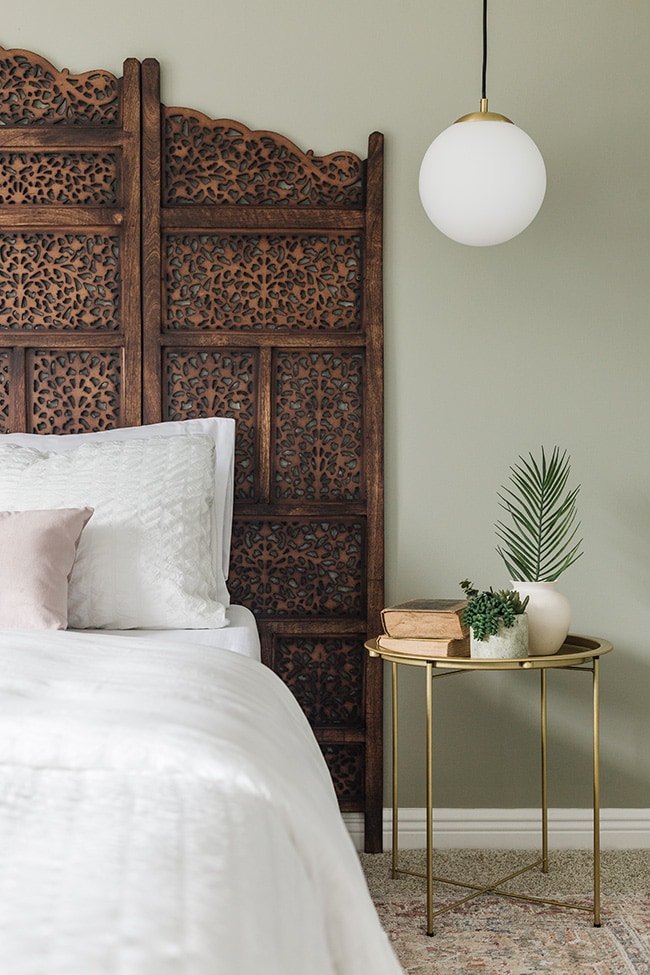
Side tables are one place you can really cut back on costs (especially when it’s a guest room that doesn’t require hidden storage). These pretty $32 gold tray tables do the trick while adding a little warmth and glam (and they match the sconces!)
I’m loving the crisp white and texture of the seersucker duvet cover, and the fact it required minimal steaming ?? I found the set on Amazon a few months ago after an extensive search, and loved it so much I ended up buying the same one for almost all of the bedrooms in both of our rentals.
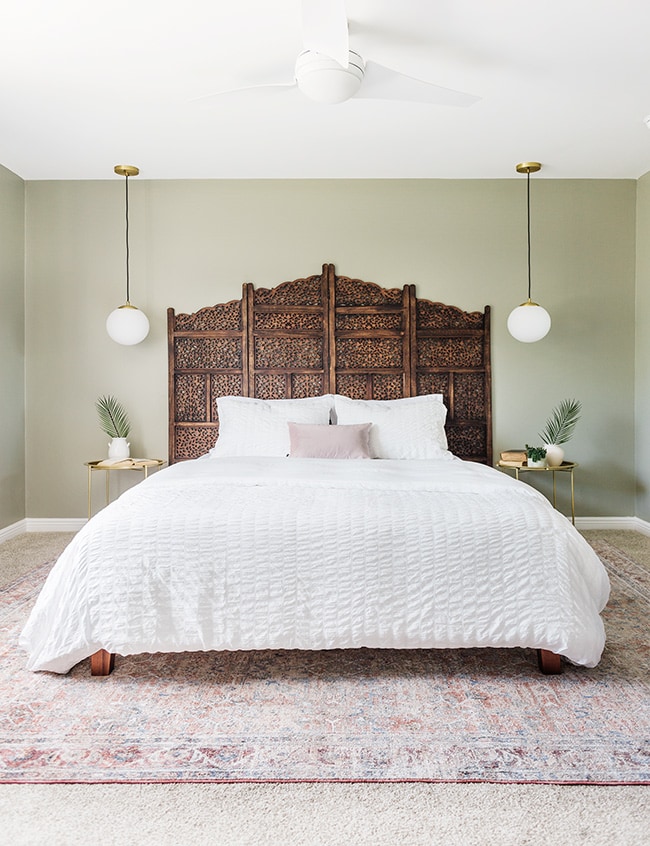
The cherry wood bed platform worked out perfectly with the headboard. The wood tones are similar so it blends in as if it was meant to be there. The assembly was also super easy and we were really impressed with the quality. No squeaky metal bed frame to worry about!
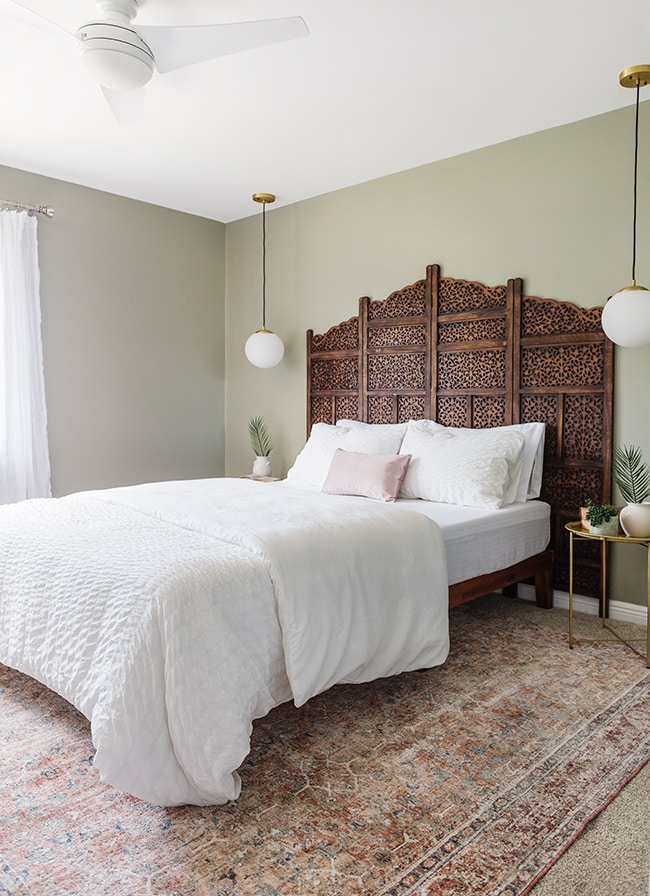
It’s crazy how different the wall color looks in these photos. It transitions from green to gray to beige, depending on the lighting and the angle and time of day. Such a rich, dynamic color. I had never even heard of PPG paints until we bought the house.
I kept the decor very simple in here—both because of our budget/time constraints, and because it’s best to take a minimalist approach when designing a vacation rental. You want it to feel clean, clutter-free and relaxing.
The only thing we hung on the wall was a simple mirror pulled from storage, across from the window to reflect the natural light and make it feel larger. I didn’t get a full shot of this side of the room… oops (it’s not as exciting as the rest ?)
If you watch the video you can see shots of the entire room. Honestly this is one of those spaces with that “wow” factor in person, that’s difficult to capture in photos. You’ll just have to come stay with us and see for yourself ?
Tell me, what’s your favorite part? I’m sure most of you will agree it’s the headboard. Even though it was the biggest splurge, it’s still so affordable, and it completely makes the room! Here’s the link to everything again, so you don’t have to go back to the last post…
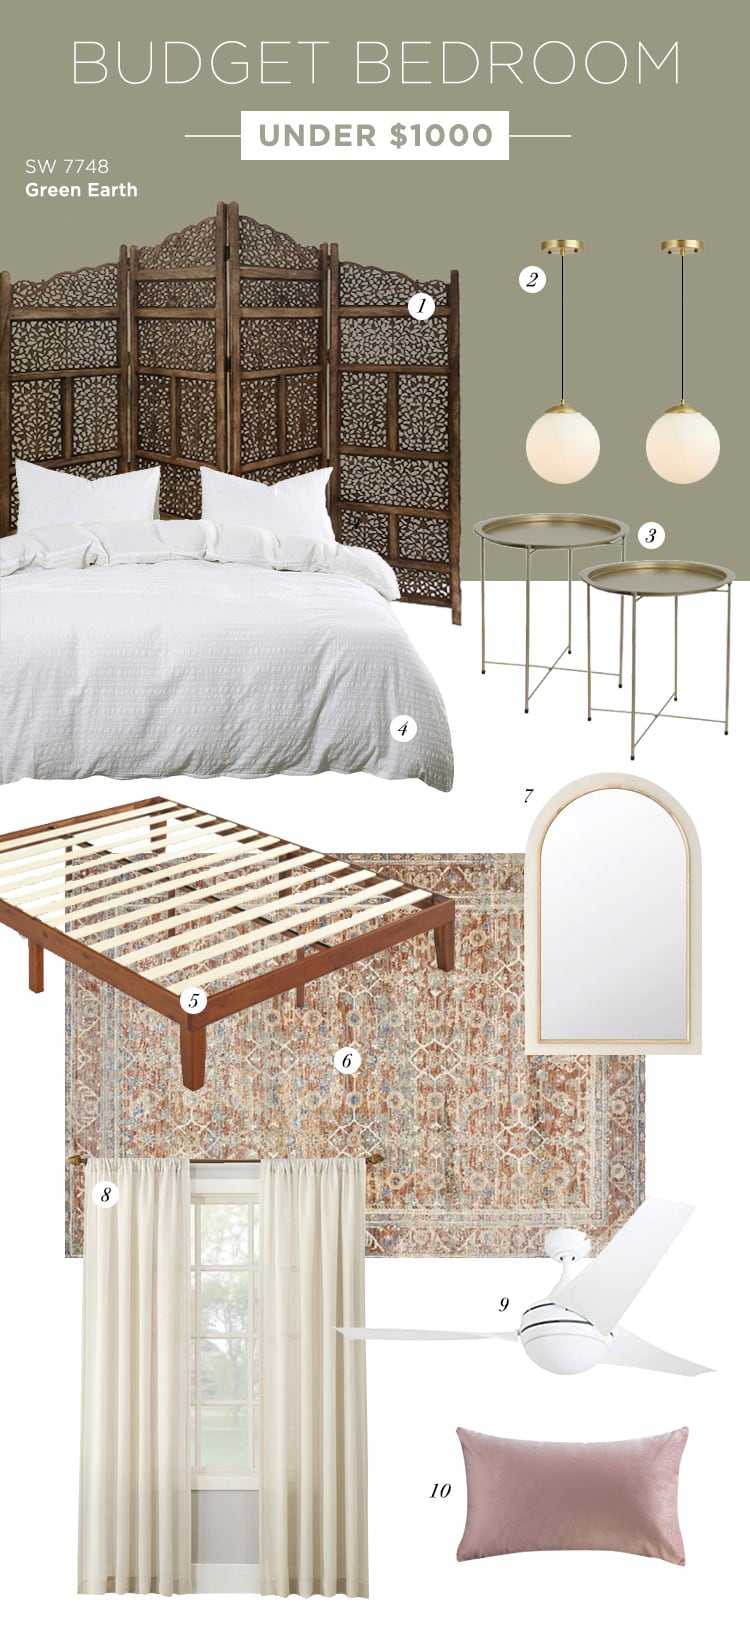
1 / 2 / 3 / 4 / 5 / 6 / 7 / 8 / 9 / 10
And for those wondering: we used this mattress, this lightweight duvet, this sheet set and these pillows for every room in the house.
It will be another 1-2 weeks before we’re able to finish the house and photograph it (if all goes well) so you can expect to see a (Phase 1) finished house tour hopefully in the next few weeks. Who knows, maybe I’ll have time to shoot and reveal the beach house master bedroom next week… would you guys rather see that, or an update on the backyard at The Riverside Retreat? Or something else? ? Let me know in the comments below!


Kathleen says
can you use the remote puck lights idea in a light that is dimply glass? (that a technical term right? dimply? lol ) its called hammered class on amazon. I’m trying to figure out if you see the lights how they would look as I may need to look for a different option. I like one that is capiz. just realized I have to measure the top inside to make sure the puck lights fit. Your kiddo is just adorable !
Jenna Sue says
I don’t see why not! The puck lights are pretty inconspicuous so even if they were highly visible, I don’t think it’s an issue. Just make sure you get the right size!
Erin says
This room looks utterly gorgeous – especially given your budget limitations! ( I, too, buy king-size bedding for queen-size beds, so am currently patting myself on the back for my designerly ways). Thanks for the inspiration you continue to provide, even in these depressing times. I don’t live in North America (or anywhere near it), but your post has me dreaming of both travel and affordable updates I can make to my own home.
Jenna Sue says
That makes me so happy to read Erin! I am dying to get out there and travel again too! Gotta fake it til we make it 😉
andrea in mn says
We have some battery LED puck lights in our home, and my husband is regularly changing out batteries for any that get regular use or are left on for a while. How it you mitigate this in a rental? Thanks… (Maybe the ones we bought are suck more energy…)
andrea in mn says
PS – BEAUTIFUL!
Jenna Sue says
Hmm that’s a good point, I guess we will have to cross that bridge when we get to it and schedule regular checkups for those things! Hopefully they last a while being LED.
Meredith says
Just gorgeous!
If it’s not too cheeky to ask:
*How many pillows/duvets/sheet sets have you had to buy for each room?
*How long do you need to spend online to find all this lovely stuff – and where do you look?
Thanks ?
Jenna Sue says
Thanks Meredith! I bought 4 pillows, 1 duvet, 2 duvet cover sets and sheet sets for each room. I found these months ago for our other rental and am really happy with them, so fortunately I didn’t have to look all over again! 🙂
Meredith says
Thanks!
Bethany says
Oh my god, that headboard. Please do a tutorial on how you anchored it to the wall!
Jenna Sue says
We don’t have any closeup photos of that part unfortunately, but we held it in place, marked where we wanted the screws to go, removed it and put anchors into the wall, then put it back in place and drove the screws into the anchors (into the cutouts, not directly into the wood). I hope this helps!
susan says
What size is your bed? What size is your comforter? What size is the rug?
Just trying to figure out sizes here.
Love it all.!
Thanks
Jenna Sue says
Thanks Susan! Queen size bed, king comforter/duvet cover, and 8×10 rug 🙂
susan says
So very nice. The combination of the sizes looks great!
Kathleen says
Fav item – lights! (and quarantine hairdo) . Beach house is my preference for next reveal
Teri says
The headboard, of course! I love all your posts, it doesn’t matter the order to me, just keep ’em coming!
elle says
Wonderful!
Do you have a recommendation for a steamer that works well?
Jenna Sue says
Thanks Elle! This is the steamer I use and love: https://amzn.to/2YphWKj
Shauna says
Just lovely, always elegant and balanced.
Lu Ann says
The entire room is beautiful but I love the lights, especially since they don’t require wiring and take up space on a nightstand. What a great idea!
Backyard updates would be great to see! Thanks!
jaime says
This design is a testament to your talent and vision. The headboard is stunning and really takes the room to a much higher level.
But Lucas’ hair … oh my, it takes this video places we are all relating to right now. His hair is EPIC! LOL.
Best of luck with all your endeavors.
Stay safe
Jenna Sue says
Hahah! We were wondering if anyone would notice his quarantine hair. I finally caved and cut it myself ;P
jaime says
Nooooo!
Lucas was rocking the Pebbles Flintstone look like a star.
A little jealously perhaps Jenna Sue?
Jenna Sue says
Haha you got me ;P
Kimberly Powers says
Love the lights! wow great idea for headboard it turned out so unique! thanks for sharing ;). I really like the colors and the mood!
I would love to see backyard update. But any of the above would be great! We are finishing up an outdoor entertainment area with a pavilion, pavers and firepit. We bought a pull down screen and mini projector and it has been so fun to watch movies outside! Need to complete furnishing so any ideas would be awesome. Also love real estate investing posts. Thanks!
Jenna Sue says
So glad you like it Kimberly! Your yard transformation sounds amazing… I would love to have a projector in our yard some day, how fun! Might have to steal that for our someday todo list 😉
Mary says
That headboard is a showstopper. I was pleasantly surprised to see it was actually a room divider that was repurposed. You guys did a great job!
Jenna Sue says
It was such an a-ha moment when I stumbled across it! Real carved wood headboards like that are so pricey, and this thing is stunning in person. Thanks for the love Mary!