This post is part of a paid collaboration with Lowe’s Home Improvement. All opinions are my own.
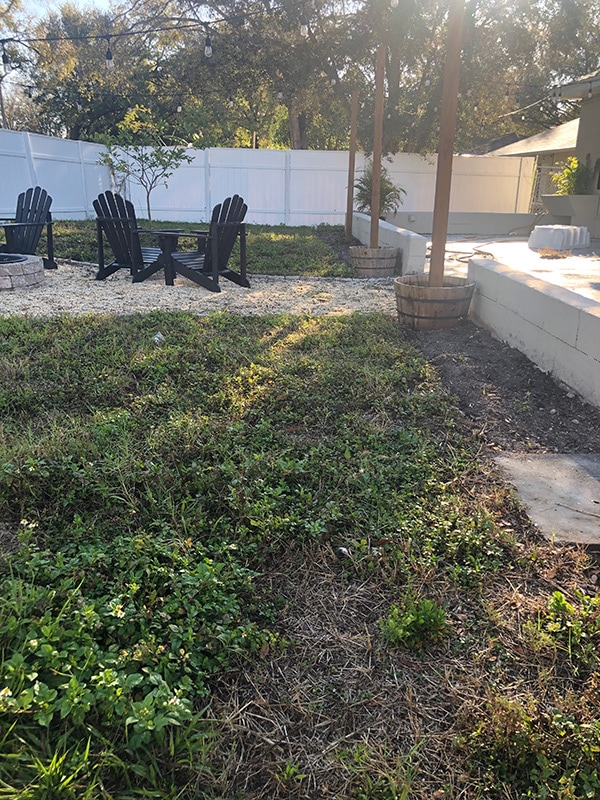
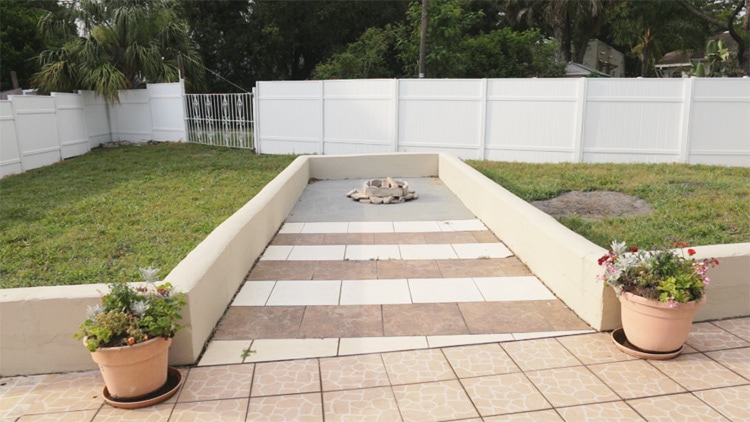
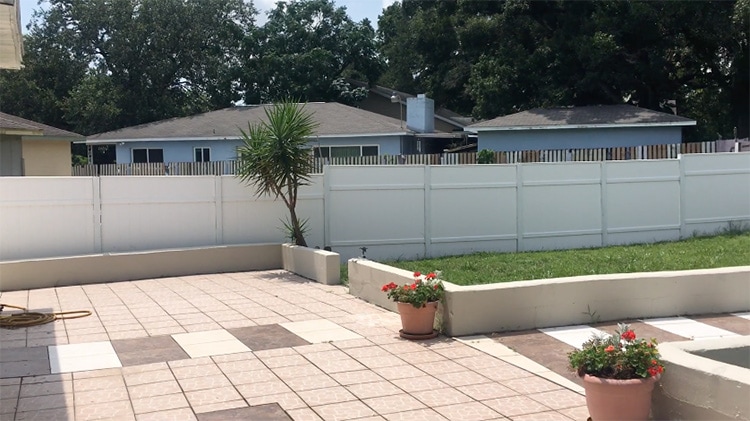
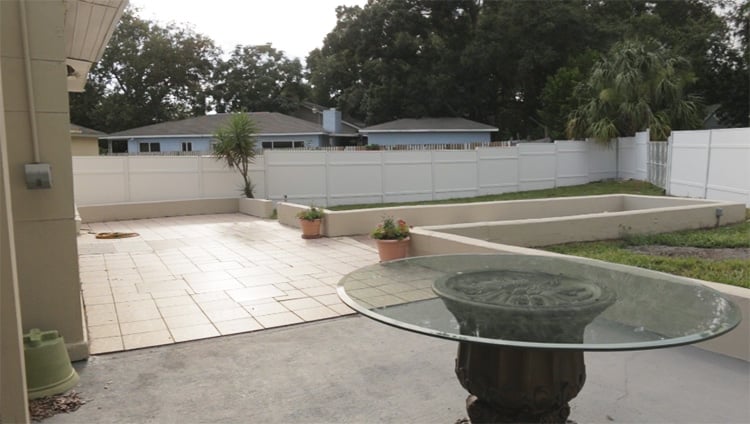
This reveal is 1½ years in the making—my longest renovation of any space to date. It all started back in February 2018, when the backyard looked like this…
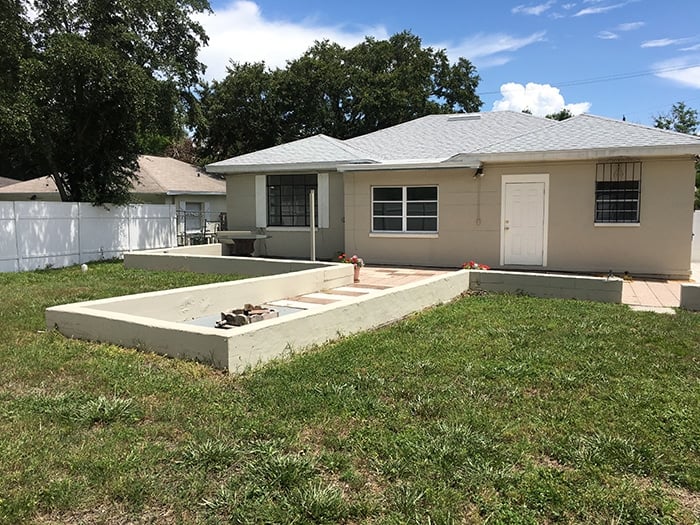
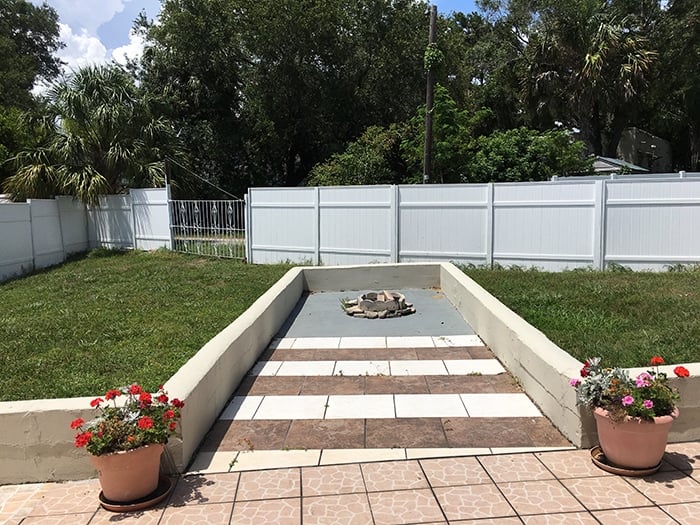
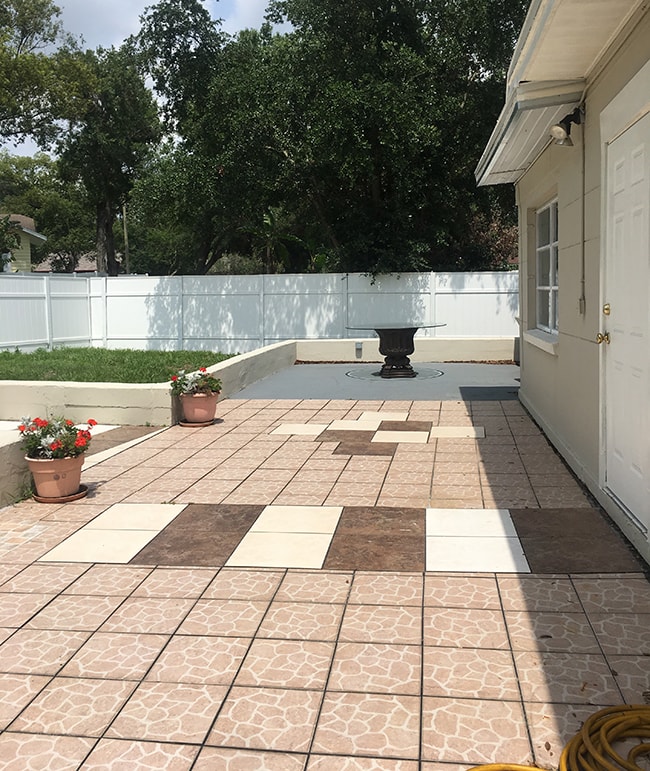
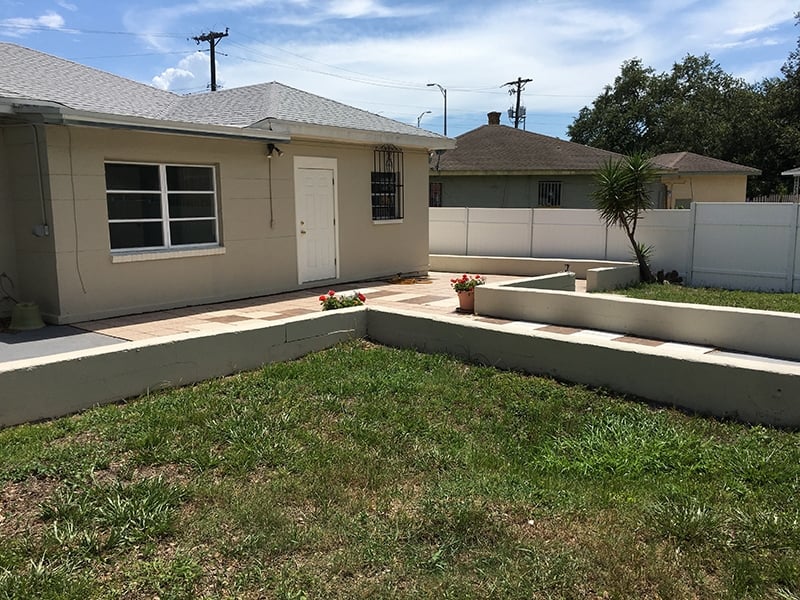
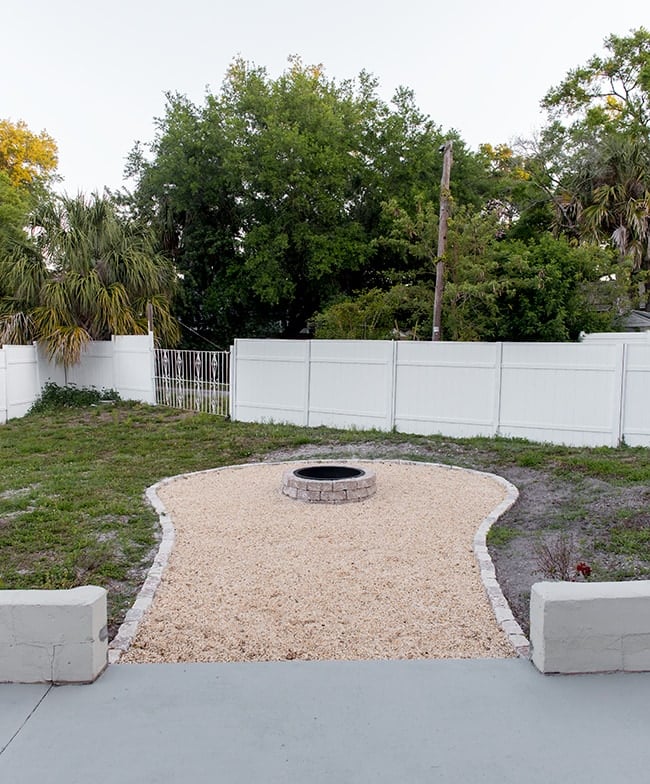
It was a disaster, pieced together with no rhyme or reason.
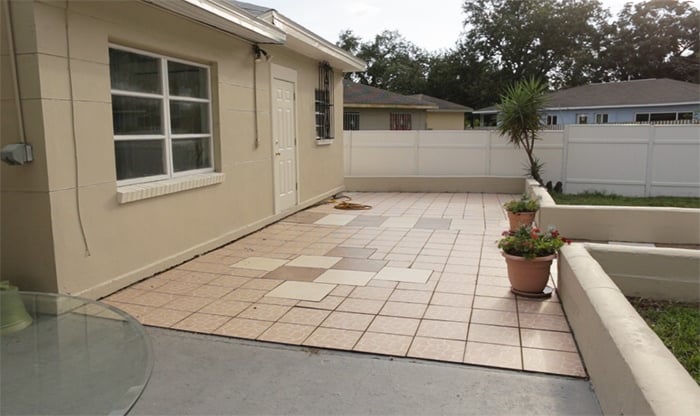
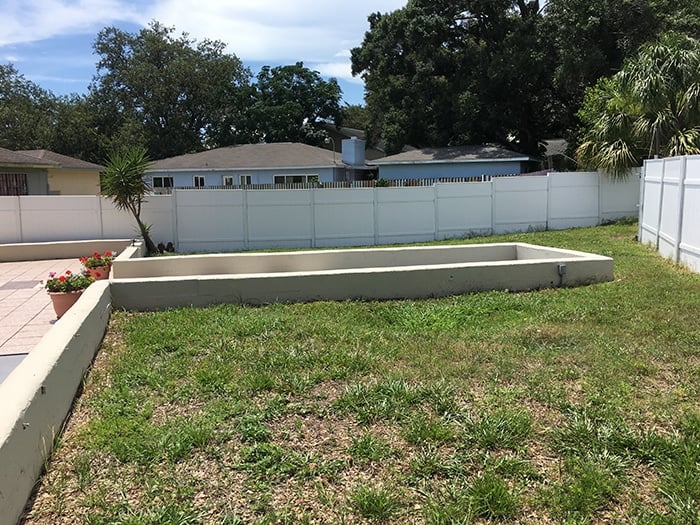
Like the short concrete wall that led to nowhere, mismatched tile that was thrown haphazardly onto painted concrete…
We had a small budget and couldn’t afford to hire out or completely redesign from scratch, so we came up with a novice backyard DIYer’s plan.
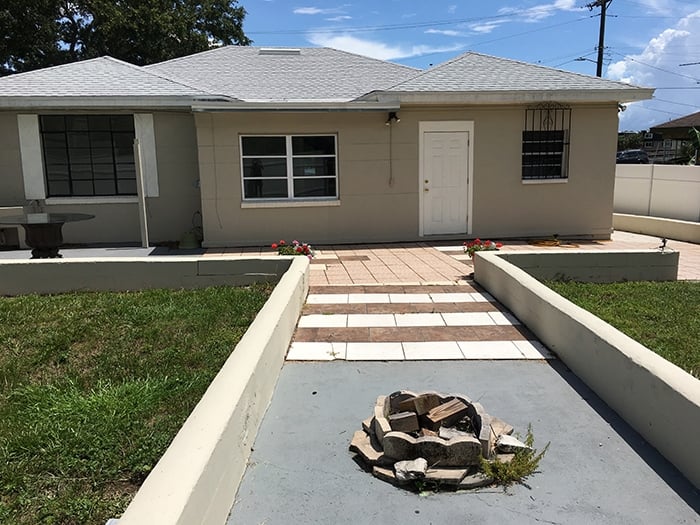
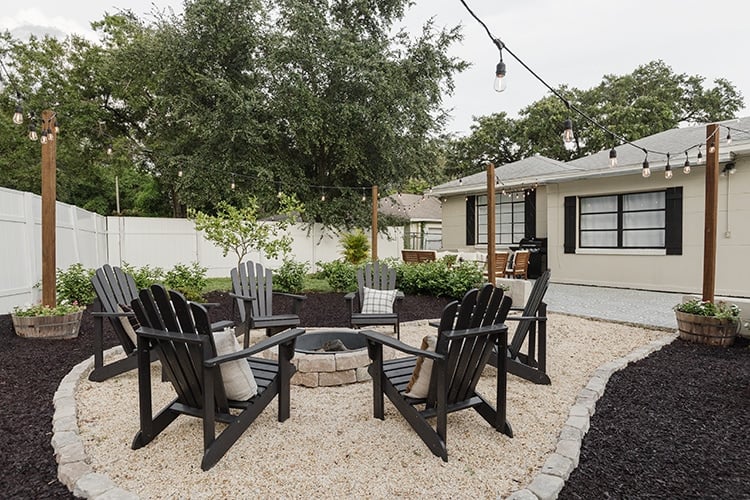
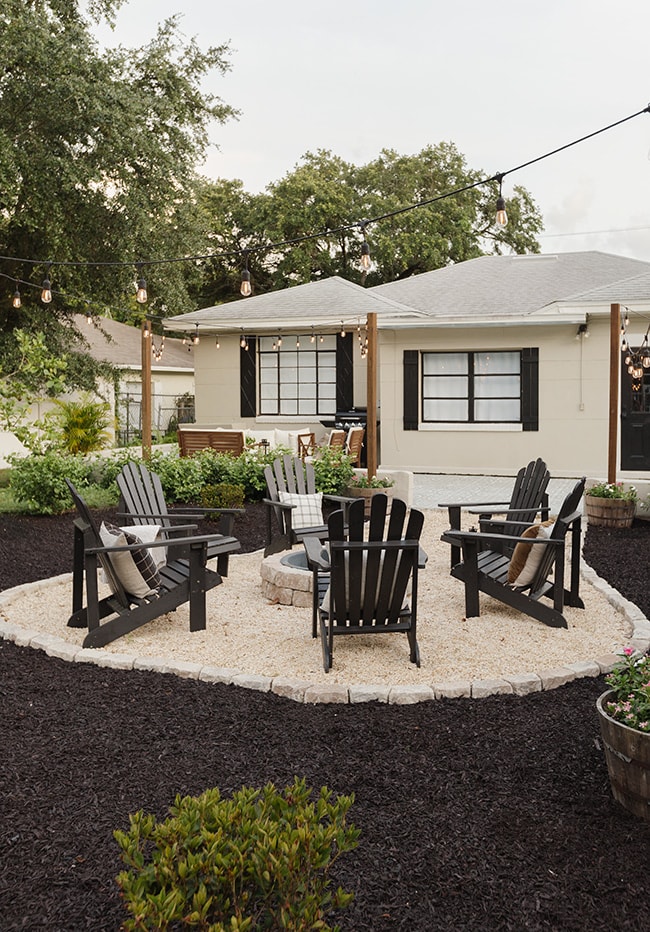
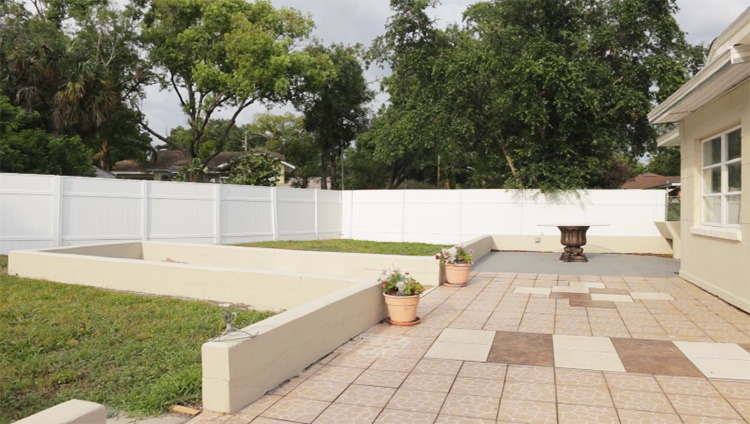
Phase 1: Remove the old giraffe tile, knock down the wall, jackhammer the concrete platform and build a fire pit area (details in this post):

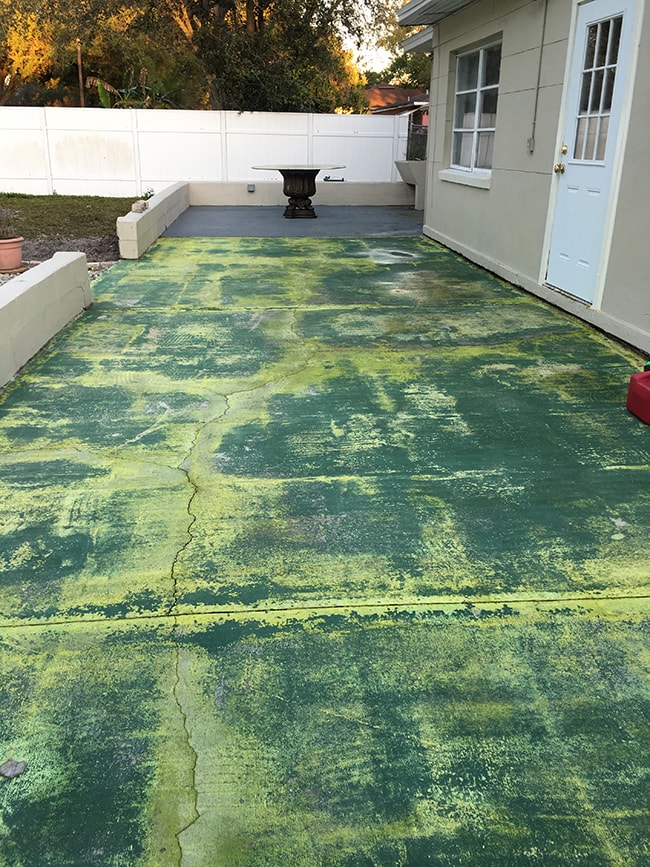
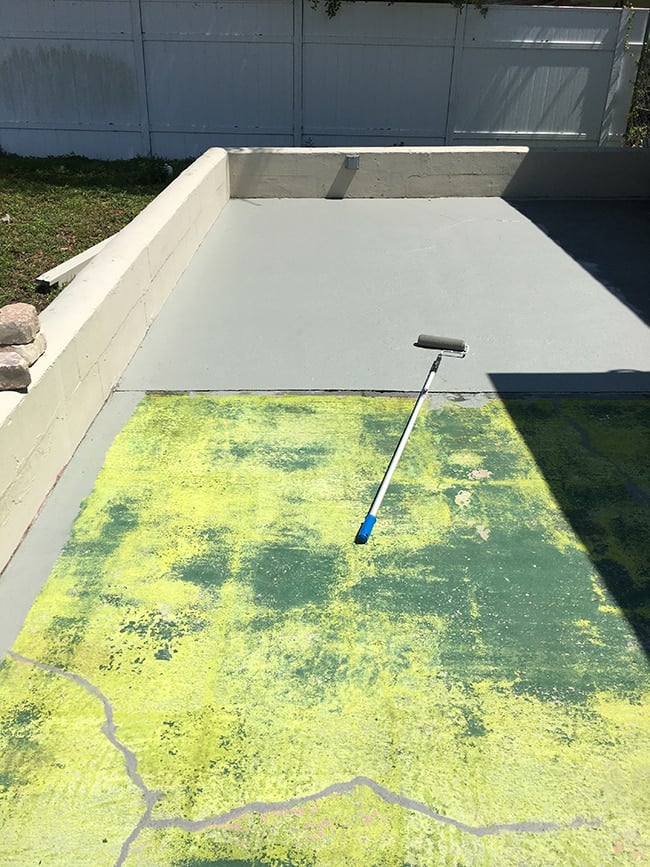
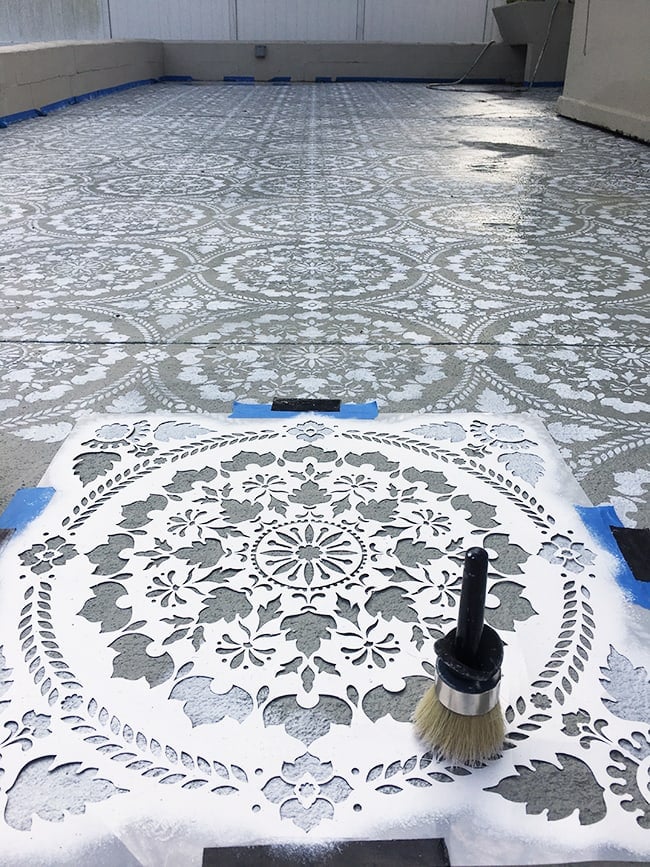
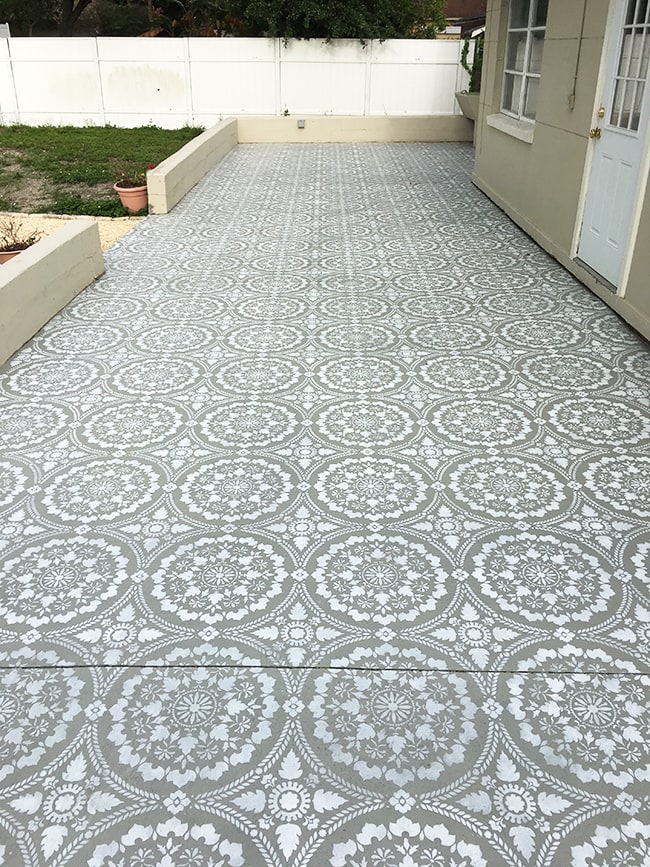
Phase 2: Power wash, scrape, repaint and stencil the concrete patio—aka the 27 hour stencil saga:
Phase 3: DIY String light planters, landscaping and shutters:
Phase 4: Furnishings, decor, and the big reveal!
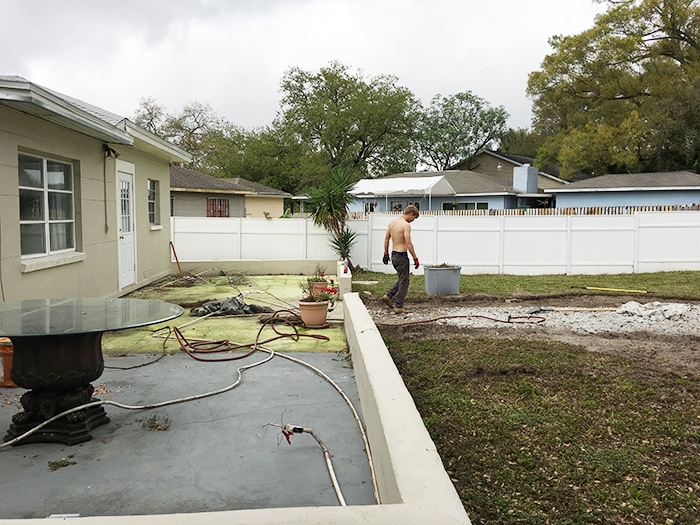
Fast forward to winter—we had a newborn and no time to take care of the yard. Every last plant died and the yard became overrun with weeds.
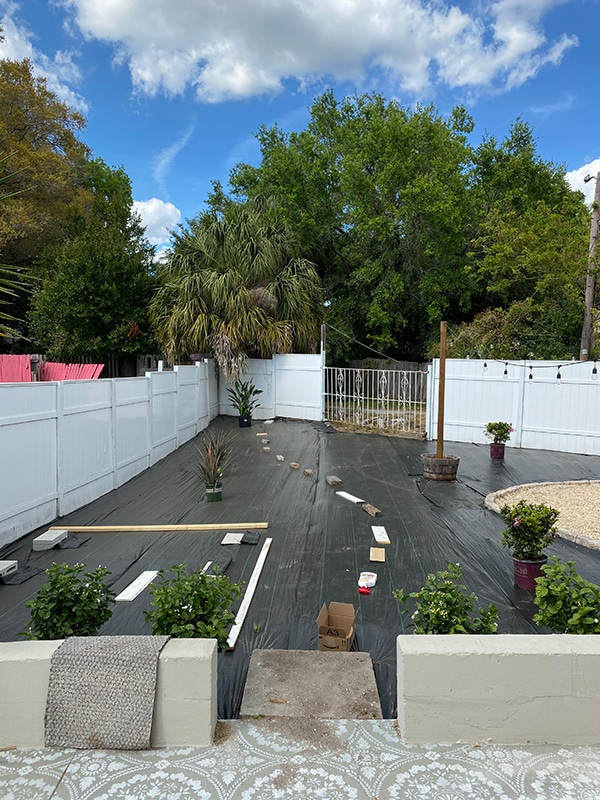
We needed a new plan, so we came up with a “no-mow” low maintenance solution—which meant removing all of the dead grass, leveling and laying down landscape fabric…
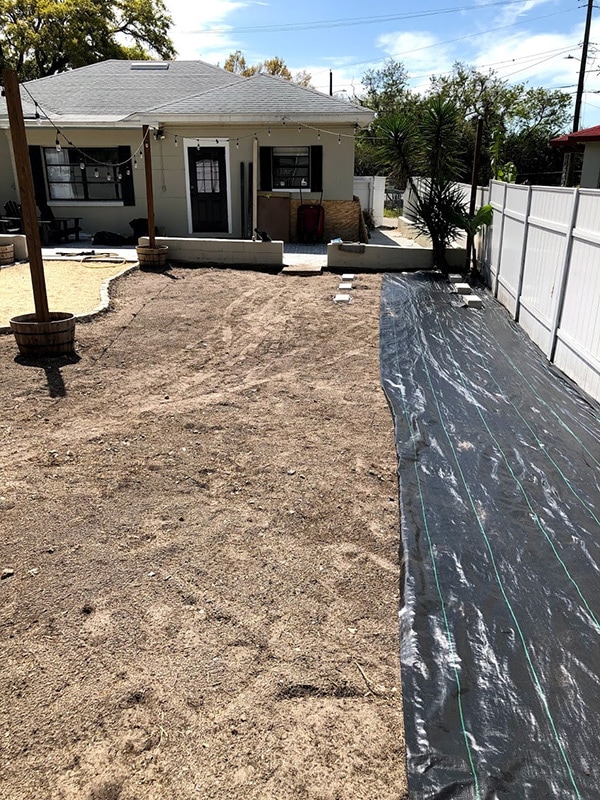
We installed a simple drip irrigation system and chose a variety of tropical plants to make the yard green and lush, even without grass.
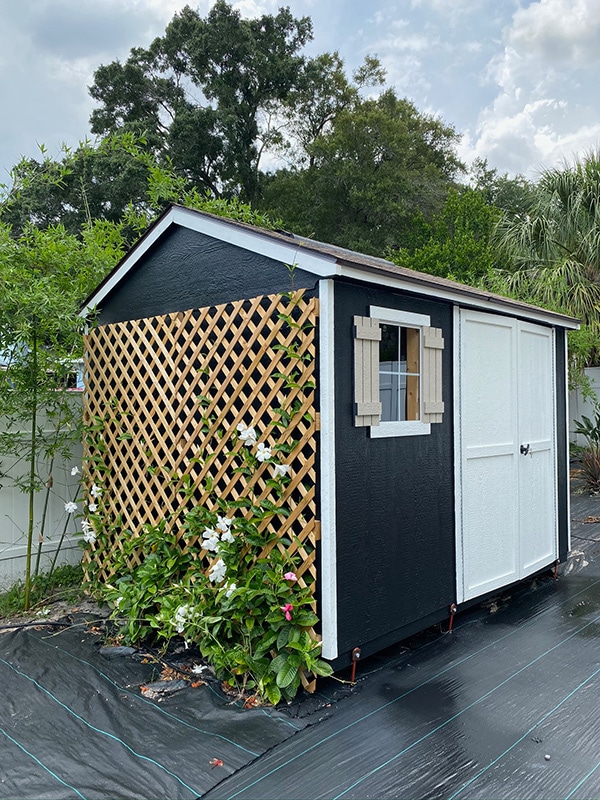
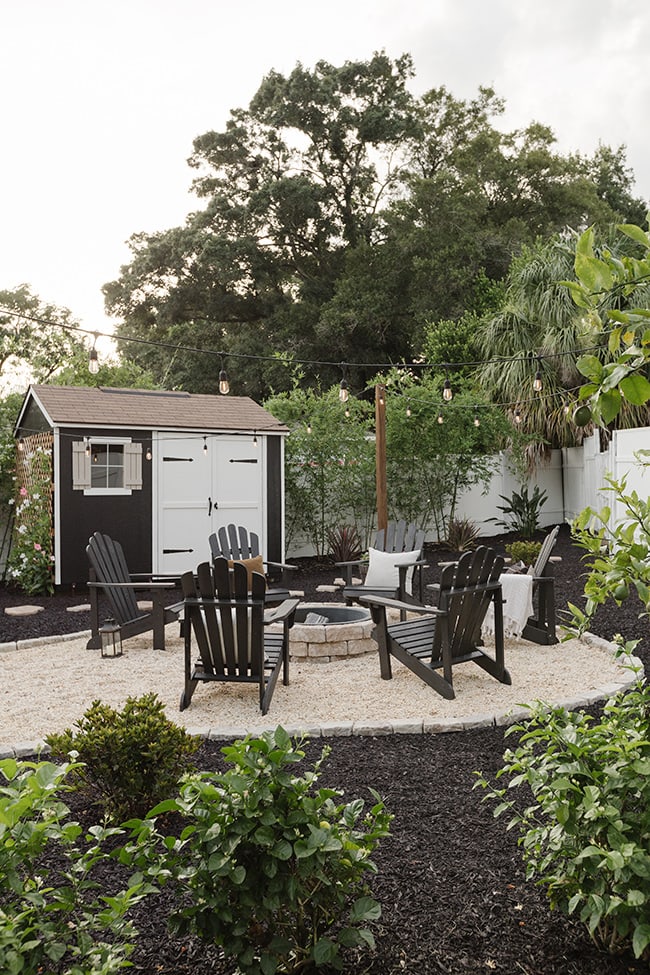
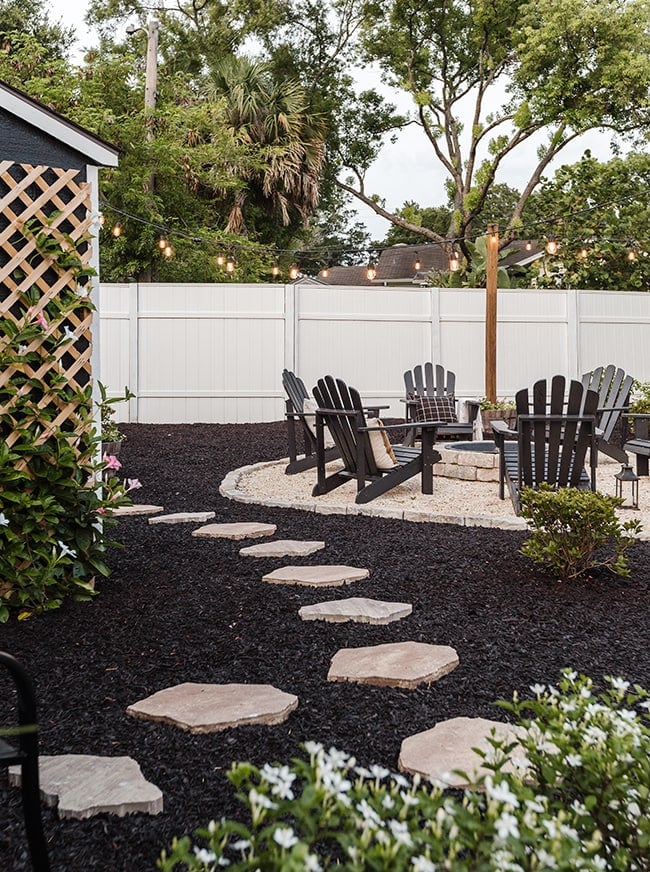
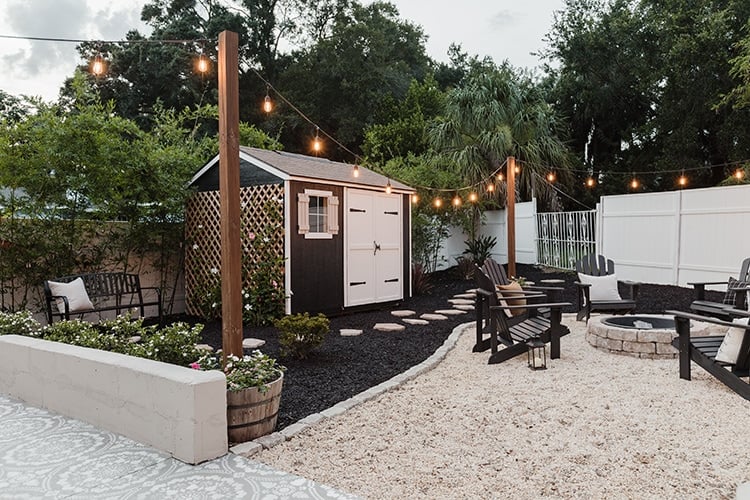
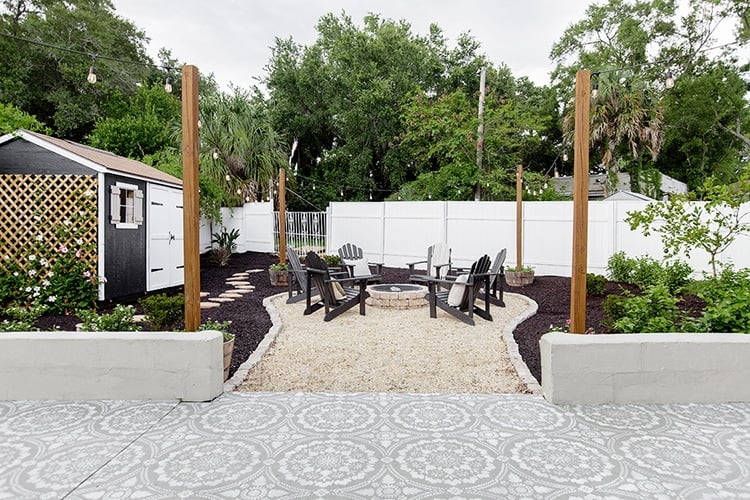
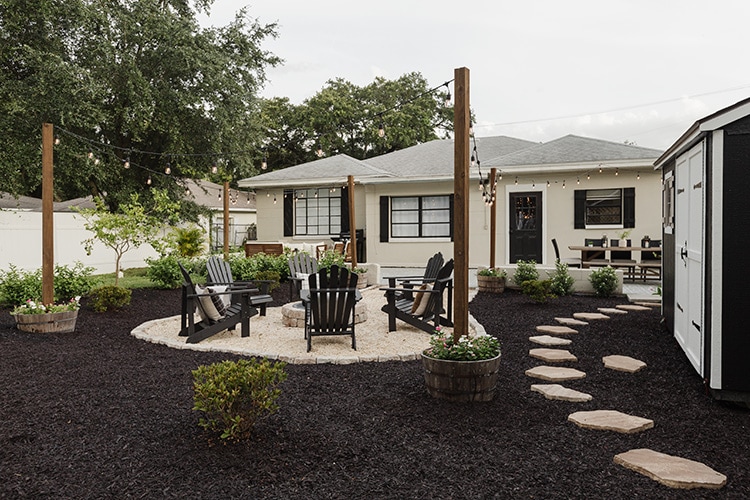
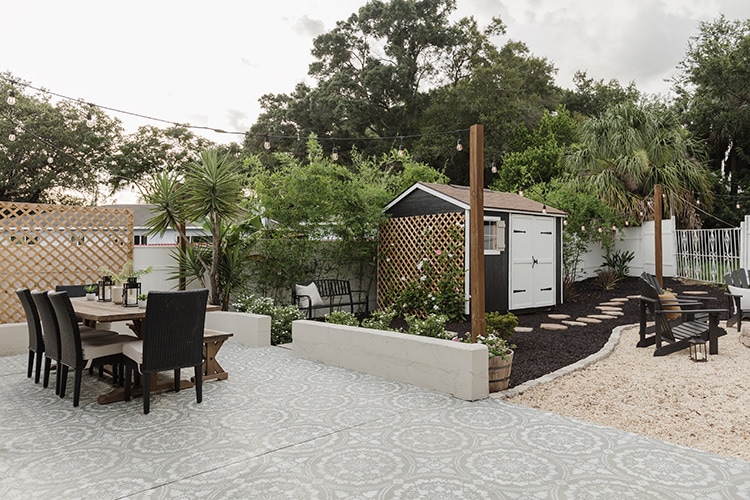
We also desperately needed storage, since this house doesn’t have a garage. A cute shed was the perfect solution:
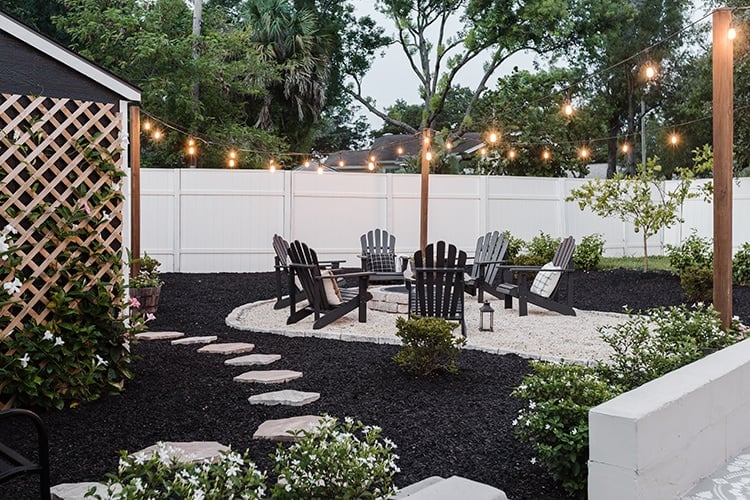
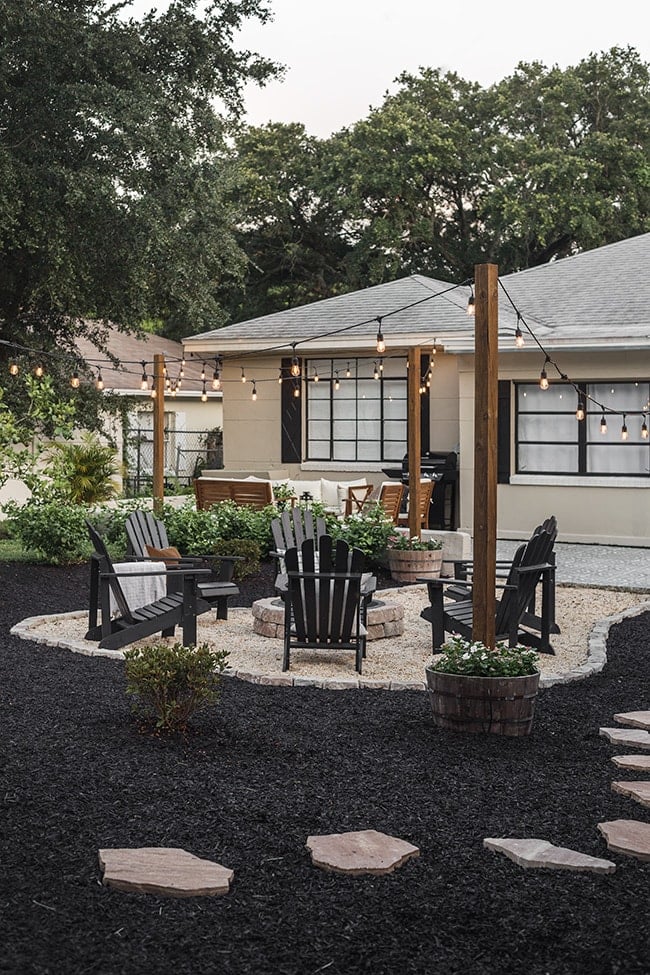
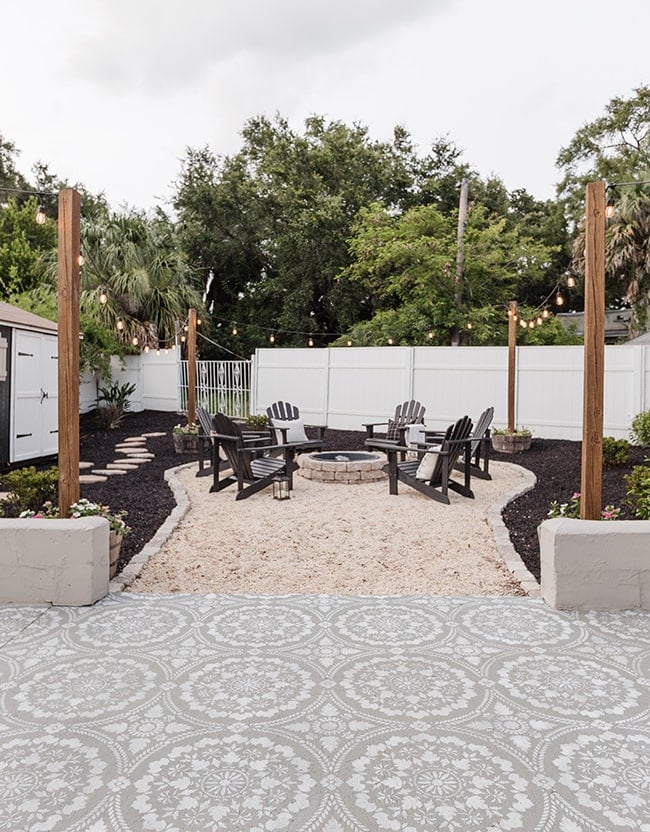
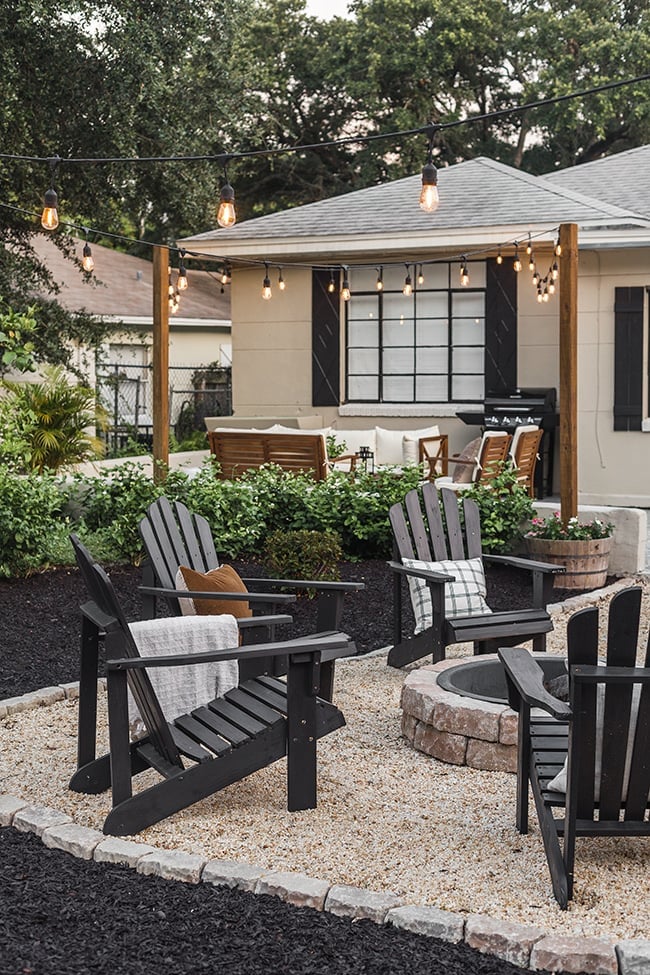
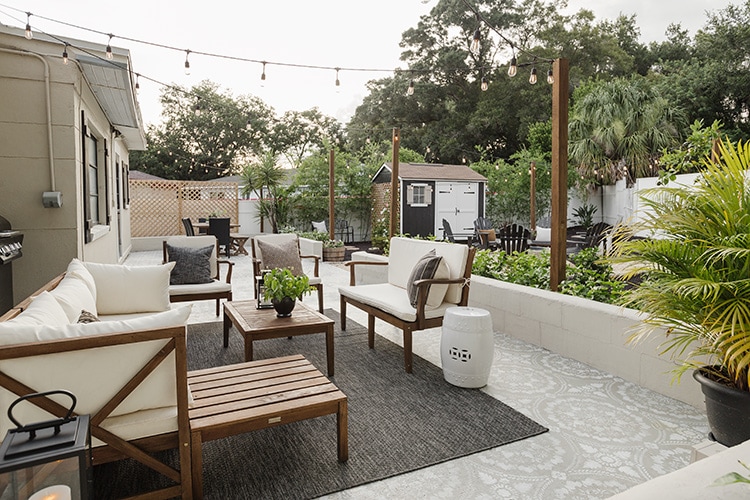
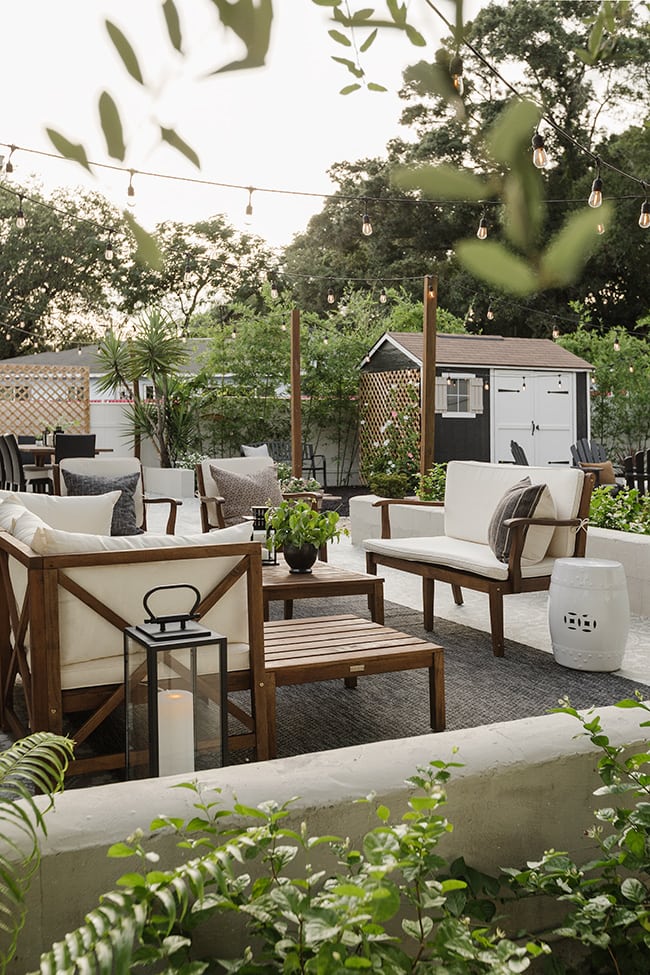
Finally, we covered the ground with mulch, added a stone pathway, cleaned up and brought back our furniture. And now, welcome to the new (and final!) Riverside Retreat oasis…
This yard is ready to entertain its first guests, just in time for those magical Florida summer nights.
Our new plants have been thriving on the irrigation system, which is such a relief!
We’re both inexperienced in this whole gardening thing and I’ve always considered myself to have a black thumb. Fortunately, most plants seem to do well in this tropical climate.
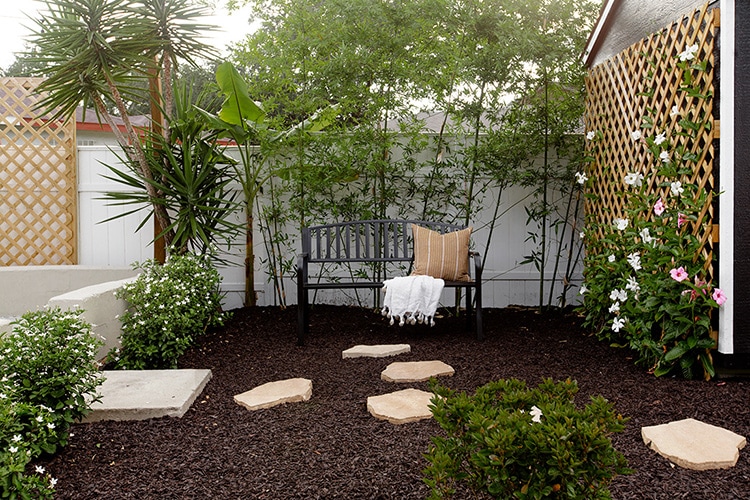
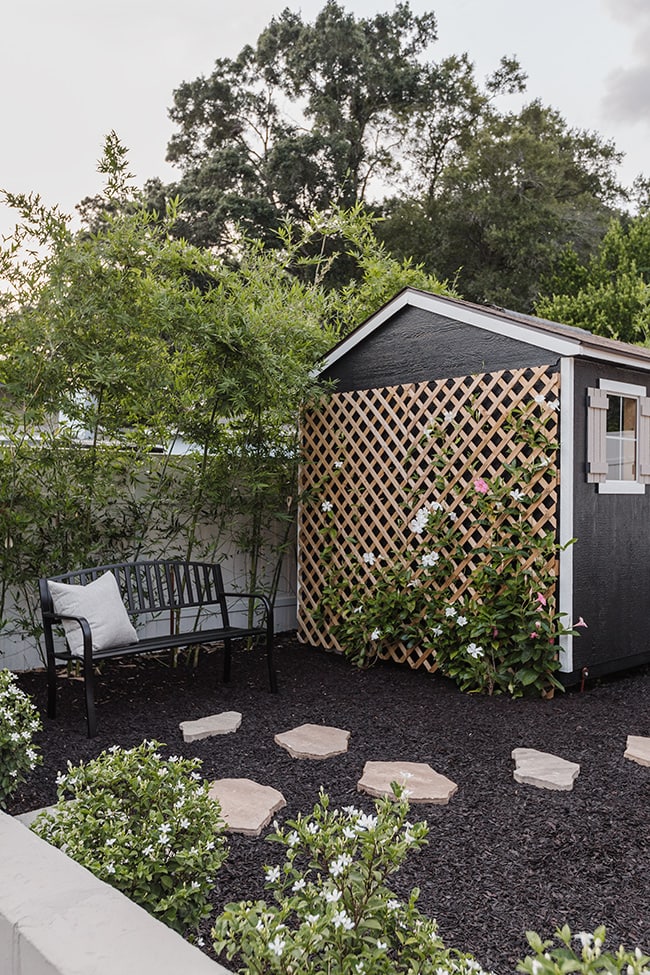
Our bamboo privacy fence has quadrupled in size since we planted it a few months ago, and the mandevillas on the trellis have been quickly climbing their way up. This little corner became the perfect secluded spot for a garden bench.
But my favorite addition to the yard is this 8×10′ shed. It not only transform the space visually, but it provides much needed storage for our patio cushions, outdoor equipment and firewood.
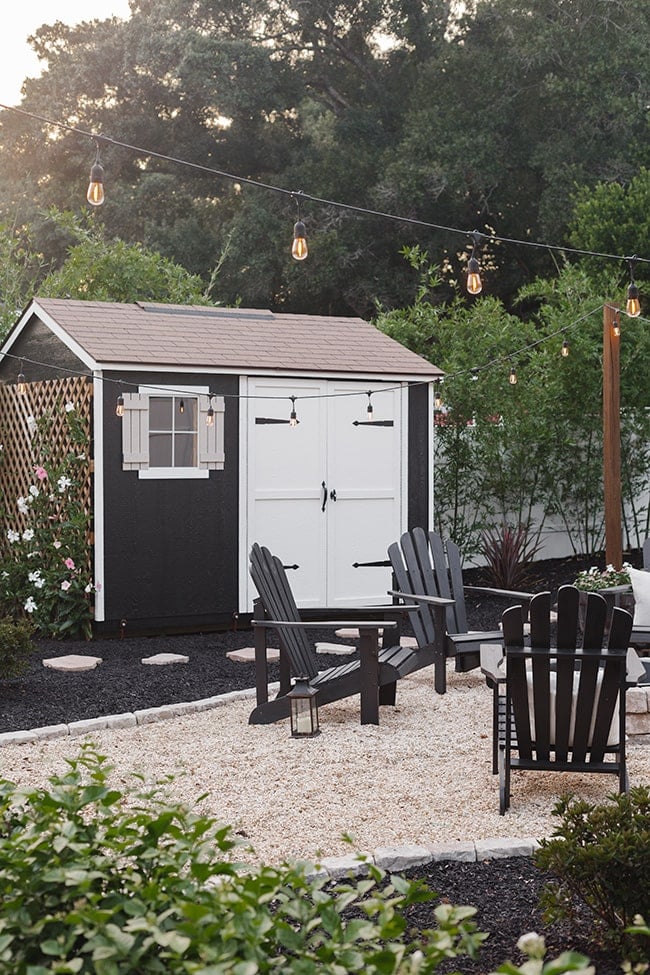
We hired Lowe’s for the install, and they assembled and painted it in a day (I chose SW Tricorn Black + Pure White trim to match the house). We also added this decorative gate hardware to give it more character.

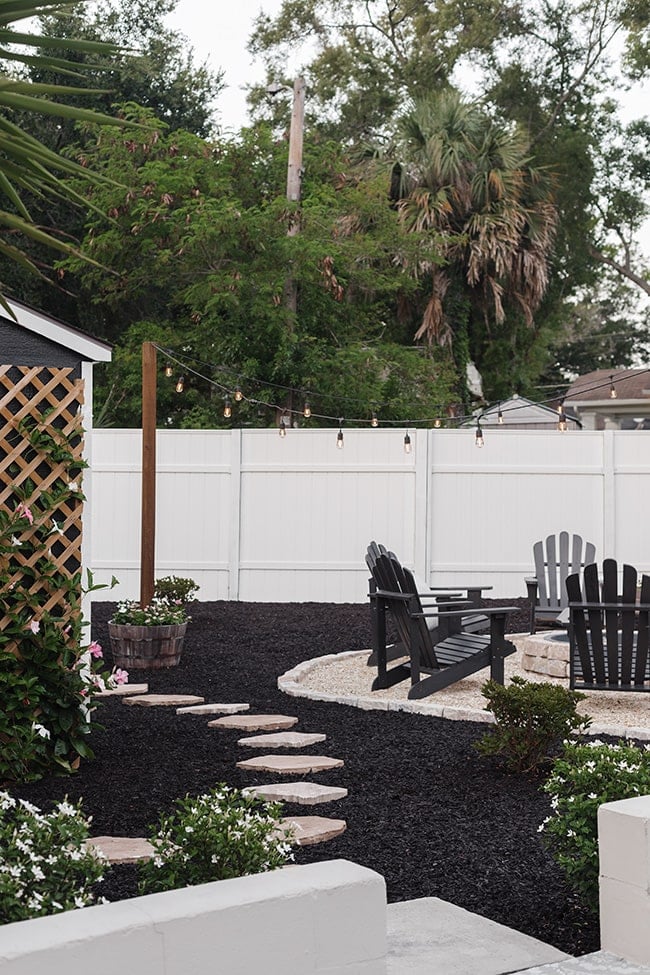
I used these inexpensive stepping stones (in small and large) and created a pathway to break up the mulch. It’s one of my favorite features!
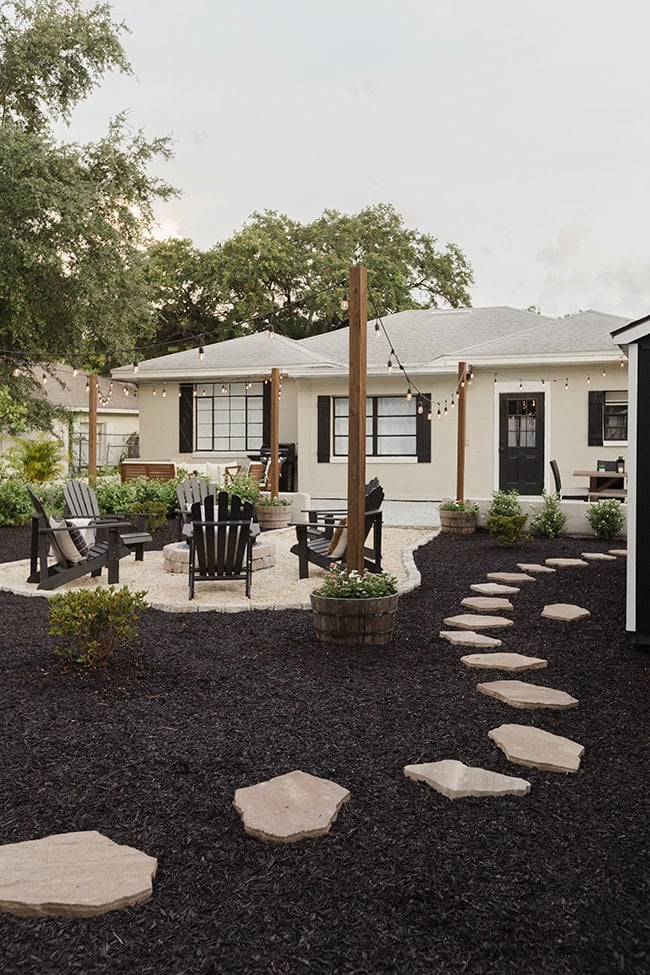
Speaking of the mulch—so many of you have been asking about it after I shared a preview in my Instagram stories. It’s dark brown shredded rubber mulch, and we used 144 bags to fill our yard (we estimated approx 700 square feet).
Laying mulch was the single most satisfying, rewarding step of this entire renovation. It instantly transformed the yard and made it look so crisp and clean. The color is a true deep brown in person, though it does look almost black when the sun goes down (as seen in some of these photos).
It’s 2-3x the cost of wood mulch, but it’s guaranteed to last 10 years which was the biggest selling point for us, since we need this yard to be as low maintenance as possible. It has great reviews online (I read through hundreds of them!) so I feel pretty confident about this choice, which was our biggest expense for this makeover (apart from the shed). Time will tell how it holds up…
There’s a lot of benefits to using rubber mulch, but it’s worth mentioning that studies have shown it can have a negative impact on the environment. Someone pointed this out to me after we had installed it, so I recommend doing your own research before buying.
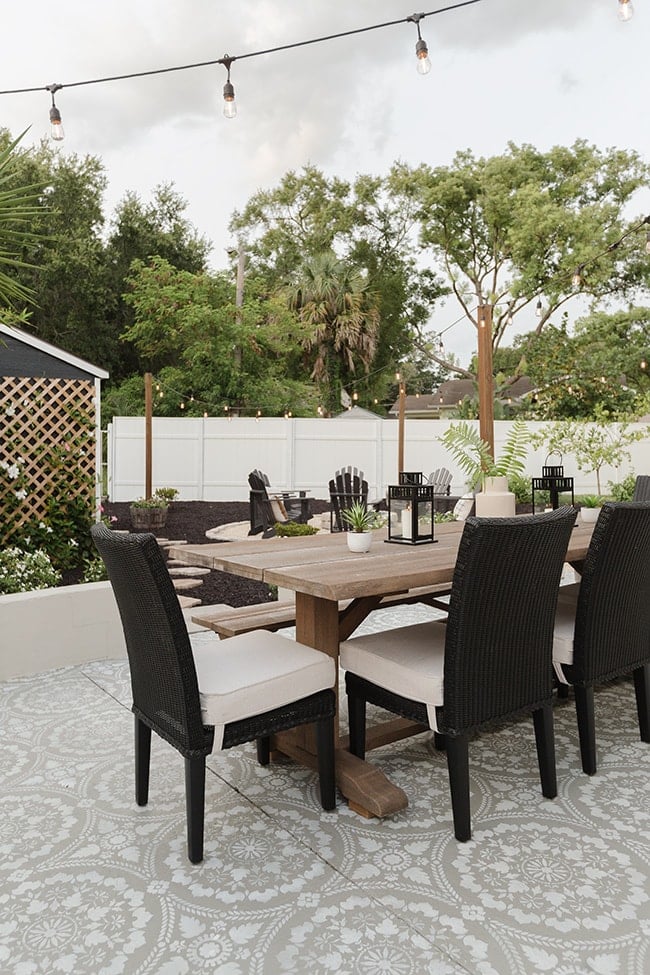
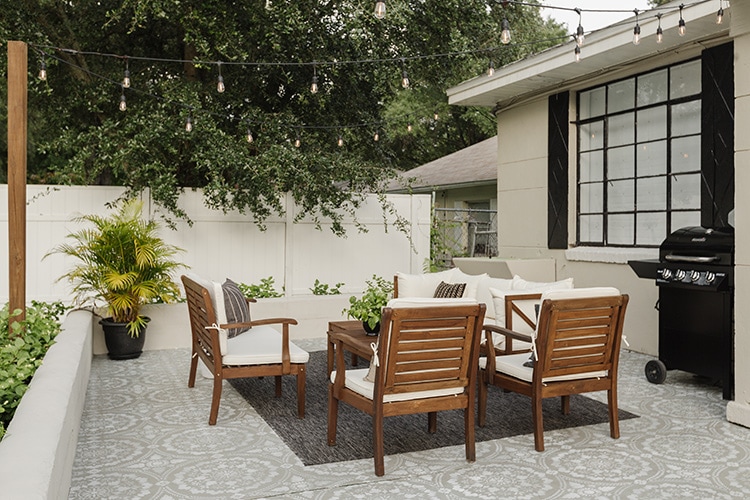
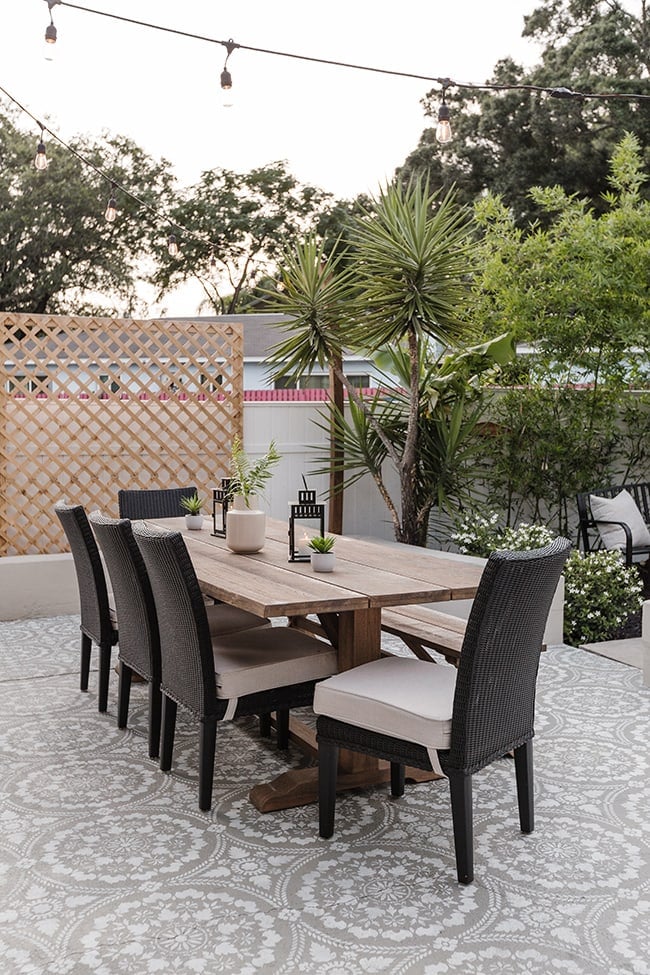
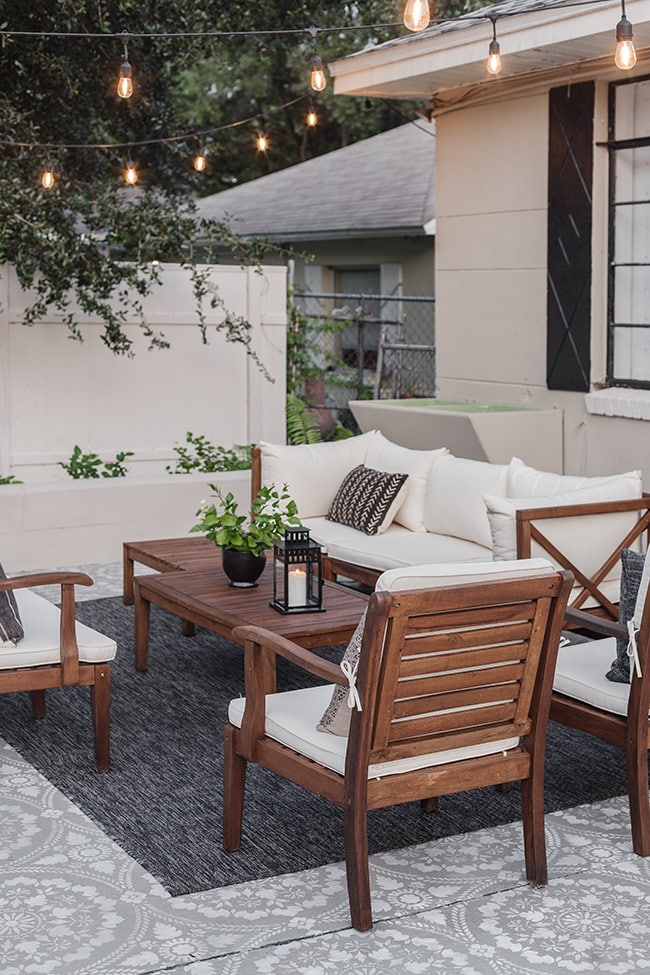
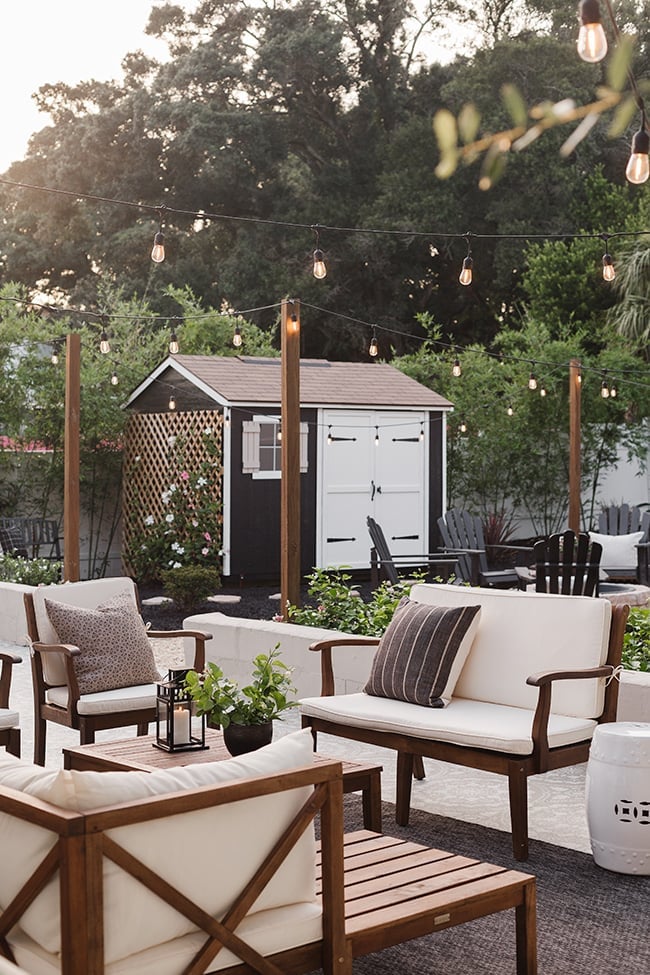
Half the yard went through a major transformation over the past several months, but fortunately, our patio furniture has been there since last year and was waiting patiently to be put to use. Our dining table set held up like a champ outside uncovered for a year—we just had to pressure wash the cushion covers (here’s a photo of it from last year, the wood has lightened in the sun but that’s to be expected!)
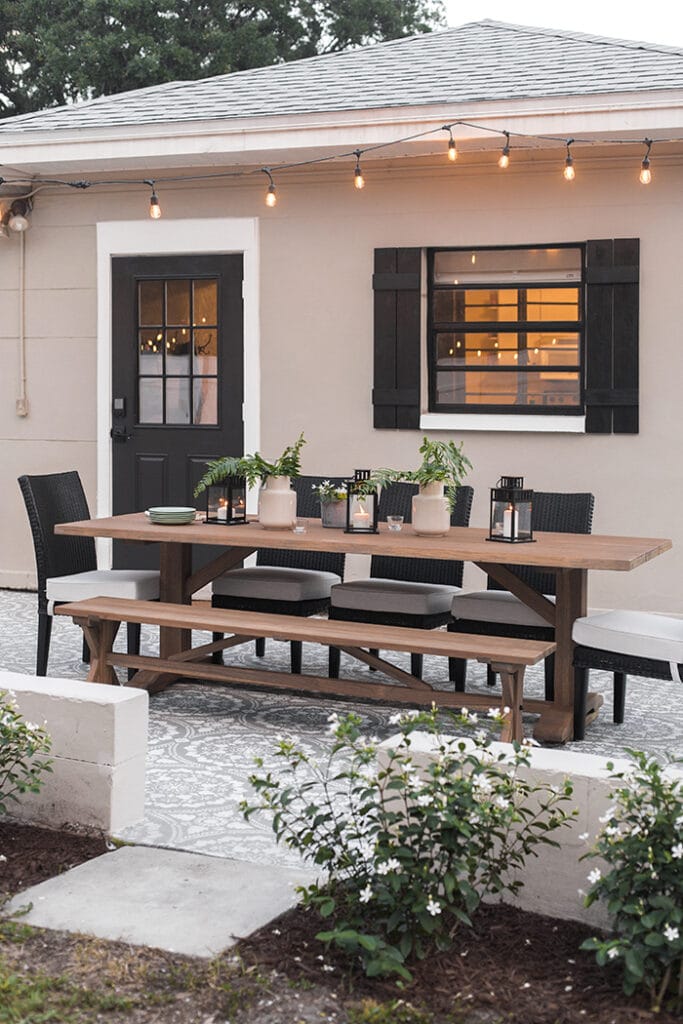
We also pressure washed our patio set, and re-stained the wood. Good as new!
The indoor/outdoor rug held up beautifully, we just hosed it off. We’ve been using the CharBroil gas grill at our own home and will probably buy another for the Heights House—FYI it’s 25% off right now!
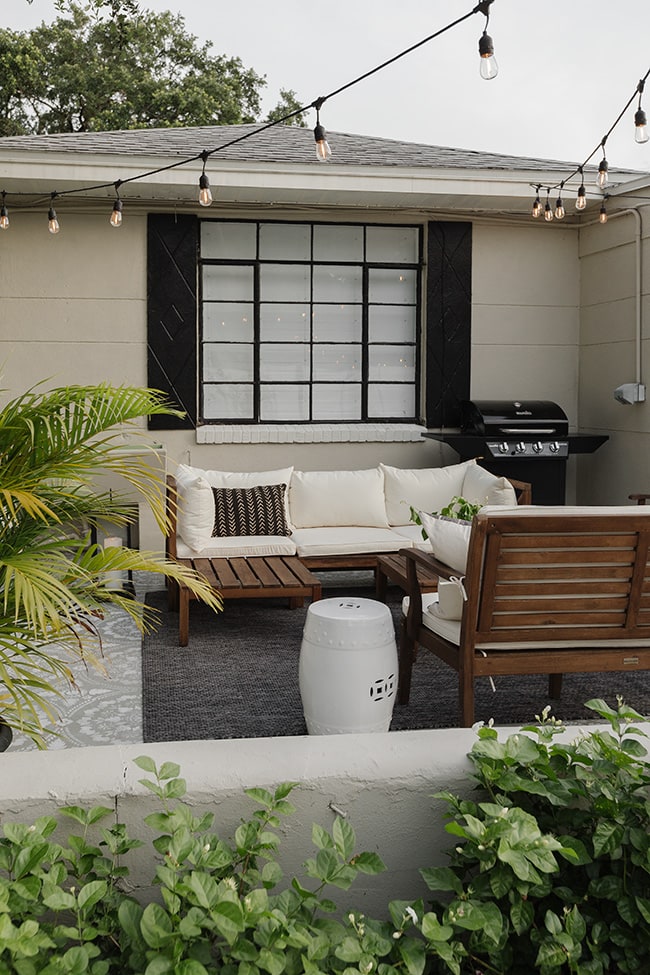
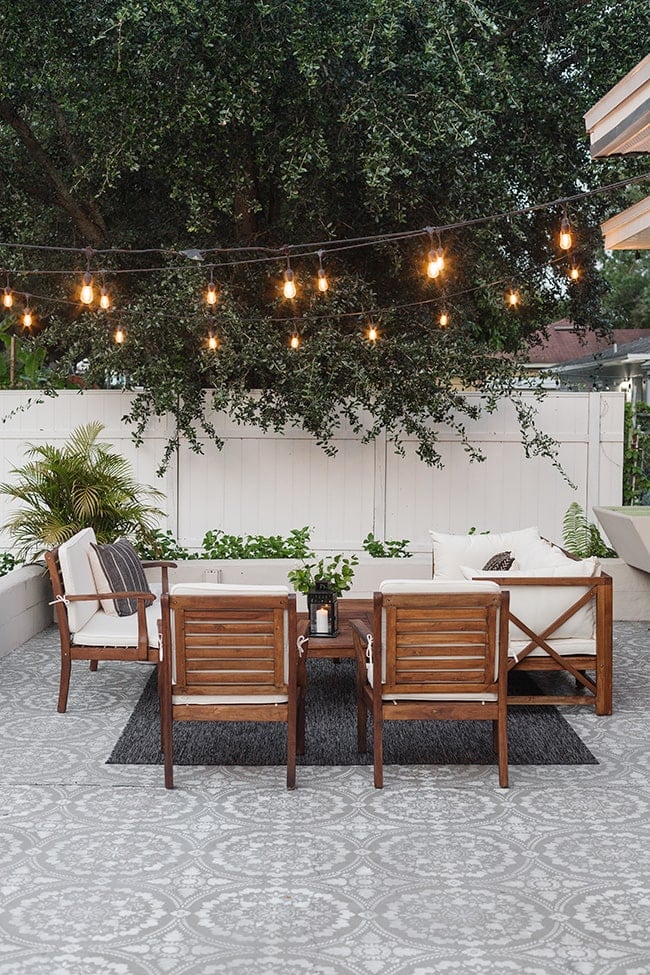
It looks like the exact patio set I have is no longer available, but it is available in gray, black, and you can find a handful of similar Safavieh styles here (I used the 4pc conversation set plus sectional).
The stenciled patio needed a good cleaning and a few touchups (as explained in my last update) but overall, I’m really pleased with the way it has held up. Totally worth the effort!
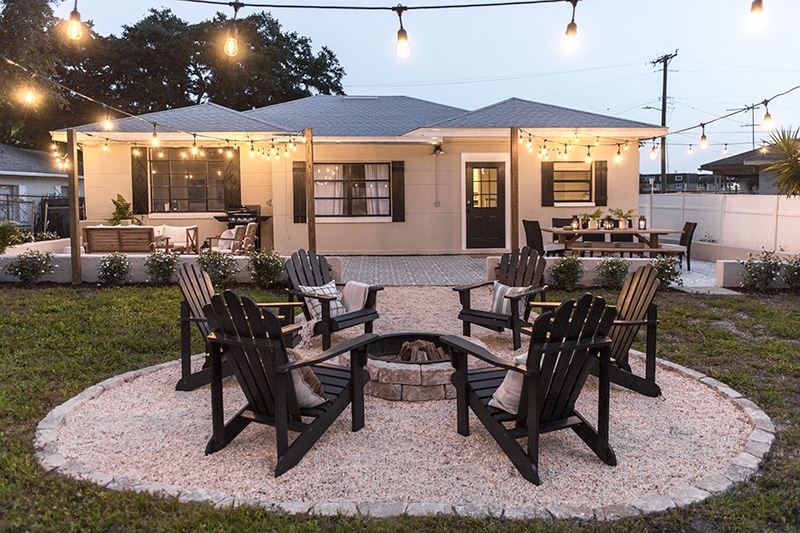
The adirondack chairs also survived the Florida elements, thanks to the SW exterior paint (tricorn black).
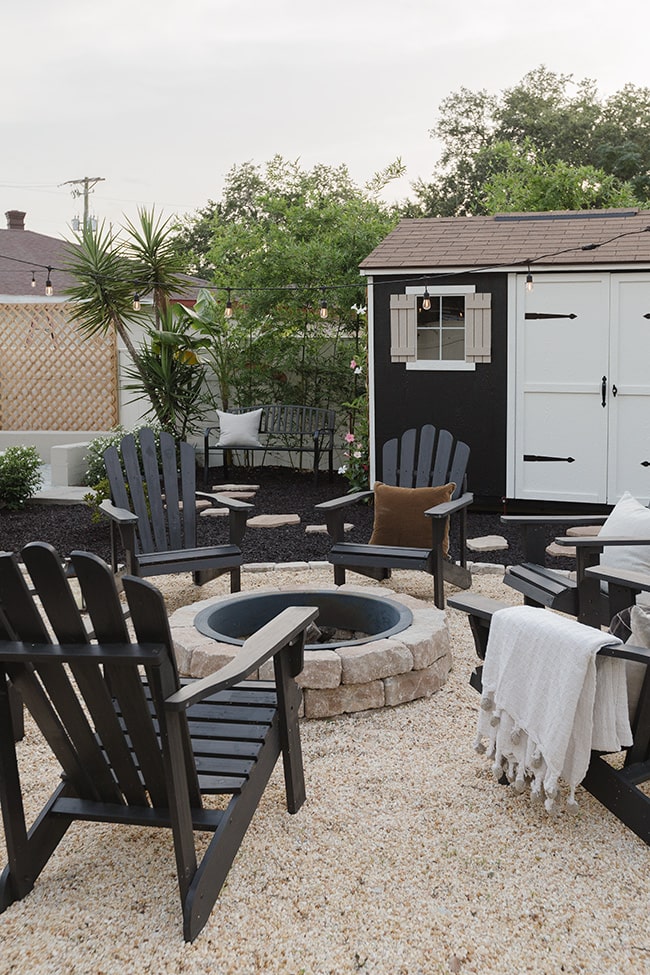
Our fire pit hasn’t been tested out and it will be too warm to use for a while, but it still looks great.
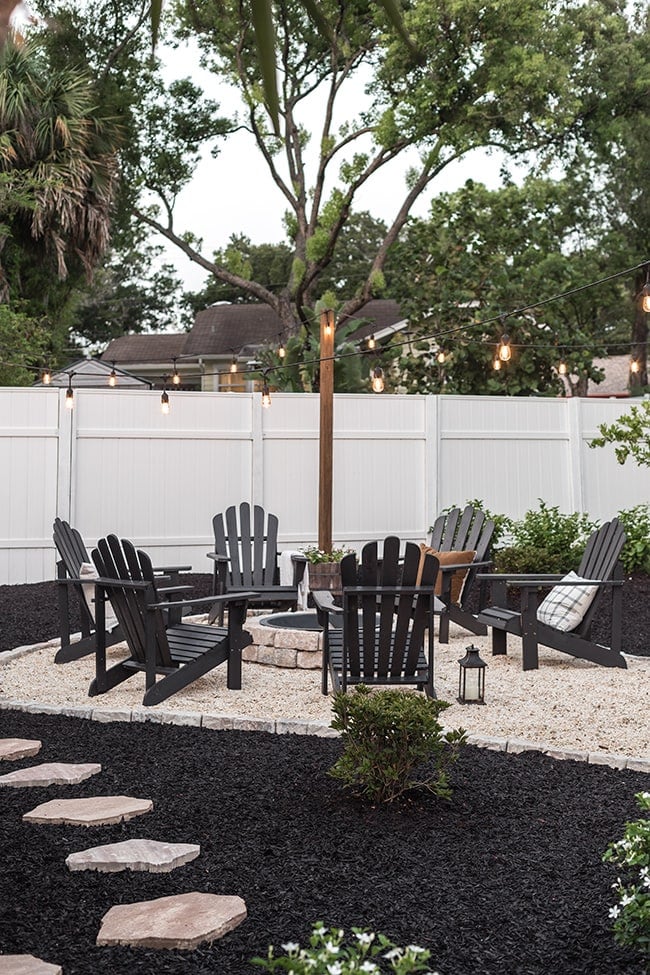
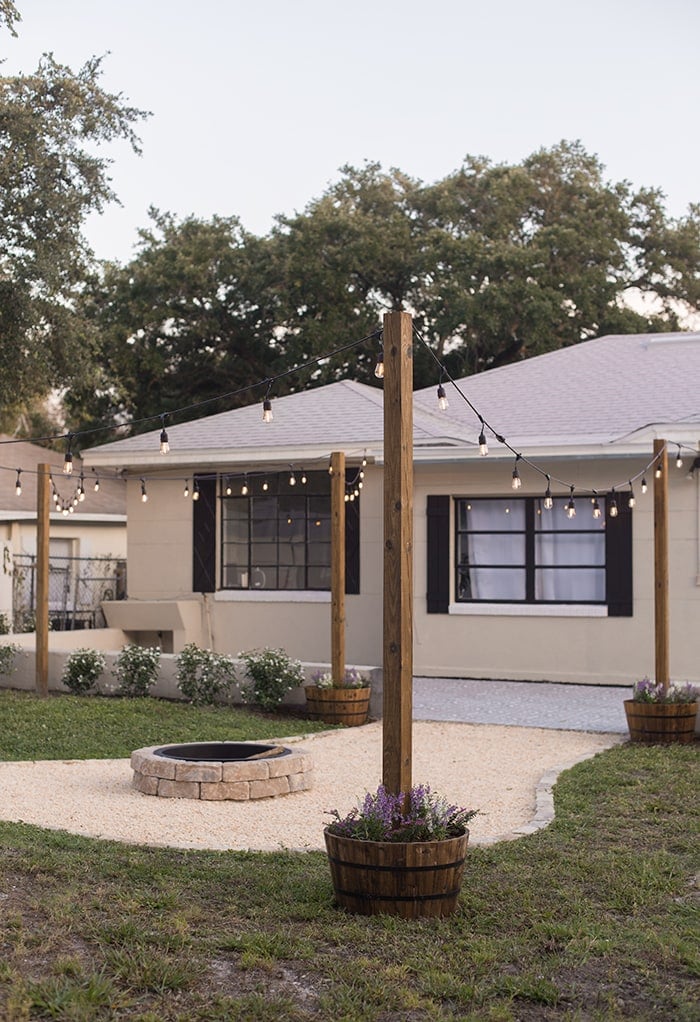
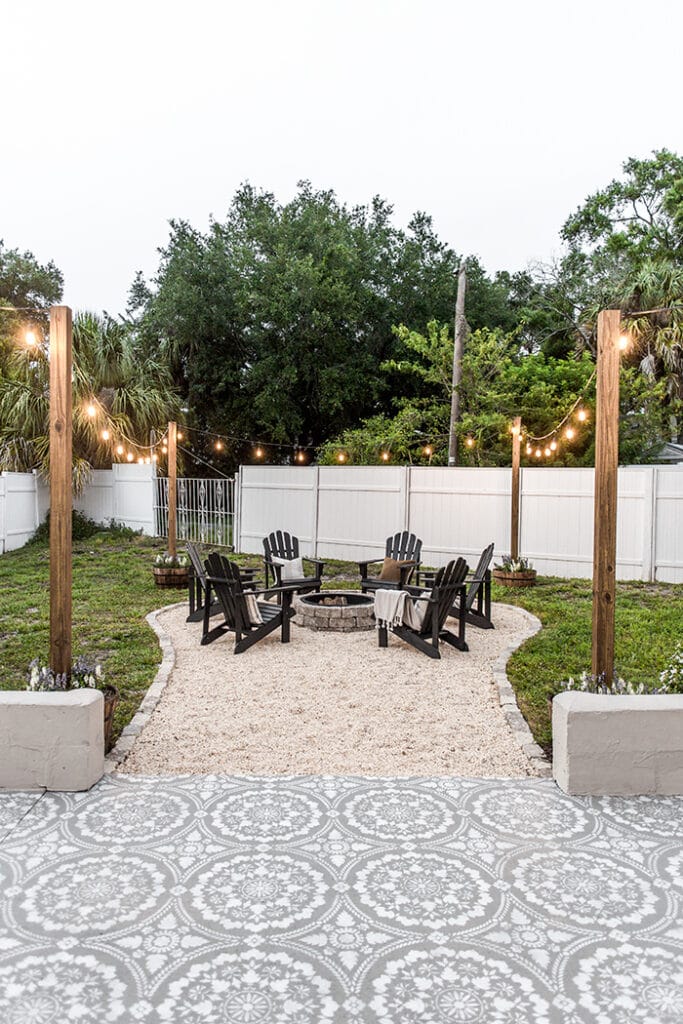
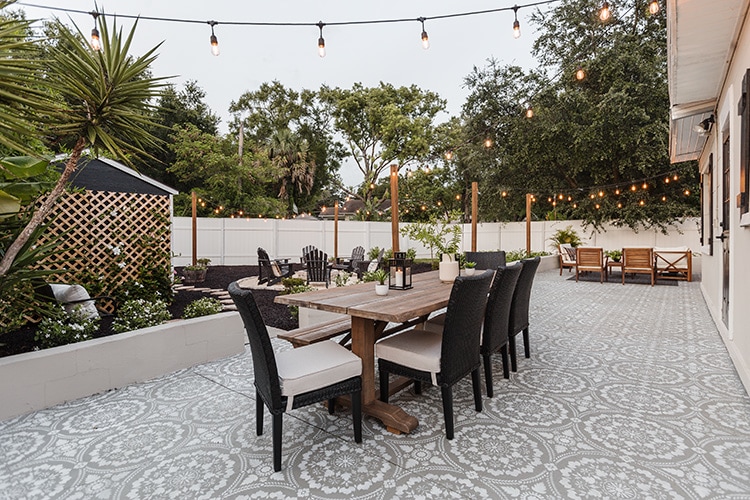
As for my most popular DIY project of all time… the string light planters!
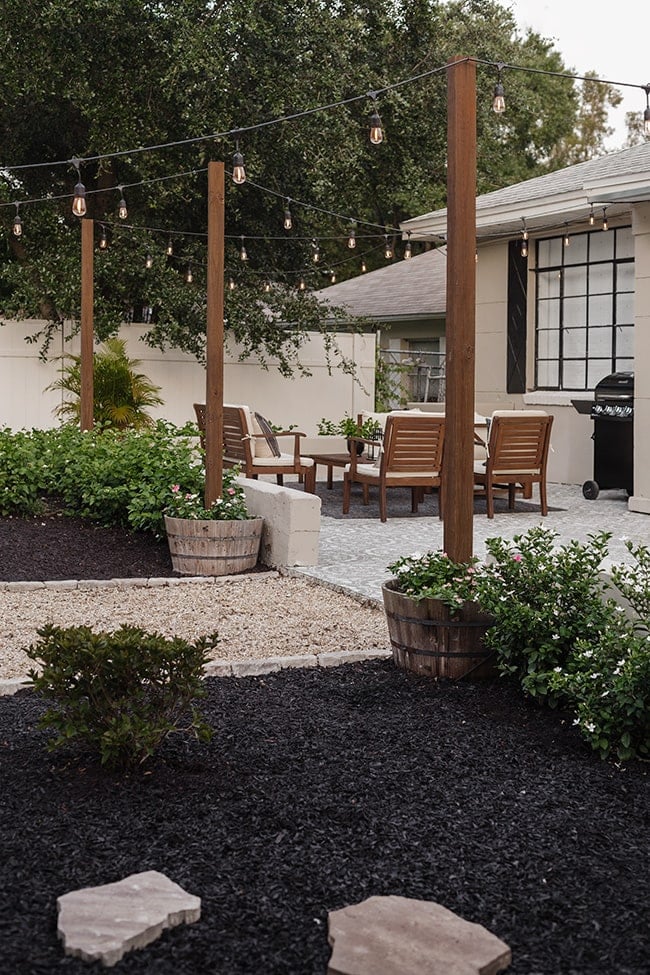
They’re still going strong. The lights haven’t budged throughout all the storms—whew! The wood barrels have weathered (no surprise) and our new flowers are thriving, thanks to the drip line we added.
This is the first project I’d recommend if you want to take your backyard/patio to the next level. String lights are a must!
There’s about 20 more photos from this shoot (I got a little carried away and spent two nights shooting) but this post is getting way too long. Eventually I’ll get around to sharing them on Instagram (I just made a new account for @theriversideretreat, follow along there for all the updates/reveals!)
But first, my favorite part—side by side Before + Afters! Check these out:

Remember friends, Rome wasn’t built in a day. This was months and months of the most painstaking labor of our lives (my pregnancy/delivery was way easier ? ). Is it perfect? No. Did we learn a ton? Absolutely! Out of necessity and sheer determination, we transformed this space with our own hands, on a budget, with a baby in my belly (for half of it), having zero prior landscaping/backyard renovation experience. If we can do it, SO CAN YOU!
Sources:
Sectional (currently out of stock, similar here)
Loveseat + chair set (currently out of stock, similar here)
String lights (on sale!)
Shed (painted SW Tricorn black + Pure White)
Stepping stones (small and large)
Projects + More Information:
Backyard Reveal (Phase 1)
One year update + new landscape design
Can you believe this yard is finally finished?! Who has been following the progress since day 1? Well guess what, the reveals are just getting started! As of this week, the Riverside Retreat will be officially COMPLETE and ready for guests!
Starting today for the next ten days, I’m recapping all of the Before/After room transformations on Instagram, and next Wednesday I’ll be posting the full house tour on the blog, including the link to book a stay on AirBnb. I can’t believe this chapter (two years in the making) is finally coming to a close, and I hope you’ll join me over on Instagram for the festivities. Wishing you the happiest summer!


RG says
This is incredible! What are the dimensions of the fire pit area? It’s a perfect size.
John Ward says
Awesome backyard what an amzing transformation!
Michele says
I love your backyard renovations. Gorgeous!
But, one caution. We had bamboo in our side yard. Suddenly, it was coming up through the deck, going into the neighbors yard, and sending shoots up in the lawn. We spent two spring/summers getting rid of it. Even, started to send shoots in the foundation.
Jenna Sue says
Thank you, Michele! I’m sorry you had that experience, and we’ve heard the same from a lot of folks. Fortunately we got the clumping type bamboo, which is non-invasive 😉
Katie says
I’m ready to book my stay! Can’t wait for it to officially be up on Airbnb so I can make our reservation! Looks so good!
Jenna Sue says
Yayyyy! So excited!!! ?
Ann Thompson says
I am unable to see your living room reveal and your kitchen reveal on your blog. I can only see the small pictures on Facebook The last blog reveal is the backyard. I love your designs! What am I doing wrong?
Jenna Sue says
Hi Ann! These reveals have already been posted on them blog, I’m re-sharing them 🙂 The links are in the description on Facebook. Here’s the living room sources: https://www.jennasuedesign.com/shop/riverside-retreat/living-room-riverside-retreat/
And the kitchen reveal post: https://www.jennasuedesign.com/2020/01/riverside-retreat-kitchen-reveal/
Karen says
That before picture is truly a head shaker. The after is amaze balls! Must really give you a great feeling to think the two of you have done that!
We are about to pull the trigger on the flooring in your home. Can’t wait.
cd says
Rubber mulch also gets very very hot in the sun. May be something to let renters know. Not that I ever walk on regular wood mulch barefoot – but. We used to have it around a kid’s playset. It was noticeably hotter in summer.
Nicole says
Further reading for environmental concerns: “Environmental Effects of Rubber Mulch” from the SF Gate covers many details. I urge you to consider the impacts to the environment long term, not just aesthetics!
https://homeguides.sfgate.com/environmental-effects-rubber-mulch-47748.html
The backyard reveal is gorgeous, but I choked when I saw 144 bags of rubber mulch on your Instagram story.
Shauna says
Good job, Jenna. Great results. Glad you mentioned the note about environmental concerns with the rubber mulch, but your no-maintenance requirements make that choice obvious.
Do you ever need parasols in Florida? Or is outdoors just the night scene? Or is there shade from some source I’m not seeing?
I’m rethinking my future travel plans, having this gorgeous house as a lure to go southbound. Well done indeed!
Kim says
Beautiful! And the paint job on the house is incredible too. Loooove the dark shutters!
Darcy says
Wow! Magazine worthy! You have both worked so hard on this huge project and now you will enjoy the rewards. I was with you in spirit when you were stenciling the patio while very pregnant.
Has your next door neighbor finally seen the light and repainted his house?
Jenna Sue says
Thank you Darcy! They painted the roof brown (whew!) and started to repaint the rest… but stopped and haven’t finished for some reason, lol. Maybe they’re just busy? Hopefully they’ll get back to it eventually!
Monica says
Jenna & Lucas – you really hit this one out of the park. GREAT JOB! I love every bit of it!
Jenna Sue says
Thank you so much Monica! <3
Pat says
It is a beautiful backyard!! Oh the hard work you guys did to beautify the yard is beyond amazing!!
Jenna Sue says
Appreciate it Pat! We’re so happy and relieved 😉
catherine says
bravo! c’est vraiment tout beau! heureux les futurs invités !